Page 116 of 472
CAUTION
●Do not operate the washer continu-
ously for more than 30 seconds.
● Do not operate the washer if the reser-
voir tank is empty.
● Do not fill the window washer reservoir
tank with washer fluid concentrates at
full strength. Some methyl alcohol
based washer fluid concentrates may
permanently stain the grille if spilled
while filling the window washer reser-
voir tank.
● Pre-mix washer fluid concentrates with
water to the manufacturer’s recom-
mended levels before pouring the fluid
into the window washer reservoir tank.
Do not use the window washer reservoir
tank to mix the washer fluid concen-
trate and water. The rear window wiper and washer operate when
the ignition switch is placed in the ON position.
Turn the switch clockwise from the OFF position
to operate the wiper.
�1Intermittent (INT) – intermittent operation
(not adjustable)
�2ON – continuous low speed operation
Push the switch forward
�3to operate the
washer. The wiper will also operate several times.
Page 202 of 472

Clock Adjust:
Adjust the time by manually inputting the correct
time.● 0–9:
Select to change the number in the display.
● Modify:
Select to change the number at the cursor
position.
● >:
Select to move the cursor position to the
right.
● <:
Select to move the cursor position to the left. ●
OK:
Select to accept the changes made and
return to the clock setting display.
After selection/settings, press the BACK button
or any other mode button to accept the changes.Comfort & Convenience settings (if so
equipped)
Select the “Comfort & Conv.” key by using the
NISSAN controller and pressing the ENTER but-
ton. The comfort and convenience option screen
will be displayed.
You can set the following operating conditions by
selecting the desired item using the NISSAN
controller, then pressing the ENTER button. The
indicator light (box at the right of the selected
item) alternately turns on and off each time the
ENTER button is pressed.
Indicator light is illuminated — ON
Indicator light is not illuminated — OFF
Page 217 of 472
Clock Format:
Choose either the 12h (12–hour) clock display or
the 24h (24–hour) clock display.
Offset Adjust:
Adjust the time by increasing or decreasing per
minute.
Daylight Saving Time:
When this item is enabled (indicator light illumi-
nated) , daylight saving time is on. To turn off the
daylight saving time, touch the “ON” key; the
amber indicator light will disappear.Time Zone:
Select the “Time Zone” key; the Time Zone
screen will appear.
Select one of the following zones, depending on
the current location, by selecting the correct time
zone key and pressing the ENTER button to
enable that time zone (indicator light will illumi-
nate for that location) .● Pacific
● Mountain
● Central
● Eastern ●
Atlantic
● Newfoundland
● Hawaii
● Alaska
After selection/settings, press the BACK button
or any other mode button to accept the changes.
Page 237 of 472
:
To turn on or off the precision phase")
For information on how to use the NISSAN con-
troller, see “How to use the NISSAN controller”
earlier in this section.Precision phased audio (if so equipped):
To turn on or off the precision phased audio,
press the SETTING button. Select the “Audio”
key using the NISSAN controller, then press the
ENTER button, the audio settings screen will be
displayed. Select the “Precision Phased Audio”
key, then press the ENTER button. If the amber
indicator light is displayed, the precision phased
audio is enabled. Pressing the ENTER button
again will turn off the precision phased audio, the
indicator light will disappear.
When this item is turned on, super high pitch
sound and super low pitch sound are empha-
sized and midrange sound is played naturally.While in this screen, you can also adjust the other
audio settings by selecting the corresponding
key.
Once you have adjusted the sound quality to the
desired level, press the BACK button.
For information on how to use the NISSAN con-
troller, see “How to use the NISSAN controller”
earlier in this section.
Clock set:
For setting the clock, see “Clock” under the
“Control panel buttons – color screen without
navigation system” heading earlier in this section.
Page 245 of 472
Precision phased audio (if so equipped):
To turn on or off the precision phased audio,
press the SETTING button. Then touch the “Au-
dio” key; the audio settings screen will be dis-
played. Touch the “Precision Phased Audio ON”
key. If the amber indicator light is displayed, the
precision phased audio is enabled. Touching the
“Precision Phased Audio ON” key again will turn
off the precision phased audio; the indicator light
will disappear.
When this item is turned on, super high pitch
sound and super low pitch sound are empha-
sized and midrange sound is played naturally.While in this screen, you can also adjust the other
audio settings by touching the corresponding
key.
Once you have adjusted the sound quality to the
desired level, touch the “BACK” key.
Clock set:
For setting the clock, see “Clock” under the
“Control panel buttons – color screen without
navigation system” heading earlier in this section.
Page 341 of 472
 position.
2. Turn the ignitio")
When the ignition switch cannot be turned to-
ward the LOCK position when the Intelligent Key
is in range, proceed as follows:1. Move the shift selector into the P (Park) position.
2. Turn the ignition switch slightly in the ON direction.
3. Turn the key toward the LOCK position.
The shift selector can be moved from the P
(Park) position if the ignition switch is in
the ON position and the foot brake pedal is
depressed.
There is an OFF position in between LOCK and
ACC, although it does not show on the lock
cylinder. When the ignition switch is OFF, the
steering wheel is not locked.
In order for the steering wheel to be locked, it
must be turned about 1/6 of a turn counterclock-
wise from the straight up position.
To lock the steering wheel, turn the ignition
switch to the LOCK position. To unlock the
steering wheel, push the ignition switch in
and turn it gently while rotating the steer-
ing wheel slightly right and left.
If the battery of the vehicle equipped with
the Intelligent Key system is discharged,
the ignition switch cannot be turned from the LOCK position, even using the me-
chanical key.
IGNITION SWITCH POSITIONS
Push in the ignition switch to the�Bposition
when you turn it.
LOCK (Normal parking position)
�A:
The ignition switch can only be locked in the
LOCK position.
The ignition switch will be unlocked when it is
pushed in, and turned to the ACC position
�C
while carrying the Intelligent Key.
ACC (Accessories)
�C:
This position activates electrical accessories
such as the radio, when the engine is not running.
ON (Normal operating position)
�D:
This position turns on the ignition system and the
electrical accessories.
START
�E:
This position starts the engine. As soon as the
engine has started, release the ignition switch
immediately. It will automatically return to the ON
position. The ignition switch cannot be turned back to the
LOCK position unless the shift selector is in the P
(Park) position. (It can be turned only to the
�B
position.)
Page 342 of 472
 positi")
AUTOMATIC TRANSMISSION
The ignition lock is designed so the ignition
switch cannot be turned to the LOCK position
and the key cannot be removed until the shift
selector is moved to the P (Park) position.
When removing the key from the ignition switch,
make sure the shift selector is in the P (Park)
position.
If the shift selector is not returned to P (Park)
position, the ignition switch cannot be moved to
the LOCK position.To remove the key from the ignition switch:
1.
Shift the shift selector to the P (Park) position
with the ignition switch in the ON position.
2. Place the ignition switch in the LOCK posi- tion.
3. Remove the key from the ignition switch.
If the shift selector is shifted to the P (Park)
position after the ignition switch is turned to the
OFF position or when the ignition switch cannot
be turned to the LOCK position, proceed as
follows to remove the key. 1. Move the shift selector into the P (Park) position.
2. Turn the ignition switch slightly toward the ON position.
3. Place the ignition switch in the LOCK posi- tion.
4. Remove the key.
The shift selector is designed so it cannot moved
out of P (Park) and into any of the other gear
positions if the ignition switch is turned to the
OFF position or if the key is removed from the
switch.
The shift selector can be moved if the igni-
tion switch is in the ON position and the
foot brake pedal is depressed. There is an OFF position between the
LOCK and ACC positions. The OFF position
is indicated by a “1” on the key cylinder.
When the ignition switch is in the OFF
position, the steering wheel is not locked.
In order for the steering wheel to be locked, it
must be turned about 1/8 of a turn clockwise
from the straight up position.
To lock the steering wheel, turn the key to
the LOCK position. Remove the key. To
unlock the steering wheel, insert the key
and turn it gently while rotating the steer-
ing wheel slightly right and left.
If the key will not turn from the LOCK posi-
tion, turn the steering wheel to the left or
right while turning the key to unlock the
key cylinder.
KEY POSITIONS
LOCK: Normal parking position (0)
OFF: (Not used) (1)
ACC: (Accessories) (2)
This position activates electrical accessories
such as the radio when the engine is not running.
ON: Normal operating position (3)
This position turns on the ignition system and the
electrical accessories.
Page 369 of 472
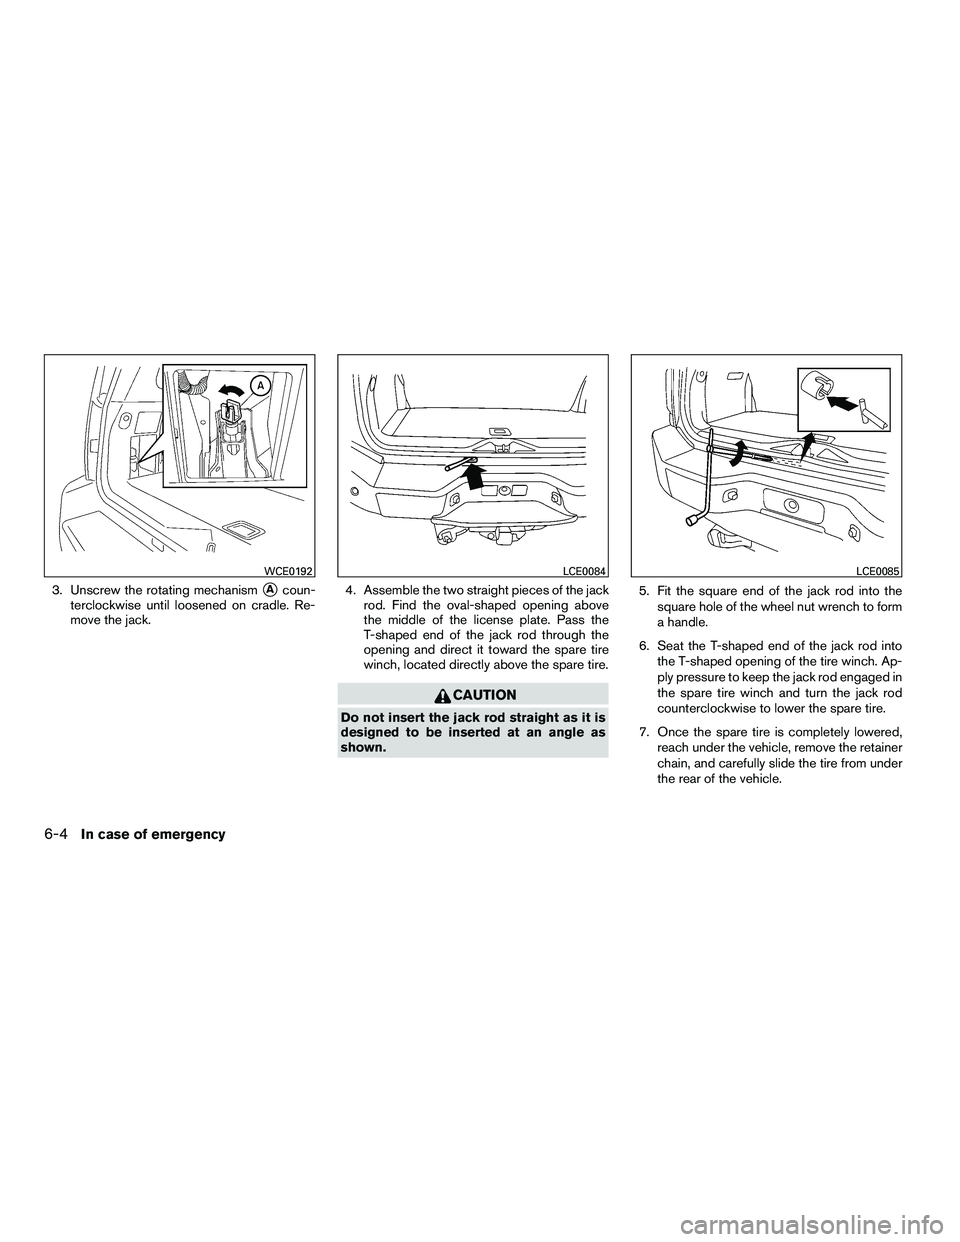
3. Unscrew the rotating mechanism�Acoun-
terclockwise until loosened on cradle. Re-
move the jack. 4. Assemble the two straight pieces of the jack
rod. Find the oval-shaped opening above
the middle of the license plate. Pass the
T-shaped end of the jack rod through the
opening and direct it toward the spare tire
winch, located directly above the spare tire.

 clock display or
the 24h (24–hour) clock display.
Offset Adjust:
Adjust the time by increasing or decreasing per
minute.
Daylight Saving Time:
When th")
:
To turn on or off the precision phased audio,
press the SETTING button. Then touch the “Au-
dio” key; the audio settings screen will be dis-
played. Touch")