2010 NISSAN ALTIMA SEDAN instrument cluster
[x] Cancel search: instrument clusterPage 1 of 18

IP-1
BODY INTERIOR
C
DE
F
G H
I
K L
M
SECTION IP
A
B
IP
N
O P
CONTENTS
INSTRUMENT PANEL
PRECAUTION ................ ...............................2
PRECAUTIONS .............................................. .....2
Precaution for Supplemental Restraint System
(SRS) "AIR BAG" and "SEAT BELT PRE-TEN-
SIONER" ............................................................. ......
2
Precaution .................................................................2
PREPARATION ............................................3
PREPARATION .............................................. .....3
Special Service Tools ........................................ ......3
Commercial Service Tools .......................................3
SYMPTOM DIAGNOSIS ...............................4
SQUEAK AND RATTLE TROUBLE DIAG-
NOSES ........................................................... .....
4
Work Flow ........................................................... ......4
Generic Squeak and Rattle Troubleshooting ............6
Diagnostic Worksheet .......................................... .....8
ON-VEHICLE REPAIR .................................10
INSTRUMENT PANEL ASSEMBLY .................10
Exploded View ..................................................... ....10
Removal and Installation .........................................11
CENTER CONSOLE ASSEMBLY ....................14
Removal and Installation .........................................14
CLUSTER LID A ...............................................16
Removal and Installation .........................................16
DISASSEMBLY AND ASSEMBLY ..............17
CENTER CONSOLE ASSEMBLY ....................17
Exploded View ..................................................... ....17
Disassembly and Assembly .....................................17
Revision: September 20092010 Altima
ProCarManuals.com
Page 6 of 18

IP-6
< SYMPTOM DIAGNOSIS >
SQUEAK AND RATTLE TROUBLE DIAGNOSES
68370-4B000: 15×25 mm (0.59 ×0.98 in) pad/68239-13E00: 5 mm (0.20 in) wide tape roll
The following materials, not found in the kit, can also be used to repair squeaks and rattles.
UHMW (TEFLON) TAPE
Insulates where slight movement is present. Ideal for instrument panel applications.
SILICONE GREASE
Used in place of UHMW tape that will be visibl e or not fit. Will only last a few months.
SILICONE SPRAY
Use when grease cannot be applied.
DUCT TAPE
Use to eliminate movement.
CONFIRM THE REPAIR
Confirm that the cause of a noise is repaired by test driving the vehicle. Operate the vehicle under the same
conditions as when the noise originally occurred. Refer to the notes on the Diagnostic Worksheet.
Generic Squeak and Rattle TroubleshootingINFOID:0000000005789633
Refer to Table of Contents for specific component removal and installation information.
INSTRUMENT PANEL
Most incidents are caused by contact and movement between:
1. Acrylic lens and combination meter housing
2. Instrument panel to front pillar finishers
3. Instrument panel to windshield
4. Instrument panel mounting pins
5. Wiring harnesses behind the combination meter
6. A/C defroster duct and duct joint
These incidents can usually be located by tapping or moving the components to duplicate the noise or by
pressing on the components while driving to stop the noise. Most of these incidents can be repaired by
applying felt cloth tape or silicone spray (in hard to reach areas). Urethane pads can be used to insulate
wiring harness.
CAUTION:
Do not use silicone spray to isolate a squeak or rattle. If you saturate the area with silicone, you
will not be able to recheck the repair.
CENTER CONSOLE
Components to pay attention to include:
1. Shifter assembly cover to finisher
2. A/C control unit and cluster lid C
3. Wiring harnesses behind audio and A/C control unit
The instrument panel repair and isolation pr ocedures also apply to the center console.
DOORS
Pay attention to the:
1. Finisher and inner panel making a slapping noise
2. Inside handle escutcheon to door finisher
3. Wiring harnesses tapping
4. Door striker out of alignment causing a popping noise on starts and stops
Tapping or moving the components or pressing on them wh ile driving to duplicate the conditions can isolate
many of these incidents. You can usually insulate the areas with felt cloth tape or insulator foam blocks from
the Nissan Squeak and Rattle Kit (J-43980) to repair the noise.
TRUNK
Trunk noises are often caused by a loose jack or loose items put into the trunk by the owner.
In addition look for:
1. Trunk lid bumpers out of adjustment
2. Trunk lid striker out of adjustment
3. The trunk lid torsion bars knocking together
Revision: September 20092010 Altima
ProCarManuals.com
Page 11 of 18
INSTRUMENT PANEL ASSEMBLYIP-11
< ON-VEHICLE REPAIR >
C
DE
F
G H
I
K L
M A
B
IP
N
O P
Removal and InstallationINFOID:0000000005434173
CAUTION:
Disconnect both battery terminals, then wait at least three minutes.
Never tamper with or force air bag lid open, as this may adversely affect air bag performance.
Be careful not to scratch instrument panel pad and other parts.
REMOVAL
1. Remove the center console. Refer to. IP-14, "Removal and Installation"
2. Disconnect both the negative and positive battery te rminals, then wait at least three minutes.
3. Remove the A-pillar finishers, then partially remove front door welts and set aside. Refer to INT-14,
"Removal and Installation".
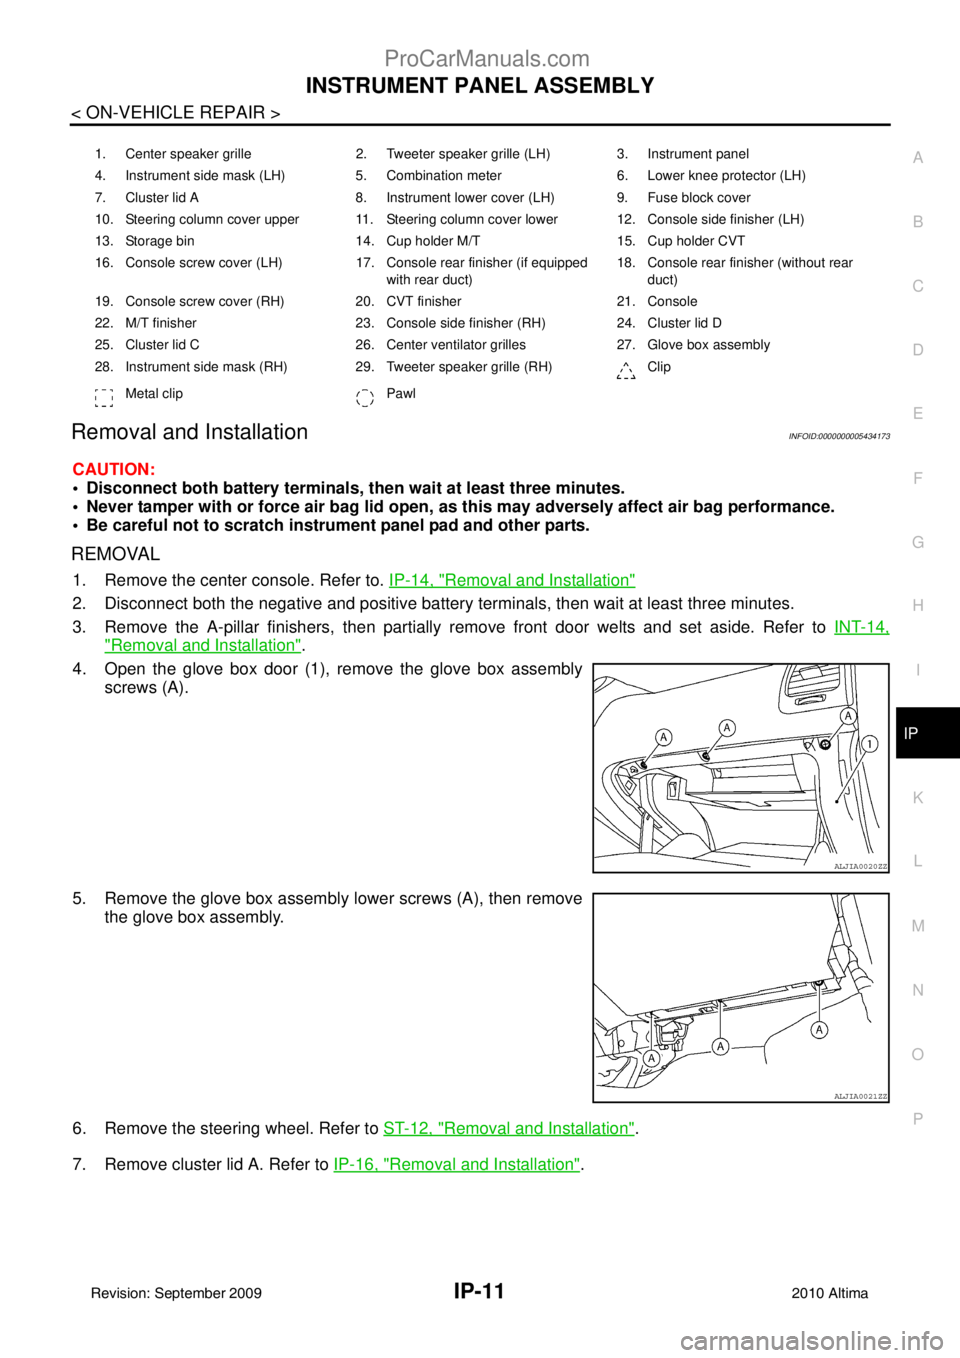
4. Open the glove box door (1), remove the glove box assembly screws (A).
5. Remove the glove box assembly lower screws (A), then remove the glove box assembly.
6. Remove the steering wheel. Refer to ST-12, "Removal and Installation"
.
7. Remove cluster lid A. Refer to IP-16, "Removal and Installation"
.
1. Center speaker grille 2. Tweeter speaker grille (LH) 3. Instrument panel
4. Instrument side mask (LH) 5. Combination meter 6. Lower knee protector (LH)
7. Cluster lid A 8. Instrument lower cover (LH) 9. Fuse block cover
10. Steering column cover upper 11. Steering column cover lower 12. Console side finisher (LH)
13. Storage bin 14. Cup holder M/T 15. Cup holder CVT
16. Console screw cover (LH) 17. Console rear finisher (if equipped
with rear duct) 18. Console rear finisher (without rear
duct)
19. Console screw cover (RH) 20. CVT finisher 21. Console
22. M/T finisher 23. Console side finisher (RH) 24. Cluster lid D
25. Cluster lid C 26. Center ventilator grilles 27. Glove box assembly
28. Instrument side mask (RH) 29. Tweeter speaker grille (RH) Clip
Metal clip Pawl
ALJIA0020ZZ
ALJIA0021ZZ
Revision: September 20092010 Altima
ProCarManuals.com
Page 12 of 18
IP-12
< ON-VEHICLE REPAIR >
INSTRUMENT PANEL ASSEMBLY
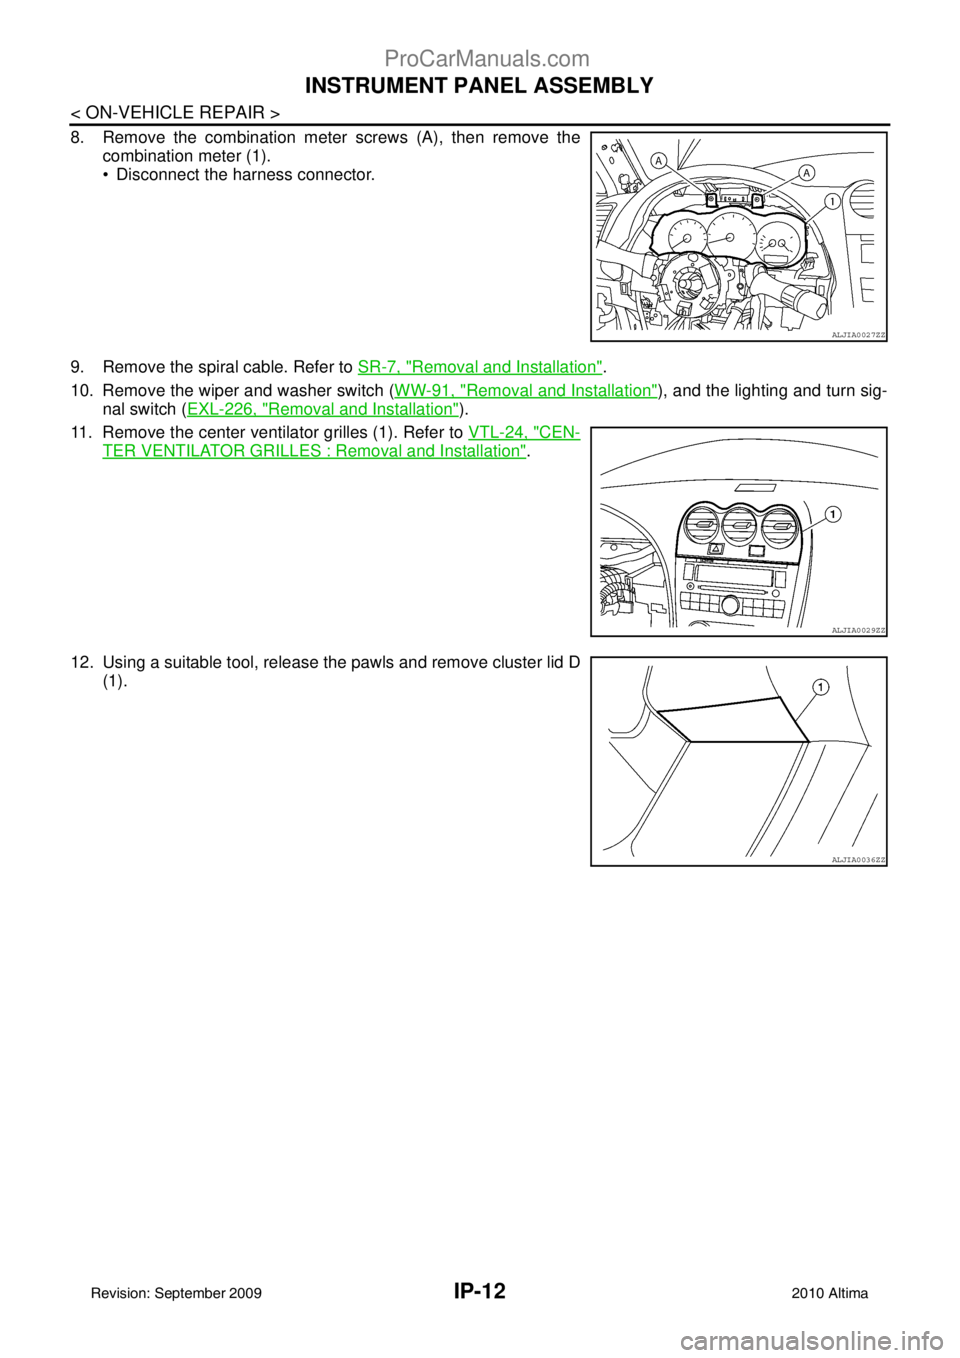
8. Remove the combination meter screws (A), then remove thecombination meter (1).
Disconnect the harness connector.
9. Remove the spiral cable. Refer to SR-7, "Removal and Installation"
.
10. Remove the wiper and washer switch ( WW-91, "Removal and Installation"
), and the lighting and turn sig-
nal switch ( EXL-226, "Removal and Installation"
).
11. Remove the center ventilator grilles (1). Refer to VTL-24, "CEN-
TER VENTILATOR GRILLES : Removal and Installation".
12. Using a suitable tool, release the pawls and remove cluster lid D (1).
ALJIA0027ZZ
ALJIA0029ZZ
ALJIA0036ZZ
Revision: September 20092010 Altima
ProCarManuals.com
Page 13 of 18
INSTRUMENT PANEL ASSEMBLYIP-13
< ON-VEHICLE REPAIR >
C
DE
F
G H
I
K L
M A
B
IP
N
O P
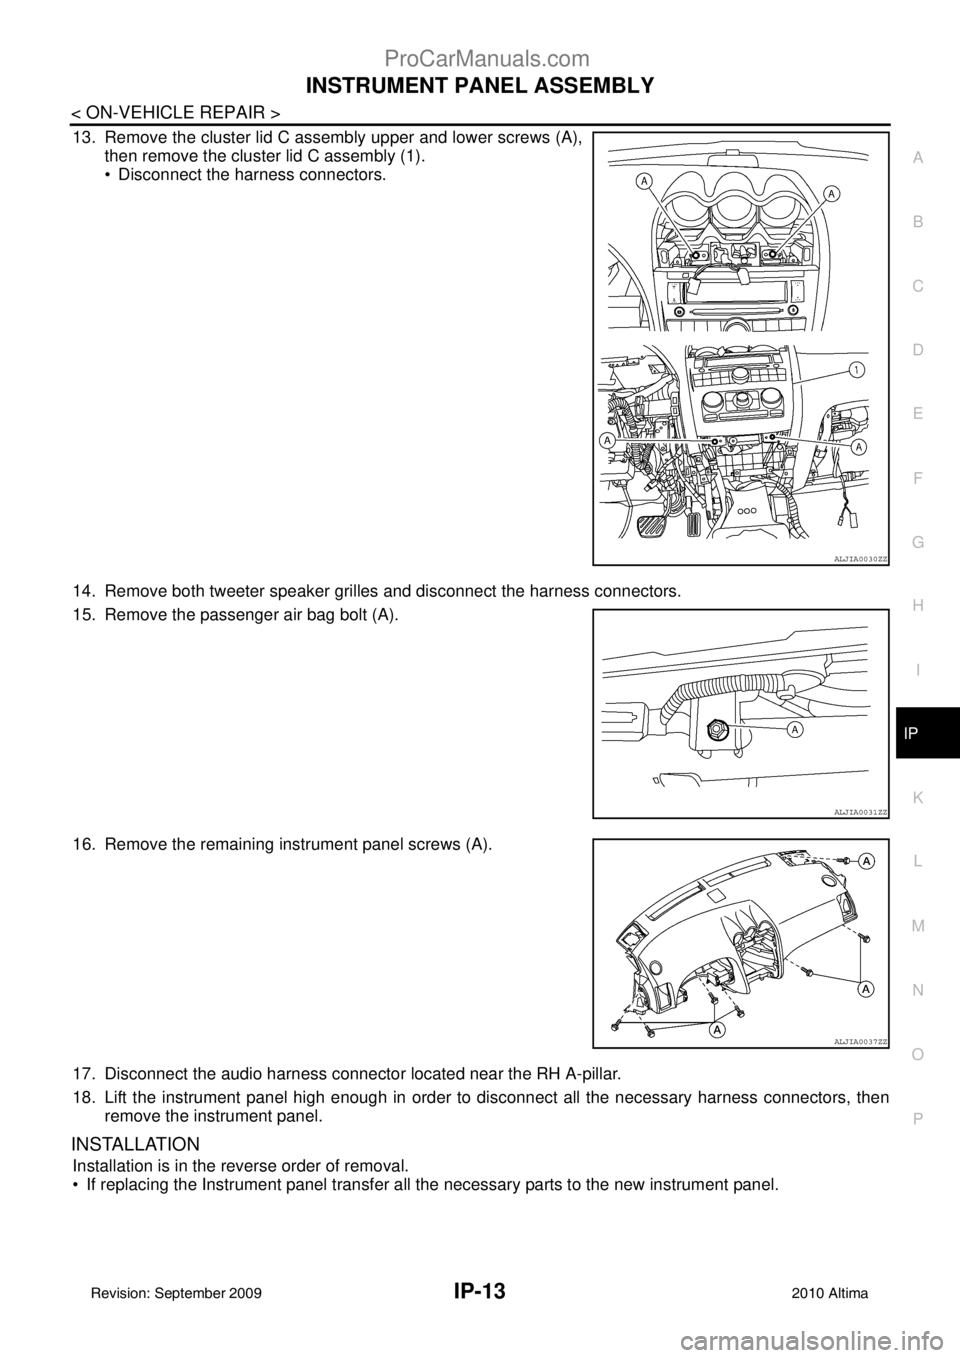
13. Remove the cluster lid C assembly upper and lower screws (A), then remove the cluster lid C assembly (1).
Disconnect the harness connectors.
14. Remove both tweeter speaker grilles and disconnect the harness connectors.
15. Remove the passenger air bag bolt (A).
16. Remove the remaining instrument panel screws (A).
17. Disconnect the audio harness connector located near the RH A-pillar.
18. Lift the instrument panel high enough in order to disconnect all the necessary harness connectors, then remove the instrument panel.
INSTALLATION
Installation is in the reverse order of removal.
If replacing the Instrument panel transfer all the necessary parts to the new instrument panel.
ALJIA0030ZZ
ALJIA0031ZZ
ALJIA0037ZZ
Revision: September 20092010 Altima
ProCarManuals.com
Page 14 of 18
IP-14
< ON-VEHICLE REPAIR >
CENTER CONSOLE ASSEMBLY
CENTER CONSOLE ASSEMBLY
Removal and InstallationINFOID:0000000005789627
REMOVAL
CAUTION:
Be careful not to scratch center console finishers and other parts.
1. Move shift lever into the drive (D) position (CVT) or neutral position (M/T), then remove shift lever handle.
Refer to TM-252, "Removal and Installation"
(CVT: RE0F09B), TM-424, "Removal and Installation" (CVT:
RE0F10A), TM-22, "Removal and Installation"
(6M/T: RS6F52A).
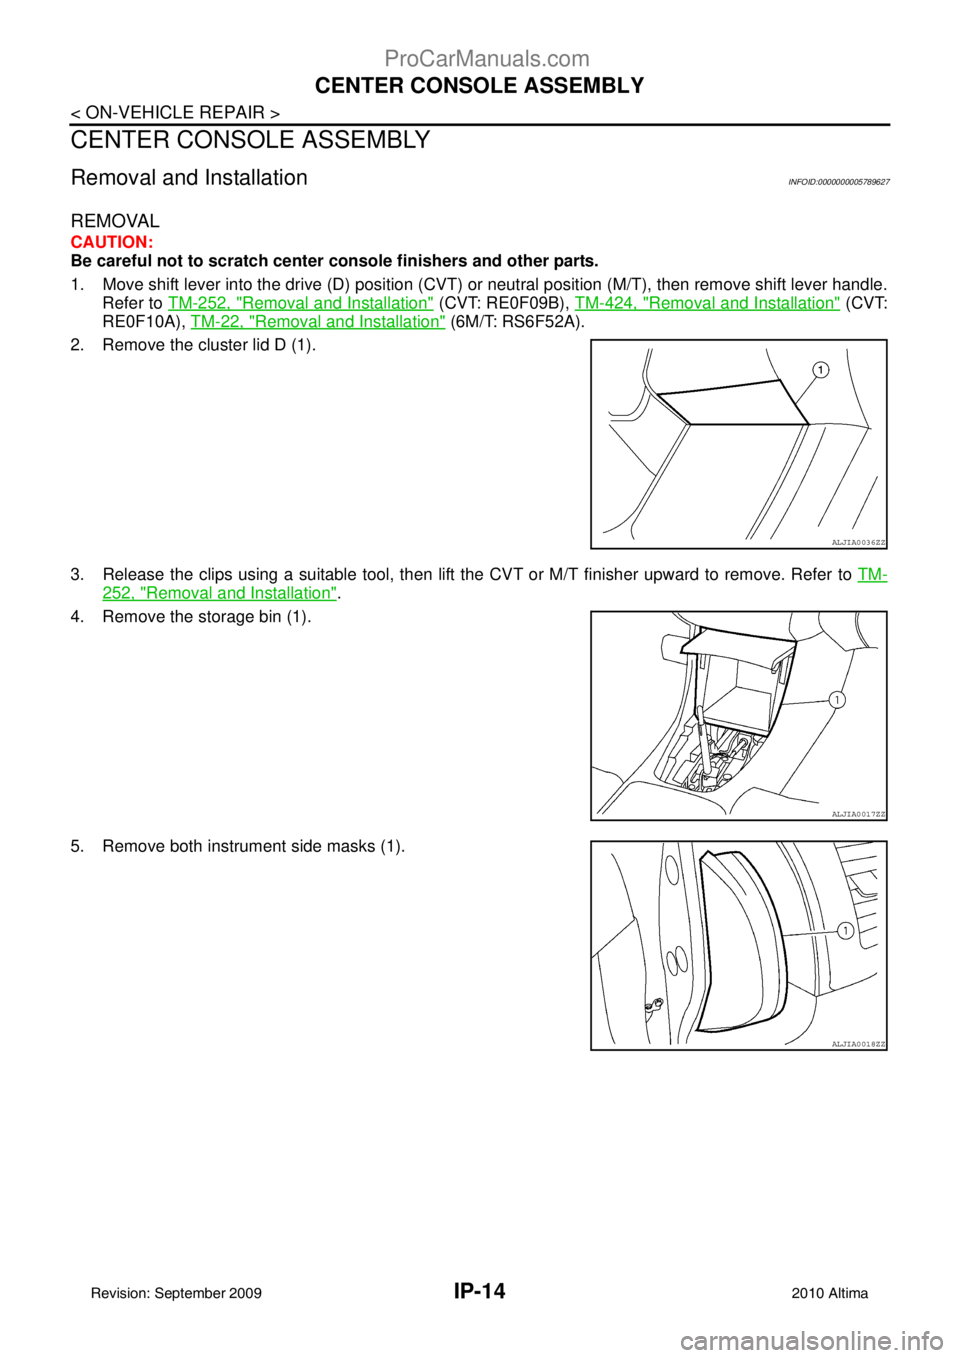
2. Remove the cluster lid D (1).
3. Release the clips using a suitable tool, then lift t he CVT or M/T finisher upward to remove. Refer to TM-
252, "Removal and Installation".
4. Remove the storage bin (1).
5. Remove both instrument side masks (1).
ALJIA0036ZZ
ALJIA0017ZZ
ALJIA0018ZZ
Revision: September 20092010 Altima
ProCarManuals.com
Page 16 of 18
IP-16
< ON-VEHICLE REPAIR >
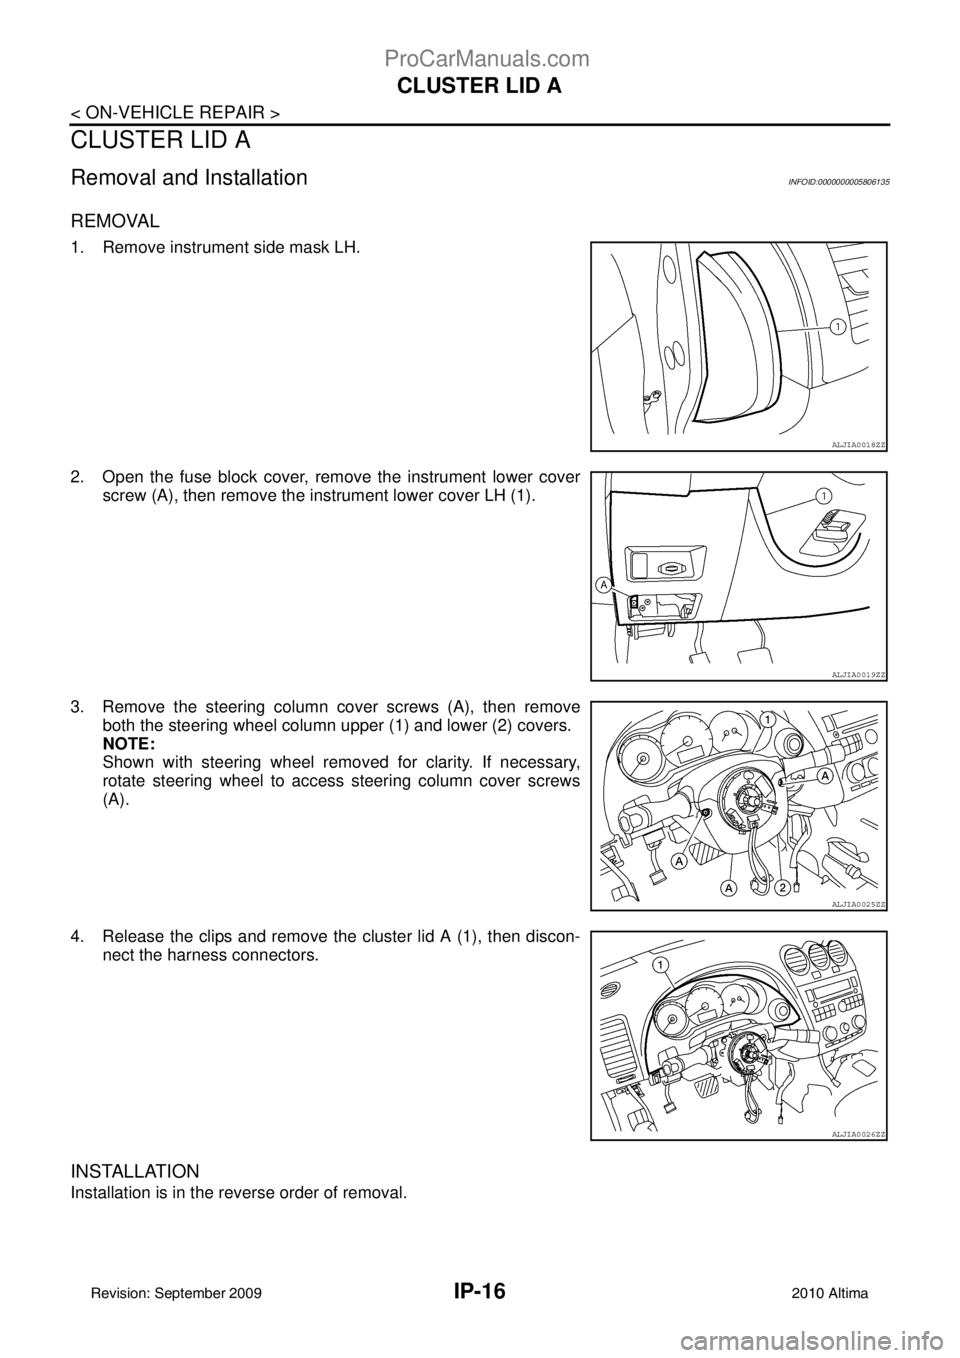
CLUSTER LID A
CLUSTER LID A
Removal and InstallationINFOID:0000000005806135
REMOVAL
1. Remove instrument side mask LH.
2. Open the fuse block cover, remove the instrument lower coverscrew (A), then remove the instrument lower cover LH (1).
3. Remove the steering column cover screws (A), then remove both the steering wheel column upper (1) and lower (2) covers.
NOTE:
Shown with steering wheel removed for clarity. If necessary,
rotate steering wheel to access steering column cover screws
(A).
4. Release the clips and remove the cluster lid A (1), then discon- nect the harness connectors.
INSTALLATION
Installation is in the reverse order of removal.
ALJIA0018ZZ
ALJIA0019ZZ
ALJIA0025ZZ
ALJIA0026ZZ
Revision: September 20092010 Altima
ProCarManuals.com