Page 26 of 438

Pull the seat recliner lever�1to the uppermost
position folding the seatback forward
�2, releas-
ing the seat tra")
Entry to the rear seat from outside of
the vehicle on the front passenger side
(Coupe)
Pull the seat recliner lever�1to the uppermost
position folding the seatback forward
�2, releas-
ing the seat track.
Slide the entire seat forward for access to the
rear seat. To return the seat to a locked position:
Push the upper seatback rearward until the seat-
back and track are locked.
Operating tips:
● The seatback and track will not lock until the
seatback is returned rearward.
● The seat track will not lock until it reaches
the first position memory point.
● The seatback will return to the first locking
notch when using the seat recliner lever.
Entry to the rear seat from outside of
the vehicle on the driver’s side using
the upper seatback release lever
(Coupe)
The use of the upper seatback release lever�1,
on the inboard side of the passenger seat, allows
for the driver to:
● allow passenger entry to the rear seat from
outside of the vehicle.
● access items located behind the front pas-
senger seat.
Page 27 of 438

Pull the upper seatback release lever�1to the
uppermost position, folding the seatback forward
�2, releasing the seat track.
Slide the entire seat forward for access to the
rear seat.
To return the seat to a locked position:
Push the upper seatback rearward until the seat-
back and track are locked.
Operating tips: ● The seatback and track will not lock until the
seatback is returned rearward.
● The seat track will not lock until it reaches
the first position memory point.
● The seatback will return to an upright seating
position if the upper seatback release lever
is pulled to the uppermost position.
Exiting from the rear seat on the front
passenger side, using the lower
seatback release lever (coupe)
Press on the lower seatback release lever�1
until it reaches the lowermost position. Fold the
seatback forward
�2, releasing the seat track.
Slide the entire seat forward for access from the
rear seat. To return the seat to a locked position:
Push the upper seatback rearward until the seat-
back and track are locked.
Operating tips:
● The seatback and track will not lock until the
seatback is returned rearward.
● The seat track will not lock until it reaches
the first position memory point.
● The seatback will return to an upright seating
position if the lower seatback release lever is
pushed to the uppermost position.
Page 28 of 438
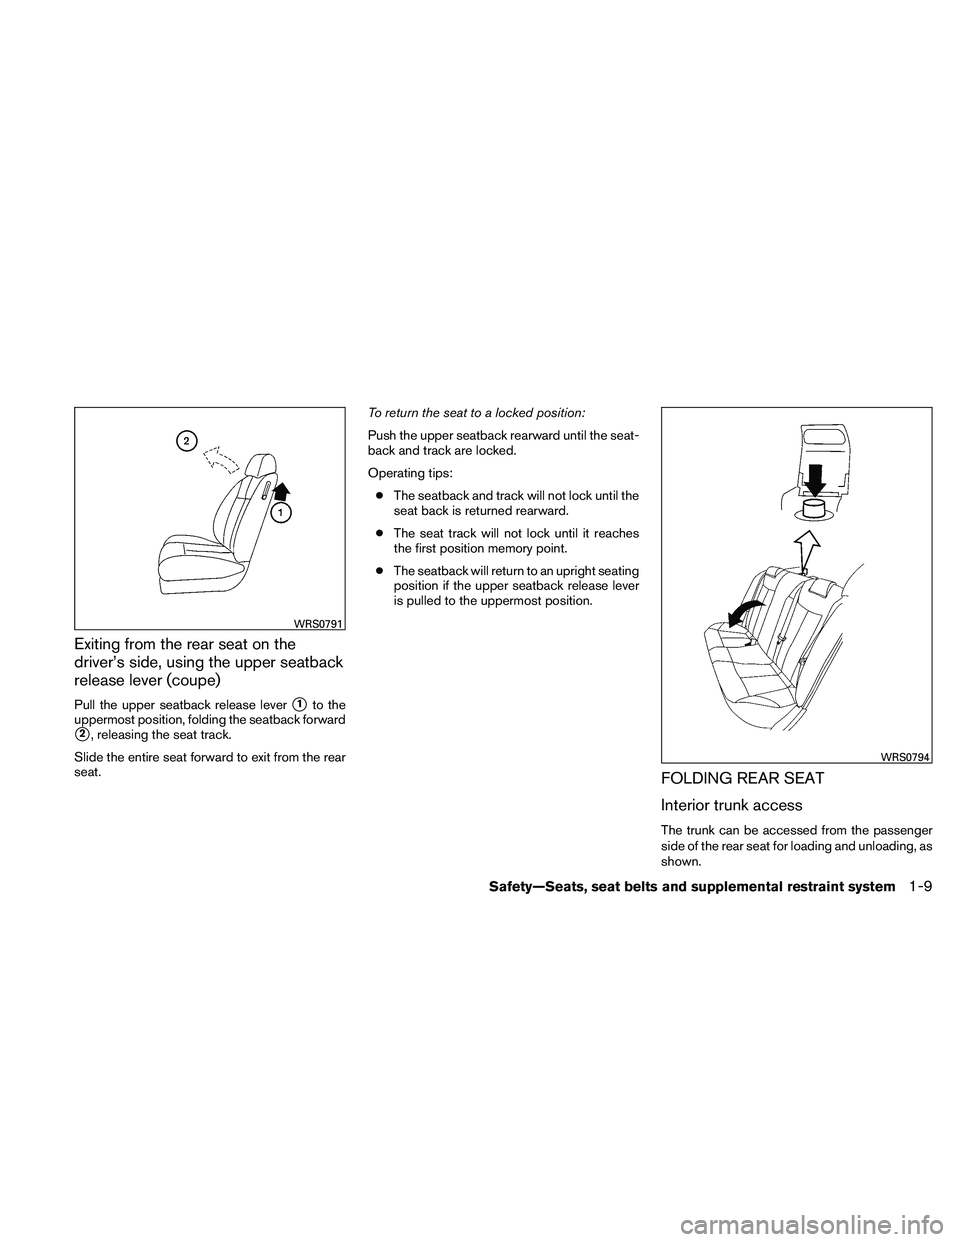
Exiting from the rear seat on the
driver’s side, using the upper seatback
release lever (coupe)
Pull the upper seatback release lever�1to the
uppermost position, folding the seatback forward
�2, releasing the seat track.
Slide the entire seat forward to exit from the rear
seat. To return the seat to a locked position:
Push the upper seatback rearward until the seat-
back and track are locked.
Operating tips:
● The seatback and track will not lock until the
seat back is returned rearward.
● The seat track will not lock until it reaches
the first position memory point.
● The seatback will return to an upright seating
position if the upper seatback release lever
is pulled to the uppermost position.
FOLDING REAR SEAT
Interior trunk access
The trunk can be accessed from the passenger
side of the rear seat for loading and unloading, as
shown.
Page 31 of 438
Components
1. Head restraint
2. Adjustment notches
3. Lock knob
4. Stalks
5. Release knob
Adjustment
Adjust the head restraint so the center is level
with the center of the seat occupant’s ears.To raise the head restraint, pull it up.
Page 32 of 438
To lower, push and hold the lock knob and push
the head restraint down.Removal
Use the following procedure to remove the ad-
justable head restraints.1. Pull the head restraint up to the highest position.
2. Push and hold the lock knob and release knob.
3. Remove the head restraint from the seat.
4. Store the head restraint properly so it is not loose in the vehicle.
5. Reinstall and properly adjust the head re- straint before an occupant uses the seating
position.
Install
1. Align the head restraint stalks with the holesin the seat. Make sure the head restraint is
facing the correct direction. The stalk with
the adjustment notches
�1must be installed
in the hole with the lock knob
�2.
2. Push and hold the lock knob and push the head restraint down.
3. Properly adjust the head restraint before an occupant uses the seating position.
Page 38 of 438

�2Slowly pull the seat belt out of the retractor
and insert the tongue into the buckle until
you hear and feel the latch engage.
● The retractor is designed to lock during
a sudden stop or on impact. A slow
pulling motion permits the seat belt to
move, and allows you some freedom of
movement in the seat.
● If the seat belt cannot be pulled from
its fully retracted position, firmly pull
the belt and release it. Then smoothly
pull the belt out of the retractor.�3Position the lap belt portion low and snug
on the hips as shown.
�4Pull the shoulder belt portion toward the
retractor to take up extra slack. Be sure the
shoulder belt is routed over your shoulder
and across your chest.
The front passenger seat and the rear seating
positions three-point seat belts have two modes
of operation: ● Emergency Locking Retractor (ELR)
● Automatic Locking Retractor (ALR) The Emergency Locking Retractor (ELR) mode
allows the seat belt to extend and retract to allow
the driver and passengers some freedom of
movement in the seat. The ELR locks the seat belt
when the vehicle slows down rapidly or during
certain impacts.
The Automatic Locking Retractor (ALR) mode
(child restraint mode) locks the seat belt for child
restraint installation.
When the ALR mode is activated, the seat belt
cannot be extended again until the seat belt
tongue is detached from the buckle and fully
retracted. The seat belt returns to the ELR mode
after the seat belt fully retracts. See “Child re-
straints” later in this section for more information.
The ALR mode should be used only for
child restraint installation. During normal
seat belt use by an occupant, the ALR mode
should not be activated. If it is activated, it
may cause uncomfortable seat belt ten-
sion.
Page 39 of 438

Unfastening the seat belts
�1To unfasten the seat belt, press the button on
the buckle. The seat belt automatically re-
tracts.
Checking seat belt operation
Seat belt retractors are designed to lock seat belt
movement by two separate methods:
● When the seat belt is pulled quickly from the
retractor.
● When the vehicle slows down rapidly. To increase your confidence in the seat belts,
check the operation as follows:
● Grasp the shoulder belt and pull forward
quickly. The retractor should lock and re-
strict further belt movement.
If the retractor does not lock during this check or
if you have any questions about seat belt opera-
tion, see a NISSAN dealer.
Shoulder belt height adjustment
(Sedan, front seats)
The shoulder belt anchor height should be ad-
justed to the position best for you. See “Precau-
tions on seat belt usage” earlier in this section. To
adjust, pull out the adjustment button
�1and
move the shoulder belt anchor to the desired
position
�2, so the belt passes over the center of
the shoulder. The belt should be away from your
face and neck, but not falling off your shoulder.
Release the adjustment button to lock the shoul-
der belt anchor into position.
Page 50 of 438
 must be used
when installing a child restraint. Failure to
use the ALR mode will result in the child
restraint not being proper")
WARNING
The three-point seat belt with Automatic
Locking Retractor (ALR) must be used
when installing a child restraint. Failure to
use the ALR mode will result in the child
restraint not being properly secured. The
restraint could tip over or be loose and
cause injury to a child in a sudden stop or
collision. Also, it can change the opera-
tion of the front passenger air bag. See
“Front passenger air bag and status light”
later in this section.Refer to all Warnings and Cautions in the “Child
Safety” and “Child Restraint” sections before in-
stalling a child restraint.
Follow these steps to install a rear-facing child
restraint using the vehicle seat belts in the rear
seats:1. Child restraints for infants must be
used in the rear-facing direction and
therefore must not be used in the front
seat. Position the child restraint on the seat.
Always follow the restraint manufacturer’s
instructions. 2. Route the seat belt tongue through the child
restraint and insert it into the buckle until you
hear and feel the latch engage. Be sure to
follow the child restraint manufacturer’s in-
structions for belt routing.