Page 10 of 438
Coupe
1. Power windows (P. 2-42)
2. Windshield (P. 8-20)
3. Windshield wiper and washer switch(P. 2-26)
4. Engine hood (P. 3-23)
5. Tie down (P. 6-14)
6. Fog light switch (if so equipped)
(P. 2-32)
7. Headlight and turn signal switch
(P. 2-28)
8. Replacing bulbs (P. 8-27)
9. Tire pressure (P. 8-34)
10. Flat tire (P. 6-2)
11. Tire chains (P. 8-42)
12. Mirrors (P. 3-28)
13. Door locks, NISSAN Intelligent Key ™ ,
keys (P. 3-4, 3-6, 3-2)
Page 11 of 438
Sedan
1. Power windows (P. 2-42)
2. Windshield (P. 8-20)
3. Windshield wiper and washer switch(P. 2-26)
4. Engine hood (P. 3-23)
5. Tie down (P. 6-14)
6. Fog light switch (if so equipped)
(P. 2-32)
7. Headlight and turn signal switch
(P. 2-28)
8. Replacing bulbs (P. 8-27)
9. Tire pressure (P. 8-34)
10. Flat tire (P. 6-2)
11. Tire chains (P. 8-42)
12. Mirrors (P. 3-28)
13. Door locks, NISSAN Intelligent Key ™ ,
keys (P. 3-4, 3-6, 3-2)
See the page number indicated in paren-
theses for operating details.
Page 14 of 438
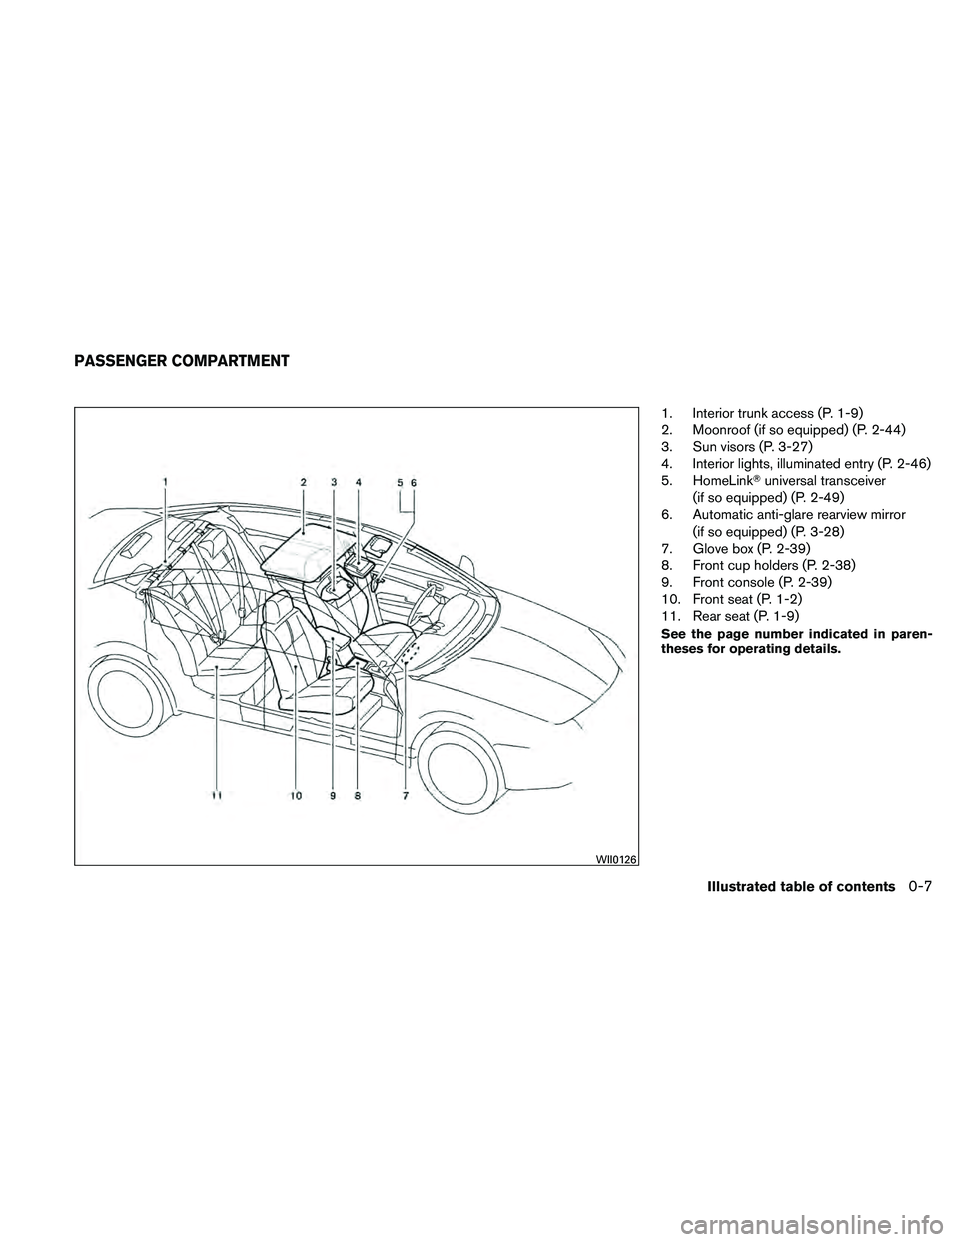
1. Interior trunk access (P. 1-9)
2. Moonroof (if so equipped) (P. 2-44)
3. Sun visors (P. 3-27)
4. Interior lights, illuminated entry (P. 2-46)
5. HomeLink�universal transceiver
(if so equipped) (P. 2-49)
6. Automatic anti-glare rearview mirror
(if so equipped) (P. 3-28)
7. Glove box (P. 2-39)
8. Front cup holders (P. 2-38)
9. Front console (P. 2-39)
10. Front seat (P. 1-2)
11. Rear seat (P. 1-9)
See the page number indicated in paren-
theses for operating details.
Page 15 of 438
1. Vents (P. 4-18)
2. Headlight/fog light (if so equipped)/turnsignal switch (P. 2-28) 3. Steering wheel switch for audio control
(if so equipped)/Bluetooth� Hands-free
Phone System (if so equipped)
(P. 4-96, P. 4-92, P. 4-107)
4. Meters and gauges (P. 2-3) 5. Driver supplemental air bag/horn
(P. 1-42, P. 2-33)
6. Cruise control main/set switch
(P. 5-19)
7. Windshield wiper and washer switch
(P. 2-26)
8. Ignition switch (P. 5-7)
9. Hazard warning flasher switch (P. 2-33)
10. Front passenger air bag status light
(P. 1-51)
11. Front passenger supplemental air bag
(P. 1-42)
12. Glove box (P. 2-39)
13. Navigation system* (if so equipped)
(P. 4-2)
14. Covered storage box (P. 2-40)
15. Heater and air conditioner (automatic)
(P. 4-27)
16. Heater and air conditioner (manual)
(P. 4-19)
17. Shift selector (P. 5-11)
18. Audio system controls (if so equipped)/
Storage (if so equipped)
(P. 4-30, P.2-40)
19. Tilt/telescopic steering wheel controls
(P. 3-27)
Page 19 of 438
Page 36 of 438

WARNING
●Always route the shoulder belt over
your shoulder and across your chest.
Never put the belt behind your back,
under your arm or across your neck. The
belt should be away from your face and
neck, but not falling off your shoulder.
● Position the lap belt as low and snug as
possible AROUND THE HIPS, NOT THE
WAIST. A lap belt worn too high could
increase the risk of internal injuries in
an accident. ●
Be sure the seat belt tongue is securely
fastened to the proper buckle.
● Do not wear the seat belt inside out or
twisted. Doing so may reduce its
effectiveness.
● Do not allow more than one person to
use the same seat belt.
● Never carry more people in the vehicle
than there are seat belts.
● If the seat belt warning light glows con-
tinuously while the ignition is turned
ON with all doors closed and all seat
belts fastened, it may indicate a mal-
function in the system. Have the system
checked by a NISSAN dealer.
● No changes should be made to the seat
belt system. For example, do not modify
the seat belt, add material, or install
devices that may change the seat belt
routing or tension. Doing so may affect
the operation of the seat belt system.
Modifying or tampering with the seat
belt system may result in serious per-
sonal injury. ●
Once a seat belt pretensioner has acti-
vated, it cannot be reused and must be
replaced together with the retractor.
See your NISSAN dealer.
● Removal and installation of preten-
sioner system components should be
done by a NISSAN dealer.
● All seat belt assemblies, including re-
tractors and attaching hardware,
should be inspected after any collision
by a NISSAN dealer. NISSAN recom-
mends that all seat belt assemblies in
use during a collision be replaced un-
less the collision was minor and the
belts show no damage and continue to
operate properly. Seat belt assemblies
not in use during a collision should also
be inspected and replaced if either
damage or improper operation is noted.
● All child restraints and attaching hard-
ware should be inspected after any col-
lision. Always follow the restraint
manufacturer’s inspection instructions
and replacement recommendations.
The child restraints should be replaced
if they are damaged.
Page 50 of 438
 must be used
when installing a child restraint. Failure to
use the ALR mode will result in the child
restraint not being proper")
WARNING
The three-point seat belt with Automatic
Locking Retractor (ALR) must be used
when installing a child restraint. Failure to
use the ALR mode will result in the child
restraint not being properly secured. The
restraint could tip over or be loose and
cause injury to a child in a sudden stop or
collision. Also, it can change the opera-
tion of the front passenger air bag. See
“Front passenger air bag and status light”
later in this section.Refer to all Warnings and Cautions in the “Child
Safety” and “Child Restraint” sections before in-
stalling a child restraint.
Follow these steps to install a rear-facing child
restraint using the vehicle seat belts in the rear
seats:1. Child restraints for infants must be
used in the rear-facing direction and
therefore must not be used in the front
seat. Position the child restraint on the seat.
Always follow the restraint manufacturer’s
instructions. 2. Route the seat belt tongue through the child
restraint and insert it into the buckle until you
hear and feel the latch engage. Be sure to
follow the child restraint manufacturer’s in-
structions for belt routing.
Page 57 of 438
8. Tighten the tether strap according to themanufacturer’s instructions to remove any
slack.
9. Check to make sure the child restraint is properly secured prior to each use. If the
seat belt is not locked, repeat steps 2
through 8.
10. If the child restraint is installed in the frontpassenger seat, place the ignition switch in
the ON position. The front passenger air bag
status light

2. Windshield (P. 8-20)
3. Windshield wiper and washer switch(P. 2-26)
4. Engine hood (P. 3-23)
5. Tie down (P. 6-14)
6. Fog light switch (if so equipped)
(P. 2-32)
7.")

2. Windshield (P. 8-20)
3. Windshield wiper and washer switch(P. 2-26)
4. Engine hood (P. 3-23)
5. Tie down (P. 6-14)
6. Fog light switch (if so equipped)
(P. 2-32)
7.")