2010 NISSAN ALTIMA HYBRID display
[x] Cancel search: displayPage 13 of 36
11
PLAYING AN iPod®
The interface for iPod® operation shown on the vehicle center display is similar to the iPod® interface.
Select the u SB/iPod
® mode using one of the following methods:
Push the SOURCE select switch on the steering wheel.
Press the DISC/AUX button.
FOR USB MEMORY:
After selecting the u SB/iPod® mode, select the “Play Movie contents” key or “Play Audio
contents” key to start playing audio or video files on the device.
SEEKING BUTTON
Press or for less than 1.5 seconds to skip through tracks.
Press and hold or for more than 1.5 seconds to rewind or fast forward. When the
button is released the audio will play at normal speed.
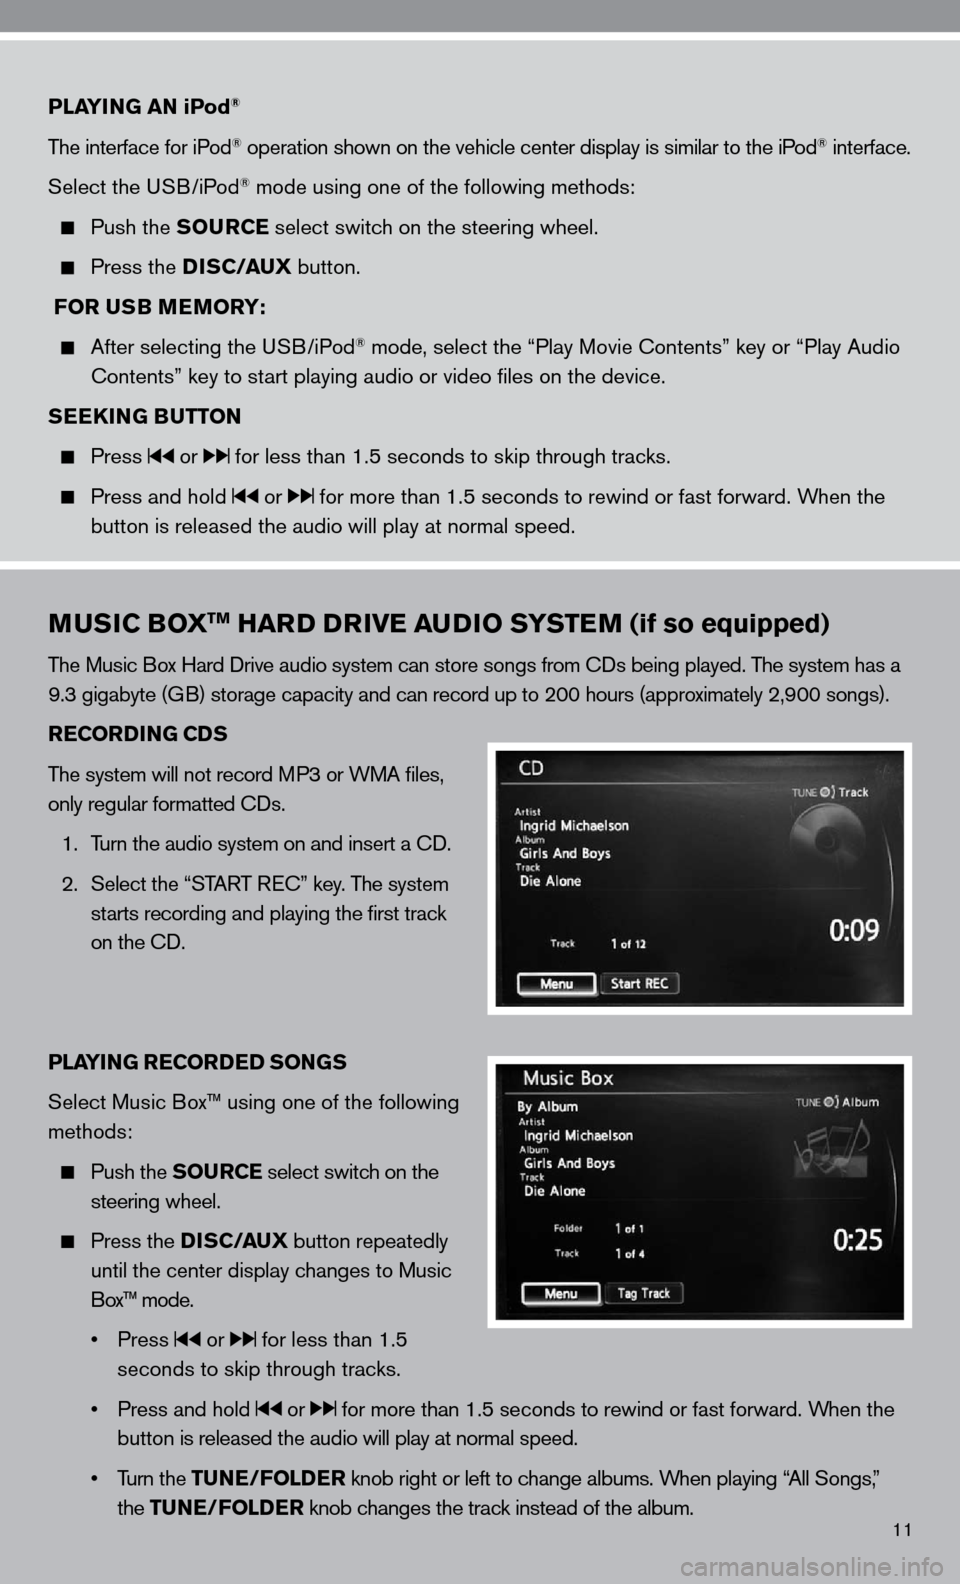
MUSIC BOXTM HARD DRIVE AUDIO SYSTEM (if so equipped)
The Music Box Hard drive audio system can store songs from cds being played. The system has a
9.3 gigabyte (GB) storage capacity and can record up to 200 hours (approximately 2,900 songs).
RECORDING CDS
The system will not record MP3 or WMA files,
only regular formatted cds.
1. Turn the audio system on and insert a cd.
2. Select the “START R ec” key. The system
starts recording and playing the first track
on the cd.
PLAYING RECORDED SONGS
Select Music Box™ using one of the following
methods:
Push the SOURCE select switch on the
steering wheel.
Press the DISC/AUX button repeatedly
until the center display changes to Music
Box™ mode.
• Press
or for less than 1.5
seconds to skip through tracks.
• Press and hold
or for more than 1.5 seconds to rewind or fast forward. When the
button is released the audio will play at normal speed.
• Turn the TUNE/FOLDER knob right or left to change albums. When playing “All Songs,”
the TUNE/FOLDER knob changes the track instead of the album.
Page 14 of 36
BLUETOOTH® STREAMING AUDIO (if so equipped)
if you have a compatible Bluetooth® Streaming Audio device, it can be connected to the vehicle’s
audio system and played through the speakers.
cOnnec TinG
Press the SETTING button on the instrument panel, then select the “Bluetooth” key.
Select the “ connect Bluetooth” key and a screen will appear asking if you are connecting the
device to use with the hands-free phone system.
Select “no” when you receive the pop-up question.
enter a P in of your choice. it will be needed by your Bluetooth® audio device to complete the
connection process.
note: See the Bluetooth
® device’s Owner’s Manual for more information.
A udiO OPe RATiOn
To switch to the Bluetooth® Streaming Audio mode, press the SOURCE select switch on
the steering wheel or the DISC/AUX button repeatedly until the Bluetooth® Streaming
Audio mode is displayed on the screen.
The controls (Menu, Play and Pause) for Bluetooth® Streaming Audio are displayed on the
screen.
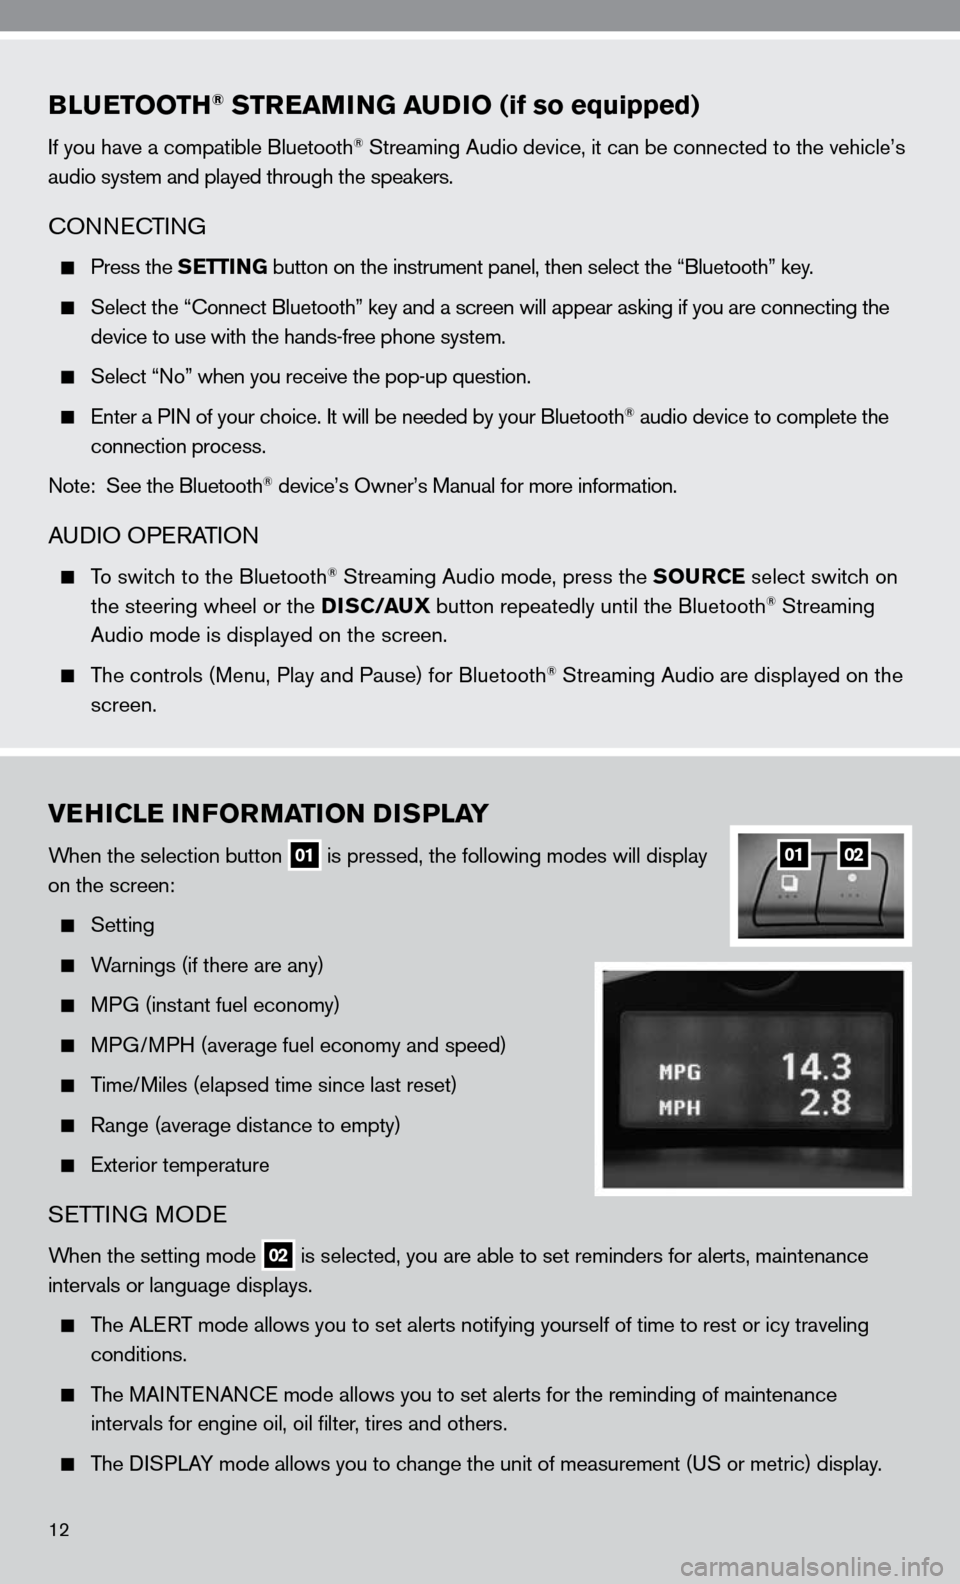
VEHICLE INFORMATION DISPLAY
When the selection button 01 is pressed, the following modes will display
on the screen:
Setting
Warnings (if there are any)
MPG (instant fuel economy)
MPG/MPH (average fuel economy and speed)
Time/Miles (elapsed time since last reset)
Range (average distance to empty)
exterior temperature
SeTTin G MO de
When the setting mode 02 is selected, you are able to set reminders for alerts, maintenance
intervals or language displays.
The ALe RT mode allows you to set alerts notifying yourself of time to rest or i\
cy traveling
conditions.
The MAinTenAnce mode allows you to set alerts for the reminding of maintenance
intervals for engine oil, oil filter, tires and others.
The di SPLAy mode allows you to change the unit of measurement (u S or metric) display.
0102
12
Page 15 of 36
13
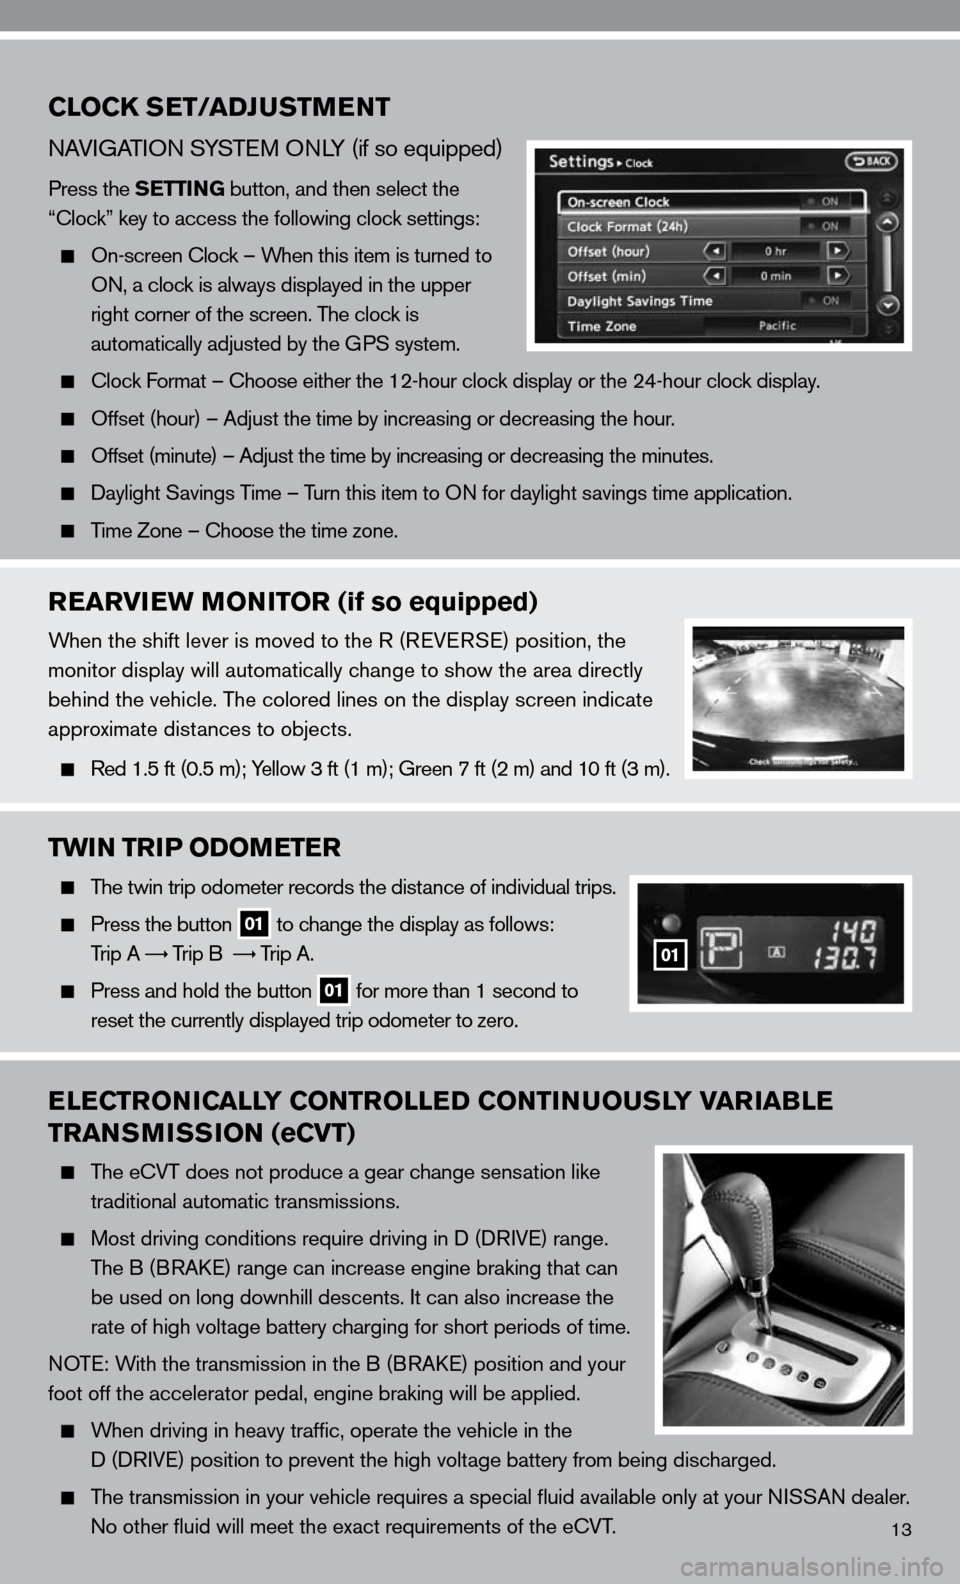
CLOCK SET/ADJUSTMENT
nAViGATi On S ySTe M O nLy (if so equipped)
Press the SETTING button, and then select the
“clock” key to access the following clock settings:
On-screen clock – When this item is turned to
On, a clock is always displayed in the upper
right corner of the screen. The clock is
automatically adjusted by the GPS system.
clock f ormat – choose either the 12-hour clock display or the 24-hour clock display.
Offset (hour) – Adjust the time by increasing or decreasing the hou\
r.
Offset (minute) – Adjust the time by increasing or decreasing the minutes.
daylight Savings Time – Turn this item to O n for daylight savings time application.
Time Zone – choose the time zone.
REARVIEW MONITOR (if so equipped)
When the shift lever is moved to the R (R eVeRSe) position, the
monitor display will automatically change to show the area directly
behind the vehicle. The colored lines on the display screen indicate
approximate distances to objects.
Red 1.5 ft (0.5 m); y ellow 3 ft (1 m); Green 7 ft (2 m) and 10 ft (3 m).
TWIN TRIP ODOMETER
The twin trip odometer records the distance of individual trips.
Press the button 01 to change the display as follows:
Trip A
Trip B
Trip A.
Press and hold the button 01 for more than 1 second to
reset the currently displayed trip odometer to zero.
ELECTRONICALLY CONTROLLED CONTINUOUSLY VARIABLE
TRANSMISSION (eCVT)
The e cVT does not produce a gear change sensation like
traditional automatic transmissions.
Most driving conditions require driving in d (d RiV e) range.
The B (BRA ke) range can increase engine braking that can
be used on long downhill descents. it can also increase the
rate of high voltage battery charging for short periods of time.
n OT e: With the transmission in the B (BRA ke) position and your
foot off the accelerator pedal, engine braking will be applied.
When driving in heavy traffic, operate the vehicle in the
d (d RiVe) position to prevent the high voltage battery from being discharged.
The transmission in your vehicle requires a special fluid available onl\
y at your ni SSAn dealer.
no other fluid will meet the exact requirements of the ecVT.
01
Page 21 of 36
19
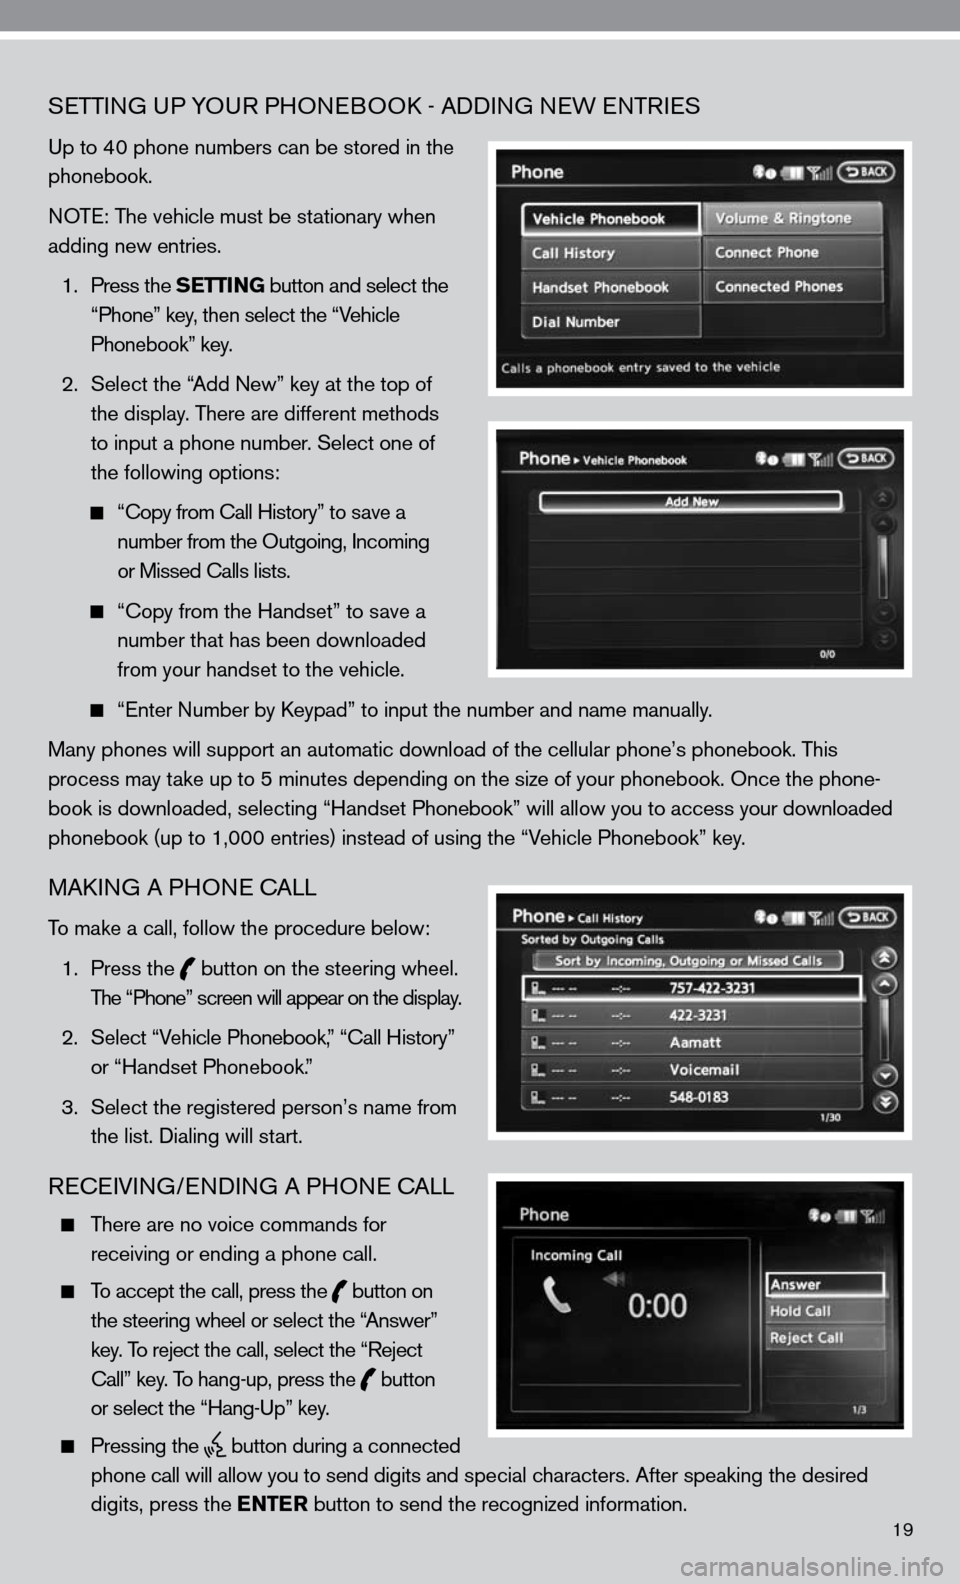
SeTTin G uP yOuR PHO neBOO k - Addin G neW enTR ieS
up to 40 phone numbers can be stored in the
phonebook.
n OT e: The vehicle must be stationary when
adding new entries.
1. Press the SETTING button and select the
“Phone” key, then select the “Vehicle
Phonebook” key.
2. Select the “Add new” key at the top of
the display. There are different methods
to input a phone number. Select one of
the following options:
“c opy from call History” to save a
number from the Outgoing, incoming
or Missed calls lists.
“c opy from the Handset” to save a
number that has been downloaded
from your handset to the vehicle.
“enter number by k eypad” to input the number and name manually.
Many phones will support an automatic download of the cellular phone’\
s phonebook. This
process may take up to 5 minutes depending on the size of your phonebook. Once the ph\
one-
book is downloaded, selecting “Handset Phonebook” will allow you t\
o access your downloaded
phonebook (up to 1,000 entries) instead of using the “Vehicle Phonebook” key.
MAkin G A PHO ne cALL
To make a call, follow the procedure below:
1. Press the
button on the steering wheel.
The “Phone” screen will appear on the display.
2. Select “Vehicle Phonebook,” “ call History”
or “Handset Phonebook.”
3. Select the registered person’s name from
the list. dialing will start.
ReceiVin G/endin G A PHO ne cALL
There are no voice commands for
receiving or ending a phone call.
To accept the call, press the
button on
the steering wheel or select the “Answer”
key. To reject the call, select the “Reject
call” key. To hang-up, press the
button
or select the “Hang-up” key.
Pressing the
button during a connected
phone call will allow you to send digits and special characters. After speaking the desired
digits, press the ENTER button to send the recognized information.
Page 22 of 36
20
HOW TO SAy nuMBeRS
The system provides two commands for entering and dialing a phone number: “ diAL” and
“inTe RnATi OnAL c ALL.” The “diAL” command is used for domestic phone numbers up to
10-digits in length, starting with the area code. The “inTe RnATi OnAL c ALL” command is used
when more than 10-digits need to be dialed or when special characters are required, such as: *,
# or +. When using these two commands, please follow the phone digit speaking rul\
es below:
Only single digits 0 (zero) to 9 (nine) can be spoken.
When saying the phone number 800-662-6200, the system will accept “eight hundred” in
addition to “eight zero zero” or “eight oh oh.” 500, 700 and 900 are also supported.
The long-distance calling prefix “1” is not required when making a call.
“diAL” c OMMAnd O nLy
y ou can say all the digits of a 7- or 10-digit phone number at one time.
f or a 10-digit number, saying the phone number in groups of 3, 3 and 4 digits may improve
recognition for some speakers. To use this group dialing method, say only the first 3 digits of
the phone number. After the system recognizes the number, it will request the next 3 digits
and finally the last 4 digits.
i f a phone number is incorrectly recognized, you can try entering the phone number again
using the 3-3-4 group dialing procedure by saying, “c HAnGe nu MBeR.”
“inTe RnATi OnAL c ALL” c OMMAnd O nLy
y ou can say the entire phone number at once or in groups of any digit length.
f or *, # and +, say “STAR, ” “POund” or “PLuS,” respectively.
NISSAN VOICE RECOGNITION SYSTEM (vehicles with navigation -
if so equipped)
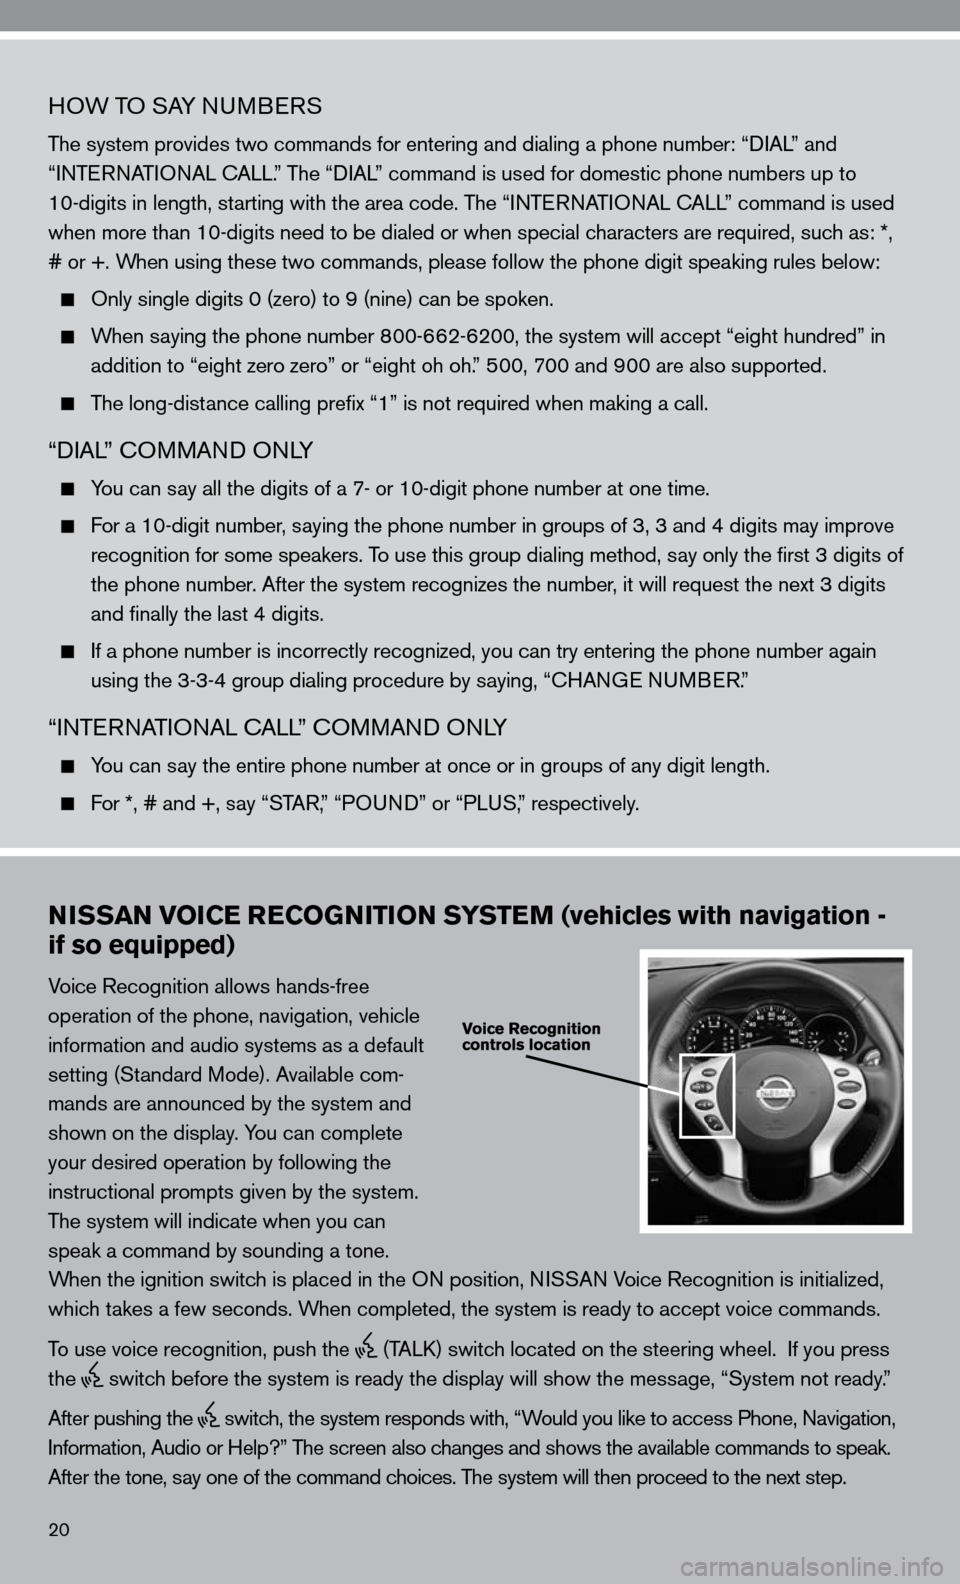
Voice Recognition allows hands-free
operation of the phone, navigation, vehicle
information and audio systems as a default
setting (Standard Mode). Available com-
mands are announced by the system and
shown on the display. y ou can complete
your desired operation by following the
instructional prompts given by the system.
The system will indicate when you can
speak a command by sounding a tone.
When the ignition switch is placed in the O n position, niSSAn Voice Recognition is initialized,
which takes a few seconds. When completed, the system is ready to accept voice commands.
To use voice recognition, push the
(TALk) switch located on the steering wheel. if you press
the
switch before the system is ready the display will show the message, “System not ready.”
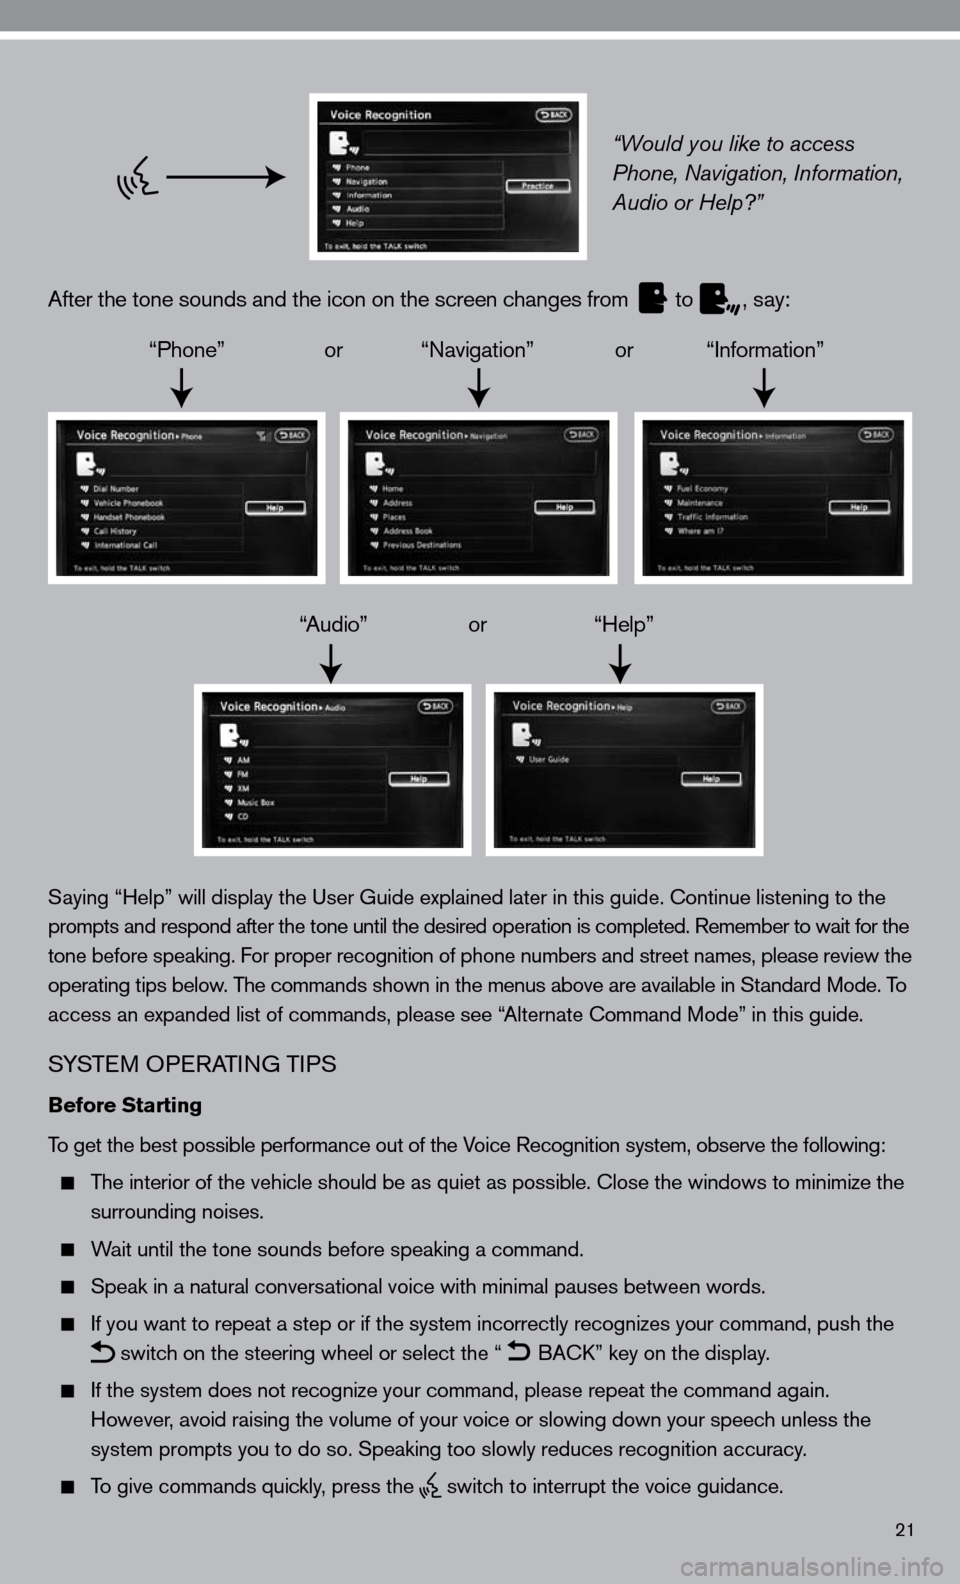
After pushing the
switch, the system responds with, “Would you like to access Phone, navigation,
i nformation, Audio or Help?” The screen also changes and shows the available commands to speak.
After the tone, say one of the command choices. The system will then proceed to the next step.
Page 23 of 36
21
“Would you like to access
Phone, Navigation, Information,
Audio or Help?”
After the tone sounds and the icon on the screen changes from
to
, say:
“Phone” or “navigation” or “information”
“Audio” or “Help”
Saying “Help” will display the user Guide explained later in this guide. continue listening to the
prompts and respond after the tone until the desired operation is completed. Remember to wait for the
tone before speaking. for proper recognition of phone numbers and street names, please review the
operating tips below. The commands shown in the menus above are available in Standard Mode. To
access an expanded list of commands, please see “Alternate command Mode” in this guide.
S ySTe M OP eRATin G TiPS
Before Starting
To get the best possible performance out of the Voice Recognition system, observe the following:
The interior of the vehicle should be as quiet as possible. close the windows to minimize the
surrounding noises.
Wait until the tone sounds before speaking a command.
Speak in a natural conversational voice with minimal pauses between words.
if you want to repeat a step or if the system incorrectly recognizes your command, push the
switch on the steering wheel or select the “
BA
ck” key on the display.
if the system does not recognize your command, please repeat the command \
again.
However, avoid raising the volume of your voice or slowing down your speech unless the
system prompts you to do so. Speaking too slowly reduces recognition acc\
uracy.
To give commands quickly, press the
switch to interrupt the voice guidance.
Page 24 of 36
22
How to speak phone numbers
The system provides two commands for entering and dialing a phone number: “diAL” and
“inTe RnATi OnAL c ALL.” The “diAL” command is used for domestic phone numbers up to
10 digits in length starting with the area code. The “ inTe R nAT iO nAL cALL” command is used
when more than 10 digits need to be dialed or when special characters are required such as *, #,
or +. When using these two commands, please follow the phone digit speaking rul\
es below:
Only single digits 0 (zero) to 9 (nine) can be spoken.
Speak digits at a normal pace. Speaking too slowly reduces recognition a\
ccuracy.
When saying the phone number 800-662-6200, the system will accept “eight zero zero” or
“eight oh oh.” 500, 700 and 900 are also supported.
The long-distance dialing prefix “1” is not required when making a call.
“diAL” c OMMAnd O nLy
you can say all the digits of a 7- or 10-digit phone number at one time.
for a 10-digit number, saying the phone number in groups of 3, 3 and 4 digits may improve
recognition for some speakers. To use this group dialing method, say only the first 3 digits of
the phone number. After the system recognizes the 3 three digits, it will request the next 3
digits and finally the last 4 digits.
if a phone number is incorrectly recognized, you can try entering the pho\
ne number again
using the 3-3-4 group dialing procedure by saying, “c HAnGe nu MBeR.”
“inTe RnATi OnAL c ALL” c OMMAnd O nLy
you can say the entire phone number at once or in groups of any digit length.
for *, # and +, say “STAR,” “PO und” or “PLuS,” respectively.
VOice c OMMAnd u SAGe
Making a Phone Call
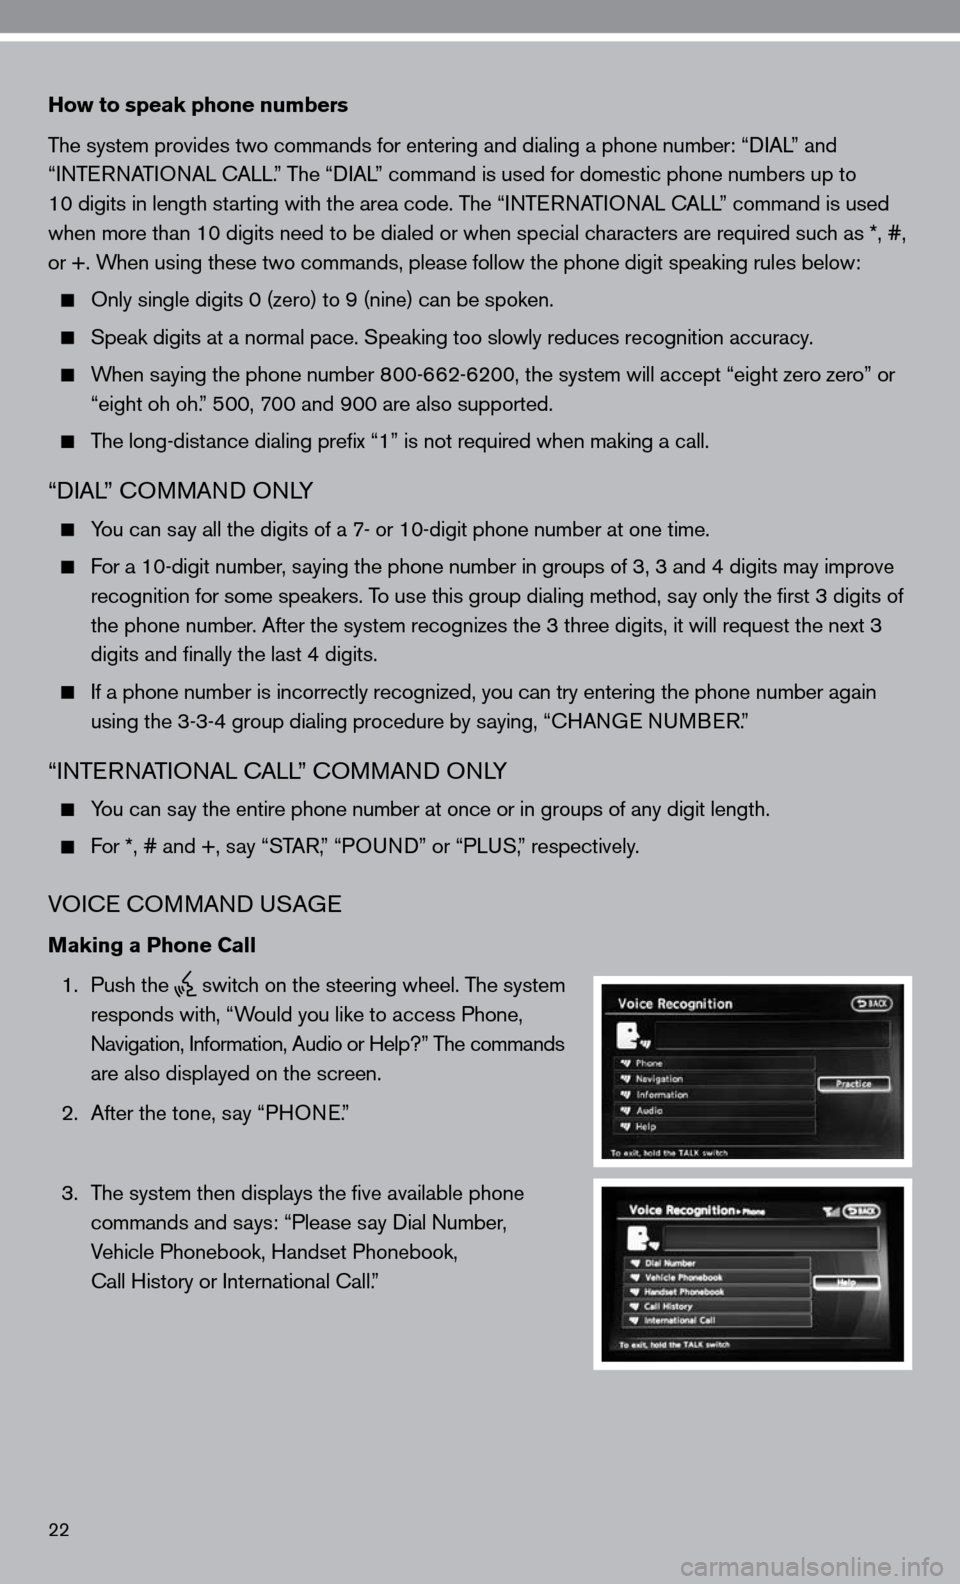
1. Push the
switch on the steering wheel. The system
responds with, “Would you like to access Phone,
n avigation, information, Audio or Help?” The commands
are also displayed on the screen.
2. After the tone, say “PHO ne.”
3. The system then displays the five available phone
commands and says: “Please say dial number,
Vehicle Phonebook, Handset Phonebook,
call History or international call.”
Page 25 of 36
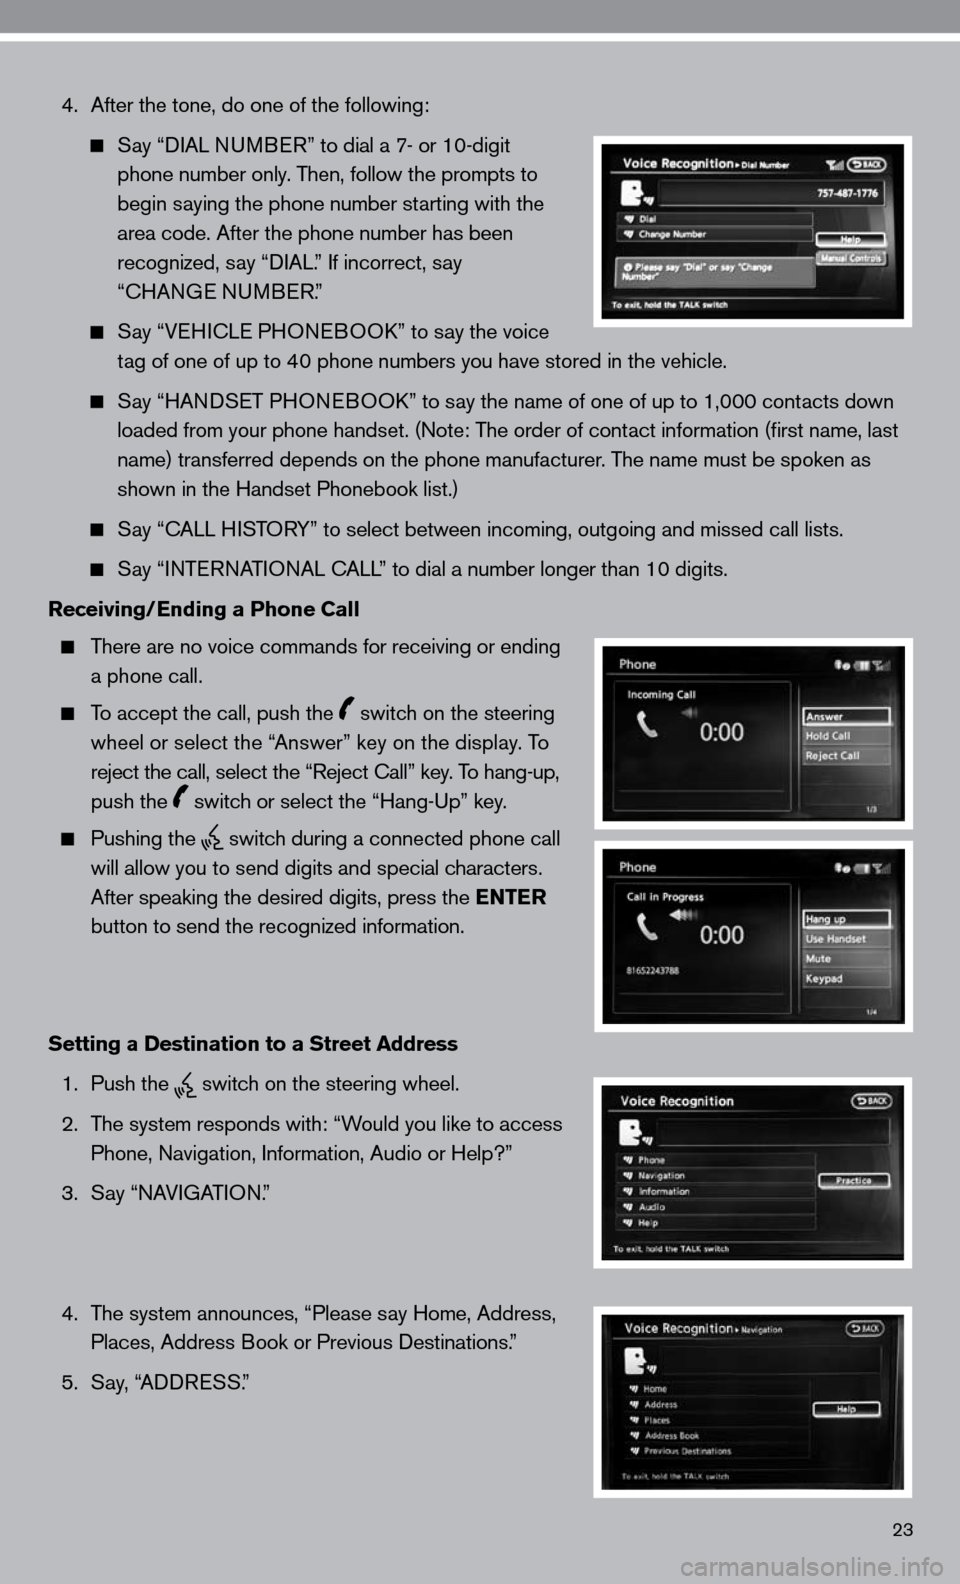
4. After the tone, do one of the following:
Say “ diAL nu MB eR” to dial a 7- or 10-digit
phone number only. Then, follow the prompts to
begin saying the phone number starting with the
area code. After the phone number has been
recognized, say “ diAL.” if incorrect, say
“cHAn Ge nu MBeR.”
Say “V eH ic Le PHO neBOO k” to say the voice
tag of one of up to 40 phone numbers you have stored in the vehicle.
Say “HAnd SeT PHO neBOO k” to say the name of one of up to 1,000 contacts down
loaded from your phone handset. ( note: The order of contact information (first name, last
name) transferred depends on the phone manufacturer. The name must be spoken as
shown in the Handset Phonebook list.)
Say “c ALL HiSTOR y” to select between incoming, outgoing and missed call lists.
Say “inTe RnATi OnAL c ALL” to dial a number longer than 10 digits.
Receiving/Ending a Phone Call
There are no voice commands for receiving or ending
a phone call.
To accept the call, push the switch on the steering
wheel or select the “Answer” key on the display. To
reject the call, select the “Reject call” key. To hang-up,
push the
switch or select the “Hang-up” key.
Pushing the
switch during a connected phone call
will allow you to send digits and special characters.
After speaking the desired digits, press the ENTER
button to send the recognized information.
Setting a Destination to a Street Address
1. Push the
switch on the steering wheel.
2. The system responds with: “Would you like to access
Phone, navigation, information, Audio or Help?”
3. Say “nAVi GATiOn.”
4. The system announces, “Please say Home, Address,
Places, Address Book or Previous destinations.”
5. Say, “ AddR eSS.”
23