2010 NISSAN 370Z ROADSTER sport mode
[x] Cancel search: sport modePage 31 of 409
Black plate (29,1)
Model "Z34-D" EDITED: 2009/ 9/ 10
CHILD SAFETYChildren need adults to help protect them.
They need to be properly restrained.
In addition to the general information in this
manual, child safety information is available from
many other sources, including doctors, teachers,
government traffic safety offices, and community
organizations. Every child is different, so be sure
to learn the best way to transport your child.
There are three basic types of child restraint
systems:
.Rear-facing child restraint
. Front-facing child restraint
. Booster seat
The proper restraint depends on the child’s size.
Generally, infants (up to about 1 year and less
than 20 lb (9 kg)) should be placed in rear-
facing child restraints. Front-facing child re-
straints are available for children who outgrow
rear-facing child restraints and are at least 1
year old. Booster seats are used to help position
a vehicle lap/shoulder belt on a child who can no
longer use a front-facing child restraint.
WARNING
Children need special protection. The
vehicle’s seat belts may not fit them properly. The shoulder belt may come
too close to the face or neck. The lap
belt may not fit over their small hip
bones. In an accident, an improperly
fitting seat belt could cause serious or
fatal injury. Always use appropriate
child restraints.
All U.S. states and Canadian provinces or
territories require the use of approved child
restraints for infants and small children. (See
“CHILD RESTRAINTS” later in this section.)
Also, there are other types of child restraints
available for larger children for additional pro-
tection.
InfantsInfants up to at least one year old should be
placed in a rear-facing child restraint. The
passenger seat is not suitable for use with a
rear-facing child restraint for infants. Therefore,
infants should not be transported in this vehicle.Small children (for Coupe models)Children that are over one year old and weigh at
least 20 lb (9 kg) can be placed in a front-facing
child restraint. Refer to the manufacturer’s
instructions for minimum and maximum weight
and height recommendations. NISSAN recom-
mends that small children be placed in child
restraints that comply with Federal Motor Vehicle Safety Standards or Canadian Motor
Vehicle Safety Standards. You should choose a
child restraint that fits your vehicle and always
follow the manufacturer’s instructions for instal-
lation and use.
Larger childrenChildren who are too large for child restraints
should be seated and restrained by the seat
belts which are provided. The seat belt may not
fit properly if the child is less than 4 ft 9 in (142.5
cm) tall and weighs between 40 lb (18 kg) and
80 lb (36 kg) . A booster seat should be used to
obtain proper seat belt fit.
NISSAN recommends that a child be placed in a
commercially availabl
eboosterseatifthe
shoulder belt in the child’s seating position fits
close to the face or neck or if the lap portion of
the seat belt goes across the abdomen. The
booster seat should raise the child so that the
shoulder belt is properly positioned across the
top, middle portion of the shoulder and the lap
belt is low on the hips. A booster seat can only
be used in seating positions that have a three-
point type seat belt. The booster seat should fit
the vehicle seat and have a label certifying that it
complies with Federal Motor Vehicle Safety
Standards or Canadian Motor Vehicle Safety
Standards. Once the child has grown so the
shoulder belt is no longer on or near the face
and neck, use the shoulder belt without the
booster seat.
Safety — Seats, seat belts and supplemental restraint system
1-11
Page 38 of 409
Black plate (36,1)
Model "Z34-D" EDITED: 2009/ 9/ 10
seat belts or harnesses.
. Adjustable seatbacks should be
positioned to fit the child restraint,
but as upright as possible.
. After attaching the child restraint,
test it before you place the child in
it. Push it from side to side while
holding the seat by the seat belt
path. The child restraint should not
move more than 1 inch (25 mm) from
side to side. Try to tug it forward and
check to see if the belt holds the
restraint in place. If the restraint is
not secure, tighten the belt as
necessary, or put the restraint in
another seat and test it again. You
may need to try a different child
restraint. Not all child restraints fit
in all types of vehicles.
. When your child restraint is not in
use, keep it secured with a seat belt
to prevent it from being thrown
around in case of a sudden stop or
accident.
CAUTION
Remember that a child restraint left in a
closed vehicle can become very hot.
Check the seating surface and buckles
before placing your child in the child
restraint.
In general, child restraints are designed to be
installed with the lap portion of a lap/shoulder
seat belt.
Several manufacturers offer child restraints for
children of various sizes. When selecting any
child restraint, keep the following points in mind:
. Choose only a restraint with a label certifying
that it complies with Federal Motor Vehicle
Safety Standard 213 or Canadian Motor
Vehicle Safety Standard 213.
. Check the child restraint in your vehicle to
be sure it is compatible with the vehicle’s
seat and seat belt system.
. If the child restraint is compatible with your
vehicle, place your child in the child restraint
and check the various adjustments to be
sure the child restraint is compatible with
your child. Choose a child restraint that is
designed for your child’s height and weight.
Always follow all recommended procedures. The passenger seat is not suitable for use with a
rear-facing child restraint for infants. Therefore,
infants should not be transported in this vehicle.
All U.S. states and Canadian provinces or
territories require that infants and small
children be restrained in an approved child
restraint at all times while the vehicle is
being operated. Canadian law requires the
top tether strap on front-facing child
restraints to be secured to the designated
anchor point on the vehicle.
1-18
Safety — Seats, seat belts and supplemental restraint system
Page 55 of 409
Black plate (53,1)
Model "Z34-D" EDITED: 2009/ 9/ 10
child and the type of child restraint being used. If
the passenger air bag status light is not
illuminated (indicating that the air bag might
inflate in a crash) , it could be that the child
restraint or seat belt is not being used properly.
Make sure that the child restraint is installed
properly, the seat belt is used properly and the
occupant is positioned properly. If the passen-
ger air bag status light is still not illuminated, try
a different child restraint.
If the passenger air bag status light will not
illuminate even though you believe that the child
restraint, the seat belts and the occupant are
properly positioned, the system may be sensing
an unoccupied seat (in which case the air bag is
OFF) . Your NISSAN dealer can check that the
system is OFF by using a special tool. However,
until you have confirmed with your dealer that
your air bag is working properly, do not transport
a child in this vehicle.
The NISSAN Advanced Air Bag System and
passenger air bag status light will take a few
seconds to register a change in the passenger
seat status. However, if the seat becomes
unoccupied, the air bag status light will remain
off.
If a malfunction occurs in the front passenger air
bag system, the supplemental air bag warning
light
, located in the meter and gauges area
will blink. Have the system checked by a
NISSAN dealer.
Other supplemental front-impact air bag
precautions
WARNING
. Do not place any objects on the
steering wheel pad or on the instru-
ment panel. Also, do not place any
objects between any occupant and
the steering wheel or instrument
panel. Such objects may become
dangerous projectiles and cause
injury if the front air bag inflates.
. Do not place objects with sharp
edges on the seat. Also, do not
place heavy objects on the seat that
will leave permanent impressions in
the seat. Such objects can damage
the seat or occupant classification
sensor (pattern sensor) . This can
affect the operation of the air bag
system and result in serious perso-
nal injury.
. Do not use water or acidic cleaners
(hot steam cleaners) on the seat.
This can damage the seat or occu-
pant classification sensor. This can
also affect the operation of the air
bag system and result in serious personal injury.
. Immediately after inflation, several
front air bag system components
will be hot. Do not touch them; you
may severely burn yourself.
. No unauthorized changes should be
made to any components or wiring
of the air bag system. This is to
prevent accidental inflation of the
supplemental air bag or damage to
the supplemental air bag system.
. Do not make unauthorized changes
to your vehicle’s electrical system,
suspension system or front end
structure. This could affect proper
operation of the front air bag sys-
tem.
. Tampering with the front air bag
system may result in serious perso-
nal injury. Tampering includes
changes to the steering wheel and
the instrument panel assembly by
placing material over the steering
wheel pad and above the instrument
panel or by installing additional trim
material around the air bag system.
. Modifying or tampering with the
front passenger seat may result in
Safety — Seats, seat belts and supplemental restraint system
1-35
Page 370 of 409
Black plate (372,1)
Model "Z34-D" EDITED: 2009/ 9/ 10
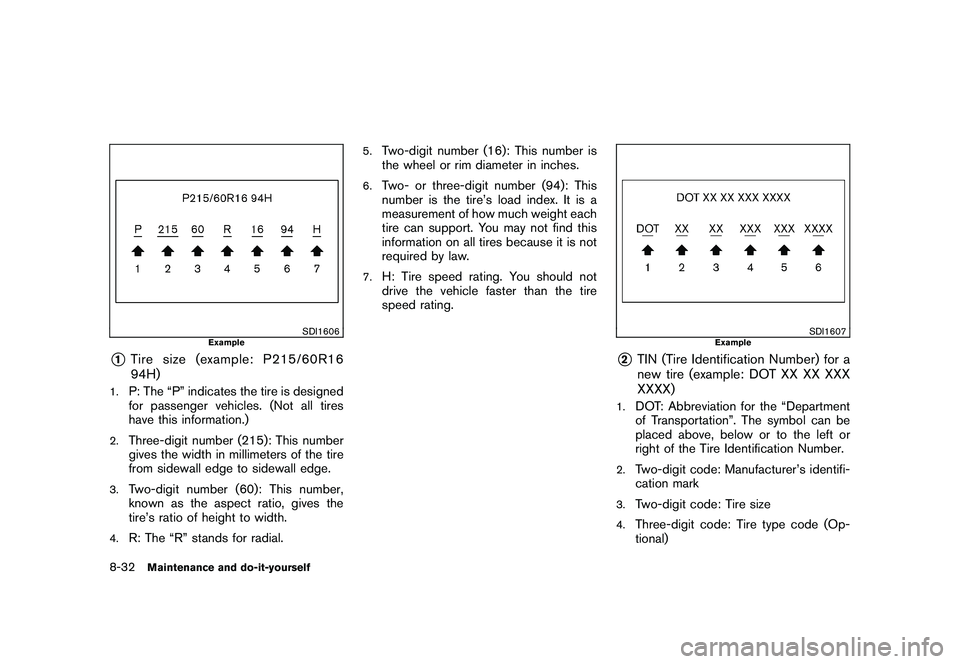
SDI1606
Example
*1
Tire size (example: P215/60R16
94H)
1.
P: The “P” indicates the tire is designed
for passenger vehicles. (Not all tires
have this information.)
2.
Three-digit number (215): This number
gives the width in millimeters of the tire
from sidewall edge to sidewall edge.
3.
Two-digit number (60): This number,
known as the aspect ratio, gives the
tire’s ratio of height to width.
4.
R: The “R” stands for radial.
5.
Two-digit number (16): This number is
the wheel or rim diameter in inches.
6.
Two- or three-digit number (94): This
number is the tire’s load index. It is a
measurement of how much weight each
tire can support. You may not find this
information on all tires because it is not
required by law.
7.
H: Tire speed rating. You should not
drive the vehicle faster than the tire
speed rating.
SDI1607
Example
*2
TIN (Tire Identification Number) for a
new tire (example: DOT XX XX XXX
XXXX)
1.
DOT: Abbreviation for the “Department
of Transportation”. The symbol can be
placed above, below or to the left or
right of the Tire Identification Number.
2.
Two-digit code: Manufacturer’s identifi-
cation mark
3.
Two-digit code: Tire size
4.
Three-digit code: Tire type code (Op-
tional)
8-32
Maintenance and do-it-yourself
Page 392 of 409
Black plate (394,1)
Model "Z34-D" EDITED: 2009/ 9/ 10
7. Insert a flat-blade screwdriver into thegrommet hole to add a 90 8turn onto the
part
*E.
8. Insert a J-nut into the license plate bracket before placing the license plate bracket on
the fascia.
9. Install the license plate bracket with the screws.
10. Install the license plate with bolts that are not longer than 0.55 in (14 mm) .
When the recovery hook is used, you need to
temporarily remove the front license plate and
bracket from the vehicle. (See “VEHICLE
RECOVERY (freeing a stuck vehicle)” in the
“6. In case of emergency” section for further
details.)
STI0623
Left side
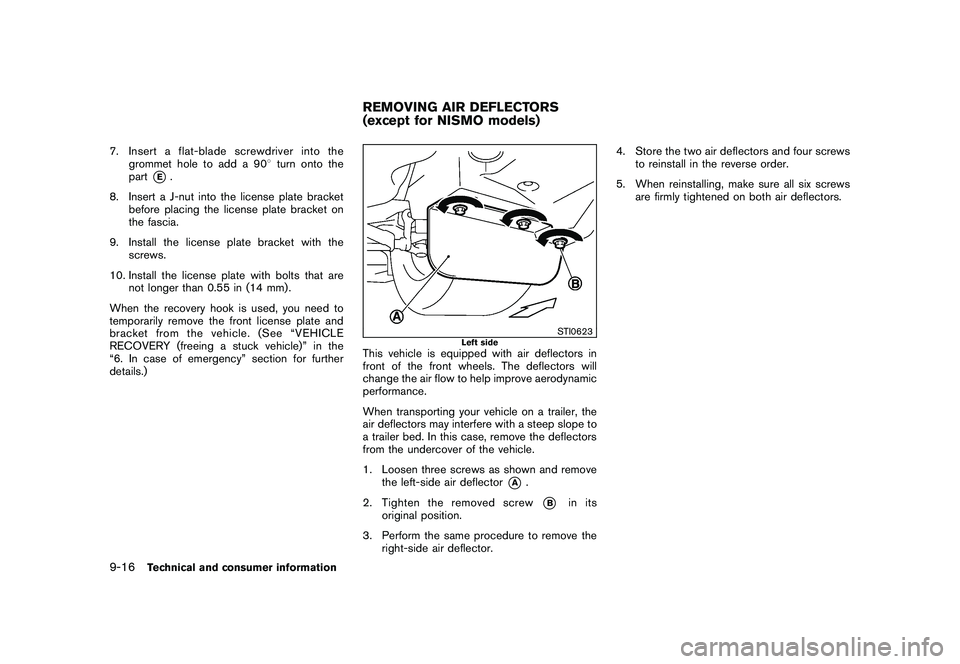
This vehicle is equipped with air deflectors in
front of the front wheels. The deflectors will
change the air flow to help improve aerodynamic
performance.
When transporting your vehicle on a trailer, the
air deflectors may interfere with a steep slope to
a trailer bed. In this case, remove the deflectors
from the undercover of the vehicle.
1. Loosen three screws as shown and remove the left-side air deflector
*A
.
2. Tighten the removed screw
*B
in its
original position.
3. Perform the same procedure to remove the right-side air deflector. 4. Store the two air deflectors and four screws
to reinstall in the reverse order.
5. When reinstalling, make sure all six screws are firmly tightened on both air deflectors.
REMOVING AIR DEFLECTORS
(except for NISMO models)
9-16
Technical and consumer information
Page 396 of 409
Black plate (398,1)
Model "Z34-D" EDITED: 2009/ 9/ 10
Towing your vehicle with all four wheels on the
ground is sometimes called flat towing. This
method is sometimes used when towing a
vehicle behind a recreational vehicle, such as a
motor home.
CAUTION
.Failure to follow these guidelines
can result in severe transmission
damage.
. Whenever flat towing your vehicle,
always tow forward, never back-
ward.
. DO NOT tow any automatic trans-
mission vehicle with all four wheels
on the ground (flat towing) . Doing
so WILL DAMAGE internal transmis-
sion parts due to lack of transmis-
sion lubrication.
. For emergency towing procedures
refer to “TOWING RECOMMENDED
BY NISSAN (except for NISMO
models)” in the “6. In case of
emergency” section of this manual.
AUTOMATIC TRANSMISSIONTo tow a vehicle equipped with an automatic
transmission, an appropriate vehicle dolly MUST
be placed under the towed vehicle’s drive
wheels. Always follow the dolly manufacturer’s
recommendations when using their product.MANUAL TRANSMISSION. Always tow with the manual transmission in
Neutral.
. Your vehicle speed should never exceed 70
MPH (112 km/h) when flat towing your
vehicle.
. After towing 500 miles, start and idle the
engine with the transmission in Neutral for
two minutes. Failure to idle the engine after
every 500 miles of towing may cause
damage to the transmission’s internal parts. DOT (Department Of Transportation) Quality
Grades: All passenger car tires must conform to
federal safety requirements in addition to these
grades.
Quality grades can be found where applicable
on the tire sidewall between tread shoulder and
maximum section width. For example:
Treadwear 200 Traction AA Temperature A
TREADWEARThe treadwear grade is a comparative rating
based on the wear rate of the tire when tested
under controlled conditions on a specified
government test course. For example, a tire
graded 150 would wear one and one-half (1
1/2) times as well on the government course as
a tire graded 100. The relative performance of
tires depends upon actual conditions of their
use, however, and may depart significantly from
the norm due to variations in driving habits,
service practices and differences in road char-
acteristics and climate.TRACTION AA, A, B AND CThe traction grades, from highest to lowest, are
AA, A, B and C. Those grades represent the
tire’s ability to stop on wet pavement as
measured under controlled conditions on spe-
cified government test surfaces of asphalt and
concrete. A tire marked C may have poor
traction performance.
FLAT TOWING
UNIFORM TIRE QUALITY GRADING9-20
Technical and consumer information