2010 NISSAN 370Z ROADSTER wheel size
[x] Cancel search: wheel sizePage 47 of 409
Black plate (45,1)
Model "Z34-D" EDITED: 2009/ 9/ 10
SSS0988
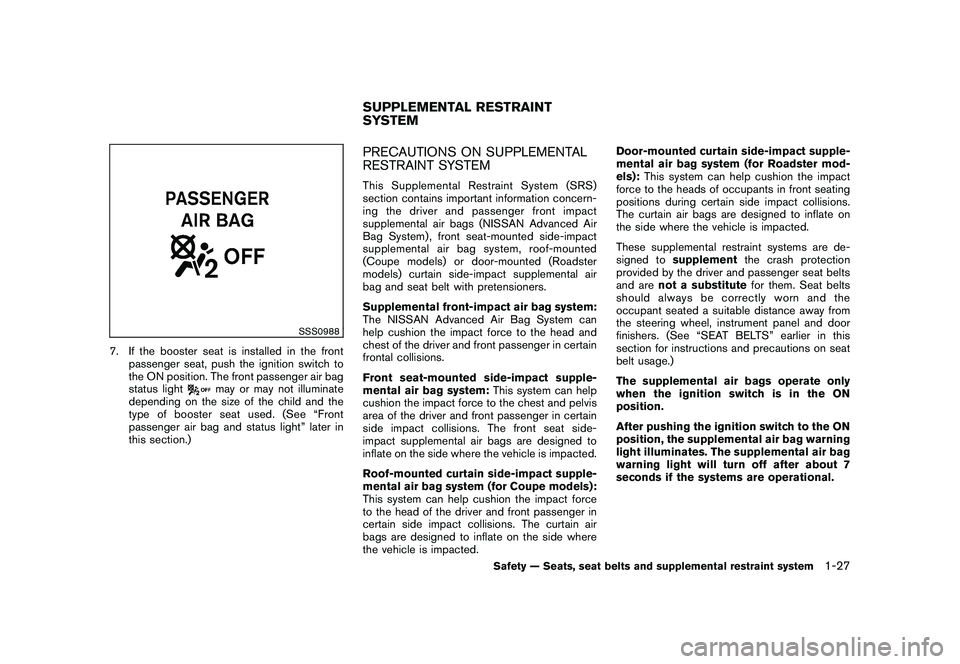
7. If the booster seat is installed in the frontpassenger seat, push the ignition switch to
the ON position. The front passenger air bag
status light
may or may not illuminate
depending on the size of the child and the
type of booster seat used. (See “Front
passenger air bag and status light” later in
this section.)
PRECAUTIONS ON SUPPLEMENTAL
RESTRAINT SYSTEMThis Supplemental Restraint System (SRS)
section contains important information concern-
ing the driver and passenger front impact
supplemental air bags (NISSAN Advanced Air
Bag System) , front seat-mounted side-impact
supplemental air bag system, roof-mounted
(Coupe models) or door-mounted (Roadster
models) curtain side-impact supplemental air
bag and seat belt with pretensioners.
Supplemental front-impact air bag system:
The NISSAN Advanced Air Bag System can
help cushion the impact force to the head and
chest of the driver and front passenger in certain
frontal collisions.
Front seat-mounted side-impact supple-
mental air bag system: This system can help
cushion the impact force to the chest and pelvis
area of the driver and front passenger in certain
side impact collisions. The front seat side-
impact supplemental air bags are designed to
inflate on the side where the vehicle is impacted.
Roof-mounted curtain side-impact supple-
mental air bag system (for Coupe models):
This system can help cushion the impact force
to the head of the driver and front passenger in
certain side impact collisions. The curtain air
bags are designed to inflate on the side where
the vehicle is impacted. Door-mounted curtain side-impact supple-
mental air bag system (for Roadster mod-
els):
This system can help cushion the impact
force to the heads of occupants in front seating
positions during certain side impact collisions.
The curtain air bags are designed to inflate on
the side where the vehicle is impacted.
These supplemental restraint systems are de-
signed to supplement the crash protection
provided by the driver and passenger seat belts
and are not a substitute for them. Seat belts
should always be correctly worn and the
occupant seated a suitable distance away from
the steering wheel, instrument panel and door
finishers. (See “SEAT BELTS” earlier in this
section for instructions and precautions on seat
belt usage.)
The supplemental air bags operate only
when the ignition switch is in the ON
position.
After pushing the ignition switch to the ON
position, the supplemental air bag warning
light illuminates. The supplemental air bag
warning light will turn off after about 7
seconds if the systems are operational.SUPPLEMENTAL RESTRAINT
SYSTEM
Safety — Seats, seat belts and supplemental restraint system
1-27
Page 73 of 409
Black plate (71,1)
Model "Z34-D" EDITED: 2009/ 9/ 10
minute. Have the system checked by a NISSAN
dealer.
For additional information, see “TIRE PRES-
SURE MONITORING SYSTEM (TPMS)” in the
“5. Starting and driving” section.
WARNING
.If the light does not illuminate with
the ignition switch pushed ON, have
the vehicle checked by a NISSAN
dealer as soon as possible.
. If the light illuminates while driving,
avoid sudden steering maneuvers or
abrupt braking, reduce vehicle
speed, pull off the road to a safe
location and stop the vehicle as
soon as possible. Driving with un-
der-inflated tires may permanently
damage the tires and increase the
likelihood of tire failure. Serious
vehicle damage could occur and
may lead to an accident and could
result in serious personal injury.
Check the tire pressure for all four
tires. Adjust the tire pressure to the
recommended COLD tire pressure
shownontheTireandLoading
Information label to turn the low tire pressure warning light OFF. If
the light still illuminates while driv-
ing after adjusting the tire pressure,
a tire may be flat. If you have a flat
tire, replace it with a spare tire as
soon as possible.
. When a spare tire is mounted or a
wheel is replaced, the TPMS will not
function and the low tire pressure
warning light will flash for approxi-
mately 1 minute. The light will
remain on after the 1 minute. Con-
tact your NISSAN dealer as soon as
possible for tire replacement and/or
system resetting.
. Replacing tires with those not ori-
ginally specified by NISSAN could
affect the proper operation of the
TPMS.
CAUTION
.The TPMS is not a substitute for the
regular tire pressure check. Be sure
to check the tire pressure regularly.
. If the vehicle is being driven at
speeds of less than 16 MPH (25
km/h) , the TPMS may not operate correctly.
. Be sure to install the specified size
of tires to the four wheels correctly.
Master warning light
When the ignition switch is in the ON position,
the master warning light illuminates if any of the
following are displayed on the vehicle informa-
tion display:
.No key warning
. Low fuel warning
. Low washer fluid warning
. Parking brake release warning
. Door/rear hatch open warning
See “VEHICLE INFORMATION DISPLAY” later
in this section.
Seat belt warning light and chime
The light and chime remind you to fasten seat
belts. The light illuminates whenever the ignition
switch is pushed to the ON position, and will
remain illuminated until the driver’s seat belt is
fastened. At the same time, the chime will sound
for about 6 seconds unless the driver’s seat belt
is securely fastened.
Instruments and controls
2-11
Page 277 of 409
Black plate (277,1)
Model "Z34-D" EDITED: 2009/ 9/ 10
high temperatures to help reduce pollutants.
WARNING
.The exhaust gas and the exhaust
system are very hot. Keep people,
animals or flammable materials
away from the exhaust system com-
ponents.
. Do not stop or park the vehicle over
flammable materials such as dry
grass, waste paper or rags. They
may ignite and cause a fire.
CAUTION
.Do not use leaded gasoline. Depos-
its from leaded gasoline seriously
reduce the three-way catalyst’s abil-
ity to help reduce exhaust pollu-
tants.
. Keep your engine tuned up. Mal-
functions in the ignition, fuel injec-
tion, or electrical systems can cause
overrich fuel flow into the three-way
catalyst, causing it to overheat. Do
not keep driving if the engine mis-
fires, or if noticeable loss of perfor-
mance or other unusual operating conditions are detected. Have the
vehicle inspected promptly by a
NISSAN dealer.
. Avoid driving with an extremely low
fuel level. Running out of fuel could
cause the engine to misfire, dama-
ging the three-way catalyst.
. Do not race the engine while warm-
ing it up.
. Do not push or tow your vehicle to
start the engine.
TIRE PRESSURE MONITORING SYS-
TEM (TPMS)Each tire, including the spare (if provided) ,
should be checked monthly when cold and
inflated to the inflation pressure recommended
by the vehicle manufacturer on the vehicle
placard or tire inflation pressure label. (If your
vehicle has tires of a different size than the size
indicated on the vehicle placard or tire inflation
pressure label, you should determine the proper
tire inflation pressure for those tires.)
As an added safety feature, your vehicle has
been equipped with a Tire Pressure Monitoring
System (TPMS) that illuminates a low tire
pressure telltale when one or more of your tires
is significantly under-inflated. Accordingly, when
the low tire pressure telltale illuminates, you should stop and check your tires as soon as
possible, and inflate them to the proper pres-
sure. Driving on a significantly under-inflated tire
causes the tire to overheat and can lead to tire
failure. Under-inflation also reduces fuel effi-
ciency and tire tread life, and may affect the
vehicle’s handling and stopping ability.
Please note that the TPMS is not a substitute for
proper tire maintenance, and it is the driver’s
responsibility to maintain correct tire pressure,
even if under-inflation has not reached the level
to trigger illumination of the TPMS low tire
pressure telltale.
Your vehicle has also been equipped with a
TPMS malfunction indicator to indicate when the
system is not operating properly. The TPMS
malfunction indicator is combined with the low
tire pressure telltale. When the system detects a
malfunction, the telltale will flash for approxi-
mately one minute and then remain continuously
illuminated. This sequence will continue upon
subsequent vehicle start-ups as long as the
malfunction exists. When the malfunction indi-
cator is illuminated, the system may not be able
to detect or signal low tire pressure as intended.
TPMS malfunctions may occur for a variety of
reasons, including the installation of replace-
ment or alternate tires or wheels on the vehicle
that prevent the TPMS from functioning properly.
Always check the TPMS malfunction telltale
after replacing one or more tires or wheels on
Starting and driving
5-3
Page 300 of 409
Black plate (300,1)
Model "Z34-D" EDITED: 2009/ 9/ 10
BRAKE ASSISTWhen the force applied to the brake pedal
exceeds a certain level, the Brake Assist is
activated generating greater braking force than a
conventional brake booster even with light pedal
force.
WARNING
The Brake Assist is only an aid to assist
braking operation and is not a collision
warning or avoidance device. It is the
driver’s responsibility to stay alert, drive
safely and be in control of the vehicle at
all times.ANTI-LOCK BRAKING SYSTEM (ABS)
WARNING
.The Anti-lock Braking System (ABS)
is a sophisticated device, but it
cannot prevent accidents resulting
from careless or dangerous driving
techniques. It can help maintain
vehicle control during braking on
slippery surfaces. Remember that
stopping distances on slippery sur-
faces will be longer than on normal
surfaces even with ABS. Stopping distances may also be longer on
rough, gravel or snow covered
roads, or if you are using tire chains.
Alwaysmaintainasafedistance
from the vehicle in front of you.
Ultimately, the driver is responsible
for safety.
. Tire type and condition may also
affect braking effectiveness.
— When replacing tires, install the
specified size of tires on all four
wheels.
— When installing a spare tire, make sure that it is the proper
size and type as specified on the
Tire and Loading Information
label. See “TIRE AND LOADING
INFORMATION LABEL” in the “9.
Technical and consumer infor-
mation” section of this manual.
— For detailed information, see “WHEELS AND TIRES” in the
“8. Maintenance and do-it-your-
self” section of this manual.
The Anti-lock Braking System (ABS) controls
the brakes so the wheels do not lock during hard
braking or when braking on slippery surfaces.
The system detects the rotation speed at each wheel and varies the brake fluid pressure to
prevent each wheel from locking and sliding. By
preventing each wheel from locking, the system
helps the driver maintain steering control and
helps to minimize swerving and spinning on
slippery surfaces.
Using the systemDepress the brake pedal and hold it down.
Depress the brake pedal with firm steady
pressure, but do not pump the brakes. The
ABS will operate to prevent the wheels from
locking up. Steer the vehicle to avoid obstacles.
WARNING
Do not pump the brake pedal. Doing so
may result in increased stopping dis-
tances.Self-test featureThe ABS includes electronic sensors, electric
pumps, hydraulic solenoids and a computer. The
computer has a built-in diagnostic feature that
tests the system each time you start the engine
and move the vehicle at a low speed in forward
or reverse. When the self-test occurs, you may
hear a “clunk” noise and/or feel a pulsation in the
brake pedal. This is normal and does not
indicate a malfunction. If the computer senses
a malfunction, it switches the ABS off and
illuminates the ABS warning light on the
BRAKE ASSIST5-26
Starting and driving
Page 304 of 409
Black plate (304,1)
Model "Z34-D" EDITED: 2009/ 9/ 10
FREEING A FROZEN DOOR LOCKTo prevent a door lock from freezing, apply
deicer through the key hole. If the lock becomes
frozen, heat the key before inserting it into the
key hole or use the Intelligent Key system.ANTIFREEZEIn the winter when it is anticipated that the
outside temperature will drop below 328F(0 8C) ,
check antifreeze to assure proper winter protec-
tion. For additional information, see “ENGINE
COOLING SYSTEM” in the “8. Maintenance
and do-it-yourself” section.BATTERYIf the battery is not fully charged during
extremely cold weather conditions, the battery
fluid may freeze and damage the battery. To
maintain maximum efficiency, the battery should
be checked regularly. For additional information,
see “BATTERY” in the “8. Maintenance and do-
it-yourself” section.DRAINING OF COOLANT WATERIf the vehicle is to be left outside without
antifreeze, drain the cooling system, including
the engine block. Refill before operating the
vehicle. For details, see “ENGINE COOLING
SYSTEM” in the “8. Maintenance and do-it-
yourself” section.
TIRE EQUIPMENTSUMMER tires have a tread designed to provide
superior performance on dry pavement. How-
ever, the performance of these tires will be
substantially reduced in snowy and icy condi-
tions. If you operate your vehicle on snowy or icy
roads, NISSAN recommends the use of MUD &
SNOW or ALL SEASON tires on all four wheels.
Consult a NISSAN dealer for the tire type, size,
speed rating and availability information.
For additional traction on icy roads, studded
tires may be used. However, some U.S. states
and Canadian provinces prohibit their use.
Check local, state and provincial laws before
installing studded tires.
Skid and traction capabilities of studded
snow tires, on wet or dry surfaces, may be
poorer than that of non-studded snow
tires.
Tire chains may be used. For details, see “TIRE
CHAINS” in the “8. Maintenance and do-it-
yourself” section of this manual.SPECIAL WINTER EQUIPMENTIt is recommended that the following items be
carried in the vehicle during winter:
. A scraper and stiff-bristled brush to remove
ice and snow from the windows and wiper
blades. .
A sturdy, flat board to be placed under the
jack to give it firm support.
. A shovel to dig the vehicle out of snowdrifts.
. Extra window washer fluid to refill the
reservoir tank.
DRIVING ON SNOW OR ICE
WARNING
.Wet ice (32 8F, 0 8C and freezing rain) ,
very cold snow or ice can be slick
and very hard to drive on. The
vehicle will have much less traction
or “grip” under these conditions. Try
to avoid driving on wet ice until the
road is salted or sanded.
. Whatever the condition, drive with
caution. Accelerate and slow down
with care. If accelerating or down-
shifting too fast, the drive wheels
will lose even more traction.
. Allow more stopping distance under
these conditions. Braking should be
started sooner than on dry pave-
ment.
. Allow greater following distances
on slippery roads.
COLD WEATHER DRIVING5-30
Starting and driving
Page 312 of 409
Black plate (312,1)
Model "Z34-D" EDITED: 2009/ 9/ 10
Models equipped with different sized
tires in the front and rear:
When replacing a front tire, make sure that
the hole in the spare tire wheel is aligned
with the pin on the brake rotor.
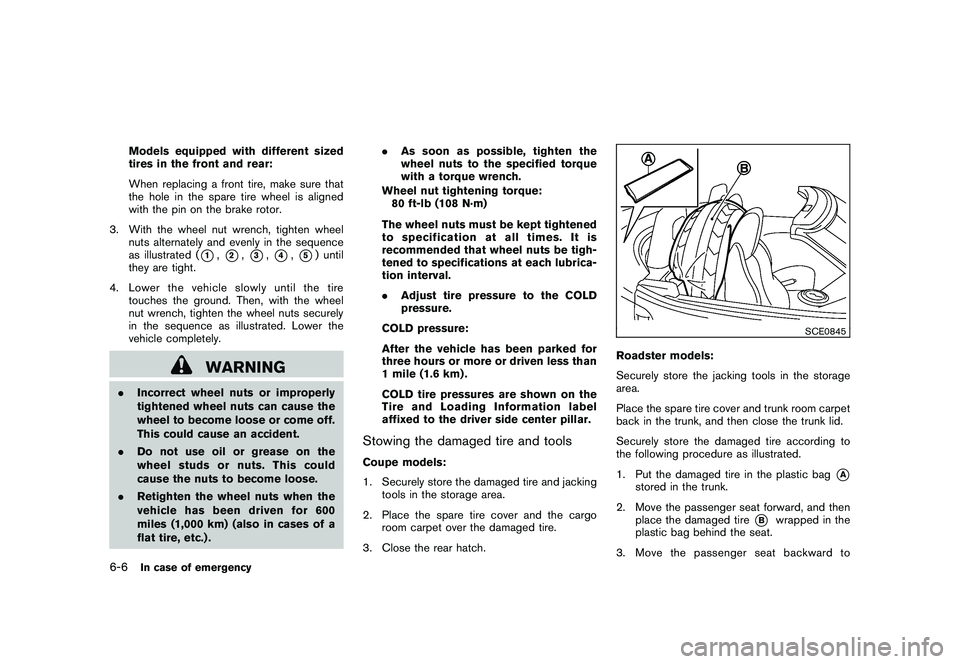
3. With the wheel nut wrench, tighten wheel nuts alternately and evenly in the sequence
as illustrated (
*1,*2,*3,*4,*5) until
they are tight.
4. Lower the vehicle slowly until the tire touches the ground. Then, with the wheel
nut wrench, tighten the wheel nuts securely
in the sequence as illustrated. Lower the
vehicle completely.
WARNING
.Incorrect wheel nuts or improperly
tightened wheel nuts can cause the
wheel to become loose or come off.
This could cause an accident.
. Do not use oil or grease on the
wheel studs or nuts. This could
cause the nuts to become loose.
. Retighten the wheel nuts when the
vehicle has been driven for 600
miles (1,000 km) (also in cases of a
flat tire, etc.) . .
As soon as possible, tighten the
wheel nuts to the specified torque
with a torque wrench.
Wheel nut tightening torque: 80 ft-lb (108 N·m)
The wheel nuts must be kept tightened
to specification at all times. It is
recommended that wheel nuts be tigh-
tened to specifications at each lubrica-
tion interval.
. Adjust tire pressure to the COLD
pressure.
COLD pressure:
After the vehicle has been parked for
three hours or more or driven less than
1 mile (1.6 km) .
COLD tire pressures are shown on the
Tire and Loading Information label
affixed to the driver side center pillar.
Stowing the damaged tire and toolsCoupe models:
1. Securely store the damaged tire and jacking tools in the storage area.
2. Place the spare tire cover and the cargo room carpet over the damaged tire.
3. Close the rear hatch.
SCE0845
Roadster models:
Securely store the jacking tools in the storage
area.
Place the spare tire cover and trunk room carpet
back in the trunk, and then close the trunk lid.
Securely store the damaged tire according to
the following procedure as illustrated.
1. Put the damaged tire in the plastic bag
*A
stored in the trunk.
2. Move the passenger seat forward, and then place the damaged tire
*B
wrapped in the
plastic bag behind the seat.
3. Move the passenger seat backward to
6-6
In case of emergency
Page 341 of 409
Black plate (343,1)
Model "Z34-D" EDITED: 2009/ 9/ 10
Lights*:Clean the headlights on a regular basis.
Make sure that the headlights, stop lights, tail
lights, turn signal lights, and other lights are all
operating properly and installed securely. Also
check headlight aim.
Road wheel nuts (lug nuts)*: When checking
the tires, make sure no wheel nuts are missing,
and check for any loose wheel nuts. Tighten if
necessary.
Tire rotation*: Tires cannot be rotated on this
vehicle because the front tires are a different
size than the rear tires.
Tires*: Check the pressure with a gauge often
and always prior to long distance trips. If
necessary, adjust the pressure in all tires,
including the spare, to the pressure specified.
Check carefully for damage, cuts or excessive
wear.
Tire Pressure Monitoring System (TPMS)
transmitter components: Replace the TPMS
transmitter grommet seal, valve core and cap
when the tires are replaced due to wear or age.
Tire, wheel alignment and balance: If the
vehicle should pull to either side while driving on
a straight and level road, or if you detect uneven
or abnormal tire wear, there may be a need for
wheel alignment. If the steering wheel or seat vibrates at normal
highway speeds, wheel balancing may be
needed.
For additional information regarding tires, refer
to “Important Tire Safety Information” (US) or
“Tire Safety Information” (Canada) in the
NISSAN Warranty Information Booklet.
Windshield:
Clean the windshield on a regular
basis. Check the windshield at least every six
months for cracks or other damage. Have a
damaged windshield repaired by a qualified
repair facility.
Windshield wiper blades*: Check for cracks
or wear if they do not wipe properly.
Inside the vehicleThe maintenance items listed here should be
checked on a regular basis, such as when
performing scheduled maintenance, cleaning
the vehicle, etc.
Accelerator pedal: Check the pedal for
smooth operation and make sure the pedal
does not catch or require uneven effort. Keep
the floor mat away from the pedal.
Automatic transmission P (Park) mechan-
ism: On a fairly steep hill, check that your
vehicle is held securely with the selector lever in
the P (Park) position without applying any
brakes. Brake pedal:
Check the pedal for smooth
operation. If the brake pedal suddenly goes
down further than normal, the pedal feels
spongy or the vehicle seems to take longer to
stop, see a NISSAN dealer immediately. Keep
the floor mat away from the pedal.
Brakes: Check that the brakes do not pull the
vehicle to one side when applied.
Parking brake: Check the parking brake
operation regularly. The vehicle should be
securely held on a fairly steep hill with only the
parking brake applied. If the parking brake needs
adjusted, see a NISSAN dealer.
Seat belts: Check that all parts of the seat belt
system (for example, buckles, anchors, adjuster
and retractors) operate properly and smoothly,
and are installed securely. Check the belt
webbing for cuts, fraying, wear or damage.
Seats: Check seat position controls such as
seat adjusters, seatback recliner, etc. to ensure
they operate smoothly and that all latches lock
securely in every position. Check that the head
restraints move up and down smoothly and that
the locks (if so equipped) hold securely in all
latched positions.
Steering wheel: Check for changes in the
steering conditions, such as excessive free play,
hard steering or strange noises.
Maintenance and do-it-yourself
8-3
Page 370 of 409
Black plate (372,1)
Model "Z34-D" EDITED: 2009/ 9/ 10
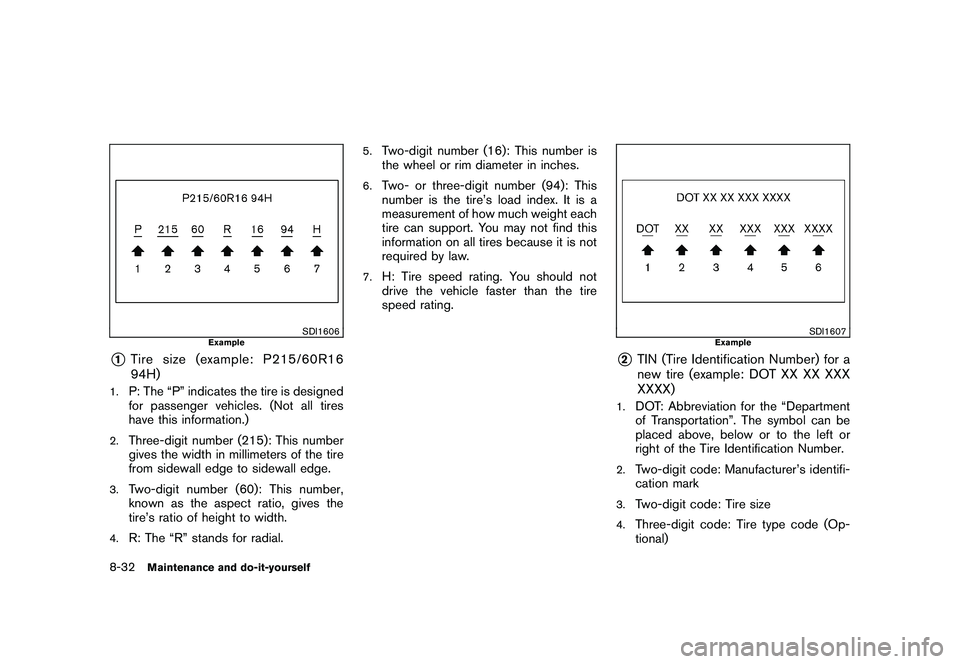
SDI1606
Example
*1
Tire size (example: P215/60R16
94H)
1.
P: The “P” indicates the tire is designed
for passenger vehicles. (Not all tires
have this information.)
2.
Three-digit number (215): This number
gives the width in millimeters of the tire
from sidewall edge to sidewall edge.
3.
Two-digit number (60): This number,
known as the aspect ratio, gives the
tire’s ratio of height to width.
4.
R: The “R” stands for radial.
5.
Two-digit number (16): This number is
the wheel or rim diameter in inches.
6.
Two- or three-digit number (94): This
number is the tire’s load index. It is a
measurement of how much weight each
tire can support. You may not find this
information on all tires because it is not
required by law.
7.
H: Tire speed rating. You should not
drive the vehicle faster than the tire
speed rating.
SDI1607
Example
*2
TIN (Tire Identification Number) for a
new tire (example: DOT XX XX XXX
XXXX)
1.
DOT: Abbreviation for the “Department
of Transportation”. The symbol can be
placed above, below or to the left or
right of the Tire Identification Number.
2.
Two-digit code: Manufacturer’s identifi-
cation mark
3.
Two-digit code: Tire size
4.
Three-digit code: Tire type code (Op-
tional)
8-32
Maintenance and do-it-yourself