2010 NISSAN 370Z COUPE AUX
[x] Cancel search: AUXPage 152 of 409

Black plate (13,1)
4
Center display, heater, air conditioner,
audio, phone and voice recognition systems
Model "Z34-D" EDITED: 2009/ 9/ 10
Safety note....................................................... 4-2
Center multi-function control panel
(models with navigation system) ............................ 4-2
How to use multi-function controller ................... 4-3
How to use touch screen ................................. 4-3
Menu options ................................................ 4-5
How to select menus on the screen ................... 4-6
Vehicle information and settings
(models with navigation system) ............................ 4-6
How to use STATUS button .............................. 4-6
How to use brightness control and display ON/
OFF button ................................................... 4-6
How to use INFO button. ................................. 4-6
How to use SETTING button .......................... 4-10
Ventilators ...................................................... 4-17
Center ventilators ......................................... 4-17
Side ventilators ............................................ 4-17
Heater and air conditioner .................................. 4-17
Automatic air conditioner (Type A) .................... 4-18
Automatic air conditioner (Type B/Type C) ......... 4-21
Operating tips ............................................. 4-23
In-cabin microfilter ........................................ 4-23
Servicing air conditioner ................................ 4-24
Audio system .................................................. 4-24
Audio operation precautions ........................... 4-24
FM-AM radio with Compact Disc (CD) player ..... 4-36FM-AM-SAT radio with Compact Disc (CD)
changer (models without navigation system) . . .
.... 4-41
FM-AM-SAT radio with Compact Disc (CD)
player (models with navigation system) .............. 4-45
DVD (DIGITAL VERSATILE DISC) player
operation (models with navigation system). ......... 4-49
USB memory operation
(models with navigation system) ...................... 4-52
Bluetooth
®streaming audio
(models with navigation system) ...................... 4-56
iPod
®player operation
(models with navigation system) ...................... 4-61
Music box hard-disk drive
(models with navigation system) ...................... 4-63
Auxiliary input jacks
(models with navigation system) ...................... 4-69
CD/DVD/USB memory care and cleaning .......... 4-70
Steering-wheel-mounted controls for audio ........ 4-71
Antenna ..................................................... 4-73
Car phone or CB radio ...................................... 4-74
Bluetooth®Hands-Free Phone System
(models with navigation system) .......................... 4-74
Regulatory information ................................... 4-75
Voice commands. ......................................... 4-76
Control buttons ........................................... 4-76
Connecting procedure ................................... 4-77
Phone selection ........................................... 4-77
Page 154 of 409
Black plate (154,1)
Model "Z34-D" EDITED: 2009/ 9/ 10
WARNING
.Do not disassemble or modify this
system. If you do, it may result in
accidents, fire, or electric shock.
. Do not use this system if you notice
any abnormality, such as a frozen
screen or lack of sound. Continued
use of the system may result in
accident, fire or electric shock.
. In case you notice any foreign
object in the system hardware, spill
liquid on it, or notice smoke or smell
coming from it, stop using the
system immediately and contact
your nearest NISSAN dealer. Ignor-
ing such conditions may lead to
accidents, fire, or electric shock.
. Park the vehicle in a safe location
and apply the parking brake to view
the images on the front center dis-
play screen using devices connected
to the auxiliary input jacks.
Do not attempt to operate the system in
extreme temperature conditions [below
� 48F( �208 C) and above 158 8F(70 8C)].
Operating this system under these condi-
tions may result in system malfunctions.
SAA2273
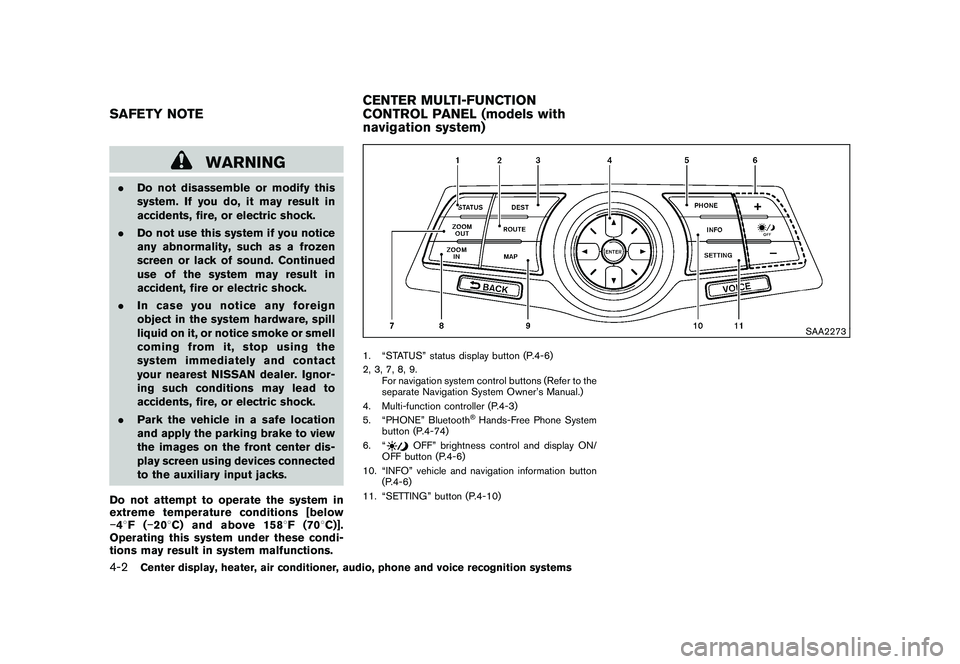
1. “STATUS” status display button (P.4-6)
2, 3, 7, 8, 9.
For navigation system control buttons (Refer to the
separate Navigation System Owner’s Manual.)
4. Multi-function controller (P.4-3)
5. “PHONE” Bluetooth
®Hands-Free Phone System
button (P.4-74)
6. “
OFF” brightness control and display ON/
OFF button (P.4-6)
10. “INFO” vehicle and navigation information button (P.4-6)
11. “SETTING” button (P.4-10)
SAFETY NOTE CENTER MULTI-FUNCTION
CONTROL PANEL (models with
navigation system)4-2
Center display, heater, air conditioner, audio, phone and voice recognition systems
Page 188 of 409
Black plate (188,1)
Model "Z34-D" EDITED: 2009/ 9/ 10
SAA2742
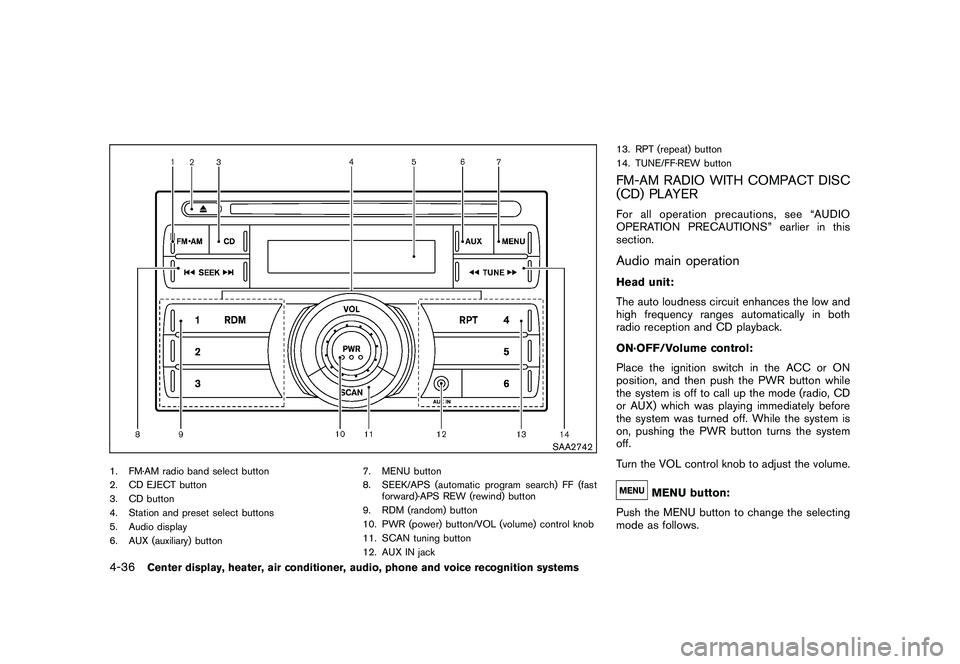
1. FM·AM radio band select button
2. CD EJECT button
3. CD button
4. Station and preset select buttons
5. Audio display
6. AUX (auxiliary) button7. MENU button
8. SEEK/APS (automatic program search) FF (fast
forward)·APS REW (rewind) button
9. RDM (random) button
10. PWR (power) button/VOL (volume) control knob
11. SCAN tuning button
12. AUX IN jack 13. RPT (repeat) button
14. TUNE/FF·REW button
FM-AM RADIO WITH COMPACT DISC
(CD) PLAYERFor all operation precautions, see “AUDIO
OPERATION PRECAUTIONS” earlier in this
section.Audio main operationHead unit:
The auto loudness circuit enhances the low and
high frequency ranges automatically in both
radio reception and CD playback.
ON·OFF/Volume control:
Place the ignition switch in the ACC or ON
position, and then push the PWR button while
the system is off to call up the mode (radio, CD
or AUX) which was playing immediately before
the system was turned off. While the system is
on, pushing the PWR button turns the system
off.
Turn the VOL control knob to adjust the volume.
MENU button:
Push the MENU button to change the selecting
mode as follows.
4-36
Center display, heater, air conditioner, audio, phone and voice recognition systems
Page 191 of 409
Black plate (191,1)
Model "Z34-D" EDITED: 2009/ 9/ 10
Pushing the button again during this 10 second
period will stop SCAN tuning.
If the SCAN tuning button is not pushed within
10 seconds, SCAN tuning continues to move to
the next CD track.AUX (Auxiliary) inputAUX IN jack:
The AUX IN jack is located on the audio unit.
The AUX IN audio input jack accepts any
standard analog audio input such as from a
portable cassette tape/CD player, MP3 player or
laptop computer.
AUX (Auxiliary) button:
Push the AUX button to play a compatible
device when it is plugged into the AUX IN jack.
When the AUX button is pushed with no device
plugged into the jack, the audio system does not
change to the AUX mode (the AUX button is
invalid) .
Center display, heater, air conditioner, audio, phone and voice recognition systems
4-39
Page 192 of 409

Black plate (192,1)
Model "Z34-D" EDITED: 2009/ 9/ 10
SAA2280
1. CD EJECT button
2. DISP (display) button
3. Radio station preset/CD select buttons
4. Audio display
5. SCRL (scroll) button
6. LOAD button7. SEEK the TRACK, CAT (category) or FILE/APS
(automatic program search) FF (fast forward)·APS
REW (rewind) button
8. MUTE button
9. FM·AM band select button
10. AUDIO button
11. SAT (satellite) band select button 12. SCAN tuning button
13. ON·OFF button/ VOL (volume) control knob
14. DISC button
15. RPT (repeat) button
16. AUX (auxiliary) button
17. RDM (random) button
18. AUX IN jack
19. TUNE the CH (channel) or FOLDER/FF·REW
button4-40
Center display, heater, air conditioner, audio, phone and voice recognition systems
Page 193 of 409
Black plate (193,1)
Model "Z34-D" EDITED: 2009/ 9/ 10
FM-AM-SAT RADIO WITH COMPACT
DISC (CD) CHANGER (models without
navigation system)For all operation precautions, see “AUDIO
OPERATION PRECAUTIONS” earlier in this
section.
The satellite radio mode requires an active XM
Satellite Radio subscription. The satellite radio is
not available in Alaska, Hawaii and Guam.
It may take some time to receive the activation
signal after subscribing to the XM Satellite
Radio. After receiving the activation signal, an
available channel list will be automatically
updated in the radio. For XM, push the ignition
switch from LOCK to ACC to update the
channel list.Audio main operationHead unit:
The auto loudness circuit enhances the low and
high frequency ranges automatically in both
radio reception and CD playback.
ON·OFF/Volume control:
Push the ignition switch to the ACC or ON
position, and then push the ON·OFF button
while the system is off to call up the mode (radio,
CD or AUX) which was playing immediately
before the system was turned off. While thesystem is on, pushing the ON·OFF button turns
the system off.
Turn the VOL control knob to adjust the volume.
MUTE button:
Push the
button to mute the audio sound.
Push thebutton again to release the mute.
Adjusting tone quality and speaker bal-
ance:
To adjust Bass, Treble, Balance and Fade, push
the Audio button. When the display shows the
setting you want to change (Bass, Treble,
Balance and Fade) , push the SEEK or TUNE
button to set the desired setting.
These items can also be adjusted by pushing
the AUDIO button.
. Speed Sensitive Vol.
Sound volume is increased according to the
vehicle speed. Choose the effect level from
“HIGH”, “MID”, “LOW” or “OFF”.
. Beep tuning
When this item is turned to ON, you will hear
a beep sound when you use a button.
FM-AM-SAT radio operation
radio (FM/AM) band select:
Pushing the radio band select button will
change the band as follows:
AM ?FM1 ?FM2 ?AMradio (SAT) band select:
Pushing the radio band select button will
change the band as follows:
XM1 ?XM2 ?XM3 ?XM1
When the radio band select button is pushed
while the ignition switch is in the ACC or ON
position, the radio will come on at the channel
last played.
The last channel played will also come on when
the ON·OFF button is pushed to ON.
The satellite radio mode requires an active XM
Satellite Radio subscription. The satellite radio is
not available in Alaska, Hawaii and Guam.
If another audio source is playing when the radio
band select button is turned to ON, the audio
source will automatically be turned off and the
last radio channel played will come on.
When the stereo broadcast signal is weak, the
radio will automatically change from stereo to
Center display, heater, air conditioner, audio, phone and voice recognition systems
4-41
Page 195 of 409
Black plate (195,1)
Model "Z34-D" EDITED: 2009/ 9/ 10
and start playing.
After loading the CD, the number of tracks on
the CD and the play time will appear on the
display.
If the radio is already operating, it will auto-
matically turn off and the CD will play.
If the system has been turned off while the CD
was playing, pushing the ON·OFF button will
start the CD.
CD LOAD:
To insert a CD in the CD changer, push the
LOAD button for less than 1.5 seconds. Select
the loading position by pushing the CD insert
select button
*1
to*6, then insert the CD.
To insert 6 CDs to the CD changer in
succession, push the LOAD button for more
than 1.5 seconds.
The inserted slot numbers will illuminate on the
display.
PLAY:
When the DISC (CD play) button is pushed with
the system off and the CD loaded, the system
will turn on and the CD will start to play.
When the DISC button is pushed with the CD
loaded and the radio playing, the radio will automatically be turned off and the CD will start
to play.
When the DISC button is pushed while a CD is
loaded and a medium is played using the
auxiliary input jacks, you can toggle back and
forth between CD and medium.
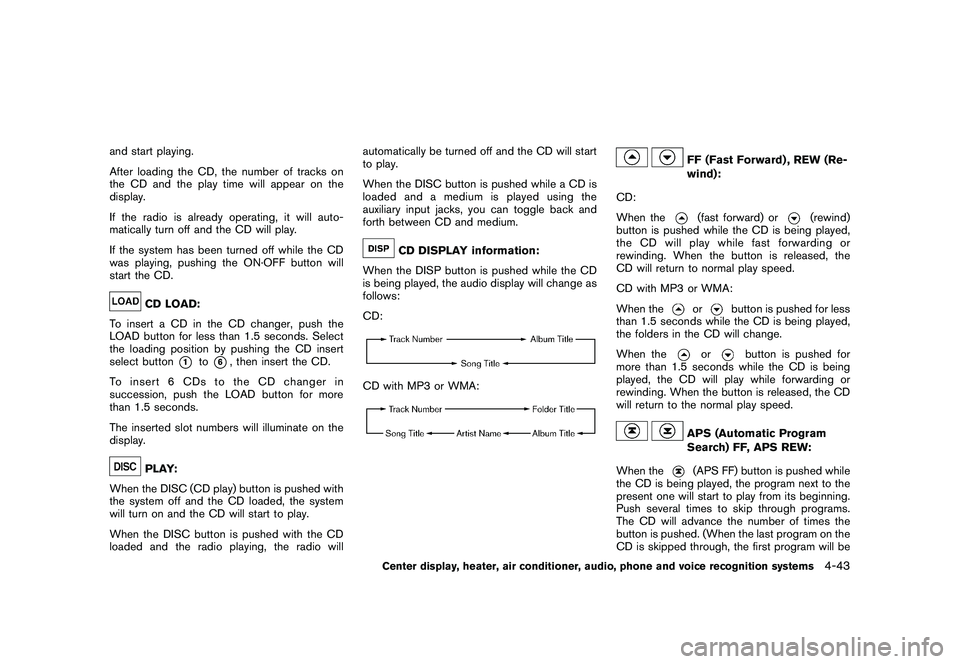
CD DISPLAY information:
When the DISP button is pushed while the CD
is being played, the audio display will change as
follows:
CD:
CD with MP3 or WMA:
FF (Fast Forward) , REW (Re-
wind):
CD:
When the(fast forward) or
(rewind)
button is pushed while the CD is being played,
the CD will play while fast forwarding or
rewinding. When the button is released, the
CD will return to normal play speed.
CD with MP3 or WMA:
When the
or
button is pushed for less
than 1.5 seconds while the CD is being played,
the folders in the CD will change.
When the
or
button is pushed for
more than 1.5 seconds while the CD is being
played, the CD will play while forwarding or
rewinding. When the button is released, the CD
will return to the normal play speed.
APS (Automatic Program
Search) FF, APS REW:
When the(APS FF) button is pushed while
the CD is being played, the program next to the
present one will start to play from its beginning.
Push several times to skip through programs.
The CD will advance the number of times the
button is pushed. (When the last program on the
CD is skipped through, the first program will be
Center display, heater, air conditioner, audio, phone and voice recognition systems
4-43
Page 196 of 409
Black plate (196,1)
Model "Z34-D" EDITED: 2009/ 9/ 10
played.) When the
(APS REW) button is
pushed, the program being played returns to its
beginning. Push several times to skip back
through programs. The CD will go back the
number of times the button is pushed.
CD PLAY selection:
To change to another CD already loaded into the
player, push the CD play select buttons
*1
to
*6.
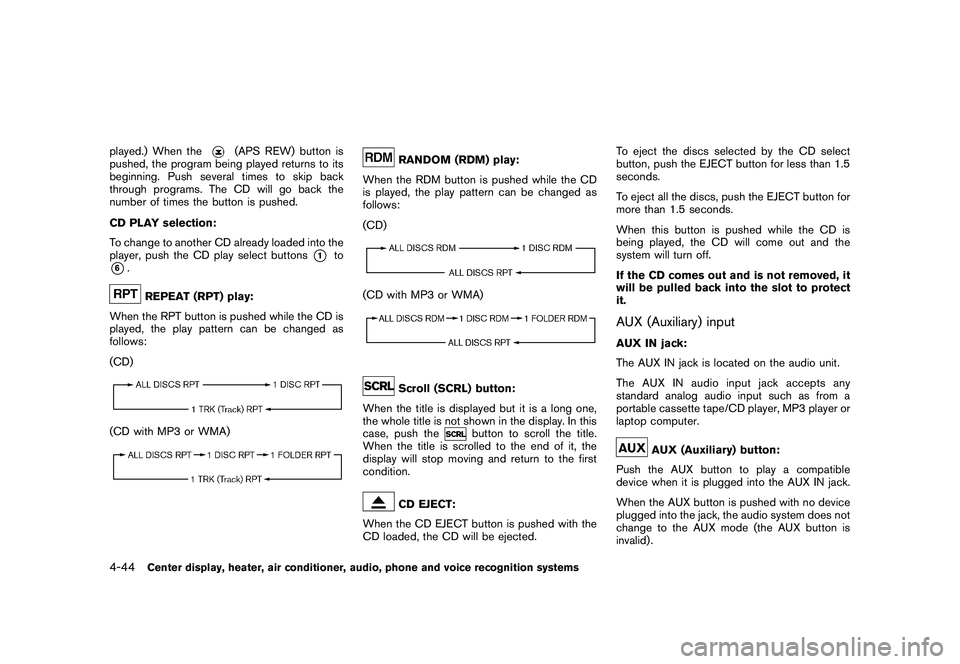
REPEAT (RPT) play:
When the RPT button is pushed while the CD is
played, the play pattern can be changed as
follows:
(CD)
(CD with MP3 or WMA)
RANDOM (RDM) play:
When the RDM button is pushed while the CD
is played, the play pattern can be changed as
follows:
(CD)
(CD with MP3 or WMA)
Scroll (SCRL) button:
When the title is displayed but it is a long one,
the whole title is not shown in the display. In this
case, push the
button to scroll the title.
When the title is scrolled to the end of it, the
display will stop moving and return to the first
condition.
CD EJECT:
When the CD EJECT button is pushed with the
CD loaded, the CD will be ejected. To eject the discs selected by the CD select
button, push the EJECT button for less than 1.5
seconds.
To eject all the discs, push the EJECT button for
more than 1.5 seconds.
When this button is pushed while the CD is
being played, the CD will come out and the
system will turn off.
If the CD comes out and is not removed, it
will be pulled back into the slot to protect
it.
AUX (Auxiliary) inputAUX IN jack:
The AUX IN jack is located on the audio unit.
The AUX IN audio input jack accepts any
standard analog audio input such as from a
portable cassette tape/CD player, MP3 player or
laptop computer.
AUX (Auxiliary) button:
Push the AUX button to play a compatible
device when it is plugged into the AUX IN jack.
When the AUX button is pushed with no device
plugged into the jack, the audio system does not
change to the AUX mode (the AUX button is
invalid) .
4-44
Center display, heater, air conditioner, audio, phone and voice recognition systems