2010 NISSAN 370Z COUPE brake
[x] Cancel search: brakePage 167 of 409
Black plate (167,1)
Model "Z34-D" EDITED: 2009/ 9/ 10
SAA2490
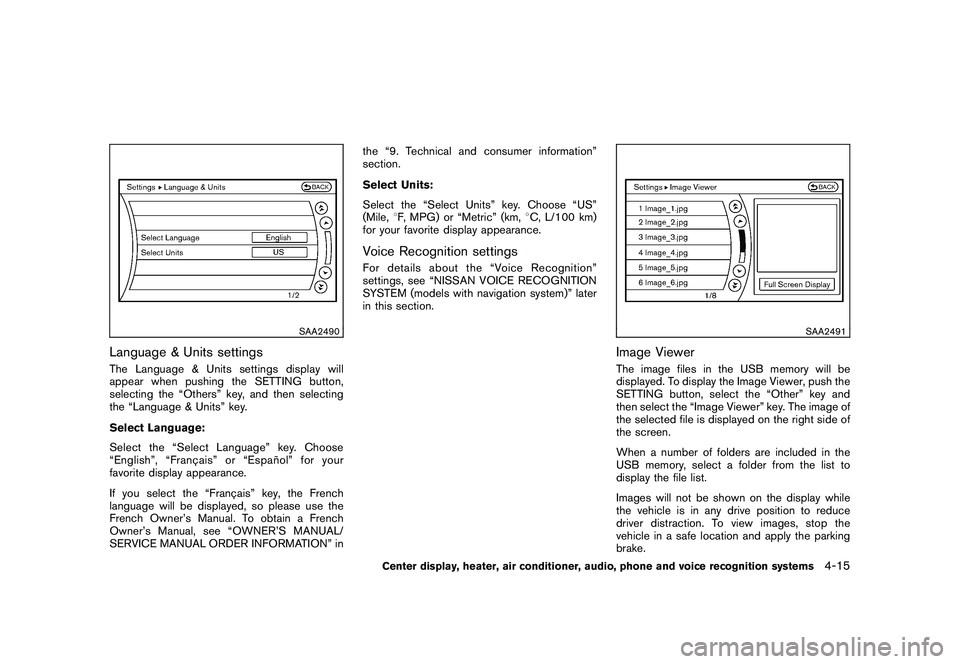
Language & Units settingsThe Language & Units settings display will
appear when pushing the SETTING button,
selecting the “Others” key, and then selecting
the “Language & Units” key.
Select Language:
Select the “Select Language” key. Choose
“English”, “Franc¸ais” or “Espan˜
ol” for your
favorite display appearance.
If you select the “Franc¸ ais” key, the French
language will be displayed, so please use the
French Owner’s Manual. To obtain a French
Owner’s Manual, see “OWNER’S MANUAL/
SERVICE MANUAL ORDER INFORMATION” in the “9. Technical and consumer information”
section.
Select Units:
Select the “Select Units” key. Choose “US”
(Mile,
8F, MPG) or “Metric” (km, 8C, L/100 km)
for your favorite display appearance.
Voice Recognition settingsFor details about the “Voice Recognition”
settings, see “NISSAN VOICE RECOGNITION
SYSTEM (models with navigation system)” later
in this section.
SAA2491
Image ViewerThe image files in the USB memory will be
displayed. To display the Image Viewer, push the
SETTING button, select the “Other” key and
then select the “Image Viewer” key. The image of
the selected file is displayed on the right side of
the screen.
When a number of folders are included in the
USB memory, select a folder from the list to
display the file list.
Images will not be shown on the display while
the vehicle is in any drive position to reduce
driver distraction. To view images, stop the
vehicle in a safe location and apply the parking
brake.
Center display, heater, air conditioner, audio, phone and voice recognition systems
4-15
Page 201 of 409
Black plate (201,1)
Model "Z34-D" EDITED: 2009/ 9/ 10
When the
or
button is pushed for less
than 1.5 seconds while the CD is being played,
the next track or the beginning of the current
track on the CD will be played.
REPEAT (RPT) , RANDOM (RDM):
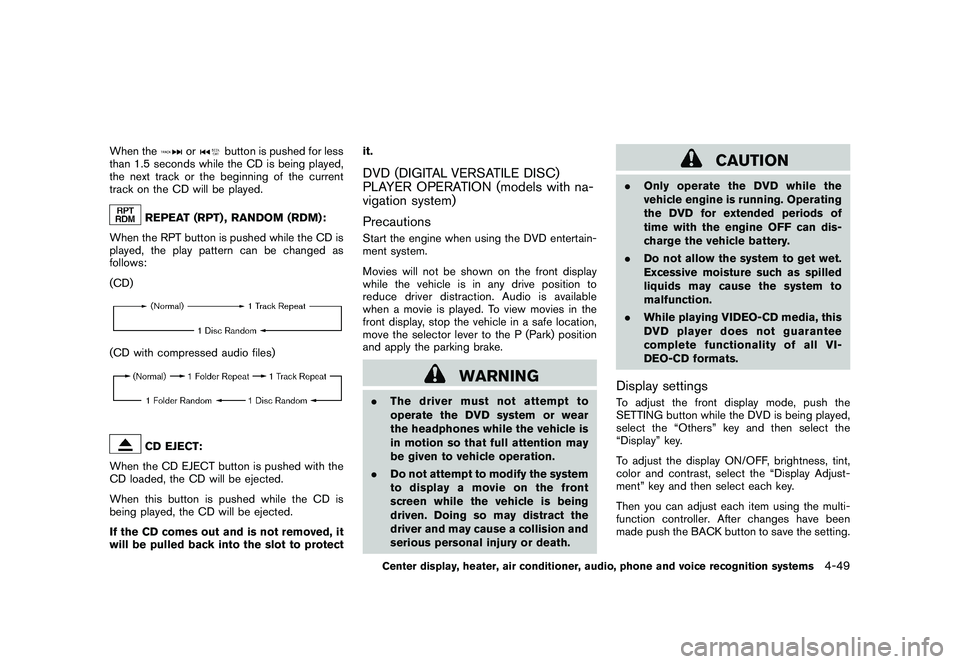
When the RPT button is pushed while the CD is
played, the play pattern can be changed as
follows:
(CD)
(CD with compressed audio files)
CD EJECT:
When the CD EJECT button is pushed with the
CD loaded, the CD will be ejected.
When this button is pushed while the CD is
being played, the CD will be ejected.
If the CD comes out and is not removed, it
will be pulled back into the slot to protect it.
DVD (DIGITAL VERSATILE DISC)
PLAYER OPERATION (models with na-
vigation system)
PrecautionsStart the engine when using the DVD entertain-
ment system.
Movies will not be shown on the front display
while the vehicle is in any drive position to
reduce driver distraction. Audio is available
when a movie is played. To view movies in the
front display, stop the vehicle in a safe location,
move the selector lever to the P (Park) position
and apply the parking brake.
WARNING
.
The driver must not attempt to
operate the DVD system or wear
the headphones while the vehicle is
in motion so that full attention may
be given to vehicle operation.
. Do not attempt to modify the system
to display a movie on the front
screen while the vehicle is being
driven. Doing so may distract the
driver and may cause a collision and
serious personal injury or death.
CAUTION
.Only operate the DVD while the
vehicle engine is running. Operating
the DVD for extended periods of
time with the engine OFF can dis-
charge the vehicle battery.
. Do not allow the system to get wet.
Excessive moisture such as spilled
liquids may cause the system to
malfunction.
. While playing VIDEO-CD media, this
DVD player does not guarantee
complete functionality of all VI-
DEO-CD formats.Display settingsTo adjust the front display mode, push the
SETTING button while the DVD is being played,
select the “Others” key and then select the
“Display” key.
To adjust the display ON/OFF, brightness, tint,
color and contrast, select the “Display Adjust-
ment” key and then select each key.
Then you can adjust each item using the multi-
function controller. After changes have been
made push the BACK button to save the setting.
Center display, heater, air conditioner, audio, phone and voice recognition systems
4-49
Page 246 of 409
Black plate (246,1)
Model "Z34-D" EDITED: 2009/ 9/ 10
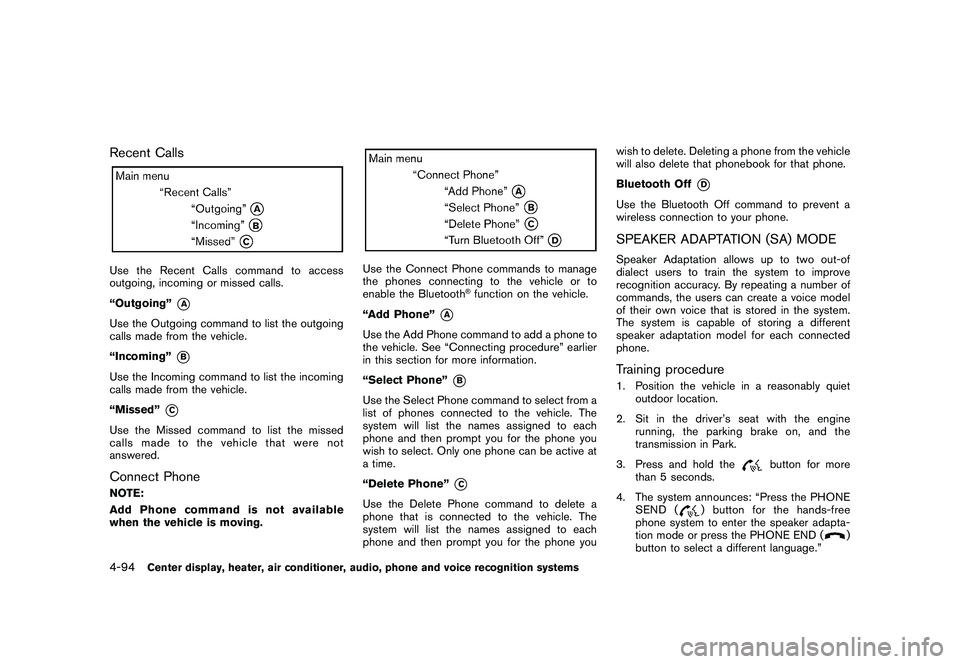
Recent CallsUse the Recent Calls command to access
outgoing, incoming or missed calls.
“Outgoing”
*A
Use the Outgoing command to list the outgoing
calls made from the vehicle.
“Incoming”
*B
Use the Incoming command to list the incoming
calls made from the vehicle.
“Missed”
*C
Use the Missed command to list the missed
calls made to the vehicle that were not
answered.Connect PhoneNOTE:
Add Phone command is not available
when the vehicle is moving.
Use the Connect Phone commands to manage
the phones connecting to the vehicle or to
enable the Bluetooth
®function on the vehicle.
“Add Phone”
*A
Use the Add Phone command to add a phone to
the vehicle. See “Connecting procedure” earlier
in this section for more information.
“Select Phone”
*B
Use the Select Phone command to select from a
list of phones connected to the vehicle. The
system will list the names assigned to each
phone and then prompt you for the phone you
wish to select. Only one phone can be active at
a time.
“Delete Phone”
*C
Use the Delete Phone command to delete a
phone that is connected to the vehicle. The
system will list the names assigned to each
phone and then prompt you for the phone you wish to delete. Deleting a phone from the vehicle
will also delete that phonebook for that phone.
Bluetooth Off
*D
Use the Bluetooth Off command to prevent a
wireless connection to your phone.SPEAKER ADAPTATION (SA) MODESpeaker Adaptation allows up to two out-of
dialect users to train the system to improve
recognition accuracy. By repeating a number of
commands, the users can create a voice model
of their own voice that is stored in the system.
The system is capable of storing a different
speaker adaptation model for each connected
phone.Training procedure1. Position the vehicle in a reasonably quiet
outdoor location.
2. Sit in the driver’s seat with the engine running, the parking brake on, and the
transmission in Park.
3. Press and hold the
button for more
than 5 seconds.
4. The system announces: “Press the PHONE SEND (
) button for the hands-free
phone system to enter the speaker adapta-
tion mode or press the PHONE END (
)
button to select a different language.”
4-94
Center display, heater, air conditioner, audio, phone and voice recognition systems
Page 275 of 409

Black plate (16,1)
5 Starting and driving
Model "Z34-D" EDITED: 2009/ 9/ 10
Precautions when starting and driving..................... 5-2
Exhaust gas (carbon monoxide) ......................... 5-2
Three-way catalyst .......................................... 5-2
Tire Pressure Monitoring System (TPMS) ............. 5-3
Avoiding collision and rollover ........................... 5-5
Off-road recovery ........................................... 5-6
Rapid air pressure loss .................................... 5-6
Drinking alcohol/drugs and driving ...................... 5-7
Push-button ignition switch .................................. 5-7
Operating range for engine start function ............. 5-8
Push-button ignition switch operation. ................. 5-8
Push-button ignition switch positions .................. 5-9
Intelligent Key battery discharge ...................... 5-10
Before starting the engine .................................. 5-10
Starting the engine ........................................... 5-11
Driving the vehicle ............................................ 5-12
Automatic transmission .................................. 5-12
Manual Transmission ..................................... 5-16
Parking brake .................................................. 5-20
Cruise control ................................................. 5-20
Precautions on cruise control .......................... 5-20
Cruise control operations ............................... 5-21 Break-in schedule
............................................ 5-22
Increasing fuel economy .................................... 5-23
Parking/parking on hills ...................................... 5-23
Power steering ................................................ 5-24
Brake system .................................................. 5-25
Braking precautions ...................................... 5-25
Parking brake break-in ................................... 5-25
Brake assist .................................................... 5-26
Brake assist ................................................ 5-26
Anti-lock Braking System (ABS) ...................... 5-26
Vehicle Dynamic Control (VDC) system ................. 5-27
Performance dampers (NISMO models) ................ 5-29
Cold weather driving ......................................... 5-30
Freeing a frozen door lock .............................. 5-30
Antifreeze ................................................... 5-30
Battery ...................................................... 5-30
Draining of coolant water ............................... 5-30
Tire equipment ............................................ 5-30
Special winter equipment ............................... 5-30
Driving on snow or ice .................................. 5-30
Engine block heater (if so equipped) ................. 5-31
Page 280 of 409
Black plate (280,1)
Model "Z34-D" EDITED: 2009/ 9/ 10
significantly more likely to be injured or
killed than a person properly wearing a
seat belt.OFF-ROAD RECOVERYWhile driving, the right side or left side wheels
may unintentionally leave the road surface. If this
occurs, maintain control of the vehicle by
following the procedure below. Please note that
this procedure is only a general guide. The
vehicle must be driven as appropriate based on
the conditions of the vehicle, road and traffic.
1. Remain calm and do not overreact.
2. Do not apply the brakes.
3. Maintain a firm grip on the steering wheelwith both hands and try to hold a straight
course.
4. When appropriate, slowly release the accel- erator pedal to gradually slow the vehicle.
5. If there is nothing in the way, steer the vehicle to follow the road while the vehicle
speed is reduced. Do not attempt to drive
the vehicle back onto the road surface until
vehicle speed is reduced.
6. When it is safe to do so, gradually turn the steering wheel until both tires return to the
road surface. When all tires are on the road
surface, steer the vehicle to stay in the appropriate driving lane.
.
If you decide that it is not safe to return
the vehicle to the road surface based on
vehicle, road or traffic conditions, gra-
dually slow the vehicle to a stop in a safe
place off the road.
RAPID AIR PRESSURE LOSSRapid air pressure loss or a “blow-out” can
occur if the tire is punctured or is damaged due
to hitting a curb or pothole. Rapid air pressure
loss can also be caused by driving on under-
inflated tires.
Rapid air pressure loss can affect the handling
and stability of the vehicle, especially at highway
speeds.
Help prevent rapid air pressure loss by main-
taining the correct air pressure and visually
inspect the tires for wear and damage. See
“WHEELS AND TIRES” in the “8. Maintenance
and do-it-yourself” section of this manual.
If a tire rapidly loses air pressure or “blows-out”
while driving maintain control of the vehicle by
following the procedure below. Please note that
this procedure is only a general guide. The
vehicle must be driven as appropriate based on
the conditions of the vehicle, road and traffic.
WARNING
The following actions can increase the
chance of losing control of the vehicle if
there is a sudden loss of tire air
pressure. Losing control of the vehicle
may cause a collision and result in
personal injury.
. The vehicle generally moves or pulls
in the direction of the flat tire.
. Do not rapidly apply the brakes.
. Do not rapidly release the accelera-
tor pedal.
. Do not rapidly turn the steering
wheel.
1. Remain calm and do not overreact.
2. Maintain a firm grip on the steering wheel with both hands and try to hold a straight
course.
3. When appropriate, slowly release the accel- erator pedal to gradually slow the vehicle.
4. Gradually steer the vehicle to a safe location off the road and away from traffic if possible.
5. Lightly apply the brake pedal to gradually stop the vehicle.
5-6
Starting and driving
Page 282 of 409
Black plate (282,1)
Model "Z34-D" EDITED: 2010/ 3/ 25
SSD0825
OPERATING RANGE FOR ENGINE
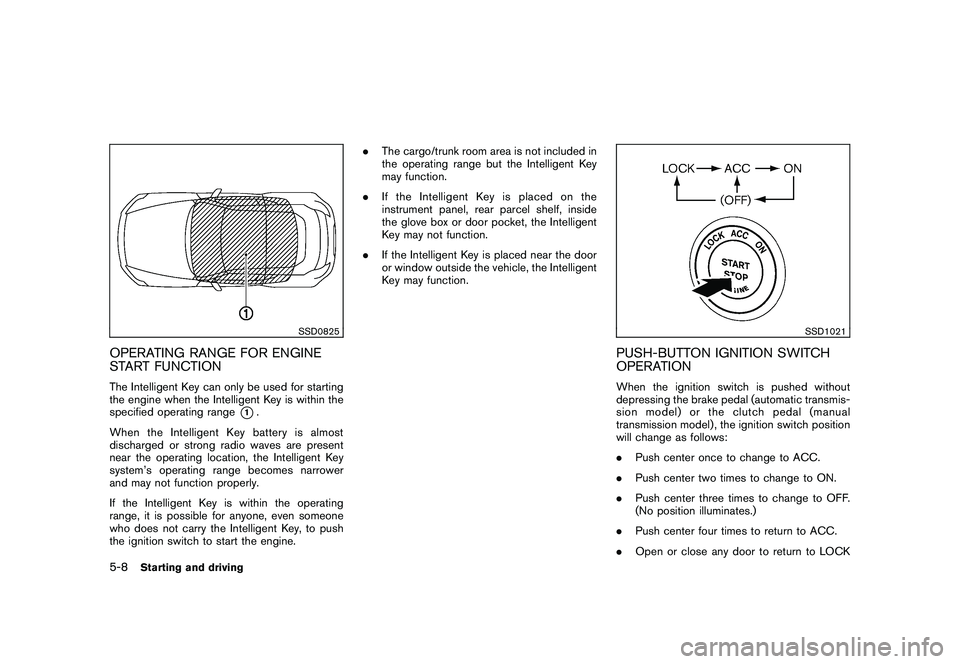
START FUNCTIONThe Intelligent Key can only be used for starting
the engine when the Intelligent Key is within the
specified operating range
*1.
When the Intelligent Key battery is almost
discharged or strong radio waves are present
near the operating location, the Intelligent Key
system’s operating range becomes narrower
and may not function properly.
If the Intelligent Key is within the operating
range, it is possible for anyone, even someone
who does not carry the Intelligent Key, to push
the ignition switch to start the engine. .
The cargo/trunk room area is not included in
the operating range but the Intelligent Key
may function.
. If the Intelligent Key is placed on the
instrument panel, rear parcel shelf, inside
the glove box or door pocket, the Intelligent
Key may not function.
. If the Intelligent Key is placed near the door
or window outside the vehicle, the Intelligent
Key may function.
SSD1021
PUSH-BUTTON IGNITION SWITCH
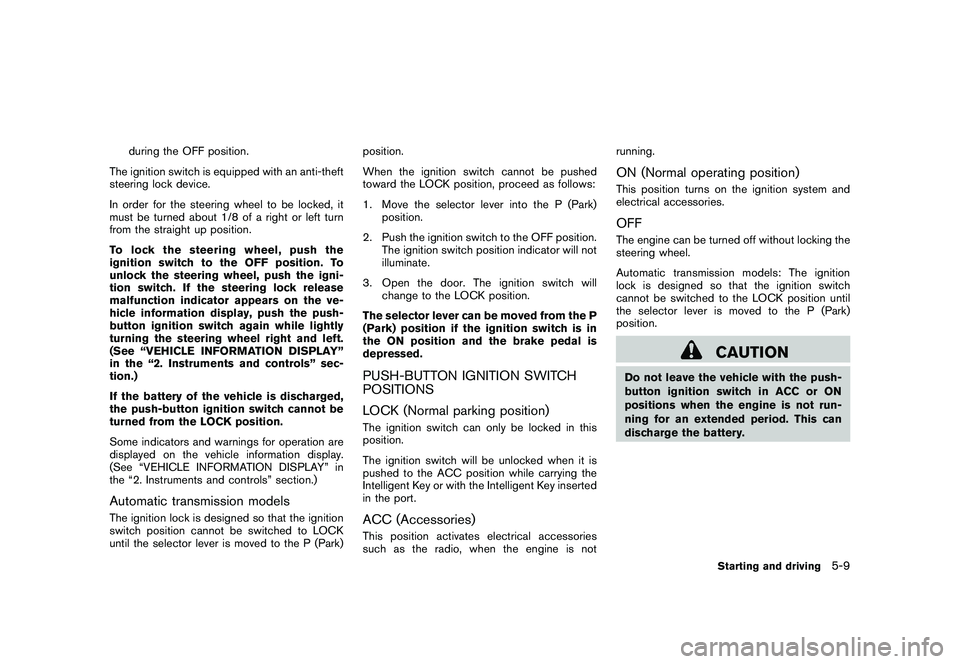
OPERATIONWhen the ignition switch is pushed without
depressing the brake pedal (automatic transmis-
sion model) or the clutch pedal (manual
transmission model) , the ignition switch position
will change as follows:
.Push center once to change to ACC.
. Push center two times to change to ON.
. Push center three times to change to OFF.
(No position illuminates.)
. Push center four times to return to ACC.
. Open or close any door to return to LOCK
5-8
Starting and driving
Page 283 of 409
Black plate (283,1)
Model "Z34-D" EDITED: 2009/ 9/ 10
during the OFF position.
The ignition switch is equipped with an anti-theft
steering lock device.
In order for the steering wheel to be locked, it
must be turned about 1/8 of a right or left turn
from the straight up position.
To lock the steering wheel, push the
ignition switch to the OFF position. To
unlock the steering wheel, push the igni-
tion switch. If the steering lock release
malfunction indicator appears on the ve-
hicle information display, push the push-
button ignition switch again while lightly
turning the steering wheel right and left.
(See “VEHICLE INFORMATION DISPLAY”
in the “2. Instruments and controls” sec-
tion.)
If the battery of the vehicle is discharged,
the push-button ignition switch cannot be
turned from the LOCK position.
Some indicators and warnings for operation are
displayed on the vehicle information display.
(See “VEHICLE INFORMATION DISPLAY” in
the “2. Instruments and controls” section.)
Automatic transmission modelsThe ignition lock is designed so that the ignition
switch position cannot be switched to LOCK
until the selector lever is moved to the P (Park) position.
When the ignition switch cannot be pushed
toward the LOCK position, proceed as follows:
1. Move the selector lever into the P (Park)
position.
2. Push the ignition switch to the OFF position. The ignition switch position indicator will not
illuminate.
3. Open the door. The ignition switch will change to the LOCK position.
The selector lever can be moved from the P
(Park) position if the ignition switch is in
the ON position and the brake pedal is
depressed.
PUSH-BUTTON IGNITION SWITCH
POSITIONS
LOCK (Normal parking position)The ignition switch can only be locked in this
position.
The ignition switch will be unlocked when it is
pushed to the ACC position while carrying the
Intelligent Key or with the Intelligent Key inserted
in the port.ACC (Accessories)This position activates electrical accessories
such as the radio, when the engine is not running.
ON (Normal operating position)This position turns on the ignition system and
electrical accessories.OFFThe engine can be turned off without locking the
steering wheel.
Automatic transmission models: The ignition
lock is designed so that the ignition switch
cannot be switched to the LOCK position until
the selector lever is moved to the P (Park)
position.
CAUTION
Do not leave the vehicle with the push-
button ignition switch in ACC or ON
positions when the engine is not run-
ning for an extended period. This can
discharge the battery.
Starting and driving
5-9
Page 284 of 409
Black plate (284,1)
Model "Z34-D" EDITED: 2009/ 9/ 10
SSD0826
INTELLIGENT KEY BATTERY DIS-
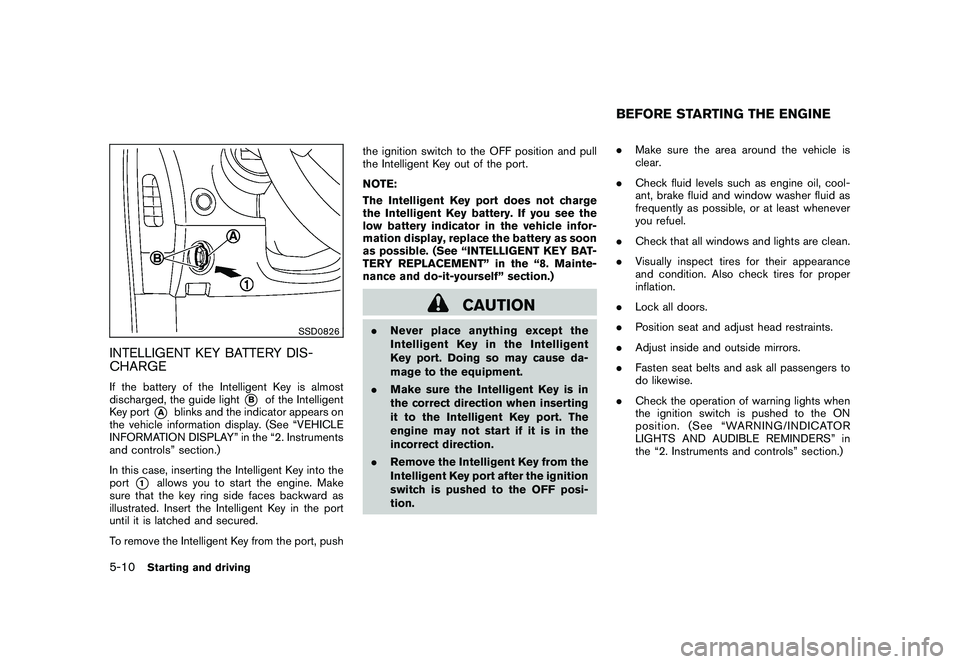
CHARGEIf the battery of the Intelligent Key is almost
discharged, the guide light
*B
of the Intelligent
Key port
*A
blinks and the indicator appears on
the vehicle information display. (See “VEHICLE
INFORMATION DISPLAY” in the “2. Instruments
and controls” section.)
In this case, inserting the Intelligent Key into the
port
*1
allows you to start the engine. Make
sure that the key ring side faces backward as
illustrated. Insert the Intelligent Key in the port
until it is latched and secured.
To remove the Intelligent Key from the port, push the ignition switch to the OFF position and pull
the Intelligent Key out of the port.
NOTE:
The Intelligent Key port does not charge
the Intelligent Key battery. If you see the
low battery indicator in the vehicle infor-
mation display, replace the battery as soon
as possible. (See “INTELLIGENT KEY BAT-
TERY REPLACEMENT” in the “8. Mainte-
nance and do-it-yourself” section.)
CAUTION
.
Never place anything except the
Intelligent Key in the Intelligent
Key port. Doing so may cause da-
mage to the equipment.
. Make sure the Intelligent Key is in
the correct direction when inserting
it to the Intelligent Key port. The
engine may not start if it is in the
incorrect direction.
. Remove the Intelligent Key from the
Intelligent Key port after the ignition
switch is pushed to the OFF posi-
tion. .
Make sure the area around the vehicle is
clear.
. Check fluid levels such as engine oil, cool-
ant, brake fluid and window washer fluid as
frequently as possible, or at least whenever
you refuel.
. Check that all windows and lights are clean.
. Visually inspect tires for their appearance
and condition. Also check tires for proper
inflation.
. Lock all doors.
. Position seat and adjust head restraints.
. Adjust inside and outside mirrors.
. Fasten seat belts and ask all passengers to
do likewise.
. Check the operation of warning lights when
the ignition switch is pushed to the ON
position. (See “WARNING/INDICATOR
LIGHTS AND AUDIBLE REMINDERS” in
the “2. Instruments and controls” section.)
BEFORE STARTING THE ENGINE
5-10
Starting and driving