Page 547 of 714

5-120 Comfort controls
5Steering wheel audio remote control switch
(if so equipped)
N00714800400
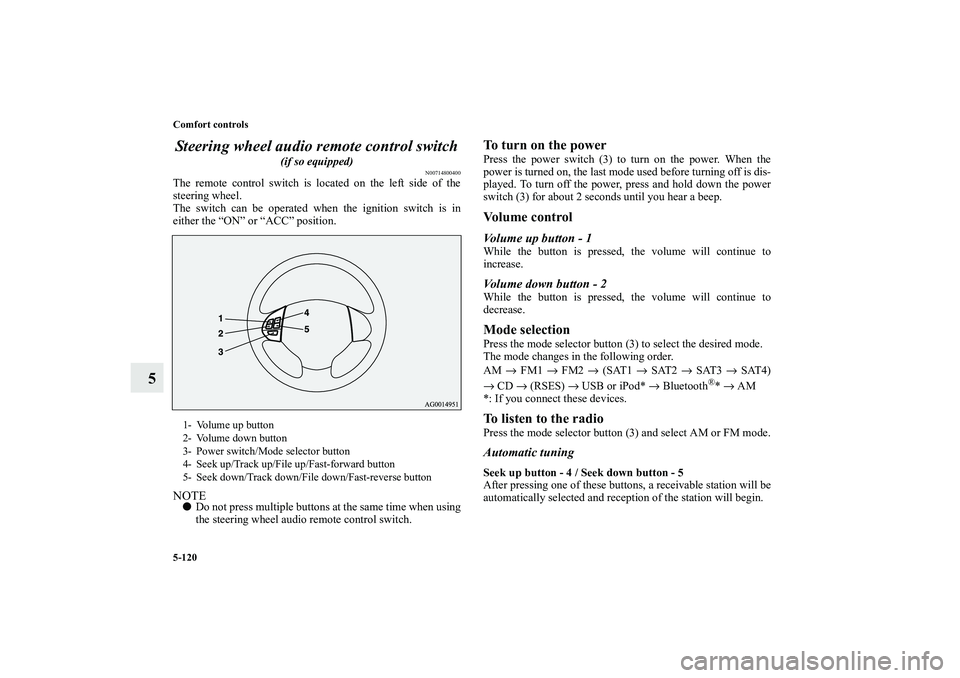
The remote control switch is located on the left side of the
steering wheel.
The switch can be operated when the ignition switch is in
either the “ON” or “ACC” position.NOTE�
Do not press multiple buttons at the same time when using
the steering wheel audio remote control switch.
To turn on the powerPress the power switch (3) to turn on the power. When the
power is turned on, the last mode used before turning off is dis-
played. To turn off the power, press and hold down the power
switch (3) for about 2 seconds until you hear a beep.Vo l u m e c o n t r o lVolume up button - 1While the button is pressed, the volume will continue to
increase.Volume down button - 2While the button is pressed, the volume will continue to
decrease.Mode selectionPress the mode selector button (3) to select the desired mode.
The mode changes in the following order.
AM → FM1 → FM2 → (SAT1 → SAT2 → SAT3 → SAT4)
→ CD → (RSES) → USB or iPod* → Bluetooth
®* → AM
*: If you connect these devices.
To listen to the radioPress the mode selector button (3) and select AM or FM mode.Automatic tuningSeek up button - 4 / Seek down button - 5
After pressing one of these buttons, a receivable station will be
automatically selected and reception of the station will begin.
1- Volume up button
2- Volume down button
3- Power switch/Mode selector button
4- Seek up/Track up/File up/Fast-forward button
5- Seek down/Track down/File down/Fast-reverse button
BK0115300US.book 120 ページ 2009年7月16日 木曜日 午前9時13分
Page 584 of 714
For emergencies
6-15
6
3. Open the lower gate.
Refer to “Flap-fold tailgate: To open” on page 3-60.
4. With the wheel nut wrench, firmly tighten the tire hanger
mounting bolt by turning it clockwise.
5. Install the cover over the tire hanger mounting bolt.
To change a tire
N00849800418
1. On vehicles with wheel covers, first remove the covers
(refer to “Wheel covers” on page 6-23). Then, loosen the
wheel nuts with the wheel nut wrench. Do not remove the
wheel nuts yet.
CAUTION
!�
Confirm that the tire hanger is firmly secured after
storing the spare tire. If the tire hanger is not
secured, it could drop out while driving, causing an
accident.
�
When hooking or unhooking the tire hanger, be sure
to hold the tire hanger firmly to prevent it from
dropping on your foot.
BK0115300US.book 15 ページ 2009年7月16日 木曜日 午前9時13分
Page 585 of 714
6-16 For emergencies
6
2. Place the jack under one of the jacking points (A) shown
in the illustration. Use the jacking point closest to the tire
you wish to change.
NOTE�
Put the spare wheel under the vehicle body near the jack.
This makes it safer if the jack slips out of position.
WA R N I N G
!�
Set the jack only at the positions shown here. If the
jack is set at a wrong position, it could dent your
vehicle or the jack might fall over and cause per-
sonal injury.
�
Do not use the jack on a tilted or soft surface.
Otherwise, the jack might slip and cause personal
injury. Always use the jack on a flat, hard surface.
Before setting the jack, make sure there are no sand
or pebbles under the jack base.
BK0115300US.book 16 ページ 2009年7月16日 木曜日 午前9時13分
Page 586 of 714
For emergencies
6-17
6
3. Rotate the jack by hand until the flange portion (B) fits in
the groove (C) at the top of the jack.4. Insert the bar (D) into the wheel nut wrench (E). Then put
the end of the bar into the shaft’s jack end, as shown in the
illustration.
Slowly rotate the wheel nut wrench until the tire is raised
slightly off the ground surface.
WA R N I N G
!�
Stop jacking up the vehicle as soon as the tire is
raised off the ground. It is dangerous to raise the
vehicle any higher.
�
Do not get under your vehicle while using the jack.
�
Do not bump the raised vehicle or leave it sitting on
the jack for a long time. Both are very dangerous.
�
Do not use a jack except the one that came with your
vehicle.
�
The jack should not be used for any purpose other
than to change a tire.
BK0115300US.book 17 ページ 2009年7月16日 木曜日 午前9時13分
Page 589 of 714
6-20 For emergencies
6
[Vehicle with aluminum wheels]
Normal wheels
Temporarily tighten the wheel nuts (flange nuts) until
their flange section comes in contact with the wheel and
it is no longer loose. Compact spare wheel
Install the wheel nuts with their tapered ends facing
inward, then tighten by hand until the wheel is no longer
loose.
NOTE�
Flange nuts can be temporarily used on the compact spare
or steel wheel, but return them to the original wheel and
tire as soon as possible.
�
If all 4 wheels are changed to steel wheels, use tapered
nuts.
CAUTION
!�
Never apply oil to either the wheel bolts or the nuts
or they will tighten too much.
BK0115300US.book 20 ページ 2009年7月16日 木曜日 午前9時13分
Page 615 of 714
7-18 Vehicle care and maintenance
7Transfer oil (All-wheel drive models)
N00938400196
Whenever the transfer oil level is checked, add oil as necessary
to maintain the proper level. Fill or change the oil according to
the table.Fluid type
Rear axle oil (All-wheel drive models)
N00915200197
Whenever the oil level is checked, add oil as necessary to
maintain the proper level.
Fill or change oil according to the table.Fluid type
Lubricant Hypoid gear oil API classification GL-5
Viscosity range SAE 80 or 90
Lubricant Hypoid gear oil API classification GL-5
Viscosity range SAE 80
BK0115300US.book 18 ページ 2009年7月16日 木曜日 午前9時13分
Page 624 of 714

Vehicle care and maintenance
7-27
7
Tire inflation pressures
N00939300727
Proper tire inflation pressure is essential for the safe and satis-
factory operation of your vehicle. The wrong tire pressure will
cause problems in three major areas:�
Safety
Too little pressure increases flexing in the tire and can
cause tire failure. Too much pressure can cause a tire to
lose its ability to cushion shock. Objects on the road and
potholes could then cause tire damage that may result in
tire failure.
�
Economy
The wrong tire pressure can cause uneven wear patterns in
the tire tread. These abnormal wear patterns will reduce
the tread life, and the tire will have to be replaced sooner.
Too little pressure also makes it harder for the tire to roll,
and this uses up more fuel.
�
Ride comfort and vehicle stability
The superior riding experience built into your vehicle
partly depends on the correct tire pressure. Too much
pressure gives an uncomfortable and jarring ride. Too lit-
tle pressure feels as if your vehicle is slow to respond.
Unequal tire pressures can make steering your vehicle
uneven and unpredictable.
The tire pressure for your vehicle under normal driving condi-
tions is listed on the placard attached to the driver’s door sill.
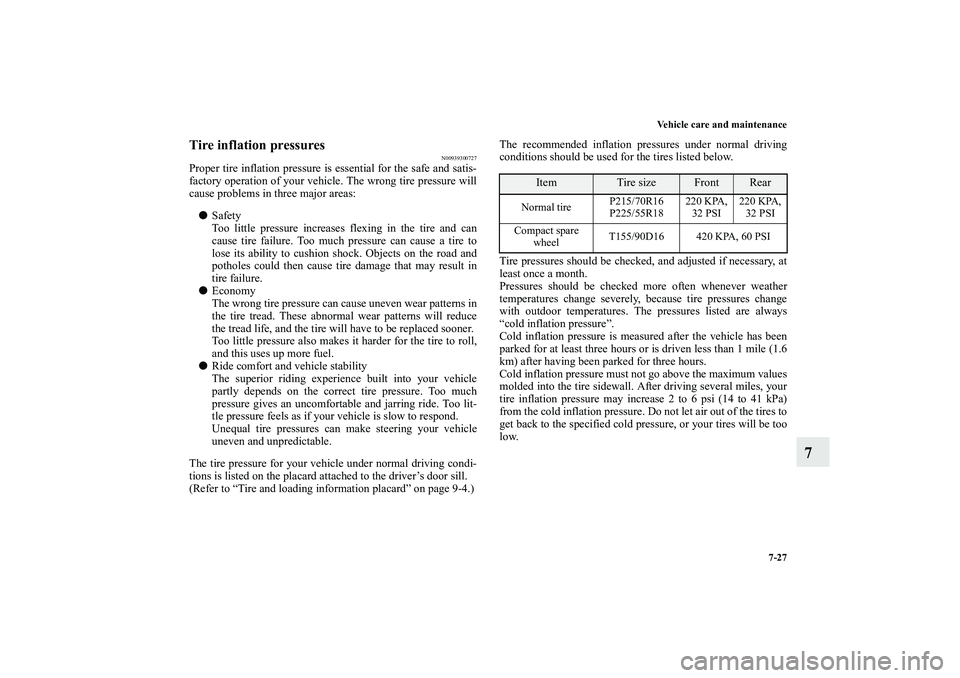
(Refer to “Tire and loading information placard” on page 9-4.)The recommended inflation pressures under normal driving
conditions should be used for the tires listed below.
Tire pressures should be checked, and adjusted if necessary, at
least once a month.
Pressures should be checked more often whenever weather
temperatures change severely, because tire pressures change
with outdoor temperatures. The pressures listed are always
“cold inflation pressure”.
Cold inflation pressure is measured after the vehicle has been
parked for at least three hours or is driven less than 1 mile (1.6
km) after having been parked for three hours.
Cold inflation pressure must not go above the maximum values
molded into the tire sidewall. After driving several miles, your
tire inflation pressure may increase 2 to 6 psi (14 to 41 kPa)
from the cold inflation pressure. Do not let air out of the tires to
get back to the specified cold pressure, or your tires will be too
low.
Item
Tire size
Front
Rear
Normal tireP215/70R16
P225/55R18220 KPA,
32 PSI220 KPA,
32 PSI
Compact spare
wheelT155/90D16 420 KPA, 60 PSI
BK0115300US.book 27 ページ 2009年7月16日 木曜日 午前9時13分
Page 704 of 714

Alphabetical index
1
A
Accessory (installation) 1-7
Active stability control (ASC) 3-135
Air bag 2-60
Air cleaner filter 7-13
Air conditioning
Automatic air conditioning 5-25
,5-35
Important air conditioning operating tips 5-45
Manual air conditioning 5-6
,5-16
Air purifier 5-46
All-wheel drive operation 3-121
Aluminum wheels 7-86
Antenna
Roof antenna 5-134
,5-135
Anti-lock braking system 3-131
Arm rest 2-15
Assist grip 3-293
Audio
AM/FM electronically tuned radio with CD autochanger 5-
66
AM/FM electronically tuned radio with CD player 5-46
Error codes 5-123
,5-125
External audio input function 5-118
Handling of compact discs 5-131
Steering wheel audio remote control switch 5-120
To listen to a disc in the rear-seat display 5-119
Automatic air conditioning 5-25
,5-35
Automatic transaxle 3-93Fluid 7-16
,9-11
Selector lever operation 3-94
Selector lever positions 3-98
Sports mode 3-99
B
Back-up light
Bulb capacity 7-51
Replacement 7-69
Ball joint, steering linkage seals, drive shaft boots 7-37
Battery 7-21
Charging system warning light 3-210
Checking battery electrolyte level 7-21
Disconnection and connection 7-22
During cold weather 7-21
Specification 9-10
Bluetooth 2.0 interface 3-236
Bottle holders 3-289
Brake
Fluid 9-11
Braking
Anti-lock braking system 3-131
Braking 4-6
Hose 7-37
Pad wear alarm 3-128
Parking brake 3-80
Pedal 3-127
Pedal free play 7-32
Power brakes 3-127
BK0115300US.book 1 ページ 2009年7月16日 木曜日 午前9時13分