Page 429 of 670
5-40 Comfort controls
5
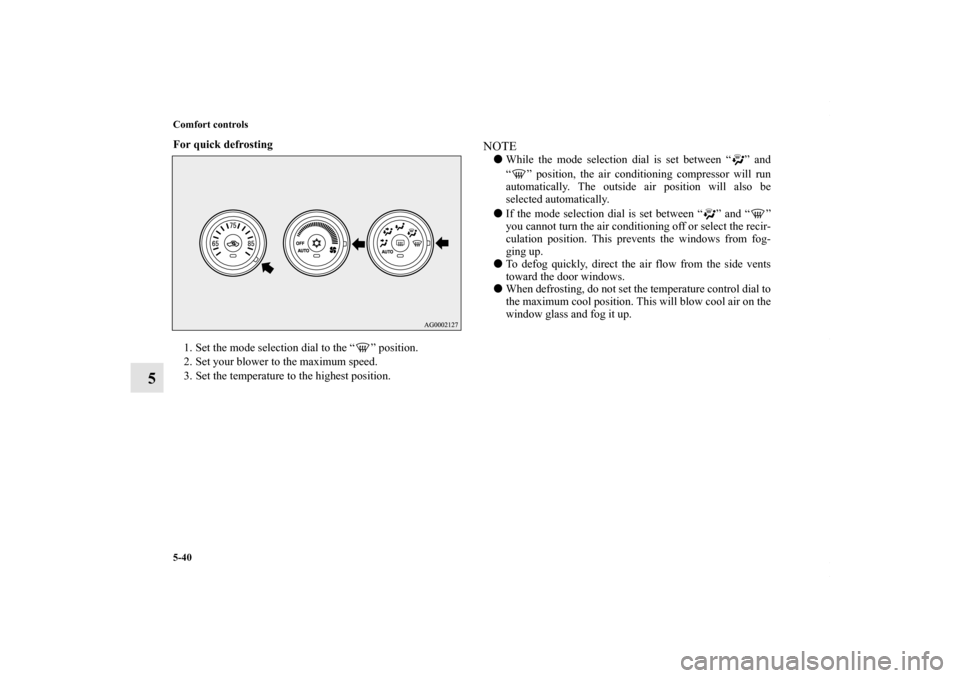
For quick defrosting
1. Set the mode selection dial to the “ ” position.
2. Set your blower to the maximum speed.
3. Set the temperature to the highest position.
NOTE�While the mode selection dial is set between “ ” and
“ ” position, the air conditioning compressor will run
automatically. The outside air position will also be
selected automatically.
�If the mode selection dial is set between “ ” and “ ”
you cannot turn the air conditioning off or select the recir-
culation position. This prevents the windows from fog-
ging up.
�To defog quickly, direct the air flow from the side vents
toward the door windows.
�When defrosting, do not set the temperature control dial to
the maximum cool position. This will blow cool air on the
window glass and fog it up.
BK0102103US.book 40 ページ 2009年10月26日 月曜日 午後1時38分
Page 439 of 670
5-50 Comfort controls
5
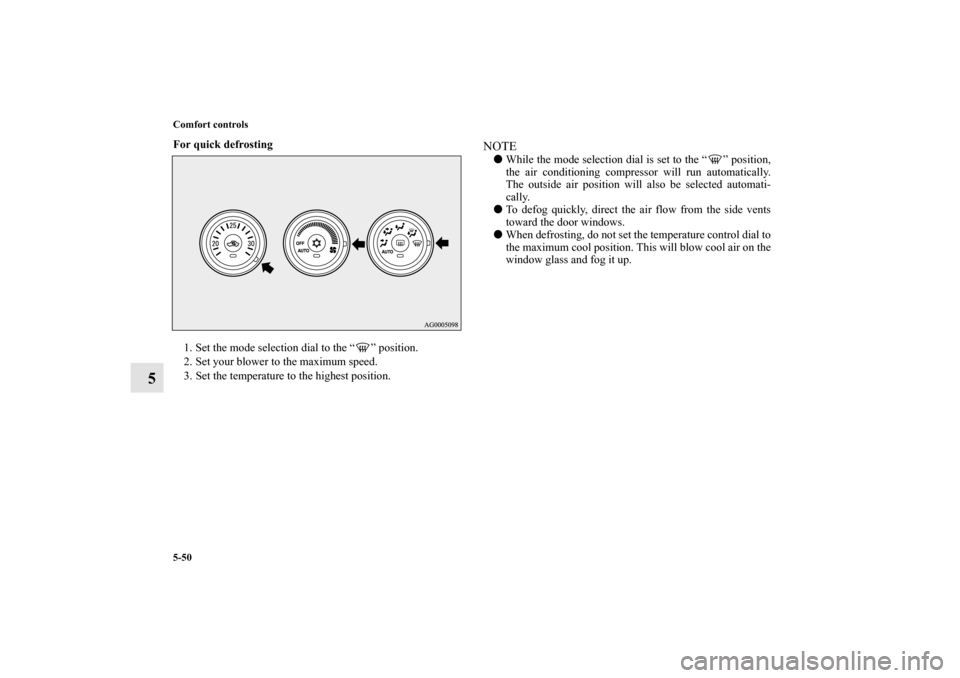
For quick defrosting
1. Set the mode selection dial to the “ ” position.
2. Set your blower to the maximum speed.
3. Set the temperature to the highest position.
NOTE�While the mode selection dial is set to the “ ” position,
the air conditioning compressor will run automatically.
The outside air position will also be selected automati-
cally.
�To defog quickly, direct the air flow from the side vents
toward the door windows.
�When defrosting, do not set the temperature control dial to
the maximum cool position. This will blow cool air on the
window glass and fog it up.
BK0102103US.book 50 ページ 2009年10月26日 月曜日 午後1時38分
Page 509 of 670

5-120 Comfort controls
5
�In the following circumstances, moisture can form on
discs and inside the audio system, preventing normal
operation.
• When there is high humidity (for example, when it is
raining).
• When the temperature suddenly rises, such as right after
the heater is turned on in cold weather.
In this case, wait until the moisture has had time to dry
out.
�When the CD player is subjected to violent vibrations,
such as during off-road driving, the tracking may not
work.
�When storing compact discs, always store them in their
separate cases. Never place compact discs in direct sun-
light, or in any place where the temperature or humidity is
high.
�Never touch the flat surface of the disc where there isn’t a
label. This will damage the disc surface and could affect
the sound quality. When handling a compact disc, always
hold it by the outer edge and the center hole.�To clean a disc, use a soft, clean, dry cloth. Wipe directly
from the center hole toward the outer edge. Do not wipe in
a circle. Never use any chemicals such as benzine, paint
thinner, a disc spray cleaner, or an anti-static agent on the
disc.
�Do not use a ball point pen, felt pen, pencil, etc. to write
on the label surface of the disc.
BK0102103US.book 120 ページ 2009年10月26日 月曜日 午後1時38分
Page 511 of 670
5-122 Comfort controls
5Antenna
N00734200396
Roof antenna (except for vehicles with SIRIUS
satellite radio)When listening to the radio, fold the antenna toward the rear of
the vehicle until you hear it click.
To removeTurn the pole (A) counterclockwise.To i n s t a l lScrew the pole (A) clockwise into the base (B) until it is
securely retained.NOTE�Be sure to remove the roof antenna in the following cases:
• When using an automatic car wash
• When covering your vehicle with a car cover
�Before driving into a structure that has a low ceiling, fold
down the antenna toward the front of the vehicle to pre-
vent it from hitting the ceiling.
BK0102103US.book 122 ページ 2009年10月26日 月曜日 午後1時38分
Page 518 of 670
6
For emergencies
If the vehicle breaks down . . . . . . . . . . . . . . . . . . .6- 2
Jump-starting the engine . . . . . . . . . . . . . . . . . . . .6- 2
Engine overheating . . . . . . . . . . . . . . . . . . . . . . . .6- 5
Tools and jack . . . . . . . . . . . . . . . . . . . . . . . . . . . .6- 7
How to change a tire . . . . . . . . . . . . . . . . . . . . . . .6- 9
Towing . . . . . . . . . . . . . . . . . . . . . . . . . . . . . . . . . .6- 22
Operation under adverse driving conditions . . . . .6- 24
BK0102103US.book 1 ページ 2009年10月26日 月曜日 午後1時38分
Page 519 of 670

6-2 For emergencies
6If the vehicle breaks down
N00836300145
If your vehicle breaks down on the road, move to the shoulder
and turn on the hazard warning flashers. If there is no shoulder,
or the shoulder is not safe, drive in the right lane slowly, with
the hazard lights flashing, until you come to a safe stopping
place. Keep the flashers flashing. If the engine stops/fails If the engine stops, there will be no power assist to the steering
and brakes, making these difficult to use.
�The brake booster will not work, so the brakes will not
grip well. The brake pedal will be harder to press than
usual.
�Since there is no power steering assist, the steering wheel
will be hard to turn. Turning the steering wheel requires
more effort than usual. When the engine fails at the intersection Get help from your passengers, bystanders, etc. to push the
vehicle and move it to a safe zone.
Jump-starting the engine
N00836400641
If the engine cannot be started because the battery is weak or
dead, you can start it with the battery from another vehicle
using jumper cables.
1. Take off any metal jewelry such as watch bands or brace-
lets that might make an accidental electrical contact.
2. Position the vehicles close enough together so that the
jumper cables can reach, but be sure the vehicles aren’t
touching each other.
WARNING
!�When using jumper cables to start a vehicle, follow
the procedures and be very cautious.
CAUTION
!�Do not try to start your vehicle by pushing or tow-
ing. Vehicles with continuously variable transmis-
sion (CVT) or Twin Clutch SST cannot be started
this way. Pushing or towing a vehicle that has a
manual transaxle may overheat and damage the cat-
alytic converter. Also, there is more risk of an acci-
dent when a vehicle is being pushed or towed.
CAUTION
!�Check the other vehicle. It must have a 12-volt bat-
tery. If the other system isn’t 12-volt, both systems
can be damaged.
BK0102103US.book 2 ページ 2009年10月26日 月曜日 午後1時38分
Page 524 of 670
For emergencies
6-7
6 Tools and jack
N00836600265
StorageThe tools and jack are stowed in the trunk.
Tools
N00832600124
1- Tools
2- Jack
1- Tool bag
2- Bar
3- Wheel nut wrench
BK0102103US.book 7 ページ 2009年10月26日 月曜日 午後1時38分
Page 527 of 670

6-10 For emergencies
6
NOTE�The chocks shown in the illustration do not come with
your vehicle. It is recommended that you purchase chocks
or blocks and keep them in the vehicle for use if needed.
�If chocks or blocks are not available, use stones or any
other objects that are large enough to hold the wheel in
position.
6. Get the jack, bar and wheel nut wrench ready.
Refer to “Tools and jack” on page 6-7.
Spare tire information
N00849600298
Compact spare tireThe compact spare tire is designed to save space in the trunk.
Its lighter weight makes it easier to use if a flat tire occurs.
WARNING
!�Be sure to apply chocks or blocks to the correct tire
when jacking up the vehicle. If the vehicle moves
while jacked up, the jack could slip out of position,
leading to an accident.
WARNING
!�Tires, including spare tire, degrade over time with
age even when they are not being used. It is recom-
mended that tires over 6 years generally be replaced
even if damage is not obvious.
CAUTION
!�While the compact spare tire is stowed, the inflation
pressure should be checked at least once a month to
assure that it remains at the recommended inflation
pressure. See the tire and loading information plac-
ard attached to the driver’s door sill.
Refer to “Tire and loading information placard” on
page 9-4.�Driving with an improperly inflated tire can cause
an accident. If you have no choice but to drive with
an under-inflated tire, keep your speed down and
avoid sudden steering or braking, if possible. Inflate
the tire to the correct pressure as soon as possible.
Refer to “Tire inflation pressures” on page 7-32.
BK0102103US.book 10 ページ 2009年10月26日 月曜日 午後1時38分
When listening to the radio, fold the antenna toward the rear of
the vehicle until you hear")

