Page 83 of 161

Recording to the Music Server 6-22Recording to the Music ServerTracks on music CDs can be recorded to the
HDD built into this device at approximately x4
speed.
NOTE The use of recorded tracks for purposes other than
personal enjoyment is prohibited by copyright law.
Recorded sounds may suffer from noise occurring
or the sound quality may be different from original
sound.
Tracks that have been recorded to the music server
cannot be reproduced in another medium (CD-R/
RW, HDD, etc.)
Previously recorded tracks cannot be recorded again
from the same CD.
Turning OFF the engine or removing the music CD
during recording will result in defective recording.
During recording, the navigation system may be slow
to operate.
Recording may be slower than the x4 speed due to
the processing load on the device or the status of
the music CD.
If sound skipping or other errors occur, return to the
start of that track and restart the recording.
Even if there are no blanks between tracks on the
CD, a brief silence is stored in the HDD between
tracks.
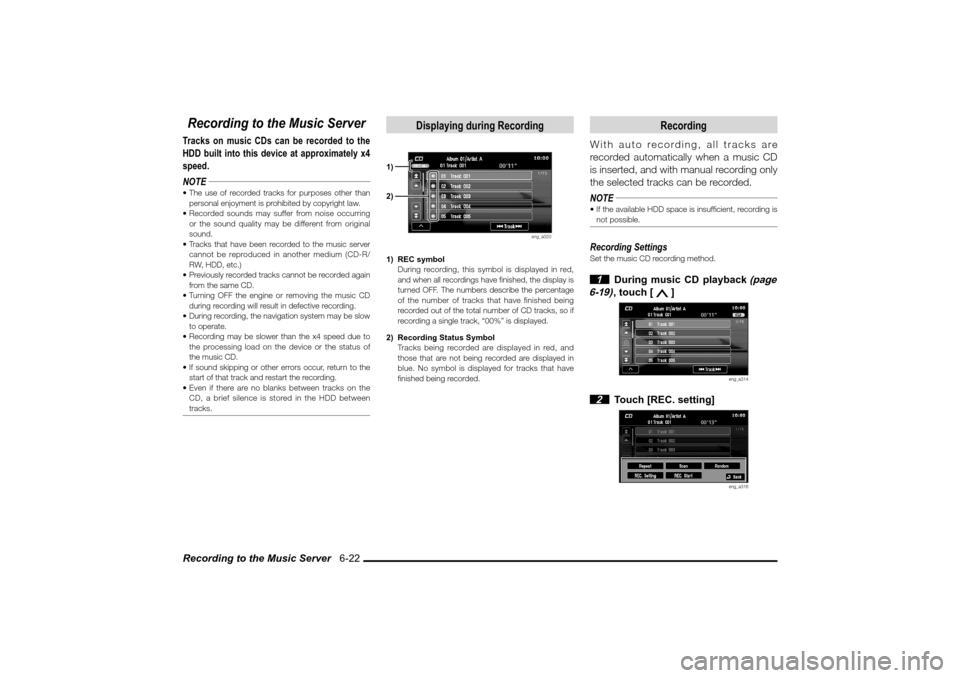
Displaying during Recording
eng_a320
1) REC symbol
During recording, this symbol is displayed in red,
and when all recordings have � nished, the display is
turned OFF. The numbers describe the percentage
of the number of tracks that have finished being
recorded out of the total number of CD tracks, so if
recording a single track, “00%” is displayed.
2) Recording Status Symbol
Tracks being recorded are displayed in red, and
those that are not being recorded are displayed in
blue. No symbol is displayed for tracks that have
� nished being recorded.
Recording
With auto recording, all tracks are
recorded automatically when a music CD
is inserted, and with manual recording only
the selected tracks can be recorded.
NOTE If the available HDD space is insuf� cient, recording is
not possible.Recording SettingsSet the music CD recording method. 1 During music CD playback
(page
6-19)
, touch [
]
eng_a314
2 Touch [REC. setting]
eng_a316
1)2)
�������������
��
����������
��������������� ��
�
Page 92 of 161

Music Server 7-1
Music Server
Music Server
Music Server
The music server can play and record CD
tracks. It is part of the MMCS hard drive device
(HDD).
NOTE The tracks on the HDD cannot be transferred to
another vehicle's navigation/audio system, and the
HDD itself cannot be replaced.
Tracks that have been recorded to the HDD cannot
be reproduced in another medium (CD-R, MD, etc.)
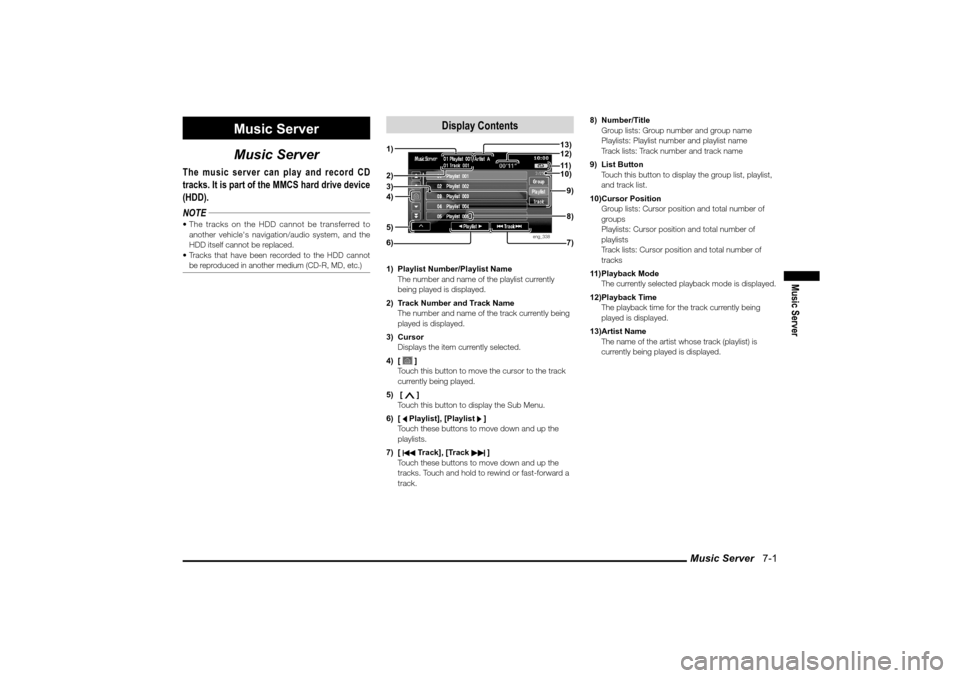
Display Contents
eng_338
1) Playlist Number/Playlist Name
The number and name of the playlist currently
being played is displayed.
2) Track Number and Track Name
The number and name of the track currently being
played is displayed.
3) Cursor
Displays the item currently selected.
4) [
]
Touch this button to move the cursor to the track
currently being played.
5) [ ]
Touch this button to display the Sub Menu.
6) [ Playlist], [Playlist ]
Touch these buttons to move down and up the
playlists.
7) [ Track], [Track
]
Touch these buttons to move down and up the
tracks. Touch and hold to rewind or fast-forward a
track.8) Number/Title
Group lists: Group number and group name
Playlists: Playlist number and playlist name
Track lists: Track number and track name
9) List Button
Touch this button to display the group list, playlist,
and track list.
10) Cursor Position
Group lists: Cursor position and total number of
groups
Playlists: Cursor position and total number of
playlists
Track lists: Cursor position and total number of
tracks
11) Playback Mode
The currently selected playback mode is displayed.
12) Playback Time
The playback time for the track currently being
played is displayed.
13) Artist Name
The name of the artist whose track (playlist) is
currently being played is displayed.
4) 2)1)3)
6) 7)8) 9) 10) 11 ) 13)
12)5)
�������������
��
���������
��������������� ��
�
Page 138 of 161
Air Conditioner 9-11
Information
Air Conditioner
The air conditioner status can be viewed.
1 Press the [INFO] key, and touch
[Air Conditioner]
eng_a140
eng_a203
1) Blower speed indicator
Displayed in 9 levels.
2) Air direction/Outside air intake indicator
3) Auto mode indicator
Displayed when the AUTO mode is operating.
4) Rear window defogger indicatior
Displayed when the rear window defogger is
operating.
5) Air conditioner indicator
Displayed when the air conditioner is operating.
6) Front defroster indicator
Displayed when the windshield defogger is
operating.NOTE When air conditioning operations are performed in the navigation screen display, the display shown below
will appear.
eng_a204
A short time after air conditioner operations have
been completed, the screen will return to the
navigation display.
1)
2)3) 4) 5) 6)
�������������
��
����������
������������� ��
���
Page 140 of 161

Other Info 9-13
Information
Other Info
System information and information about the
current location can be viewed.
Support Info
System information for this navigation
system can be viewed.
1 Press the [INFO] key, and touch
[Support Info]
eng_a140
eng_a159
The support info screen is displayed.
SW Version The software version of the system
is displayed.
MAP Version
The map data version is displayed.
CDDB VersionThe database version of the title
information is displayed.
About version updates To update the map data version, insert the DVD
containing the new map data. A screen for selecting
whether or not data should be automatically updated
will appear.
Insert the version update key, and follow the
procedures on the screen.
For the operating procedure, please refer to the
instruction manual included with the MAP Update
DVD (sold separately). (Contact an authorized
Mitsubishi Motors dealer for assistance.)
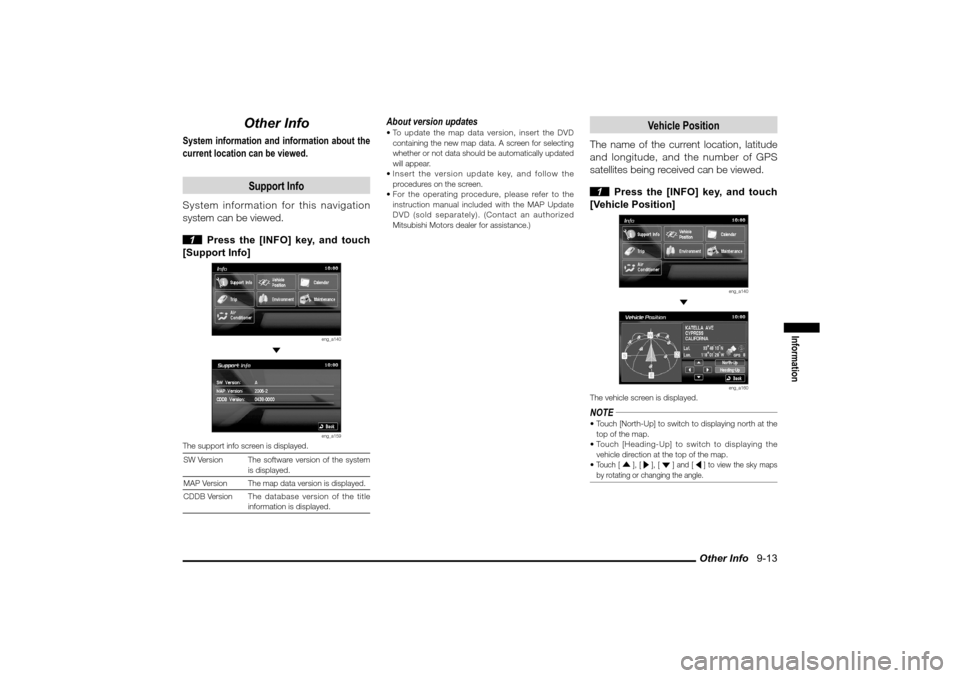
Vehicle Position
The name of the current location, latitude
and longitude, and the number of GPS
satellites being received can be viewed.
1 Press the [INFO] key, and touch
[Vehicle Position]
eng_a140
eng_a160
The vehicle screen is displayed.NOTE Touch [North-Up] to switch to displaying north at the
top of the map.
Touch [Heading-Up] to switch to displaying the
vehicle direction at the top of the map.
Touch [ ], [ ], [ ] and [ ] to view the sky maps
by rotating or changing the angle.
�������������
��
���������
������������� �� �
�
Page 142 of 161
![MITSUBISHI LANCER 2010 8.G MMCS Manual Adjusting the Screen 10-1
Settings
Setting
Adjusting the Screen
Adjustments related to the screen display.
Display Off
Turns OFF the monitor display.
1 Press the [SET] key, and touch
[Display Off MITSUBISHI LANCER 2010 8.G MMCS Manual Adjusting the Screen 10-1
Settings
Setting
Adjusting the Screen
Adjustments related to the screen display.
Display Off
Turns OFF the monitor display.
1 Press the [SET] key, and touch
[Display Off](/manual-img/19/7447/w960_7447-141.png)
Adjusting the Screen 10-1
Settings
Setting
Adjusting the Screen
Adjustments related to the screen display.
Display Off
Turns OFF the monitor display.
1 Press the [SET] key, and touch
[Display Off]
eng_a018-2
eng_a161
The monitor display is turned OFF.NOTE At this time, although the navigation voice guidance
will be switched off, the AV audio will remain on. To turn ON the display again, either touch the
screen, or press any key.
Picture Control
Adjustments related to the picture quality.
1 Press the [SET] key, and touch
[Picture Control]
eng_a018-2
2
Touch [ - ] or [ + ] for “Brightness”,
“Contrast”, or “Black Level” to adjust
eng_a162
NOTE “Brightness” can be adjusted with headlights ON and
OFF separately. If adjusting the
picture quality
while a DVD image
is displayed,
“Tint” and “Color
Intensity” can also
be adjusted.
eng_a231
3 Touch [Back]
The picture quality adjustment is completed.
Screen Size
Switches between Screen Size and other
displays for DVD image etc..
1 Press the [SET] key, and touch
[Screen Size]
eng_a163-2
2
Touch one of the following buttons
eng_a232
[Normal] Displays the screen in normal 4:3 aspect
ratio.
[Full] Extends the display evenly both left and
right in wide mode.
[Wide]Extends the left and right parts only of
the display while leaving the center as is
in wide mode.
[Zoom] Magni� es the image displayed using 4:3
aspect ratio. (I.e., the top and bottom
are out of frame.) 3 Touch [Back]
Screen Size switching is completed.
�������������
��
����������
������������� ����
�
Page 145 of 161
![MITSUBISHI LANCER 2010 8.G MMCS Manual System Settings 10-4
System Settings
The basic settings required by the navigation
function can be performed here.
1 Press the [SET] key, and touch
[System]
eng_a018-2
eng_a034-1
The system se MITSUBISHI LANCER 2010 8.G MMCS Manual System Settings 10-4
System Settings
The basic settings required by the navigation
function can be performed here.
1 Press the [SET] key, and touch
[System]
eng_a018-2
eng_a034-1
The system se](/manual-img/19/7447/w960_7447-144.png)
System Settings 10-4
System Settings
The basic settings required by the navigation
function can be performed here.
1 Press the [SET] key, and touch
[System]
eng_a018-2
eng_a034-1
The system settings screen is displayed. 2 Touch each item to change the
setting
3 Touch [Back]
eng_a034-1
The setting change is completed.
Time
Changing the time zone.
1 Touch [Time]
2 Touch the desired zone
eng_a165
3 Touch [On] or [Off] for “Daylight
Saving Time”
4 Touch [Back]
eng_a166
The time zone settings are completed, and the display
returns to the system options screen.
Language
Changing the language used by the
system.
1 Touch [Language]
2 Touch one of the languages
eng_a205
3 Touch [Back]
[English] Change to English.
[Français] Change to French.
[Español] Change to Spanish.NOTE When the meter is set to Auto, the language of both
sides can be changed by performing operations on
either the MMCS side or the meter side.
When the meter is set to Manual, the language
of the meter side and the MMCS side can be set
separately.
�������������
��
����������
������������� ����
�
Page 150 of 161
Navi Screen Options 10-9
Settings
Navi Screen Options
Settings related to the display.
1 Display the Navi Menu, and touch
[Navigation Settings]
eng_a004-2
2 Touch [Screen]
eng_a016-1
eng_a017-1
The screen options screen is displayed.
3 Touch each item to change the
setting
4 Touch [Back]
eng_a017-1
The setting change is completed.NOTE Touch [Default] to return to the factory settings.
One/Two Maps
Changing between the one map screen
and two maps screen.[One Map]
eng_a007
[Two Maps]
eng_a010
�������������
��
����������
������������� �
���
Page 153 of 161
![MITSUBISHI LANCER 2010 8.G MMCS Manual Route Options 10-12
Route Options
Setting the route search conditions.
1 Display the Navi Menu, and touch
[Navigation Settings]
eng_a502-2
2 Touch [Route]
eng_a016-1
eng_a125
The route options MITSUBISHI LANCER 2010 8.G MMCS Manual Route Options 10-12
Route Options
Setting the route search conditions.
1 Display the Navi Menu, and touch
[Navigation Settings]
eng_a502-2
2 Touch [Route]
eng_a016-1
eng_a125
The route options](/manual-img/19/7447/w960_7447-152.png)
Route Options 10-12
Route Options
Setting the route search conditions.
1 Display the Navi Menu, and touch
[Navigation Settings]
eng_a502-2
2 Touch [Route]
eng_a016-1
eng_a125
The route options screen is displayed.
3 Touch each item to change the
setting
4 Touch [Back]
eng_a176
The setting change is completed.NOTE Touch [Default] to return to the factory settings.
Route Priority
Setting the route search priority.[Fast]
Searches for a short route in terms of
time (arriving quickly at the destination),
using freeways and major roads.
[Short] Searches for the route on the map with
the shortest distance.
[Easy] Search for a route that is easy to drive,
with few left or right turns (in particular
left turns).
Minimize Freeways
Setting the conditions for using freeways.[Yes] Calculates a route that uses freeways as
little as possible.
[No] Calculates a route that uses freeways.
Minimize Toll Roads
Setting the conditions for using toll roads.[Yes] Calculates a route that uses toll roads
as little as possible.
[No] Calculates a route that uses toll roads.
�������������
��
�����������
������������� �
���