2010 MITSUBISHI L200 Illumination
[x] Cancel search: IlluminationPage 90 of 369

Water temperature gauge
E00500800479
The
water temperature gauge indicates the engine
coolant temperature when the ignition switch is in
the “ON” position. CAUTION
l
If
the indication needle enters the H zone
while the engine is running, it indicates
that the engine is possibly overheating. Im-
mediately park your vehicle in a safe
place and make the necessary correc-
tions. (Refer to “Engine overheating” on
page 6-04.)
While driving, care should always be tak-
en to maintain the normal operating tem-
perature.
Daytime dipper button (meter illumi-
nation control)* E00508800273
The rheostat can be adjusted while the headlamps
or tail lamps turn on. Turn the dial to adjust the illumination (meter, mul-
ti
centre display, audio system’s control panel, heat-
er control panel, etc.) to the desired brightness. 1- To reduce brightness
2-
To increase brightness Instruments and controls
3-05 3
OCRE12E1
Page 117 of 369

NOTE
l The
high-beams can also flash when the
lamp switch is in the “OFF” position.
l If you turn the lamps off with the headlamps
set to high-beam illumination, the headlamps
are automatically returned to their low-beam
setting when the lamp switch is next turned
to the “ ” position.
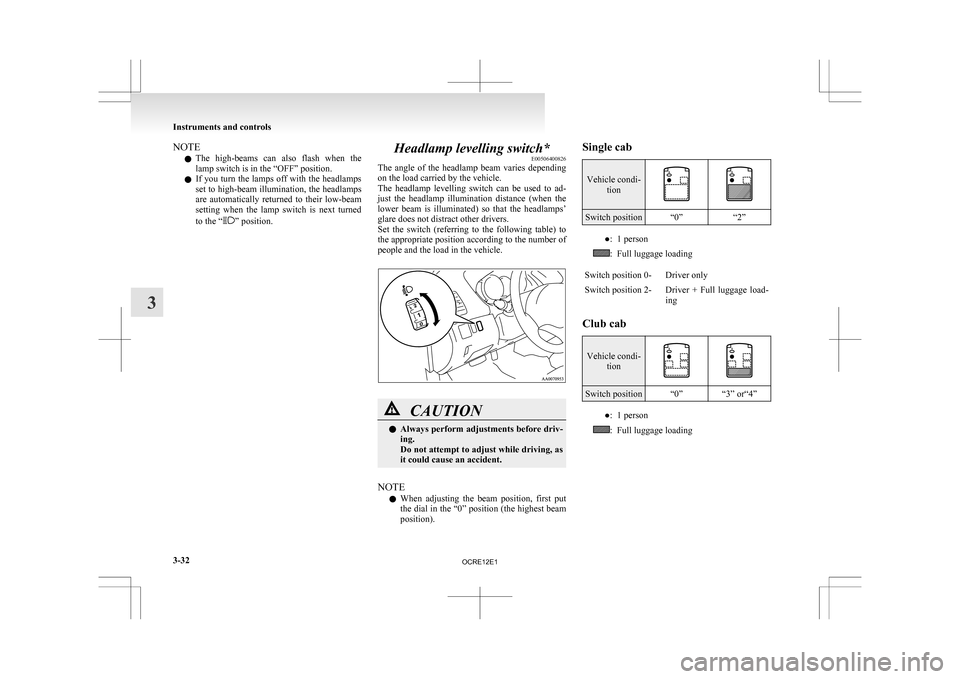
Headlamp levelling switch*
E00506400826
The
angle of the headlamp beam varies depending
on the load carried by the vehicle.
The headlamp levelling switch can be used to ad-
just the headlamp illumination distance (when the
lower beam is illuminated) so that the headlamps’
glare does not distract other drivers.
Set the switch (referring to the following table) to
the appropriate position according to the number of
people and the load in the vehicle. CAUTION
l
Always
perform adjustments before driv-
ing.
Do not attempt to adjust while driving, as
it could cause an accident.
NOTE l When
adjusting the beam position, first put
the dial in the “0” position (the highest beam
position). Single cab Vehicle condi-
tion Switch position “0”
“2” ●: 1 person
: Full luggage loading
Switch position 0- Driver only
Switch position 2- Driver + Full luggage load- ing
Club cab Vehicle condi-
tion Switch position “0” “3” or“4”
●: 1 person
: Full luggage loadingInstruments and controls
3-32
3
OCRE12E1
Page 139 of 369

l
When the engine has not been started within
about 5 seconds after the diesel preheat indi-
cation lamp went out, return the ignition key
to the “LOCK” position. Then, turn the key
to the “ON” position to preheat the engine
again.
l When the engine is warm, the diesel preheat
indication lamp does not come on even if the
ignition key is placed in the “ON” position.
Start the engine by turning the ignition key
right to the “START” position.
6. Operate the accelerator pedal as described be- low in accordance with the atmospheric tem-
perature and/or engine condition and then
start the engine.
l When the atmospheric temperature is
moderate or the engine is warm, start the
engine without depressing the accelerator
pedal.
l When the atmospheric temperature is low
and the engine is cold, start the engine
while depressing the accelerator pedal.
Fuel injection amount learning process E00616000028
To keep exhaust emissions and engine noise low,
the
engine very occasionally performs a learning
process for the fuel injection amount.
The engine sounds slightly different from usual
while the learning process is taking place. The
change in the engine sound does not indicate a fault. Diesel particulate filter (DPF)*
E00619800232
The
diesel particulate filter (DPF) is a device that
captures most of the particulate matter (PM) in the
exhaust emissions of the diesel engine. The DPF au-
tomatically burns away trapped PM during vehicle
operation. Under certain driving conditions, howev-
er, the DPF is not able to burn away all of the trap-
ped PM and, as a result, an excessive amount of
PM accumulates inside it. WARNING
l The DPF reaches very high temperatures.
Do
not park your vehicle in areas where
combustible materials such as dry grass
or leaves can come in contact with a hot
exhaust system since a fire could occur. CAUTION
l
Do
not use any type of fuel or engine oil
that is not specified for your vehicle. Al-
so, do not use any moisture-removing
agent or other fuel additive. Such substan-
ces could have a detrimental effect on the
DPF.
Refer to “Fuel selection” on page 02 and
“Engine oil” on page 8-04.
NOTE l To
minimize the likelihood of excessive ac-
cumulation of PM, try to avoid driving for
long periods at low speeds and repeatedly
driving short distances. DPF warning lamp
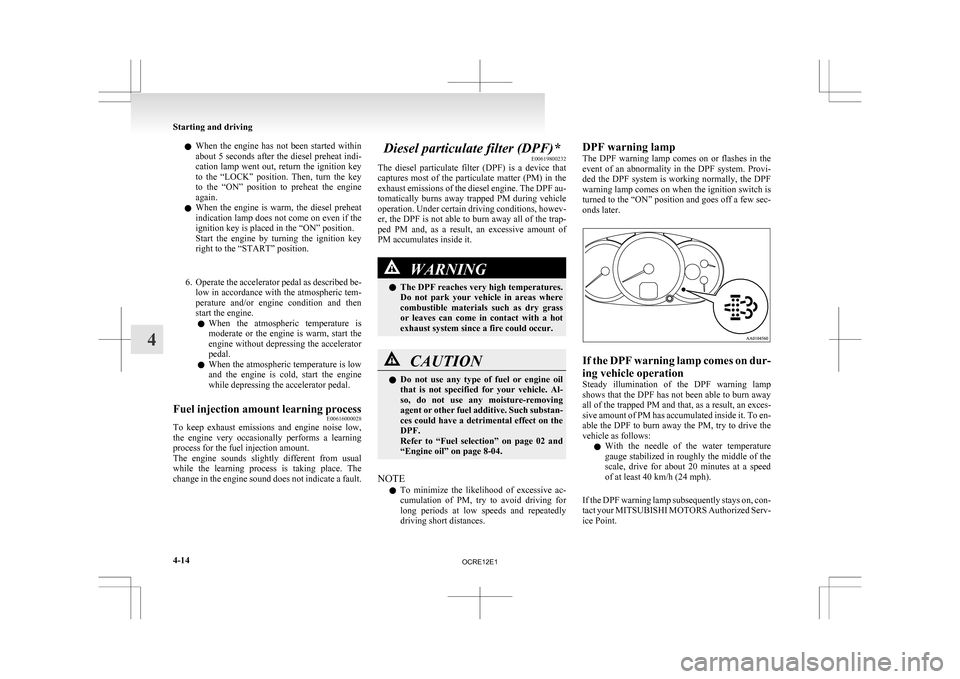
The
DPF warning lamp comes on or flashes in the
event of an abnormality in the DPF system. Provi-
ded the DPF system is working normally, the DPF
warning lamp comes on when the ignition switch is
turned to the “ON” position and goes off a few sec-
onds later. If the DPF warning lamp comes on dur-
ing vehicle operation
Steady
illumination of the DPF warning lamp
shows that the DPF has not been able to burn away
all of the trapped PM and that, as a result, an exces-
sive amount of PM has accumulated inside it. To en-
able the DPF to burn away the PM, try to drive the
vehicle as follows:
l With the needle of the water temperature
gauge stabilized in roughly the middle of the
scale, drive for about 20 minutes at a speed
of at least 40 km/h (24 mph).
If the DPF warning lamp subsequently stays on, con-
tact your MITSUBISHI MOTORS Authorized Serv-
ice Point. Starting and driving
4-14
4
OCRE12E1
Page 159 of 369

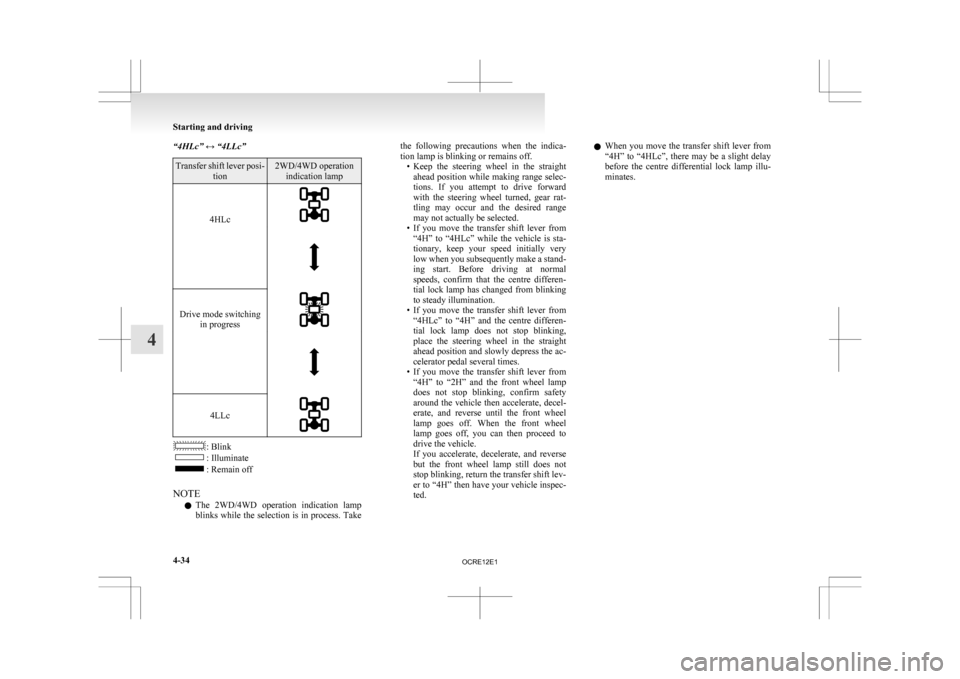
“4HLc” ↔ “4LLc”
Transfer shift lever posi-
tion 2WD/4WD operation
indication lamp
4HLc
Drive mode switching
in progress
4LLc
: Blink
: Illuminate
: Remain off
NOTE l The
2WD/4WD operation indication lamp
blinks while the selection is in process. Take the following precautions when the indica-
tion lamp is blinking or remains off.
• Keep
the steering wheel in the straight
ahead position while making range selec-
tions. If you attempt to drive forward
with the steering wheel turned, gear rat-
tling may occur and the desired range
may not actually be selected.
• If you move the transfer shift lever from “4H” to “4HLc” while the vehicle is sta-
tionary, keep your speed initially very
low when you subsequently make a stand-
ing start. Before driving at normal
speeds, confirm that the centre differen-
tial lock lamp has changed from blinking
to steady illumination.
• If you move the transfer shift lever from “4HLc” to “4H” and the centre differen-
tial lock lamp does not stop blinking,
place the steering wheel in the straight
ahead position and slowly depress the ac-
celerator pedal several times.
• If you move the transfer shift lever from “4H” to “2H” and the front wheel lamp
does not stop blinking, confirm safety
around the vehicle then accelerate, decel-
erate, and reverse until the front wheel
lamp goes off. When the front wheel
lamp goes off, you can then proceed to
drive the vehicle.
If you accelerate, decelerate, and reverse
but the front wheel lamp still does not
stop blinking, return the transfer shift lev-
er to “4H” then have your vehicle inspec-
ted. l
When you move the transfer shift lever from
“4H” to “4HLc”, there may be a slight delay
before the centre differential lock lamp illu-
minates. Starting and driving
4-34
4
OCRE12E1
Page 161 of 369

NOTE
l The
2WD/4WD operation indication lamp al-
so illuminates for a few seconds when the ig-
nition switch is turned to the “ON” position.
Refer to “2WD/4WD operation indication
lamp” on pages 4-28, 4-33.
The status of the rear differential lock (result-
ing from depression of the rear differential
lock switch) is shown by blinking or steady
illumination of the rear differential lock indi-
cation lamp. The operation
state of rear dif-
ferential lock Rear differential lock indication
lamp
Easy select 4WDSuper select
4WD
Rear differen-
tial lock deacti- vated
Switching in
progress
Rear differen-
tial lock activa- ted : Blink
: Illuminate (steady)
: Remain offNOTE
l The indication lamp blinks while the rear dif-
ferential
lock is being switched between its
activated and deactivated conditions. When
the switching operation is complete, the indi-
cation lamp is either illuminated steadily or
not illuminated.
l On vehicles with the active stability & trac-
tion control (ASTC) and anti-lock brake sys-
tem (ABS), the ASTC and ABS functions
are suspended while the rear differential lock
is activated. ASTC indication lamp, ASTC
OFF indication lamp and ABS warning lamp
are illuminated while these functions are sus-
pended. It does not indicate a problem. When
the rear differential lock is disengaged, these
lamps go out and function again.
Refer to “ABS warning lamp” on page 4-45,
“ASTC indication lamp, ASTC OFF indica-
tion lamp” on page 4-48.
l On vehicles with the anti-lock brake system
(ABS), the ABS function is suspended while
the rear differential lock is activated.
The ABS warning lamp is illuminated while
ABS functionality is suspended.
Refer to “ABS warning lamp” on page 4-45.
l If the indication lamp continues blinking af-
ter the switch has been pressed to deactivate
the rear differential lock, hold the steering
wheel in the straight ahead position then slow-
ly depress and release the accelerator pedal
several times.
l If the indication lamp continues blinking af-
ter the switch has been pressed to activate
the rear differential lock, bear in mind the fol-
lowing instructions: Starting and driving
4-36
4
OCRE12E1