Page 477 of 514
7-50 Vehicle care and maintenance
7
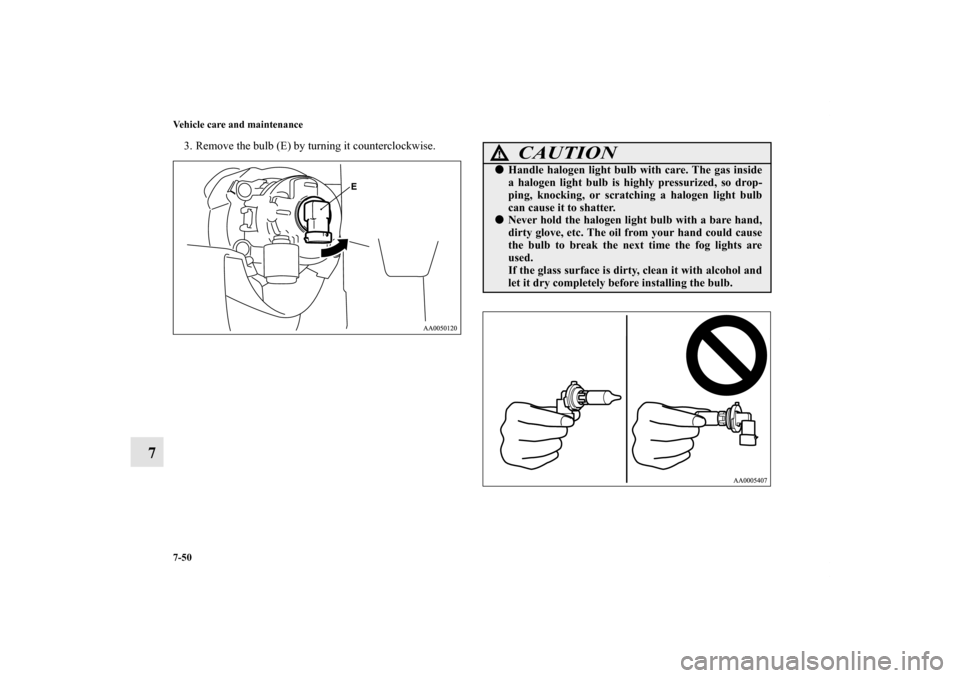
3. Remove the bulb (E) by turning it counterclockwise.
CAUTION
!�Handle halogen light bulb with care. The gas inside
a halogen light bulb is highly pressurized, so drop-
ping, knocking, or scratching a halogen light bulb
can cause it to shatter.�Never hold the halogen light bulb with a bare hand,
dirty glove, etc. The oil from your hand could cause
the bulb to break the next time the fog lights are
used.
If the glass surface is dirty, clean it with alcohol and
let it dry completely before installing the bulb.
BK0102600US.book 50 ページ 2009年3月30日 月曜日 午後2時2分
Page 479 of 514
7-52 Vehicle care and maintenance
7
2. Move the light unit toward the rear of the vehicle and
remove the clips (B).3. Remove each socket and bulb assembly by turning it
counterclockwise.
C- Tail and stop and rear side-marker light
Remove the bulb from the socket by turning it counterclock-
wise while pressing in.
D- Back-up light
Remove the bulb by pulling it out.
E- Rear turn signal light
Remove the bulb from the socket by turning it counterclock-
wise while pressing in.
BK0102600US.book 52 ページ 2009年3月30日 月曜日 午後2時2分
Page 480 of 514
Vehicle care and maintenance
7-53
7
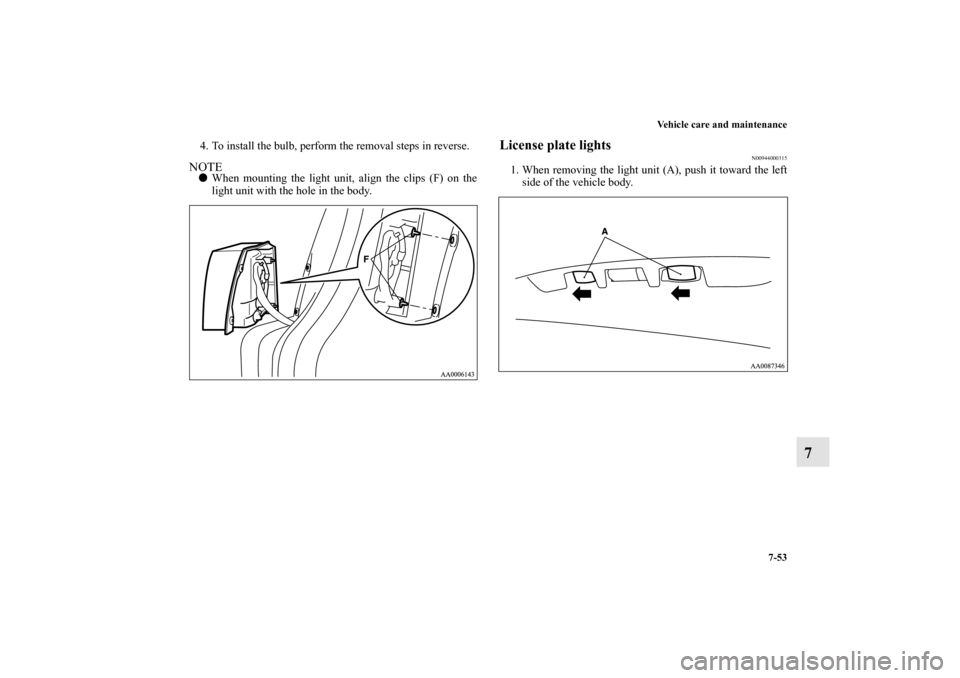
4. To install the bulb, perform the removal steps in reverse.NOTE�When mounting the light unit, align the clips (F) on the
light unit with the hole in the body.
License plate lights
N00944000315
1. When removing the light unit (A), push it toward the left
side of the vehicle body.
BK0102600US.book 53 ページ 2009年3月30日 月曜日 午後2時2分
Page 481 of 514
7-54 Vehicle care and maintenance
7
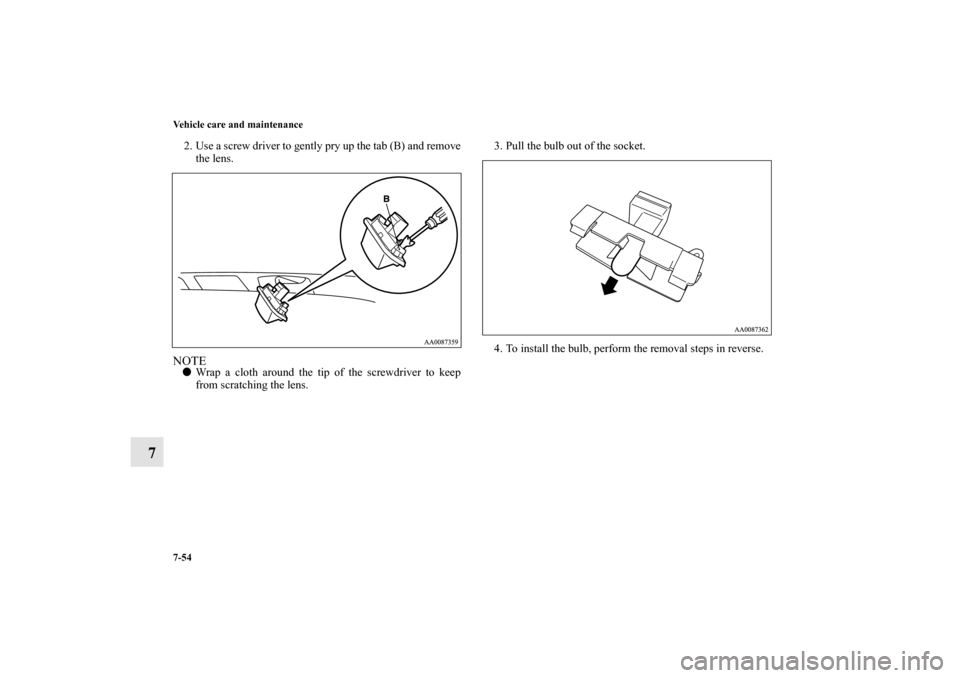
2. Use a screw driver to gently pry up the tab (B) and remove
the lens.NOTE�Wrap a cloth around the tip of the screwdriver to keep
from scratching the lens.3. Pull the bulb out of the socket.
4. To install the bulb, perform the removal steps in reverse.
BK0102600US.book 54 ページ 2009年3月30日 月曜日 午後2時2分
Page 482 of 514
Vehicle care and maintenance
7-55
7
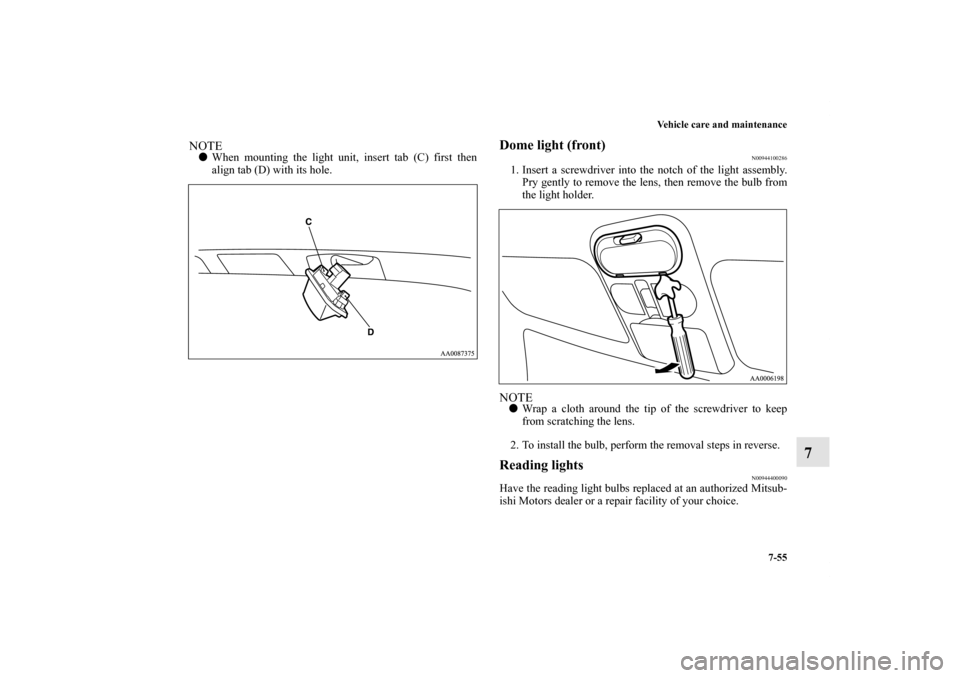
NOTE�When mounting the light unit, insert tab (C) first then
align tab (D) with its hole.
Dome light (front)
N00944100286
1. Insert a screwdriver into the notch of the light assembly.
Pry gently to remove the lens, then remove the bulb from
the light holder. NOTE�Wrap a cloth around the tip of the screwdriver to keep
from scratching the lens.
2. To install the bulb, perform the removal steps in reverse.Reading lights
N00944400090
Have the reading light bulbs replaced at an authorized Mitsub-
ishi Motors dealer or a repair facility of your choice.
BK0102600US.book 55 ページ 2009年3月30日 月曜日 午後2時2分
Page 483 of 514
7-56 Vehicle care and maintenance
7
Rear personal lights
N00944700080
1. Insert the tip of a screwdriver at the edge of the lens, pry
gently to remove the lens, and then remove the bulb from
the light holder.NOTE�Wrap a cloth around the tip of the screwdriver to keep
from scratching the lens.
2. To install the bulb, perform the removal steps in reverse.
Luggage room light
N00944900079
1. Insert a screwdriver into the notch of the light assembly
and pry gently to remove the lens. Pull the light bulb out
from the light holder.NOTE�Wrap a cloth around the tip of the screwdriver to keep
from scratching the lens.
2. To install the bulb, perform the removal steps in reverse.
BK0102600US.book 56 ページ 2009年3月30日 月曜日 午後2時2分
Page 484 of 514

Vehicle care and maintenance
7-57
7
Door lights
N00945000077
1. Insert the tip of a screwdriver at the edge of the lens, pry
gently to remove the lens. Pull the bulb from the light
holder.NOTE�Wrap a cloth around the tip of the screwdriver to keep
from scratching the lens.
2. To install the bulb, perform the removal steps in reverse.
Vehicle care precautions
N00945100153
In order to maintain the value of your vehicle, perform regular
maintenance using the proper materials and procedures. Be
sure to use only those materials and procedures that meet your
local environmental pollution control regulations. Choose the
materials you will use carefully, to be sure that they do not con-
tain corrosives. If you are not sure, contact an authorized Mit-
subishi Motors dealer for help in choosing these materials.
CAUTION
!�Cleaning products can be dangerous. Some are poi-
sonous. Others are highly flammable. Some are dan-
gerous if you breathe their fumes in a closed space.
When you use anything in a container to clean your
vehicle, be sure to follow the instructions. Always
open your vehicle doors or windows when you’re
cleaning the inside. Never use the following chemi-
cals to clean your vehicle:
• Gasoline
• Carbon Tetrachloride
• Benzine
• Kerosene
• Naphtha
• Acetone
• Turpentine
• Paint Thinner
• Lacquer Thinner
• Nail Polish Remover
BK0102600US.book 57 ページ 2009年3月30日 月曜日 午後2時2分
Page 506 of 514
 1-7
Active stability control 3-58
Air cleaner filter 7-11
Air conditioning
Automatic air conditioning 5-14
Important air condition")
Alphabetical index
1
A
Accessory boxes 3-203
Accessory (installation) 1-7
Active stability control 3-58
Air cleaner filter 7-11
Air conditioning
Automatic air conditioning 5-14
Important air conditioning operating tips 5-26
Manual air conditioning 5-6
Rear cooler 5-25
Refrigerant 9-8
All-wheel drive operation 3-48
Aluminum wheels 7-63
Antenna
SIRIUS antenna 5-77
Whip antenna 5-77
Anti-lock braking system 3-54
Warning light 3-55
Arm rest 2-11
Audio system 5-28
AM/FM electronically tuned radio with
CD autochanger-Type 2 5-43
AM/FM electronically tuned radio with CD player-Type 1
5-30
AM/FM/Satellite electronically tuned radio with
CD autochanger-Type 3 5-43
Error codes 5-70
Handling of compact discs 5-74Steering wheel remote control switch 5-68
Automatic transaxle 3-39
Fluid 7-12
,9-8
Selector lever operation 3-40
Selector lever positions 3-43
Sports mode 3-44
B
Back-up lights
Bulb capacity 7-45
Replacement 7-51
Ball joint, steering linkage seals and drive shaft boots 7-33
Battery 7-16
Charging system warning light 3-85
Checking battery electrolyte level 7-17
Disconnection and connection 7-18
During cold weather 7-18
Specification 9-7
Bottle holder 3-207
Brake
Anti-lock braking system 3-54
Braking 4-6
Fluid 7-15
,9-8
Hoses 7-33
Parking brake 3-28
Parking brake pedal stroke 7-30
Pedal 3-53
Pedal free play 7-29
Power brakes 3-53
BK0102600US.book 1 ページ 2009年3月30日 月曜日 午後2時2分
.3. Remove each socket and bulb assembly by turning it
counterclockwise.
C- Tail and s")