Page 250 of 514
Features and controls
3-161
3
Windshield washer
N00504600100
To turn on the windshield washer, pull the lever toward you
with the ignition key in either the “ON” or “ACC” position.
The wipers will wipe automatically several times when the
washer fluid is sprayed.
To turn off the spray, release the lever.
Rear window wiper and washer
N00523200323
The rear window wiper and washer can be operated when the
ignition key is in the “ON” or “ACC” position.
Turn the knob to operate the rear window wiper.OFF- Off
INT- The wiper operates continuously for several seconds then
operates intermittently at intervals of about 8 seconds.
-Washer fluid will be sprayed onto the rear window glass
while the knob is turned fully in either direction.
When the washer fluid is sprayed, the wiper will automati-
cally operate 2 or 3 times.
BK0102600US.book 161 ページ 2009年3月30日 月曜日 午後2時2分
Page 252 of 514

Features and controls
3-163
3 Electric rear window defogger switch
N00523700328
The electric rear window defogger can be used with the igni-
tion key in the “ON” position.
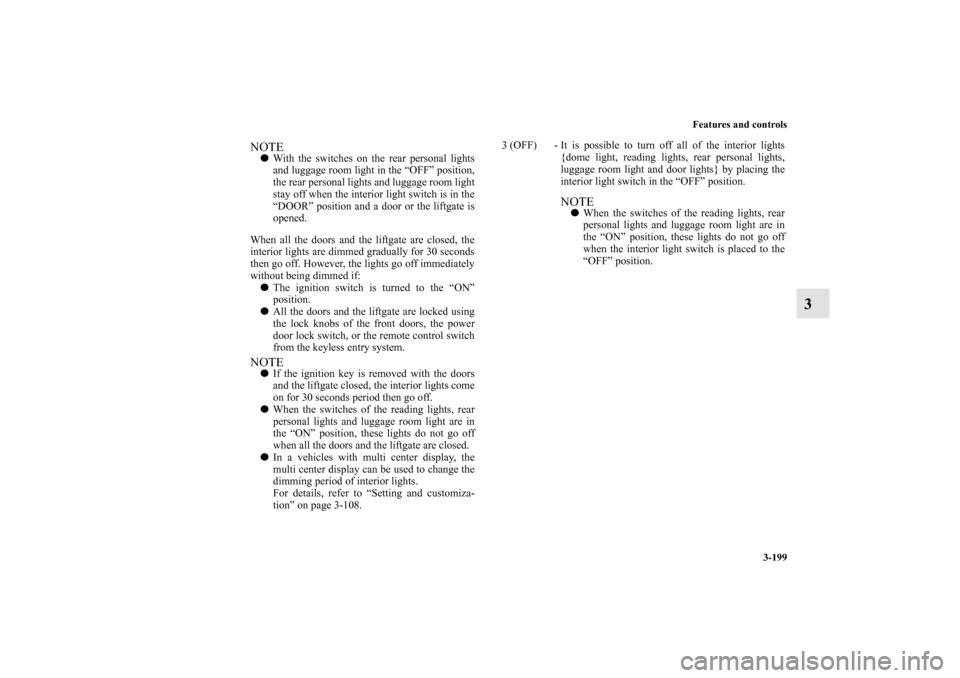
The indicator light (A) will come on when you press the elec-
tric rear window defogger switch. Electric current will flow
through the heating wires on the rear window to help clear
away moisture or frost.
After about 17 minutes of operation, the defogger will shut off
automatically.
To switch the defogger OFF before 17 minutes have passed,
press the switch again. The indicator light will go out and the
defogger will turn off.
If you need the defogger for more than 17 minutes, press the
switch again. This will add 17 more minutes.
NOTE�If your vehicle is equipped with heated mirrors, mist can
also be removed from the outside rearview mirrors when
the rear window defogger switch is pressed. (Refer to
“Heated mirror” on page 3-33.)
CAUTION
!�The rear window defogger is not designed to melt
snow. Remove any snow manually before using the
rear window defogger.�Use the rear window defogger only after the engine
has started and is running. Be sure to turn the
defogger switch off immediately after the window is
clear to save on battery power.�Do not place stickers, tape, or other items that are
attached with adhesive over the grid wires on the
rear window.�When cleaning the inside rear window, use a soft
cloth and wipe lightly over the grid wires.
BK0102600US.book 163 ページ 2009年3月30日 月曜日 午後2時2分
Page 262 of 514

Features and controls
3-173
3
Use the following procedure to pair a Bluetooth
® compatible
cellular phone to the Bluetooth
® HFP.
1. Stop your vehicle in a safe area, put the selector lever in
the “P” (PARK) position and pull the parking brake lever.
NOTE�Make sure you park the vehicle in a safe area before pair-
ing a cellular phone to the system.
2. Press the SPEECH button.
3. Say “Setup.”
4. Say “Pairing Options.”
5. The voice guide will say “Do you want to Pair a phone,
delete a phone or list paired phones?” Say “Pair a phone.” NOTE�A maximum of 7 Bluetooth
® compatible cellular phones
can be registered.
If 7 cellular phones are already registered, delete a phone
and then pair the new phone. (Refer to “Deleting a phone”
on page 3-176.)
6. The voice guide will say “This operation should only be
performed while the vehicle is parked. Please say con-
tinue to perform this operation.” Say “Continue.”7. After the voice guide says “Please say a 4-digit pairing
code,” say a 4-digit code. The 4-digit code will be regis-
tered as a pairing code for the phone.
When the confirmation function is on, the system will
confirm whether the code said is acceptable. To continue
with the code, answer “Yes.”
Say “No” to return to pairing code selection.
NOTE�The pairing code entered here is only used for the Blue-
tooth
® connection certification. It is any 4-digit code the
user would like to select.
Remember the pairing code as it needs to be keyed into
the phone later in the pairing process.
Depending on the Bluetooth
® connection settings
selected, entry of this code may be required each time the
phone attempts to “connect” to the Bluetooth
® HFP. Refer
to your cellular phone owner’s manual for connection
defaults and settings.
8. The voice guide will say “Start pairing procedure on
phone. See phone’s manual for instructions.” Refer to the
owner’s manual for your cellular phone and enter into the
phone the pairing code that was registered in Step 7.
BK0102600US.book 173 ページ 2009年3月30日 月曜日 午後2時2分
Page 288 of 514

Features and controls
3-199
3
NOTE�With the switches on the rear personal lights
and luggage room light in the “OFF” position,
the rear personal lights and luggage room light
stay off when the interior light switch is in the
“DOOR” position and a door or the liftgate is
opened.
When all the doors and the liftgate are closed, the
interior lights are dimmed gradually for 30 seconds
then go off. However, the lights go off immediately
without being dimmed if:
�The ignition switch is turned to the “ON”
position.
�All the doors and the liftgate are locked using
the lock knobs of the front doors, the power
door lock switch, or the remote control switch
from the keyless entry system.NOTE�If the ignition key is removed with the doors
and the liftgate closed, the interior lights come
on for 30 seconds period then go off.
�When the switches of the reading lights, rear
personal lights and luggage room light are in
the “ON” position, these lights do not go off
when all the doors and the liftgate are closed.
�In a vehicles with multi center display, the
multi center display can be used to change the
dimming period of interior lights.
For details, refer to “Setting and customiza-
tion” on page 3-108.3 (OFF) - It is possible to turn off all of the interior lights
{dome light, reading lights, rear personal lights,
luggage room light and door lights} by placing the
interior light switch in the “OFF” position.
NOTE�When the switches of the reading lights, rear
personal lights and luggage room light are in
the “ON” position, these lights do not go off
when the interior light switch is placed to the
“OFF” position.
BK0102600US.book 199 ページ 2009年3月30日 月曜日 午後2時2分
Page 292 of 514

Features and controls
3-203
3
Interior light auto-cutout function (dome light
and other lights)
N00526300367
If any of the interior lights are left on with the ignition switch
in the “LOCK” position, the lights go off automatically after
about 30 minutes.
The lights come on again if the ignition switch is turned to the
“ON” or “ACC” position, any door or the liftgate is opened and
closed, or the keyless entry system is operated.NOTE�In a vehicle with a multi center display, the multi center
display can be used to alter functions as listed below.
For details, please refer to “Setting and customization” on
page 3-108.
• The interior light auto-cutout function can be turned off.
• The interior light auto-cutout delay can be changed.
Accessory boxes
N00526400397
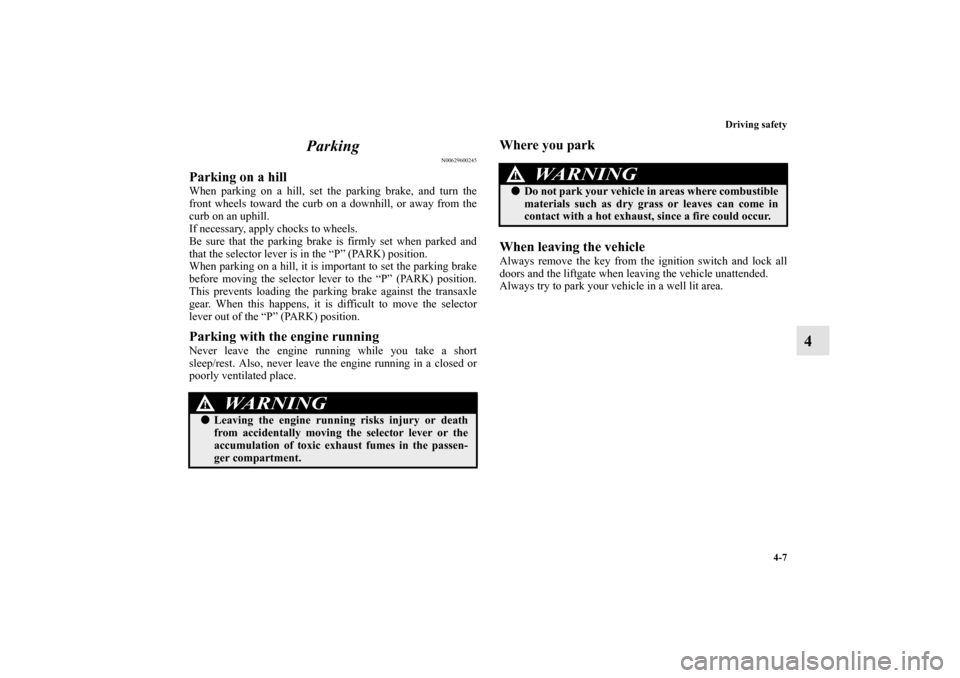
Convenient storage space is located throughout the vehicle.1- Cup holder
2- Bottle holder
3- Sunglasses holder (if so equipped)
4- Floor console box/Tissue holder
5- Glove compartment
BK0102600US.book 203 ページ 2009年3月30日 月曜日 午後2時2分
Page 306 of 514

Driving safety
4-7
4 Parking
N00629600245
Parking on a hillWhen parking on a hill, set the parking brake, and turn the
front wheels toward the curb on a downhill, or away from the
curb on an uphill.
If necessary, apply chocks to wheels.
Be sure that the parking brake is firmly set when parked and
that the selector lever is in the “P” (PARK) position.
When parking on a hill, it is important to set the parking brake
before moving the selector lever to the “P” (PARK) position.
This prevents loading the parking brake against the transaxle
gear. When this happens, it is difficult to move the selector
lever out of the “P” (PARK) position.Parking with the engine runningNever leave the engine running while you take a short
sleep/rest. Also, never leave the engine running in a closed or
poorly ventilated place.
Where you park
When leaving the vehicleAlways remove the key from the ignition switch and lock all
doors and the liftgate when leaving the vehicle unattended.
Always try to park your vehicle in a well lit area.
WA R N I N G
!�Leaving the engine running risks injury or death
from accidentally moving the selector lever or the
accumulation of toxic exhaust fumes in the passen-
ger compartment.
WA R N I N G
!�Do not park your vehicle in areas where combustible
materials such as dry grass or leaves can come in
contact with a hot exhaust, since a fire could occur.
BK0102600US.book 7 ページ 2009年3月30日 月曜日 午後2時2分
Page 325 of 514
5-6 Comfort controls
5Manual air conditioning
(if so equipped)
N00730300113
The air conditioning can only be used while the engine is run-
ning.Control panel
N00730500245
Blower speed selection dial
N00736500090
When the ignition key is in the ON position, select the blower
speed by turning the blower speed selection dial. The blower
speed will gradually increase as the dial is turned to the right.
When the blower speed selection dial is set to the “OFF” posi-
tion, all fan-driven airflow will stop.
1- Temperature control dial
2- Air selection switch
3- Blower speed selection dial
4- Air conditioning switch
5- Electric rear window defogger switch → P.3-163
6- Mode selection dial
BK0102600US.book 6 ページ 2009年3月30日 月曜日 午後2時2分
Page 334 of 514
Comfort controls
5-15
5
NOTE�There is an interior air temperature sensor (A) in the illus-
trated position.
Never place anything over the sensor, since doing so will
prevent it from functioning properly.
�The multi center display automatically switches to an air
conditioning display whenever an air conditioning control
is adjusted manually. The display automatically reverts to
its original display about 10 seconds after the adjustment
is made.
Blower speed selection dial
N00736900010
When the ignition key is in the ON position, select the blower
speed by turning the blower speed selection dial. The blower
speed will gradually increase as the dial is turned to the right.
When the blower speed selection dial is set to the “OFF” posi-
tion, all fan-driven airflow will stop.
BK0102600US.book 15 ページ 2009年3月30日 月曜日 午後2時2分