2010 MINI Hardtop 2 Door buttons
[x] Cancel search: buttonsPage 143 of 230

MOBILITYAT A GLANCE CONTROLS DRIVING TIPS ENTERTAINMENT
141
NAVIGATION REFERENCE
Radio
Your radio provides reception of the FM and AM
wavebands.
Listening to the radio
Press the button if the sound output is
switched off.
Onboard monitor, for operating principle refer
to page16.
1.Press the button.
This opens the start menu.
2.Move the MINI joystick to highlight "Enter-
tainment" and press the MINI joystick.
3.If necessary, move the highlight marker to
the uppermost field. Select "FM" or "AM".
Stations are shown on the Control Display on the
basis of various selection criteria, e.g. "All sta-
tions".
If "Autostore" does not show a station in the AM
waveband or if the displayed stations are no
longer receivable, you can update the stations
with the best reception, page142.
Changing stations
Turn the MINI joystick.
Buttons on the CD player
Press the button for the corresponding
direction.
The system switches to the next displayed
station.
You can also change the station using buttons
on the steering wheel, page11.
Changing selection criteria
In addition to the stations currently displayed,
you can have stations with another selection cri-
terion displayed.
You can choose from the following selection cri-
teria:
>"All stations"
*:
Stations that can currently be received in the
"FM" waveband.
>"Autostore":
Stations with the best reception in the "AM"
waveband.
For High Definition Radio: stations with the
best reception in the "FM" waveband.
>"Presets":
Stations you stored previously, page143.
>"Manual":
To set stations that can be received in addi-
tion to those already being displayed, refer
to Selecting the frequency manually,
page142.
Page 144 of 230

Radio
142
Changing the selection criterion
1.Move the highlight marker to the second
field from the top.
2.Select the selection criterion.
Sampling stations, scan
The displayed stations in the current waveband
are automatically sampled in succession.
1.Select "FM" or "AM".
2.Select the selection criterion.
3.Press the MINI joystick.
Other menu items are displayed.
4.Select "Scan".
The stations are sampled.
Stop sampling:
1.Press the MINI joystick.
2.Select "Scan" again.
Station sampling is interrupted and the selected
station stays on.
Buttons on the CD player
To sample stations, press the button for
the corresponding direction for an extended
time.
Press the button again to end the procedure.
Selecting the frequency manually
With "Manual" you can select stations that can
be received in addition to those displayed.
1.Select "FM" or "AM".
2.Move the highlight marker to the second
field from the top.
3.Select "Manual".
4.Turn the MINI joystick to set a certain fre-
quency.
Updating stations with best reception
If on a longer journey you move out of the
reception range of the stations originally
received, you can update the list of stations with
the best reception in the AM waveband.
1.Select "AM".
2.Move the highlight marker to the second
field from the top.
3.Select Autostore, e. g. "Autostore".
4.Press the MINI joystick.
Other menu items are displayed.
Page 147 of 230

MOBILITYAT A GLANCE CONTROLS DRIVING TIPS ENTERTAINMENT
145
NAVIGATION REFERENCE
Some stations do not transmit the digital and
analog signals simultaneously. If you are in an
area in which digital reception of the selected
station is not possible continuously, reception
will alternate between analog and digital. This
can cause repetitions or interruptions. In this
case it may be preferable to switch off digital
reception.
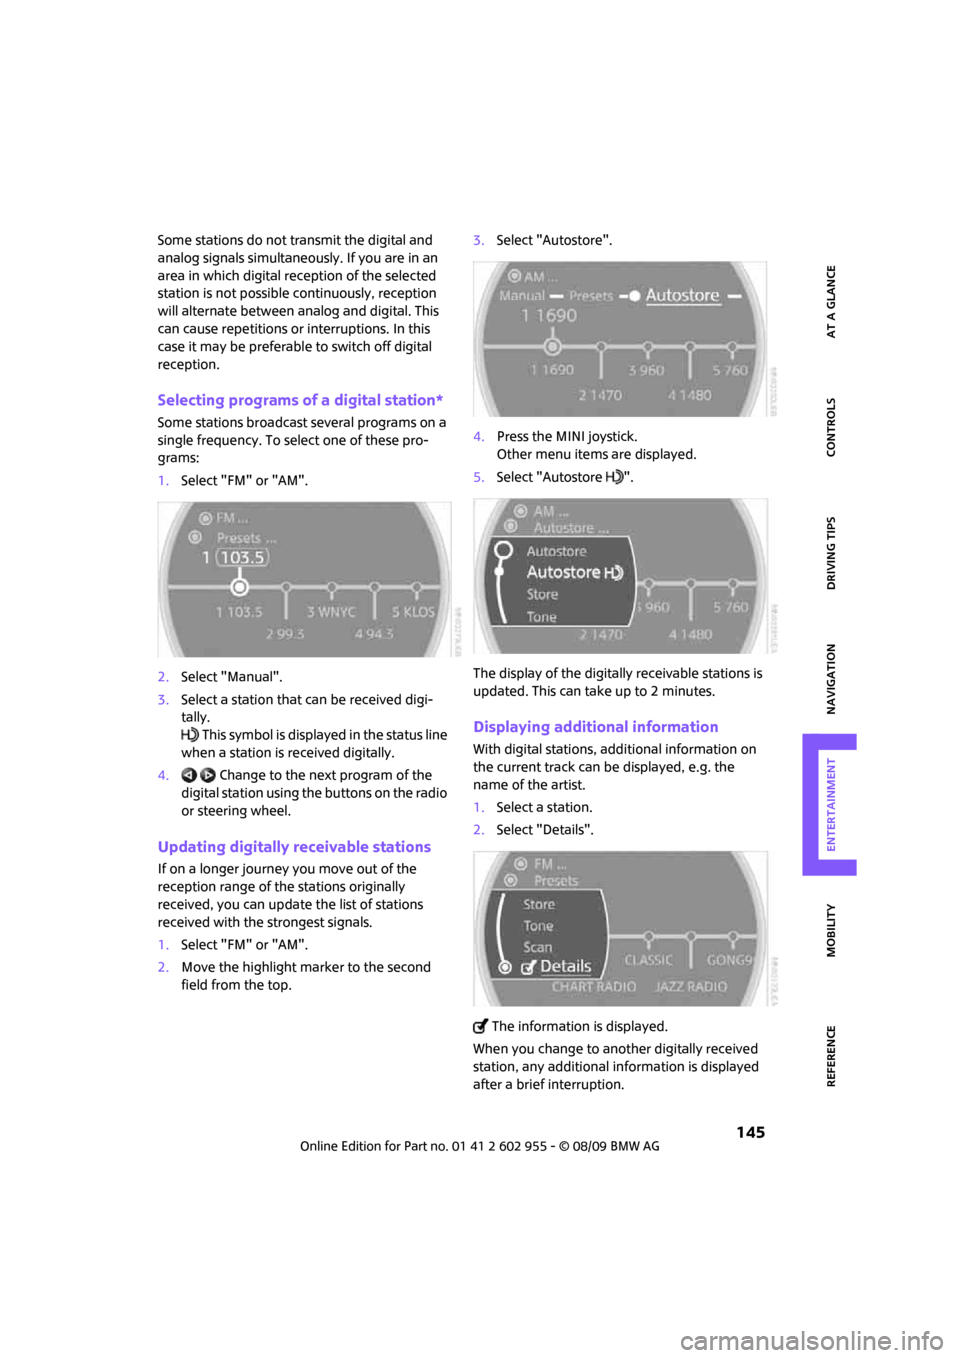
Selecting programs of a digital station*
Some stations broadcast several programs on a
single frequency. To select one of these pro-
grams:
1.Select "FM" or "AM".
2.Select "Manual".
3.Select a station that can be received digi-
tally.
This symbol is displayed in the status line
when a station is received digitally.
4. Change to the next program of the
digital station using the buttons on the radio
or steering wheel.
Updating digitally receivable stations
If on a longer journey you move out of the
reception range of the stations originally
received, you can update the list of stations
received with the strongest signals.
1.Select "FM" or "AM".
2.Move the highlight marker to the second
field from the top.3.Select "Autostore".
4.Press the MINI joystick.
Other menu items are displayed.
5.Select "Autostore ".
The display of the digitally receivable stations is
updated. This can take up to 2 minutes.
Displaying additional information
With digital stations, additional information on
the current track can be displayed, e.g. the
name of the artist.
1.Select a station.
2.Select "Details".
The information is displayed.
When you change to another digitally received
station, any additional information is displayed
after a brief interruption.
Page 150 of 230

Radio
148
4.Turn the MINI joystick to select the memory
location and press the MINI joystick.
The channel is stored. The channels of the last
selection criterion are displayed again after a
short time.
Changing channels with buttons next to
CD player
Press the button for the corresponding
direction.
The system switches to the next enabled
channel.
Notes
When more than 4 seconds go by and no signal
is received, a message appears on the Control
Display.
Under some circumstances, e.g. depend-
ing on environmental or topographic con-
ditions, it may not be possible to receive any sig-
nal. The satellite radio has no influence on this.
Signal may be unavailable in tunnels or under-
ground garages, next to high-rise buildings, in
the vicinity of trees, mountains or other strong
sources of radio interference.
Reception usually resumes as soon as the signal
becomes available again.<
Page 152 of 230

CD player and CD changer
150
Selecting a track
Buttons on the CD player
Press the button for the desired direction
repeatedly until the desired track on the current
CD is reached.
Playback of the CD starts at the beginning of
the track. The track is displayed on the Control
Display.
You can also change the track using the buttons
on the steering wheel, page11.
Using the onboard monitor
Turn the MINI joystick to select a track.
Compressed audio files*
1.Select the directory if necessary.2.Select a track and press the MINI joystick.
To change the directory:
Select a directory and press the MINI joystick.
Exit the menu:
Select the arrow.Displaying information about the track*
With compressed audio files, any information
about the current track that has been recorded
can be displayed, e.g. the name of the artist.
1.Press the MINI joystick.
2.Select "Details".
The information is shown for the current track.
The setting is stored for the remote control cur-
rently in use, refer to Personal Profile, page26.
Page 154 of 230

CD player and CD changer
152
3.Select "Repeat".
The current track on the CD is repeated.
Stop repeating
1.Press the MINI joystick again.
2.Select "Repeat".
Compressed audio files*
1.Select the current track.
2.Select the desired menu item:
>To repeat the selected track: Select
"Repeat track".
>To repeat all tracks in the current direc-
tory: Select "Repeat directory".
Stop repeating
1.Press the MINI joystick.
2.Select "Repeat track" or "Repeat directory".
Random play sequence
The tracks on the current CD are played once
each in random order.
1.Select a track.
2.Press the MINI joystick.
Other menu items are displayed.3.Select "Random".
Stop random function
1.Press the MINI joystick.
2.Select "Random".
Compressed audio files*
1.Select the current track.
2.Select the desired menu item:
>To play back the tracks in the current
directory in random order: Select "Ran-
dom directory".
>To play back all tracks on the CD in ran-
dom order: Select "Random all".
Stop random function
1.Press the MINI joystick.
2.Select "Random directory" or "Random all".
Fast forward/reverse
Buttons on the CD player:
Press and hold the button for the corre-
sponding direction.
The tracks can be heard, but reproduction is dis-
torted.
CD changer
The MINI CD changer for 6 CDs is installed in the
dashboard.
Page 155 of 230

MOBILITYAT A GLANCE CONTROLS DRIVING TIPS ENTERTAINMENT
153
NAVIGATION REFERENCE
When loading CDs into or removing them
from the CD changer, hold them at their
edges and do not touch the reflective signal-
sensing area.<
Opening
Briefly press the bottom edge of the cover.
Closing
Push the cover back into its original position.
To prevent injury in the event of an acci-
dent, close the cover after use while the
vehicle is being driven.<
Controls and displays
1LEDs at the CD slot
LEDs flash when a CD can be inserted.
2Buttons for CD compartments
LED is lit when a CD is in the compartment.
Filling the CD changer
1.Press the button.
The LED on the first empty compartment
flashes.
2.To select another compartment if necessary:
... Press the button.
3.When the LEDs 1 next to the CD slot flash,
insert a single CD.
The CD is drawn in automatically and is
placed in the selected CD compartment.
Only insert the CD when the LEDs1
next to the CD slot are flashing;
otherwise, the CD or CD changer may be
damaged.
Do not push the CD while it is being drawn in
as this may cause it to jam and become
impossible to eject.<4.To fill additional CD compartments:
Repeat steps 1-3.
5.Close the cover after the CDs have been fully
drawn in.
Filling empty CD compartments
1.Press the button for a longer period.
The LEDs on the empty CD compartments
flash.
2.When the LEDs 1 next to the CD slot flash,
insert a single CD.
The CD is drawn in automatically and is
placed in the first vacant CD compartment.
Only insert the CD when the LEDs1
next to the CD slot are flashing;
otherwise, the CD or CD changer may be
damaged.
Do not push the CD while it is being drawn in
as this may cause it to jam and become
impossible to eject.<
3.Wait for the CD to be drawn in.
4.To fill additional CD compartments:
Repeat steps 2 and 3.
5.Close the cover after the CDs have been fully
drawn in.
Removing CDs from the CD changer
1.Press the button.
2. ... Press the button to select a CD
compartment.
The CD is partially ejected from the CD
changer.
3.Remove the CD.
4.Close the cover after the CDs have been
removed.
Removing all CDs from the CD changer
1.Press the button for a longer period.
The CDs are partially ejected from the CD
changer one after the other.
2.Remove the CDs.
3.Close the cover after the CDs have been
removed.
Page 160 of 230

USB audio interface
158
Random play sequence
You can play the tracks in the selected list in ran-
dom order, e. g. all tracks of a single artist.
1.Select a current track and press the MINI joy-
stick.
2.Select "Random" and press the MINI joy-
stick.
Stop random play:
1.Press the MINI joystick.
2.Select "Random" and press the MINI joy-
stick.
Fast forward/reverse
Buttons on the steering wheel or CD player:
Press and hold the button for the corre-
sponding direction.
Notes
Do not expose the audio device to
extreme environmental conditions, e. g.
very high temperatures, refer to the operating
instructions of the audio device. Otherwise, the
audio device may become damaged, which
could compromise safety while driving.<
Depending on the configuration of the audio
files, e. g. bit rates greater than 256 kbit/s, the
files may not play back correctly in every case.
Notes on connecting
>The USB audio interface supplies the con-
nected audio devices with power, provided
that this is supported by the audio device.
Therefore, do not connect the USB audio
device to the power socket in the vehicle
during operation.
>Do not forcibly connect the plug to the USB
interface.
>Do not connect devices such as fans or
lamps to the USB audio interface.>Do not connect USB hard disks.
>Do not use the USB audio interface to charge
external devices.