2010 Mercury Mariner fuel
[x] Cancel search: fuelPage 225 of 339

WARNING:Always set the parking brake fully and make sure
the gearshift is latched in P (Park). Turn the ignition to the off
position and remove the key whenever you leave your vehicle.
R (Reverse)
With the gearshift lever in R (Reverse), the vehicle will move backward.
Always come to a complete stop before shifting into and out of R
(Reverse).
N (Neutral)
With the gearshift lever in N (Neutral), the vehicle can be started and is
free to roll. Hold the brake pedal down while in this position.
D (Drive) with Overdrive
The normal driving position for the best fuel economy. Transmission
operates in gears one through six.
D (Drive) with Grade Assist
Pressing the transmission control
switch on the side of the gearshift
lever activates grade assist and
cancels overdrive.
•Provides additional grade
(engine) braking and extends
lower gear operation on uphill
climbs for hilly terrain or
mountainous areas.
•Provides additional engine
braking through the automatic
transmission shift strategy which
reacts to vehicle inputs (vehicle
acceleration, accelerator pedal,
brake pedal and vehicle speed).
•Allows the transmission to select
gears that will provide the desired engine braking based on the vehicle
inputs mentioned above. This will increase engine RPM during engine
braking.
Driving
225
2010 Mariner(mrn)
Owners Guide, 2nd Printing
USA(fus)
Page 226 of 339

•The grade assist lamp in the
instrument cluster is illuminated.
Grade assist is designed to aid the
driver with optimal gear selection in
hilly terrain or mountainous areas
but is not intended for normal operation. It is recommended that you
return to O/D (overdrive mode) on flat terrain to provide the best fuel
economy and transmission function.
To return to normal D (Drive) position (with O/D), press the
transmission control switch again.
•The grade assist lamp in the instrument cluster will not be illuminated.
•The transmission will operate in gears one through six.
O/D (overdrive mode) is automatically returned each time the engine is
turned off.
L (Low)
•Provides maximum engine braking.
•Will downshift to the lowest available gear for the current vehicle
speed; allows for first gear when vehicle reaches slower speeds.
If your vehicle gets stuck in mud or snow
If your vehicle gets stuck in mud or snow, it may be rocked out by
shifting between forward and reverse gears, stopping between shifts in a
steady pattern. Press lightly on the accelerator in each gear.
Do not rock the vehicle if the engine is not at normal operating
temperature or damage to the transmission may occur.
Do not rock the vehicle for more than a minute or damage to the
transmission and tires may occur, or the engine may overheat.
REVERSE SENSING SYSTEM (IF EQUIPPED)
The reverse sensing system (RSS) sounds a tone to warn the driver of
obstacles near the rear bumper when R (Reverse) is selected and the
vehicle is moving at speeds less than 3 mph (5 km/h). The system is not
effective at speeds above 3 mph (5 km/h) and may not detect certain
angular or moving objects.
WARNING:To help avoid personal injury, please read and
understand the limitations of the reverse sensing system as
contained in this section. Reverse sensing is only an aid for some
(generally large and fixed) objects when moving in reverse on a flat
surface at “parking speeds”. Inclement weather may also affect the
function of the RSS; this may include reduced performance or a false
activation.
Driving
226
2010 Mariner(mrn)
Owners Guide, 2nd Printing
USA(fus)
Page 244 of 339

ROADSIDE ASSISTANCE
Getting roadside assistance
To fully assist you should you have a vehicle concern, Ford Motor
Company offers a complimentary roadside assistance program. This
program is separate from the New Vehicle Limited Warranty. The service
is available:
•24-hours, seven days a week
•for the coverage period listed on the Roadside Assistance Card
included in your Owner Guide portfolio.
Roadside assistance will cover:
•a flat tire change with a good spare (except vehicles that have been
supplied with a tire inflation kit)
•battery jump start
•lock-out assistance (key replacement cost is the customer’s
responsibility)
•fuel delivery – Independent Service Contractors, if not prohibited by
state, local or municipal law shall deliver up to 2.0 gallons (7.5L) of
gasoline or 5.0 gallons (18.9L) of diesel fuel to a disabled vehicle. Fuel
delivery service is limited to two no-charge occurrences within a
12-month period.
•winch out – available within 100 feet (30.5 meters) of a paved or
county maintained road, no recoveries.
•towing – Ford/Mercury/Lincoln eligible vehicle towed to an authorized
dealer within 35 miles (56 km) of the disablement location or to the
nearest authorized dealer. If a member requests to be towed to an
authorized dealer more than 35 miles (56 km) from the disablement
location, the member shall be responsible for any mileage costs in
excess of 35 miles (56 km).
Trailers shall be covered up to $200 if the disabled eligible vehicle
requires service at the nearest authorized dealer. If the trailer is disabled,
but the towing vehicle is operational, the trailer does not qualify for any
roadside services.
Canadian customers refer to your Customer Information Guide
for information on:
•coverage period
•exact fuel amounts
Roadside Emergencies
244
2010 Mariner(mrn)
Owners Guide, 2nd Printing
USA(fus)
Page 246 of 339
Note:With extended use, the flasher may run down your battery.
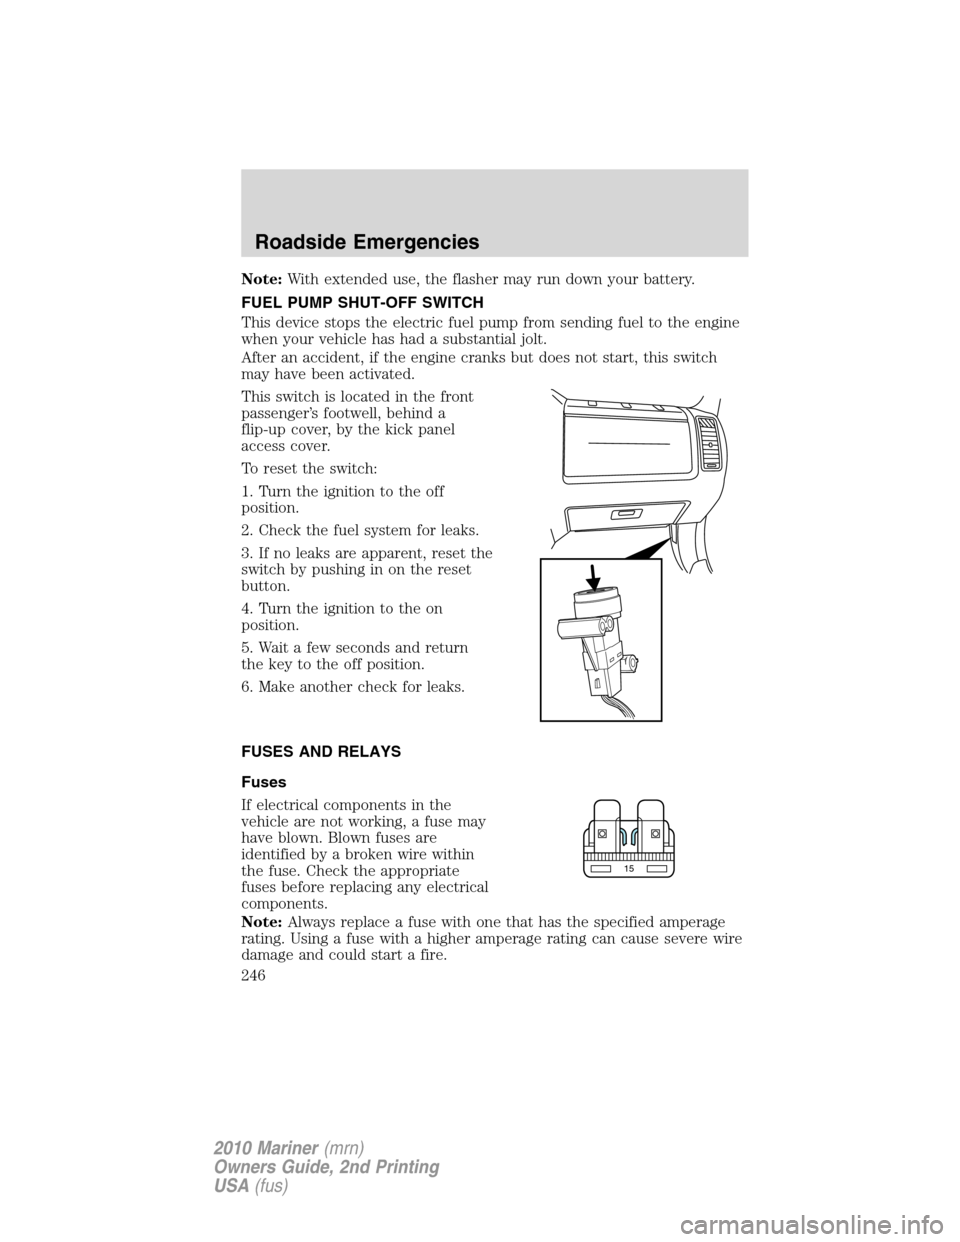
FUEL PUMP SHUT-OFF SWITCH
This device stops the electric fuel pump from sending fuel to the engine
when your vehicle has had a substantial jolt.
After an accident, if the engine cranks but does not start, this switch
may have been activated.
This switch is located in the front
passenger’s footwell, behind a
flip-up cover, by the kick panel
access cover.
To reset the switch:
1. Turn the ignition to the off
position.
2. Check the fuel system for leaks.
3. If no leaks are apparent, reset the
switch by pushing in on the reset
button.
4. Turn the ignition to the on
position.
5. Wait a few seconds and return
the key to the off position.
6. Make another check for leaks.
FUSES AND RELAYS
Fuses
If electrical components in the
vehicle are not working, a fuse may
have blown. Blown fuses are
identified by a broken wire within
the fuse. Check the appropriate
fuses before replacing any electrical
components.
Note:Always replace a fuse with one that has the specified amperage
rating. Using a fuse with a higher amperage rating can cause severe wire
damage and could start a fire.
15
Roadside Emergencies
246
2010 Mariner(mrn)
Owners Guide, 2nd Printing
USA(fus)
Page 252 of 339

Fuse/Relay
LocationFuse Amp
RatingProtected Circuits
8 20A* Trailer tow parking lamps
9 50A** Anti-lock brake system (ABS)
10 30A** Front wipers
11 30A** Starter
12 40A** Blower motor
13 10A* A/C clutch
14 15A* Trailer tow turn lamps
15 — Not used
16 40A** Cooling fan 1
17 40A** Cooling fan 2
18 20A** ABS solenoid
19 30A** Power seats
20 — A/C clutch relay
21A — Rear defroster relay
21B — Fuel relay
21C — Blower relay
21D — PCM relay
22 20A* Fuel pump
23 15A* Fuel injectors
24 — Not used
25 5A* ABS
26 15A* Ignition coils
27 10A* PCM – general powertrain
components malfunction indicator
lamp
28 20A* PCM – emission related
powertrain components
malfunction indicator lamp
29 15A* PCM
30A — Cooling fan 1 relay
30B — Starter relay
30C — Cooling fan main relay
Roadside Emergencies
252
2010 Mariner(mrn)
Owners Guide, 2nd Printing
USA(fus)
Page 264 of 339

Bolt size Wheel lug nut torque*
lb.ft. N•m
M12 x 1.5 100 135
* Torque specifications are for nut and bolt threads free of dirt and
rust. Use only Ford recommended replacement fasteners.
WARNING:When a wheel is installed, always remove any
corrosion, dirt or foreign materials present on the mounting
surfaces of the wheel or the surface of the wheel hub, brake drum or
brake disc that contacts the wheel. Ensure that any fasteners that
attach the rotor to the hub are secured so they do not interfere with
the mounting surfaces of the wheel. Installing wheels without correct
metal-to-metal contact at the wheel mounting surfaces can cause the
wheel nuts to loosen and the wheel to come off while the vehicle is in
motion, resulting in loss of control.
Note:Inspect the wheel pilot hole
prior to installation. If there is
visible corrosion in wheel pilot hole,
remove loose particles by wiping
with clean rag and apply grease.
Apply grease only to the wheel pilot
hole surface by smearing a “dime”
(1 square cm) sized glob of grease
around the wheel pilot surface (1)
with end of finger. DO NOT apply
grease to lugnut/stud holes or
wheel-to-brake surfaces.
RUNNING OUT OF FUEL
If you have run out of fuel and need to refill the vehicle with a portable
fuel container, seeRunning out of fuelin theMaintenance and
Specificationschapter for proper fuel filling method using a portable
fuel container and the included fuel filler funnel.Do notinsert the
nozzle of portable fuel containers or any type of aftermarket funnels into
the Easy Fuel™ “no cap” fuel system as it can be damaged. You must
use the included funnel in such circumstances.
Roadside Emergencies
264
2010 Mariner(mrn)
Owners Guide, 2nd Printing
USA(fus)
Page 265 of 339

WARNING:Do not insert the nozzle of portable fuel containers
or aftermarket funnels into the Easy Fuel™ system. This could
damage the fuel system and its seal, and may cause fuel to run onto
the ground instead of filling the tank, all of which could result in
serious personal injury.
JUMP STARTING
WARNING:The gases around the battery can explode if
exposed to flames, sparks, or lit cigarettes. An explosion could
result in injury or vehicle damage.
WARNING:Batteries contain sulfuric acid which can burn skin,
eyes and clothing, if contacted.
Do not attempt to push-start your automatic transmission
vehicle. Automatic transmissions do not have push-start
capability. Attempting to push-start a vehicle with an automatic
transmission may cause transmission damage.
Preparing your vehicle
When the battery is disconnected or a new battery is installed, the
automatic transmission must relearn its shift strategy. As a result, the
transmission may have firm and/or soft shifts. This operation is
considered normal and will not affect function or durability of the
transmission. Over time, the adaptive learning process will fully update
transmission operation.
1.Use only a 12–volt supply to start your vehicle.
2. Do not disconnect the battery of the disabled vehicle as this could
damage the vehicle’s electrical system.
3. Park the booster vehicle close to the hood of the disabled vehicle
making sure the two vehiclesdo nottouch. Set the parking brake on
both vehicles and stay clear of the engine cooling fan and other moving
parts.
4. Check all battery terminals and remove any excessive corrosion before
you attach the battery cables. Ensure that vent caps are tight and level.
5. Turn the heater fan on in both vehicles to protect from any electrical
surges. Turn all other accessories off.
Roadside Emergencies
265
2010 Mariner(mrn)
Owners Guide, 2nd Printing
USA(fus)
Page 267 of 339

3. Connect the negative (-) cable to the negative (-) terminal of the
assisting battery.
4. Make the final connection of the negative (-) cable to an exposed
metal part of the stalled vehicle’s engine, away from the battery and the
carburetor/fuel injection system.
Note:Do not attach the negative (-) cable to fuel lines, engine rocker
covers, the intake manifold or electrical components asgrounding
points.
WARNING:Do not connect the end of the second cable to the
negative (-) terminal of the battery to be jumped. A spark may
cause an explosion of the gases that surround the battery.
5. Ensure that the cables are clear of fan blades, belts, moving parts of
both engines, or any fuel delivery system parts.
Jump starting
1. Start the engine of the booster vehicle and run the engine at
moderately increased speed.
+–+–
+–+–
Roadside Emergencies
267
2010 Mariner(mrn)
Owners Guide, 2nd Printing
USA(fus)