2010 MERCEDES-BENZ SPRINTER phone
[x] Cancel search: phonePage 126 of 292

the rear view camera for around 15 seconds
before switching back to the auxiliary device
input (AUX).
Switching off the monitor
If the monitor was switched on by engaging
reverse gear, it switches off automatically
15 seconds
after
you disengage reverse gear.
You can switch off the monitor by pressing
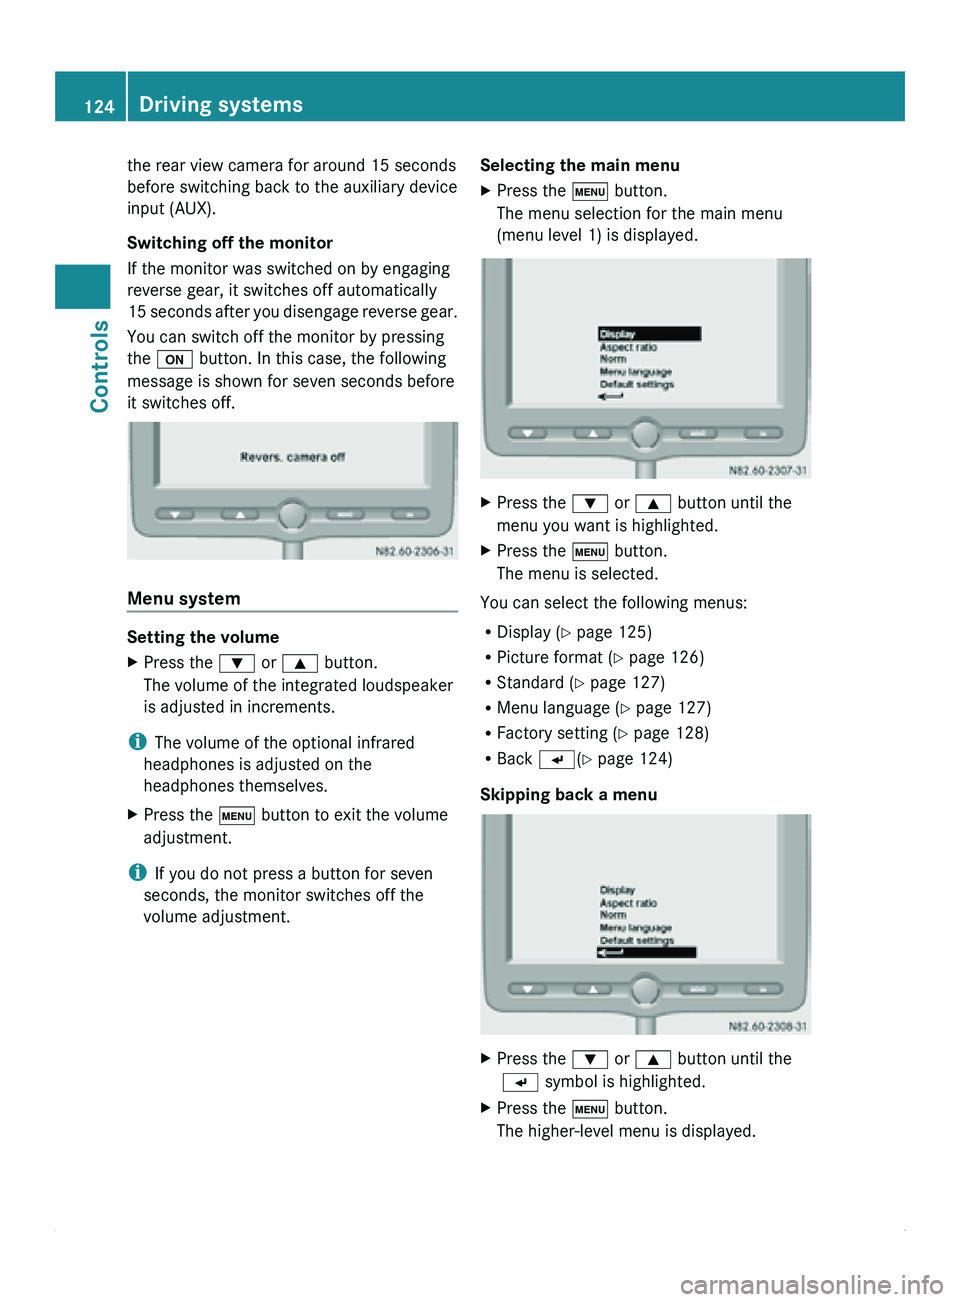
the 0094 button. In this case, the following
message is shown for seven seconds before
it switches off. Menu system
Setting the volume
X
Press the 003D or 003C button.
The volume of the integrated loudspeaker
is adjusted in increments.
i The volume of the optional infrared
headphones is adjusted on the
headphones themselves.
X Press the 0093 button to exit the volume
adjustment.
i If you do not press a button for seven
seconds, the monitor switches off the
volume adjustment. Selecting the main menu
X
Press the 0093 button.
The menu selection for the main menu
(menu level 1) is displayed. X
Press the 003D or 003C button until the
menu you want is highlighted.
X Press the 0093 button.
The menu is selected.
You can select the following menus:
R Display ( Y page 125)
R Picture format (
Y page 126)
R Standard (Y page 127)
R Menu language ( Y page 127)
R Factory setting (Y page 128)
R Back 0056(Y page 124)
Skipping back a menu X
Press the 003D or 003C button until the
0056 symbol is highlighted.
X Press the 0093 button.
The higher-level menu is displayed.124
Driving systems
Controls
Page 136 of 292

A navigation system does not supply
information on the load-bearing capacity of
bridges or the overhead clearance of
underpasses.
The driver remains responsible for the safety
of the vehicle at all times.
Observe legal requirements.
Telephones, two-way
radios
and fax machines
without an exterior antenna could interfere
with the vehicle electronics and thus
compromise the operational safety of the
vehicle. There is an increased risk of accident.
Do not use this equipment while the vehicle
is in motion.
Failure to observe the Sprinter installation
specifications can result in the invalidation of
your vehicle's operating permit.
You will find information on retrofitting
electrical or electronic equipment in the
"Technical data" section ( Y page 277).Telephone
G
Warning
A driver's attention to the road must always
be his/her primary focus when driving. For
your safety and the safety of others, we
recommend that you pull over to a safe
location and stop before placing or taking a
telephone call. If you choose to use the
telephone while driving,
please use the hands-
free device and only use the telephone when
weather, road and traffic conditions permit.
Some jurisdictions prohibit the driver from
using a mobile phone while driving a vehicle.
Bear in mind that at a speed of just 30 mph
(approximately 50 km/h ), your vehicle is
covering a distance of 44 feet (approximately
14 m) every second. G
Warning
Excessive electromagnetic radiation may
constitute a health hazard to yourself and
others. Use of an exterior antenna gives consideration to scientific discussion
surrounding the
possible
health risk posed by
electromagnetic fields.
The exterior antenna should only be installed
at a qualified specialist workshop which has
the necessary specialist knowledge and tools
to carry out the work required. We
recommend that you use an authorized
Sprinter Dealer for this purpose. In particular,
work relevant to safety or on safety-related
systems must be carried out at a qualified
specialist workshop.
We recommend the use of an approved
exterior antenna for operating the mobile
phone. Only in this way can optimal mobile
phone reception quality in the vehicle be
ensured and mutual interference between the
vehicle electronics and mobile phones
minimized.
Observe the legal requirements for each
individual country.
The mobile phone fitting includes a hands-
free system integrated into the vehicle. The
microphone for the hands-free system is
installed in the overhead control panel or in
the overhead stowage compartment together
with the front interior light.
In order to use the hands-free system, you will
need a special bracket. The Sprinter range of
accessories includes brackets for various
mobile phone models.
i Mobile phone brackets which are
available from various manufacturers on
the open market are not compatible with
the Sprinter telephone system. You can
recognize suitable phone brackets for your
mobile, by the printed star and the B6 in the
part number on the rear of the phone
bracket.
Detailed instructions for use can be found in
the operating instructions for the mobile
phone bracket and in the separate operating
instructions for the mobile phone fittings.
i The mobile phone battery is charged
depending on the condition of charge 134
Communications
Controls
Page 137 of 292

status and the position of the key in the
ignition lock. The mobile phone display
indicates the charging status. Communications
135Controls Z
Page 159 of 292

Select the SAE class (viscosity) of the engine
oil in accordance with the outside
temperature.
!
If the SAE
viscosity class of the engine oil
used does not cover the outside
temperature range in which you are
operating the vehicle, it must be changed
in good time, in particular before the cold
season commences. Using an engine oil
that does not have adequate temperature
characteristics can lead to engine damage.
The temperature range information of the
SAE classification always refers to that of
fresh oil. The temperature characteristics
of the engine oil may deteriorate
significantly due to aging in use, especially
at low outside temperatures.
For this reason, we recommend that the
engine oil be changed before the cold
season commences. Use an approved
engine oil of the specified SAE class. Engine oil SAE classification
i
Only by using
engine oil with a particularly
high quality grade, e.g. according to Sheet
Number 228.51 of the MB Specifications
for Service Products, can the maximum
interval for oil change be achieved.
We recommend that you only add engine oil
of the same quality grade and SAE class as
used when the engine oil was last changed.
You can obtain further information from any
authorized Sprinter Dealer.
! Do not add too much oil. Adding too much
oil can result in damage to the engine or the catalytic converter. Have excess oil
siphoned off.
Miscibility of engine oils If, in exceptional cases, oil of the type in the
engine is not available, top up using another
approved mineral or synthetic engine oil.
Engine oils are differentiated according to:
R
engine oil brand
R quality grade (sheet number)
R SAE class (viscosity)
Subsequently have the
engine oil changed at
the earliest possible opportunity.
! Mixing oils reduces the benefits of using
high grade engine oils.
i The sheet number (quality grade) and the
SAE classification (viscosity) can be found
on the designation on the oil bottle. Service products
157
Operation Z
Page 165 of 292

!
In order to avoid consequential damage,
repair damage caused by loose chippings
and remove any dirt immediately, in
particular:
R insect remains
R bird droppings
R flash rust
R tree resin
R oils and grease
R fuels
R tar stains
R salt residue
Wash your vehicle
more frequently if it gets
dirty more often.
! Do not park the vehicle for an extended
period right after cleaning it, particularly
after having cleaned the wheels with wheel
cleaner. Wheel cleaners could cause
increased corrosion of the brake discs and
brake pads/linings. Generally, park the
vehicle at operating temperature after
cleaning.
PARKTRONIC sensors PARKTRONIC sensors (example: front bumper, left
side of vehicle)
0046
Sensors
Clean all the sensors in the front and rear
bumpers with water, shampoo and a soft
cloth.
! Do not
use
dry, coarse or hard cloths and
do not scrub. You will otherwise scratch or
damage the sensors. If you clean the sensors with a power
washer or steam cleaner, observe the
information provided by the manufacturer
regarding the distance to be maintained
between the vehicle and the nozzle of the
power washer.
Rear-view camera lens Rear-view camera in the middle of the roof above
the high-mounted brake lamp
0046
Rear-view camera lens
0047 Microphone openings
Make sure not to put any wax on the lens of
rear-view camera 0046 when waxing the
vehicle. If necessary, remove the wax using
water, shampoo and a soft cloth.
! Do not
use
dry, coarse or hard cloths and
do not scrub. You could otherwise scratch
or damage the lens of the rear-view
camera.
When cleaning the vehicle with a high-
pressure or steam cleaner, observe a
minimum distance of 1.6 ft (50 cm) to the
rear-view camera.
To avoid damaging the rear-view camera,
do not aim directly at the rear-view camera
or the microphone openings on the bottom
of the rear-view camera.
Outside of the windshield and wiper
blades G
Warning
Before cleaning the windshield or wiper
blades, turn the key to 0 in the ignition lock. Cleaning and care
163
Operation
Z
Page 166 of 292

The windshield wipers may otherwise move
and injure you.
X Turn the key to position 0 in the ignition
lock or remove it.
! Do not fold the windshield wipers away
from the windshield unless the hood is
closed. Otherwise, you could damage the
hood.
X Fold the wiper arms away from the
windshield until you feel them engage.
X Clean the windshield and the wiper blades.
X Fold the windshield wipers back again
before switching on the ignition.
Headlamps Wipe the headlamp lenses with a wet sponge.
! Only use washer
fluid which is suitable for
plastic lamp lenses. Unsuitable washer
fluid could damage the plastic lamp lenses
of the headlamps.
Therefore, do not use:
R dry cloths
R abrasive products
R solvents
R cleaning products containing solvents
You could otherwise scratch or damage the
surface of the lenses.
Sliding door Clean the contact plates and the tips of the
contact pins around the sliding door with
water, shampoo and a soft cloth.
Do not oil or grease the contact plates and
contact pins.
Remove foreign objects. Power washers
! Maintain the following minimum
distances between the high-pressure
nozzle and the object being cleaned:
R approximately 2.2 ft (70 cm)
when using
round-jet nozzles
R approximately 1 ft (30 cm) when using
25° flat-spray jets and concentrated-
power jets
Keep the water jet moving while cleaning.
To avoid causing damage, do not point the
water jet directly at:
R door joints
R brake hoses
R electrical components
R plug connections
R seals
R the drive train, especially not at the
intermediate bearing of the propeller
shaft
R the rear-view camera or the microphone
opening on the bottom of the rear-view
camera. Keep a minimum distance of
1.6 ft (50 cm). G
Warning
Do not
use round-jet nozzles to clean the tires.
The pulsating water jet can cause damage to
the substructure of
the tires that is not visible
from the outside. This type of damage only
becomes noticeable at a much later stage and
can cause the tires to burst. This could cause
you to lose control of the vehicle, resulting in
an accident and injuring yourself or others.
Replace damaged tires immediately. Automatic car wash
If the vehicle is very dirty, prewash it before
you put it through an automatic car wash. G
Warning
If a wax preservative is applied after the
vehicle is washed,
you should remove the wax164
Cleaning and care
Operation
Page 167 of 292

from the windshield and the wiper blades to
prevent smearing.
Smears
impair the driver's
view, and their effect is made worse in
conditions where visibility is poor (e.g. glare,
mist, darkness, snow). You may therefore fail
to recognize dangers, or not recognize them
in time, and thereby cause an accident.
! Make sure that the automatic car wash is
suitable for the size of the vehicle.
Before washing the vehicle in an automatic
car wash, fold in the exterior mirrors and
remove the radio/telephone antenna.
Otherwise, the exterior mirror, antenna or
the vehicle itself could be damaged.
Make sure that the antenna is installed and
that the exterior mirrors are fully folded out
again when you leave the automatic car
wash.
! Make sure that the side windows are
completely closed, that the ventilation/
heating is switched off and that the
windshield wiper switch is set to 0.
Otherwise, the rain/light sensor could be
activated, triggering unintended wiper
movements. This can cause damage to the
vehicle.
After putting the vehicle through an
automatic car wash, wipe off wax from:
R the rear-view camera lens ( Y page 163)
R the windshield and the wiper blades. This
prevents smears and reduces wiping noise
which can be caused by residue on the
windshield. Cleaning the engine
! Water must not
enter intake or ventilation
openings. When cleaning with high
pressure water or steam cleaners, the
spray must not be aimed directly at
electrical components or the terminals of
electrical lines. Preserve the engine after the engine has
been cleaned.
Protect
the belt drive system
from exposure to the preservative agent. Alloy wheels
Clean the alloy wheels regularly.
! Do not use
any acidic or alkaline cleaning
agents. They can cause corrosion on the
wheel bolts (wheel nuts) or the retainer
springs for the wheel-balancing weights. After driving off-road or on
construction sites
G
Warning
Dirt on the vehicle can affect road and
operating safety.
It can specifically result in the following
dangers:
Stone impact. Stones trapped between the
tires can be thrown out while driving. This
could injure other
road users or damage other
vehicles (especially windscreens).
Risk of skidding. Dirt and mud on the tires/
on the road reduce the grip of the tires on the
road. This especially applies when the surface
is wet. The vehicle could then start to skid.
Risk of injury. Dirt and mud on the steps and
entrance can make the steps unsafe. This
could cause you to slip off the steps and be
injured.
For this reason, you should always clean your
vehicle carefully after driving off-road or on
construction sites before driving on public
roads. Observe the corresponding safety
notices in this chapter if you use a power
washer or an automatic car wash to clean your
vehicle.
X Clean the vehicle, paying special attention
to the following:
R
Lighting system
R Windows and exterior mirrors
R Access steps and entrances Cleaning and care
165
Operation Z
Page 175 of 292

Vehicles with a yellow oil dipstick: only check
the oil level when the engine is cold.
X
Park the vehicle on a level surface. X
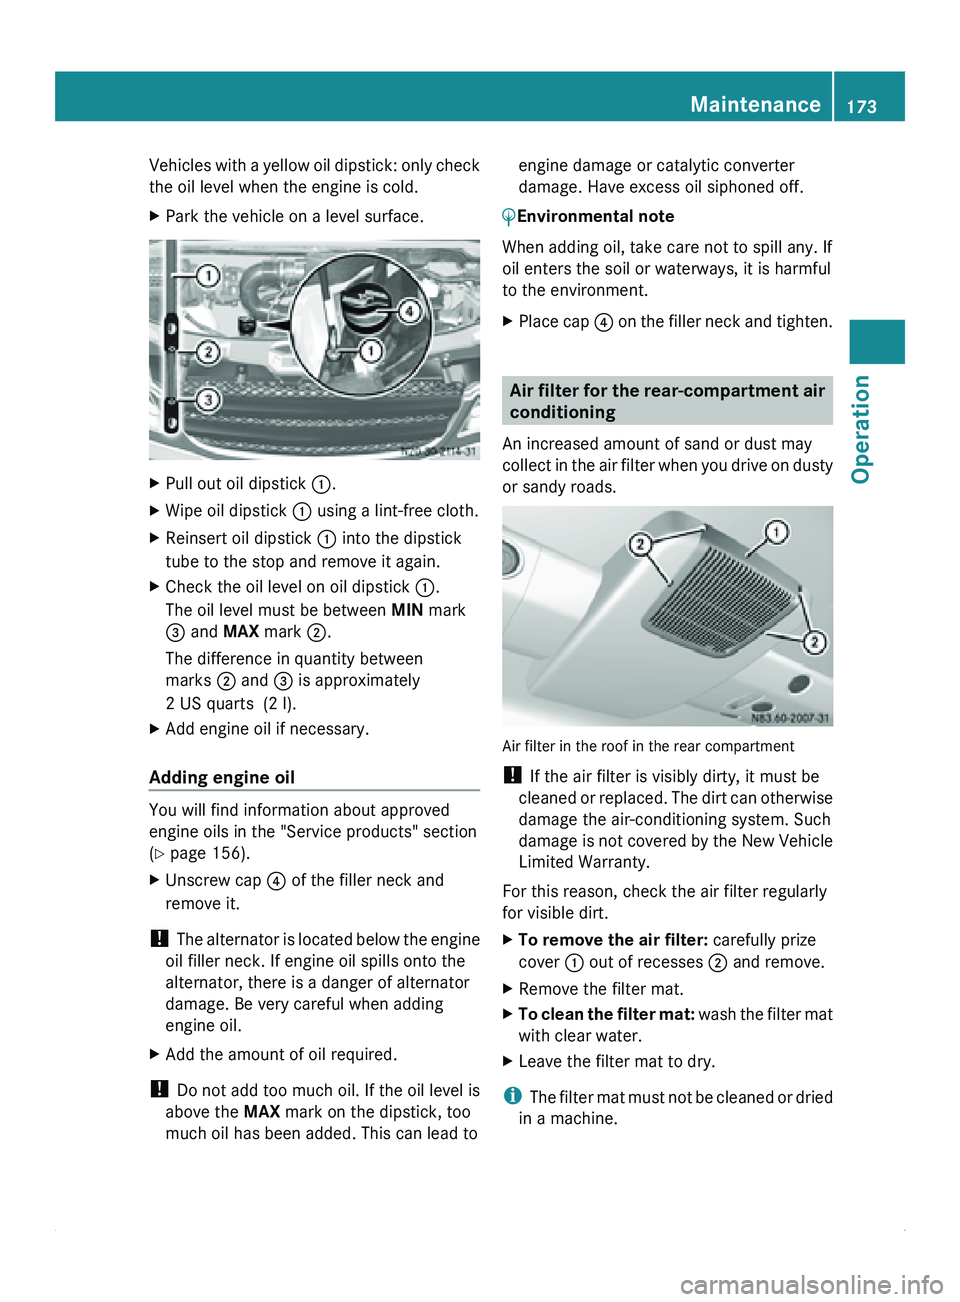
Pull out oil dipstick 0046.
X Wipe oil dipstick 0046 using a lint-free cloth.
X Reinsert oil dipstick 0046 into the dipstick
tube to the stop and remove it again.
X Check the oil level on oil dipstick 0046.
The oil level must be between MIN mark
008A and MAX mark 0047.
The difference in quantity between
marks 0047 and 008A is approximately
2 US quarts (2 l).
X Add engine oil if necessary.
Adding engine oil You will find information about approved
engine oils in the "Service products" section
(Y page 156).
X
Unscrew cap 0088 of the filler neck and
remove it.
! The alternator
is
located below the engine
oil filler neck. If engine oil spills onto the
alternator, there is a danger of alternator
damage. Be very careful when adding
engine oil.
X Add the amount of oil required.
! Do not add
too much oil. If the oil level is
above the MAX mark on the dipstick, too
much oil has been added. This can lead to engine damage or catalytic converter
damage. Have excess oil siphoned off.
0040Environmental note
When adding oil, take care not to spill any. If
oil enters the soil or waterways, it is harmful
to the environment.
X Place cap 0088 on the
filler neck and tighten. Air filter for the rear-compartment air
conditioning
An increased amount of sand or dust may
collect in the
air filter when you drive on dusty
or sandy roads. Air filter in the roof in the rear compartment
!
If the air filter is visibly dirty, it must be
cleaned or replaced.
The dirt can otherwise
damage the air-conditioning system. Such
damage is not covered by the New Vehicle
Limited Warranty.
For this reason, check the air filter regularly
for visible dirt.
X To remove the air filter: carefully prize
cover 0046 out of recesses 0047 and remove.
X Remove the filter mat.
X To clean the filter mat:
wash the
filter mat
with clear water.
X Leave the filter mat to dry.
i The filter mat
must not be cleaned or dried
in a machine. Maintenance
173
Operation Z