2010 MERCEDES-BENZ SLK55AMG radio
[x] Cancel search: radioPage 115 of 312
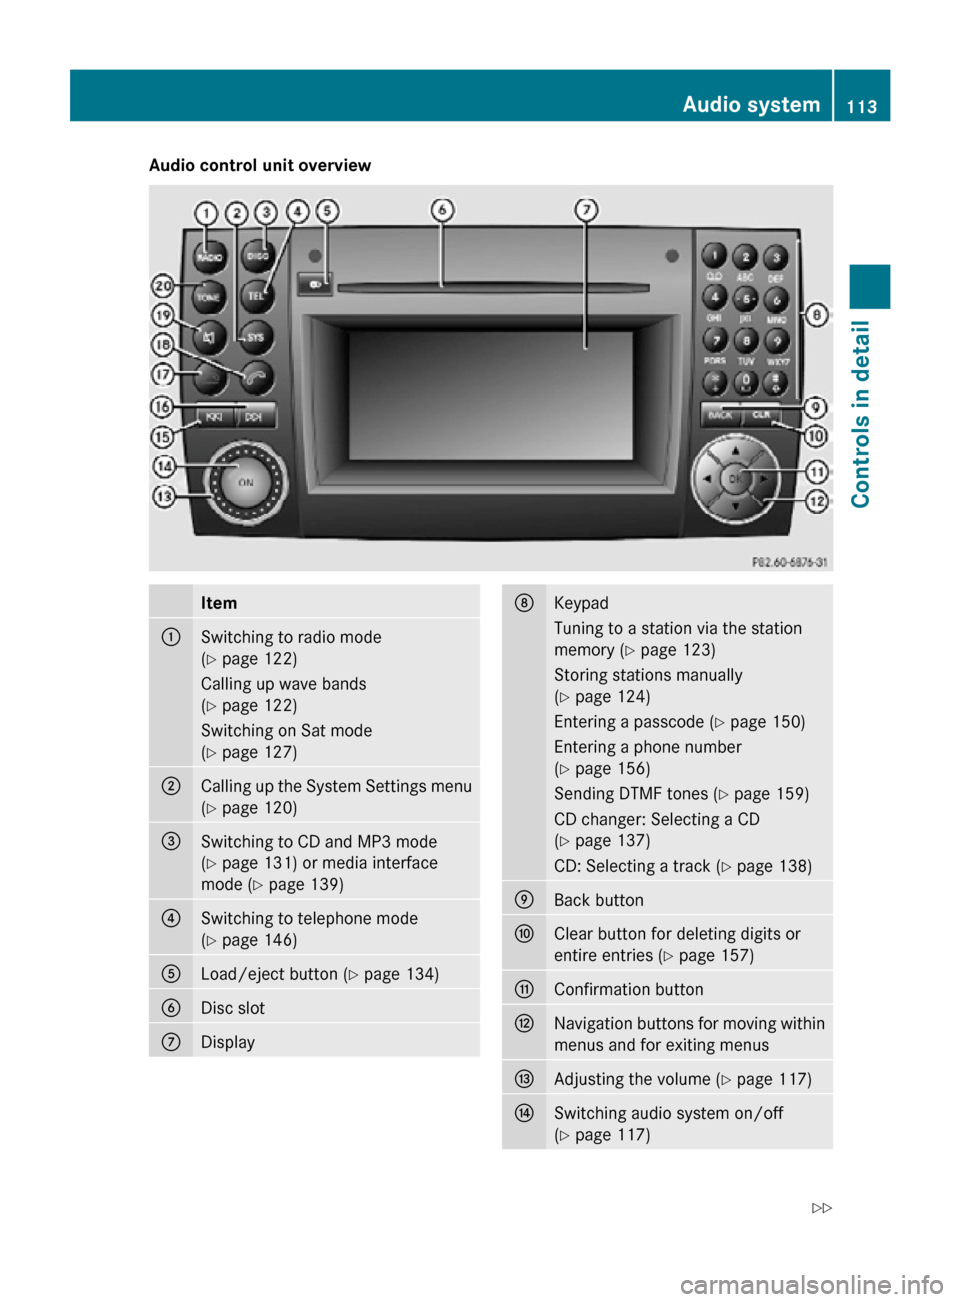
Audio control unit overview
Item
:
Switching to radio mode
(Y page 122)
Calling up wave bands
(Y page 122)
Switching on Sat mode
(Y page 127)
;
Calling up the System Settings menu
(Y page 120)
=
Switching to CD and MP3 mode
(Y page 131) or media interface
mode (
Y page 139) ?
Switching to telephone mode
(Y page 146)
A
Load/eject button (Y page 134)
B
Disc slot
C
Display D
Keypad
Tuning to a station via the station
memory (
Y page 123)
Storing stations manually
(Y page 124)
Entering a passcode (Y page 150)
Entering a phone number
(Y page 156)
Sending DTMF tones ( Y page 159)
CD changer: Selecting a CD
(Y page 137)
CD: Selecting a track (Y page 138) E
Back button
F
Clear button for deleting digits or
entire entries (
Y page 157) G
Confirmation button
H
Navigation buttons for moving within
menus and for exiting menus
I
Adjusting the volume (Y page 117)
J
Switching audio system on/off
(Y page 117) Audio system
113Controls in detail
171_AKB; 3; 60, en-US
d2ureepe, Version: 2.11.8.1 2009-05-11T16:00:23+02:00 - Seite 113 Z
Page 116 of 312
K
Tuning to a station via station search
(Y page 123)
Fast rewind (Y page 138)
Skipping backwards to a track
(Y page 138) L
Tuning to a station via station search
(Y page 123)
Fast forward (
Y page 138)
Skipping forwards to a track
(Y page 138) M
Rejecting a call (
Y page 158)
Ending an active call (Y page 158) N
Confirming a passcode
(Y page 150)
Accepting a call (Y page 158)
Initiating a call (
Y page 156)
Redial ( Y page 157) O
Switching sound on/off
(Y page 118)
Switching hands-free microphone
on/off (
Y page 158) P
Sound settings (
Y page 118) Audio display
!
Avoid touching the audio display at all
times. The display has a very sensitive high-
gloss surface, there is a risk of it being
scratched. Do not press directly in the
display face. Otherwise, the audio display
will be damaged.
i For information about cleaning and care
of the audio display, see “Audio or
COMAND display” ( Y page 231).
Display
The currently selected mode and the
associated menus are shown on the audio
display. The audio display is divided into
several areas. Example illustration: Radio selected
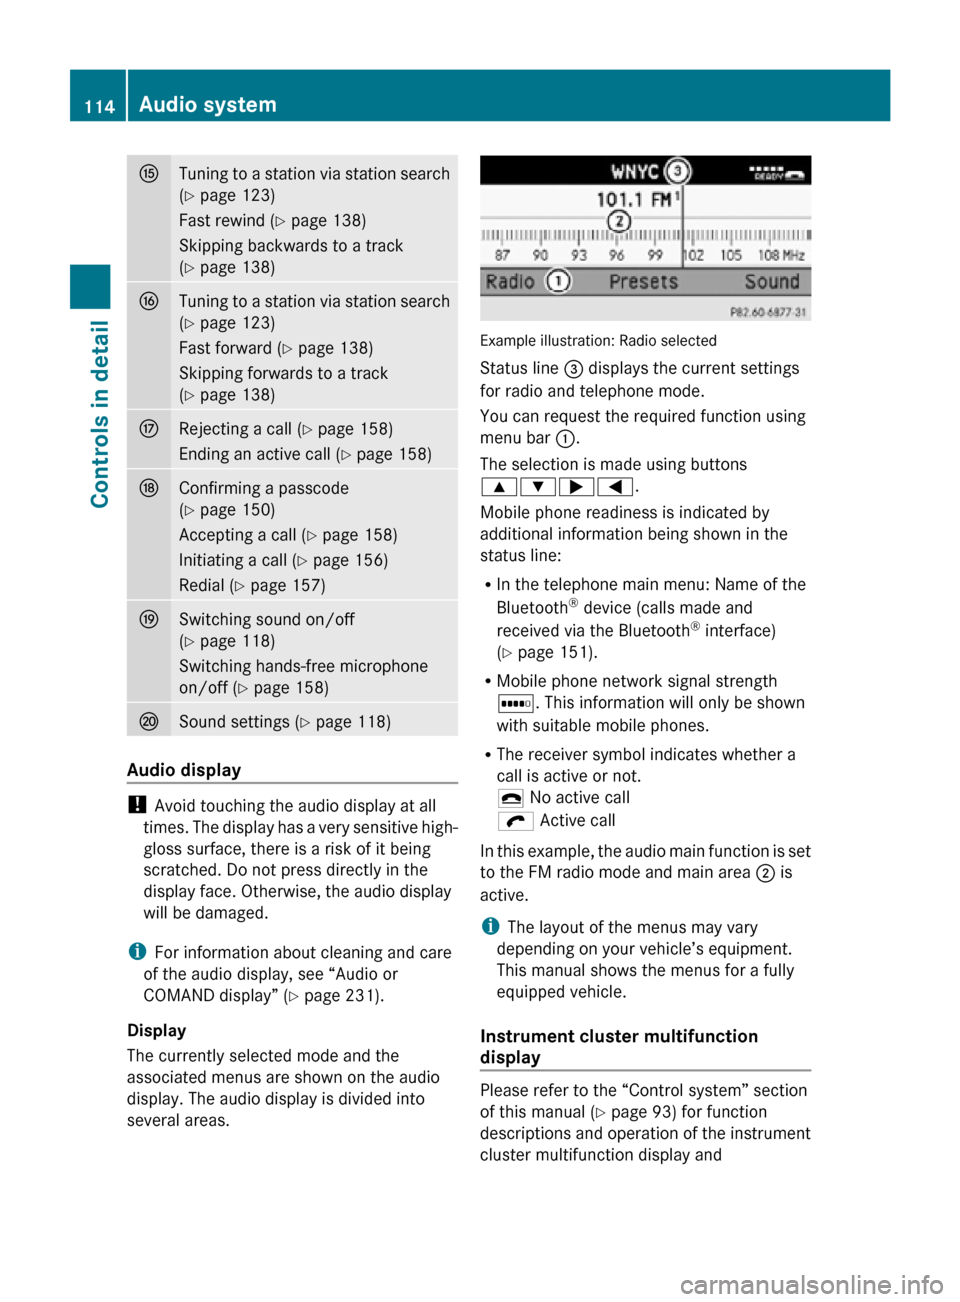
Status line = displays the current settings
for radio and telephone mode.
You can request the required function using
menu bar
:.
The selection is made using buttons
9:;=.
Mobile phone readiness is indicated by
additional information being shown in the
status line:
R In the telephone main menu: Name of the
Bluetooth ®
device (calls made and
received via the Bluetooth ®
interface)
(Y page 151).
R Mobile phone network signal strength
r. This information will only be shown
with suitable mobile phones.
R The receiver symbol indicates whether a
call is active or not.
¢ No active call
ö Active call
In this example, the audio main function is set
to the FM radio mode and main area ; is
active.
i The layout of the menus may vary
depending on your vehicle’s equipment.
This manual shows the menus for a fully
equipped vehicle.
Instrument cluster multifunction
display Please refer to the “Control system” section
of this manual (
Y page 93) for function
descriptions and operation of the instrument
cluster multifunction display and 114
Audio systemControls in detail
171_AKB; 3; 60, en-US
d2ureepe,
Version: 2.11.8.1 2009-05-11T16:00:23+02:00 - Seite 114
Page 117 of 312
multifunction steering wheel buttons as they
relate to audio functions described in this
section.
Menu
The table below shows the structure of the
modes and their menus. Each mode has a
basic menu. Each menu item in turn has
several submenu items. Button Mode/Menu
$
Radio mode
Radio (FM/AM) (Y page 121)
Weather Band (
Y page 121) Satellite radio (
Y page 125) h
Disc mode
CD/MP3 mode (Y page 131)
Media interface operation
(Y page 139)
Audio AUX mode (
Y page 145) %
Telephone mode
Telephone mode (Y page 146)
i
System menu
System settings (Y page 119)
Display on/off (
Y page 120) Calling up an operating mode
X
Press the respective button ( $, h,
%, or i) on the audio control unit.
The basic menu of the selected mode
appears in the audio display. The main area
is active. The active area is highlighted.
i The following screens show the audio
display’s day design. The appearance of the
highlighted items in the menu will vary
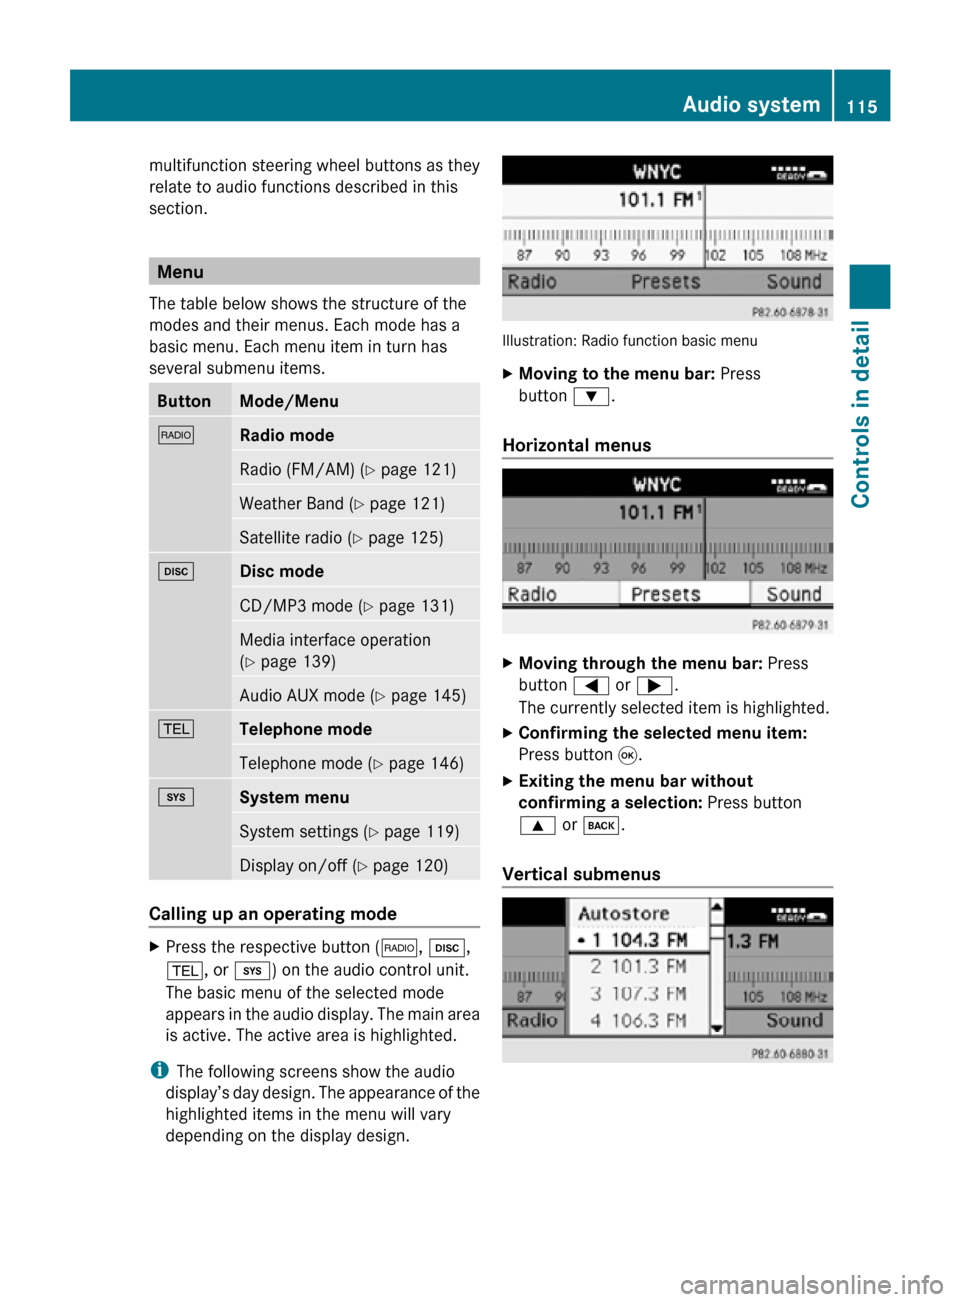
depending on the display design. Illustration: Radio function basic menu
X
Moving to the menu bar: Press
button :.
Horizontal menus X
Moving through the menu bar: Press
button = or ;.
The currently selected item is highlighted.
X Confirming the selected menu item:
Press button 9.
X Exiting the menu bar without
confirming a selection: Press button
9 or k.
Vertical submenus Audio system
115Controls in detail
171_AKB; 3; 60, en-US
d2ureepe, Version: 2.11.8.1 2009-05-11T16:00:23+02:00 - Seite 115 Z
Page 118 of 312
X
Moving through the submenu: Press
button 9 or :.
The currently selected item is highlighted.
X Confirming the selected submenu
item: Press button 9.
X Exiting the submenu without
confirming a selection: Press button
= or ;.
Back button X
Moving to the superordinate menu:
Press back button k briefly.
X Moving to the main menu of the current
operating mode: Press and hold back
button k.
Clear button Use clear button 2 for deleting digit or
entire entries ( Y page 157).
X Deleting a single digit: Press button
2 briefly.
X Deleting entire entry: Press and hold
button 2.
Example of how to use the audio system Example: direct frequency input,
FM 104.5 MHz.
$ Q Radio Q Enter Frequency
The individual steps for the above-mentioned
example are described below.
X Press button $ on audio control unit
repeatedly until desired wave band FM has
been selected.
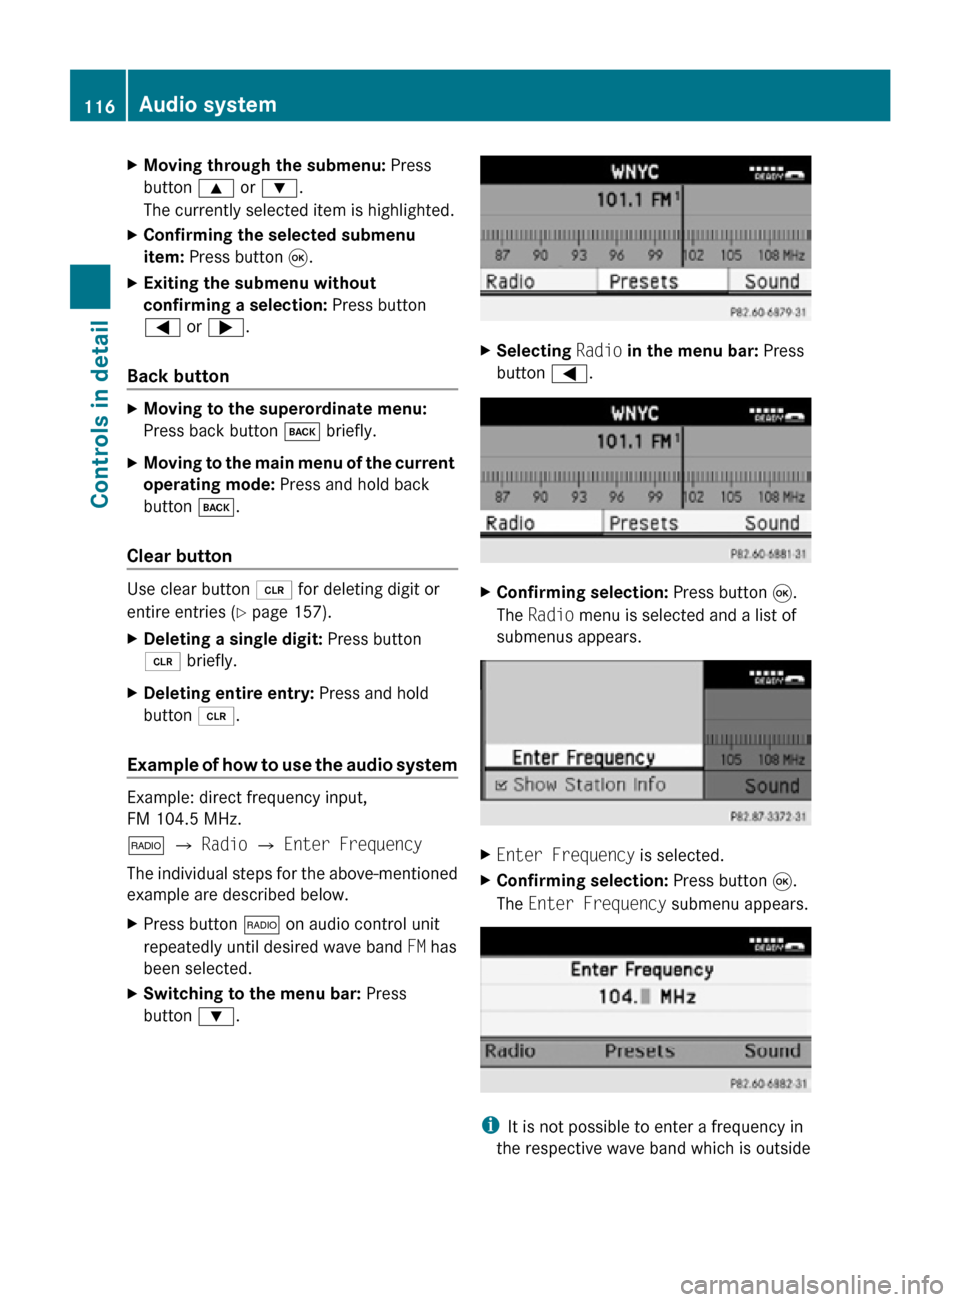
X Switching to the menu bar: Press
button :. X
Selecting Radio in the menu bar: Press
button =. X
Confirming selection: Press button 9.
The Radio menu is selected and a list of
submenus appears. X
Enter Frequency is selected.
X Confirming selection: Press button 9.
The Enter Frequency submenu appears. i
It is not possible to enter a frequency in
the respective wave band which is outside 116
Audio systemControls in detail
171_AKB; 3; 60, en-US
d2ureepe,
Version: 2.11.8.1 2009-05-11T16:00:23+02:00 - Seite 116
Page 119 of 312

the frequency range. Frequencies within
the current frequency range, but outside
the current frequency step width are
rounded to the next lower allowed
frequency.
X Enter 1045 with the keypad on the audio
control unit.
The audio system tunes in to the frequency
entered. Operation
In the following description, an operation step
is described as in the example below.
X $ Q Radio Q Enter Frequency
is the short for
X Press button $ on audio control unit
repeatedly until desired wave band has
been selected.
X Press button :.
X Press button = to select Radio.
X Press button 9.
The Radio menu is selected and a list of
submenus appears.
X Enter Frequency is selected. If it is not
selected, press button 9 to select
Enter Frequency.
X Press button 9.
The Enter Frequency submenu appears
in the audio display.
Switching audio system on or off X
Switching on: Press push button q.
or
X If the audio system was on as you switched
off the ignition, turn the SmartKey in the
starter switch to position 1.
The audio system will come back on with
the last selected function.
i If the audio system is switched on without
the SmartKey in the starter switch, it will
automatically switch off again after
approximately 30 minutes.
X Switching off: Press push button q.
or
X Turn the SmartKey in the starter switch to
position 0 and remove SmartKey from
starter switch.
i Should excessively high temperatures
occur while the audio system is being
operated, Temperature Too High -
Device switching off now. will appear
in the audio display, after which the audio
system will be switched off for a cooling-
down period.
i When you switch off the audio system,
you also switch off the currently playing
audio source. Also, telephone operation via
the audio control unit is not possible.
Adjusting volume Audio system
117Controls in detail
171_AKB; 3; 60, en-US
d2ureepe, Version: 2.11.8.1 2009-05-11T16:00:23+02:00 - Seite 117 Z
Page 121 of 312
X
Changing setting: Press button =
or ; until desired balance setting is
achieved.
X Saving setting: Press button 9 or k.
The balance setting is stored for all audio
sources and the menu is exited.
Surround sound If your vehicle is equipped with the harman/
kardon Logic
7®
Surround Sound system, you
can choose between Logic7 ®
On and
Logic7 ®
Off for surround sound.
harman/kardon Logic 7®
Surround Sound is
available for the following operating modes:
R Radio (FM only)
R Satellite radio
R CD audio
R MP3
R Media interface
R AUX
i By selecting Logic7®
Off , all compatible
formats are played back as they are
present on the medium.
Adjusting surround sound
With surround sound, you can choose
between Logic7 ®
On and Logic7 ®
Off.
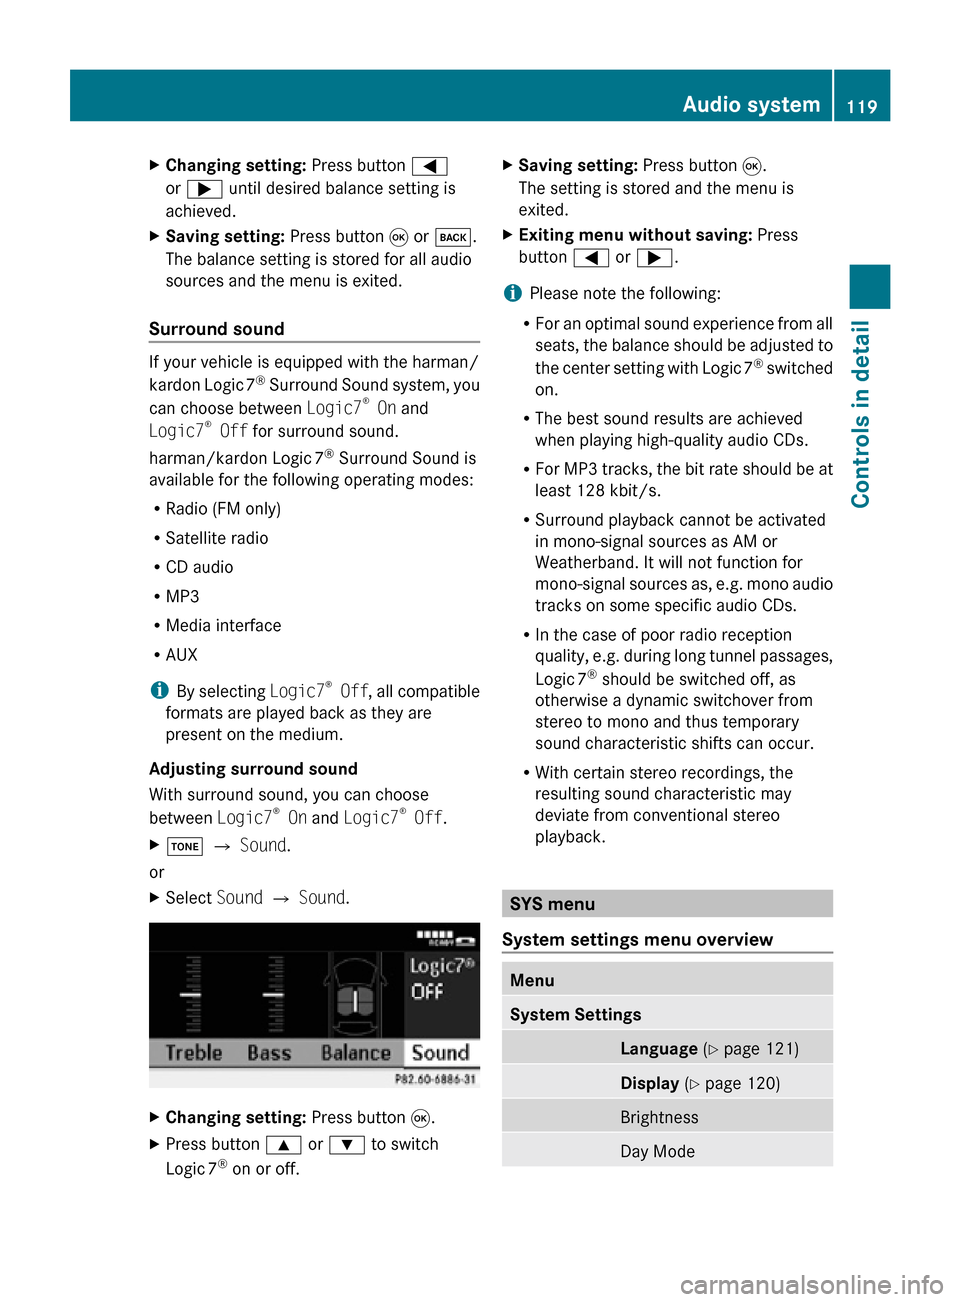
X J Q Sound.
or
X Select Sound Q Sound. X
Changing setting: Press button 9.
X Press button 9 or : to switch
Logic 7 ®
on or off. X
Saving setting: Press button 9.
The setting is stored and the menu is
exited.
X Exiting menu without saving: Press
button = or ;.
i Please note the following:
R For an optimal sound experience from all
seats, the balance should be adjusted to
the center setting with Logic 7 ®
switched
on.
R The best sound results are achieved
when playing high-quality audio CDs.
R For MP3 tracks, the bit rate should be at
least 128 kbit/s.
R Surround playback cannot be activated
in mono-signal sources as AM or
Weatherband. It will not function for
mono-signal sources as, e.g. mono audio
tracks on some specific audio CDs.
R In the case of poor radio reception
quality, e.g. during long tunnel passages,
Logic 7 ®
should be switched off, as
otherwise a dynamic switchover from
stereo to mono and thus temporary
sound characteristic shifts can occur.
R With certain stereo recordings, the
resulting sound characteristic may
deviate from conventional stereo
playback. SYS menu
System settings menu overview Menu
System Settings
Language
(Y page 121) Display
(Y page 120) Brightness
Day Mode Audio system
119Controls in detail
171_AKB; 3; 60, en-US
d2ureepe, Version: 2.11.8.1 2009-05-11T16:00:23+02:00 - Seite 119 Z
Page 123 of 312
Reset
i
You can reset the audio system back to
its factory settings. In this case, all personal
data (e.g. address book entries, call lists,
paired mobile phones, and presets) are
deleted. We recommend that you reset the
values before selling your vehicle.
X i Q System Settings Q Reset.
A prompt appears asking whether you
really want to reset.
X Select Yes or No.
If you select Yes another prompt will
appear asking whether you really want to
reset.
X Select Yes or No.
If you select Yes, the audio system will be
reset and restarted.
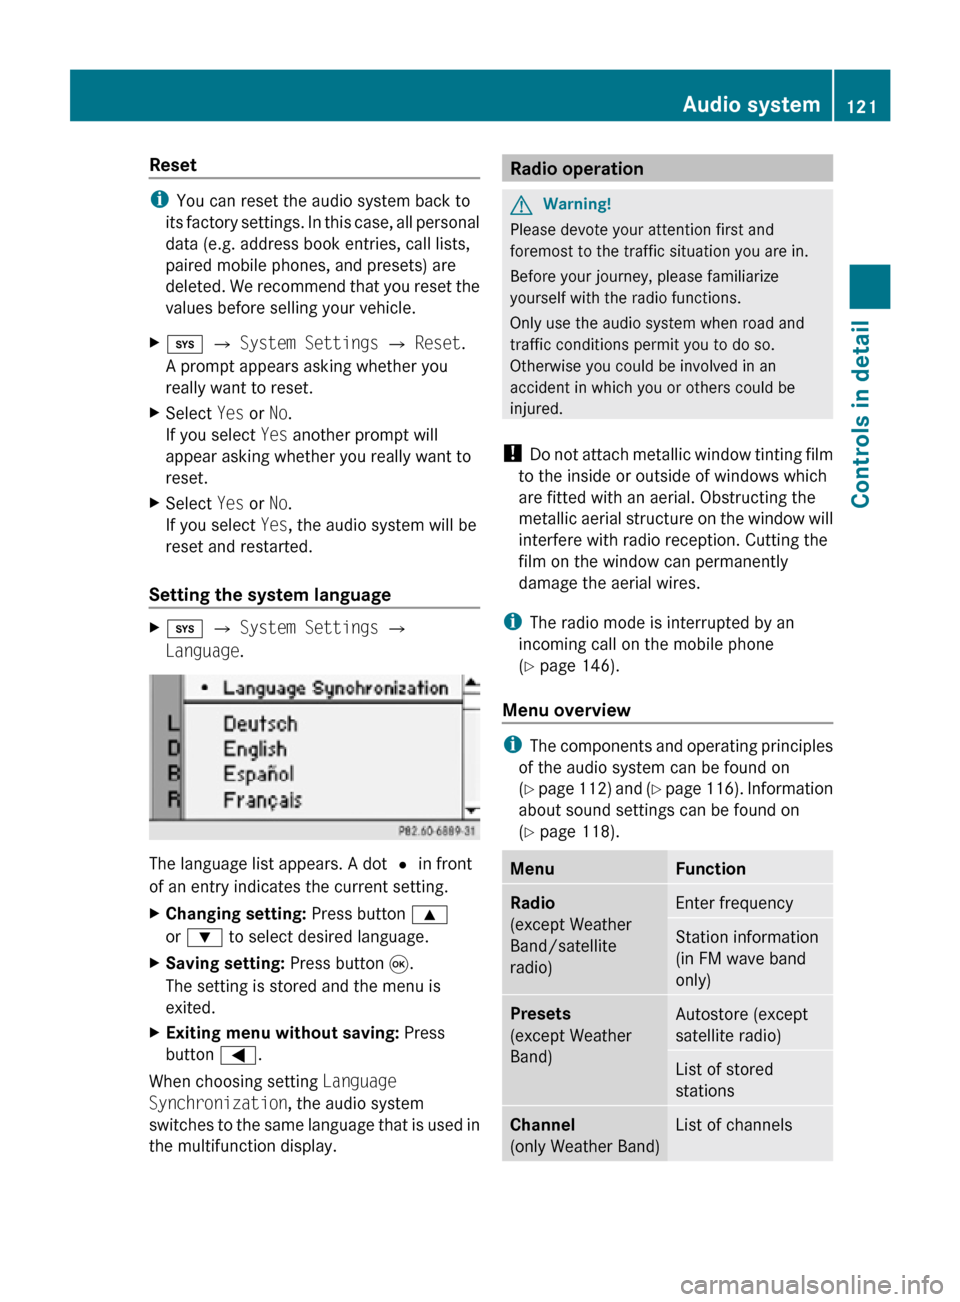
Setting the system language X
i Q System Settings Q
Language. The language list appears. A dot
# in front
of an entry indicates the current setting.
X Changing setting: Press button 9
or : to select desired language.
X Saving setting: Press button 9.
The setting is stored and the menu is
exited.
X Exiting menu without saving: Press
button =.
When choosing setting Language
Synchronization, the audio system
switches to the same language that is used in
the multifunction display. Radio operation
G
Warning!
Please devote your attention first and
foremost to the traffic situation you are in.
Before your journey, please familiarize
yourself with the radio functions.
Only use the audio system when road and
traffic conditions permit you to do so.
Otherwise you could be involved in an
accident in which you or others could be
injured.
! Do not attach metallic window tinting film
to the inside or outside of windows which
are fitted with an aerial. Obstructing the
metallic aerial structure on the window will
interfere with radio reception. Cutting the
film on the window can permanently
damage the aerial wires.
i The radio mode is interrupted by an
incoming call on the mobile phone
(Y page 146).
Menu overview i
The components and operating principles
of the audio system can be found on
(Y page 112) and (Y page 116). Information
about sound settings can be found on
(Y page 118). Menu Function
Radio
(except Weather
Band/satellite
radio)
Enter frequency
Station information
(in FM wave band
only)
Presets
(except Weather
Band)
Autostore (except
satellite radio)
List of stored
stations
Channel
(only Weather Band)
List of channels Audio system
121Controls in detail
171_AKB; 3; 60, en-US
d2ureepe, Version: 2.11.8.1 2009-05-11T16:00:23+02:00 - Seite 121 Z
Page 124 of 312
Menu Function
Sound
Treble
Bass
Balance
Surround Sound
Switching to radio mode
X
Press button $ on audio control unit.
The radio basic menu appears in the audio
display. The radio switches to the last
station you have listened to.
Weather Band will automatically tune to the
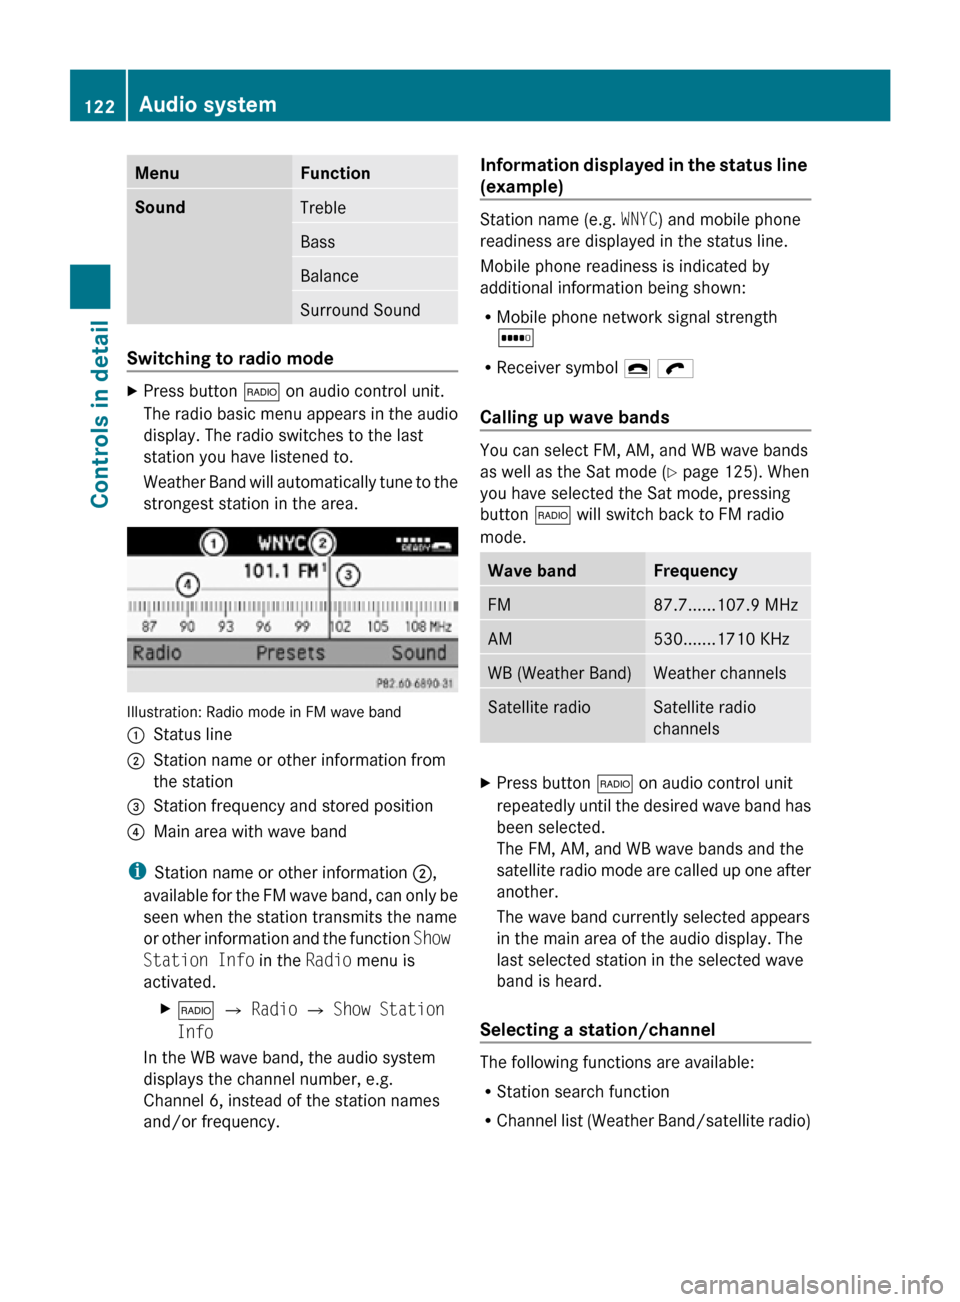
strongest station in the area. Illustration: Radio mode in FM wave band
:
Status line
; Station name or other information from
the station
= Station frequency and stored position
? Main area with wave band
i Station name or other information ;,
available for the FM wave band, can only be
seen when the station transmits the name
or other information and the function Show
Station Info in the Radio menu is
activated.
X$ Q Radio Q Show Station
Info
In the WB wave band, the audio system
displays the channel number, e.g.
Channel 6, instead of the station names
and/or frequency. Information displayed in the status line
(example) Station name (e.g.
WNYC) and mobile phone
readiness are displayed in the status line.
Mobile phone readiness is indicated by
additional information being shown:
R Mobile phone network signal strength
r
R Receiver symbol ¢ ö
Calling up wave bands You can select FM, AM, and WB wave bands
as well as the Sat mode (
Y page 125). When
you have selected the Sat mode, pressing
button $ will switch back to FM radio
mode. Wave band Frequency
FM 87.7......107.9 MHz
AM 530.......1710 KHz
WB (Weather Band) Weather channels
Satellite radio Satellite radio
channels
X
Press button $ on audio control unit
repeatedly until the desired wave band has
been selected.
The FM, AM, and WB wave bands and the
satellite radio mode are called up one after
another.
The wave band currently selected appears
in the main area of the audio display. The
last selected station in the selected wave
band is heard.
Selecting a station/channel The following functions are available:
R
Station search function
R Channel list (Weather Band/satellite radio) 122
Audio systemControls in detail
171_AKB; 3; 60, en-US
d2ureepe,
Version: 2.11.8.1 2009-05-11T16:00:23+02:00 - Seite 122