2010 MERCEDES-BENZ SLK300 open top
[x] Cancel search: open topPage 9 of 312

Direction of rotation (tires)
..............209
Displays
Digital speedometer ........................97
Maintenance service indicator .......225
Messages in the multifunction
display
........................................... 236
Multifunction display .......................95
Outside temperature ...............97, 104
Symbol messages .......................... 243
Text messages ............................... 237
Trip computer ................................ 109
Vehicle status message memory ...101
Vehicle system settings ................. 102
Door control panel .............................. 30
Doors
Locking/unlocking (SmartKey) ........ 56
Messages in the multifunction
display ........................................... 245
Opening from inside ......................... 58
Remote door unlock (Tele Aid) ....... 182
Unlocking (Mechanical key) ........... 264
DOT (Department of
Transportation) .................................. 217
Drinking and driving .........................221
Driving
Abroad ........................................... 224
Hydroplaning ................................. 224
Instructions ............................. 80, 221
In winter ........................................ 220
Problems ......................................... 82
Safety systems ................................ 47
Systems ......................................... 159
Through standing water .................224
Driving and parking
Safety notes ..................................... 79
Driving off .................................... 81, 224
Driving safety systems ....................... 47
ABS .................................................. 48
BAS .................................................. 49
ESP ®
................................................ 49
ETS .................................................. 50
Driving systems
Cruise control ................................ 159
Driving tips, automatic
transmission ........................................ 87 E
Easy-entry/exit feature .............. 67, 108
Electrical system
Improper work on or
modifications ................................... 20
Power outlet .................................. 177
Electrical system (Technical data)
see Vehicle specification
Electronic Stability Program
see ESP ®
Emergency, in case of
First aid kit ..................................... 234
Flat tire .......................................... 273
Hazard warning flasher ....................74
Roadside Assistance ................ 19, 180
Towing the vehicle .........................285
Emergency calls
Tele Aid .......................................... 179
Telephone ...................................... 152
Emergency operations
Remote door unlock (Tele Aid) ....... 182
Retractable hardtop .......................266
Trunk lid, emergency release ...........60
Emergency Tensioning Device
see ETD
Emission control ............................... 225
Information label ............................ 293
System warranties ........................... 18
Engine
Break-in recommendations ............190
Cleaning ......................................... 228
Compartment ................................ 192
Malfunction indicator
lamp ........................................ 26, 262
Messages in the multifunction
display ........................................... 247
Number .......................................... 293
Starting ............................................ 80
Turning off ....................................... 84
Engine (Technical data)
see Vehicle specification
Engine coolant
see Coolant
Engine oil
Adding ........................................... 195
Additives ........................................ 303
Checking level ............................... 193 Index
7 171_AKB; 3; 60, en-US
d2ureepe,
Version: 2.11.8.1 2009-05-11T16:00:23+02:00 - Seite 7
Page 26 of 312
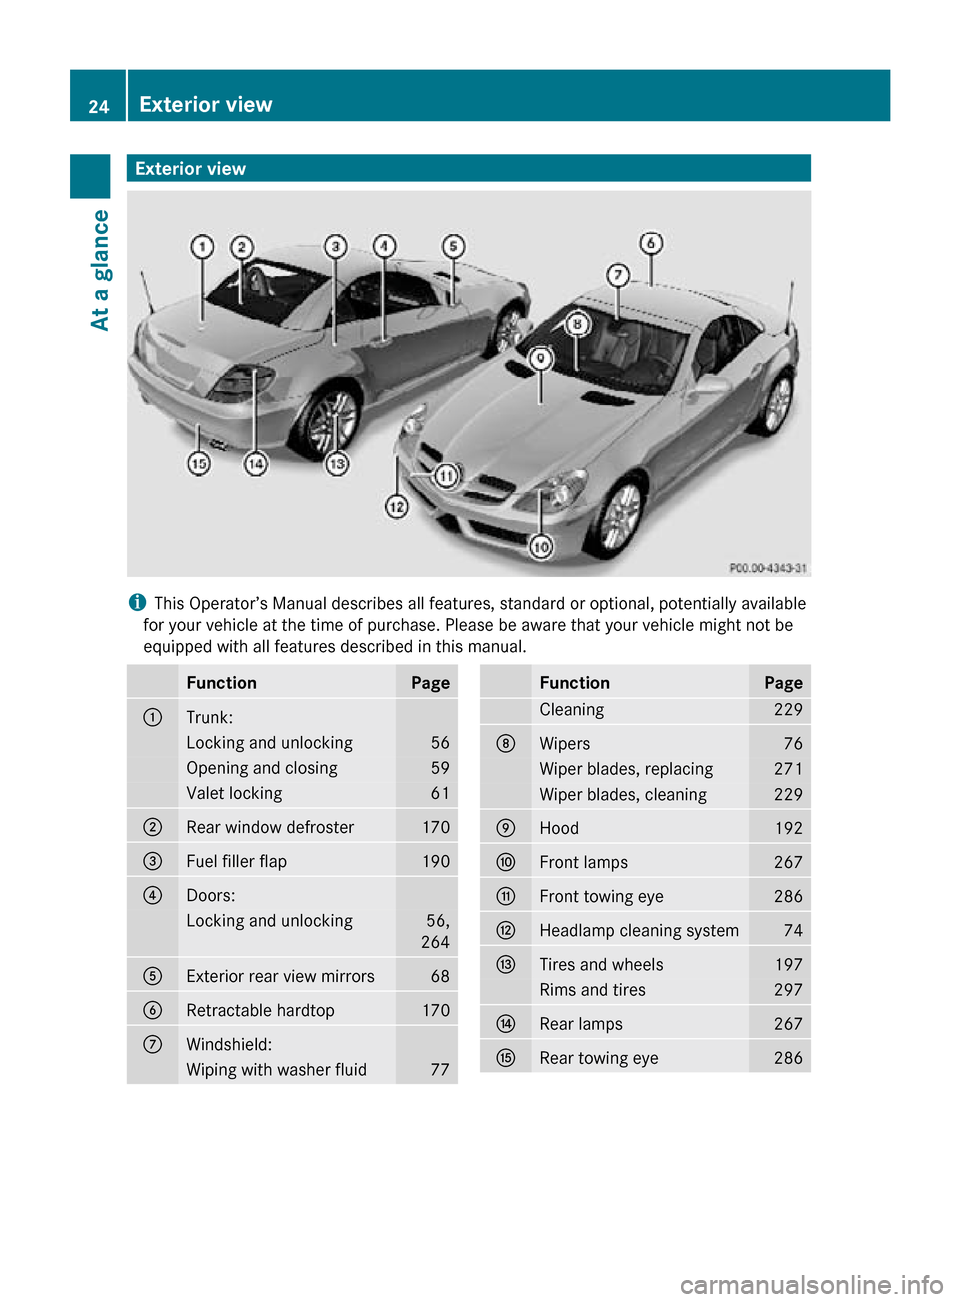
Exterior view
i
This Operator’s Manual describes all features, standard or optional, potentially available
for your vehicle at the time of purchase. Please be aware that your vehicle might not be
equipped with all features described in this manual. Function Page
:
Trunk:
Locking and unlocking 56
Opening and closing 59
Valet locking 61
;
Rear window defroster 170
=
Fuel filler flap 190
?
Doors:
Locking and unlocking 56,
264 A
Exterior rear view mirrors 68
B
Retractable hardtop 170
C
Windshield:
Wiping with washer fluid 77 Function Page
Cleaning 229
D
Wipers 76
Wiper blades, replacing 271
Wiper blades, cleaning 229
E
Hood 192
F
Front lamps 267
G
Front towing eye 286
H
Headlamp cleaning system 74
I
Tires and wheels 197
Rims and tires 297
J
Rear lamps 267
K
Rear towing eye 28624
Exterior viewAt a glance
171_AKB; 3; 60, en-US
d2ureepe,
Version: 2.11.8.1 2009-05-11T16:00:23+02:00 - Seite 24
Page 45 of 312
If after these 6 seconds the driver’s or the
passenger’s seat belt (with the passenger
seat occupied) is not fastened with both
doors closed,
R
the seat belt telltale 7 remains
illuminated
for as long as either the driver’s
or passenger’s seat belt is not fastened.
R and if the vehicle speed once exceeds
15 mph (25 km/h), the seat belt telltale
7 starts flashing and a warning chime
sounds with increasing intensity for a
maximum of 60 seconds or until the
driver’s and passenger’s seat belt are
fastened.
If you and/or your passenger release the
seat belt during driving, the seat belt
telltale 7 starts flashing and the
warning chime sounds as described before.
If the driver’s or the passenger’s seat belt
remains unfastened after 60 seconds, the
warning chime stops sounding, the seat
belt telltale 7 stops flashing but
continues to be illuminated.
After a vehicle standstill, the warning chime
is reactivated and the seat belt telltale
7 is flashing again if the vehicle speed
once exceeds 15 mph (25 km/h).
The seat belt telltale 7 will only go out if
both the driver’s and the passenger’s seat
belt (with the passenger seat occupied) are
fastened, or the vehicle is standing still and a
door is opened.
For more information, see “Practical hints”
(Y page 259).
Emergency Tensioning Device (ETD),
seat belt force limiter The seat belts are equipped with ETDs and
seat belt force limiters. The ETDs are designed to activate in the
following cases:
R
in frontal or rear-end impacts exceeding
the system’s preset deployment threshold
R if
the restraint systems are operational and
functioning correctly, see “SRS indicator
lamp” (Y page 32)
R in certain vehicle rollovers if the system
determines an additional degree of
protection
The ETDs will only activate if the seat belts are
fastened (latch plate properly inserted into
buckle).
In an impact, the ETDs remove slack from the
seat belts in such a way that the seat belts fit
more snugly against the body. Seat belt force
limiters, when activated, are employed to
help reduce the peak force exerted by the
seat belts on occupants during a crash.
i The ETDs do not correct an incorrect seat
position or incorrectly worn seat belts.
The ETDs do not pull occupants back
toward the seat backrest. G
Warning!
Pyrotechnic ETDs that were activated must be
replaced.
For your safety, when disposing of the
pyrotechnic ETDs always follow our safety
instructions. These are available at any
authorized Mercedes-Benz Center. Correct driver seat adjustment
G
Warning!
In order to avoid possible loss of vehicle
control
the following must be done before the
vehicle is put into motion:
R seat adjustment
R head restraint adjustment
R steering wheel adjustment Occupant safety
43
Safety and security
171_AKB; 3; 60, en-US
d2ureepe, Version: 2.11.8.1 2009-05-11T16:00:23+02:00 - Seite 43 Z
Page 62 of 312
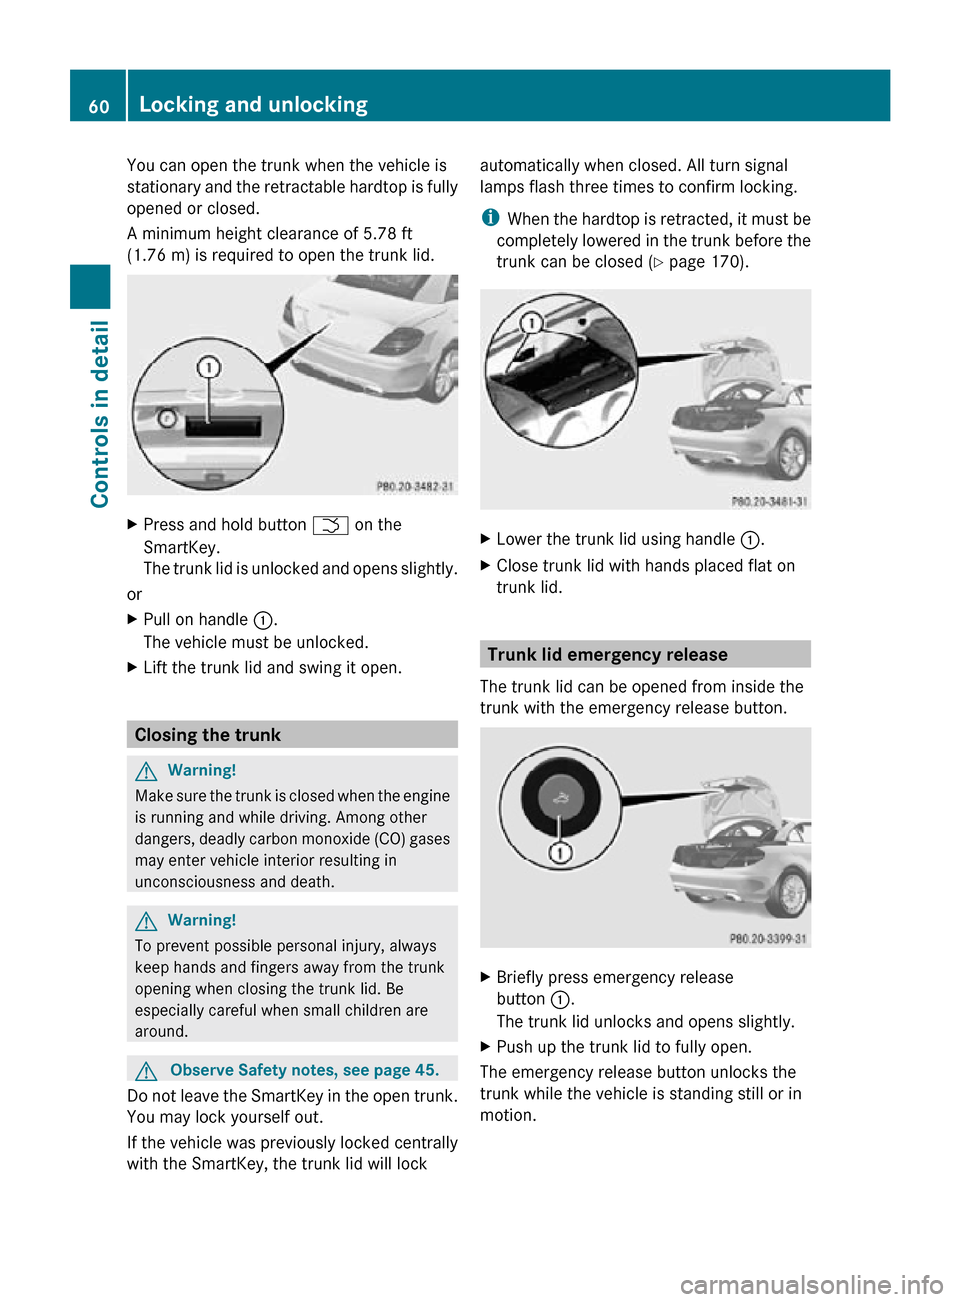
You can open the trunk when the vehicle is
stationary and the retractable hardtop is fully
opened or closed.
A minimum height clearance of 5.78 ft
(1.76 m) is required to open the trunk lid.
X
Press and hold button F on the
SmartKey.
The trunk lid is unlocked and opens slightly.
or
X Pull on handle :.
The vehicle must be unlocked.
X Lift the trunk lid and swing it open. Closing the trunk
G
Warning!
Make sure the trunk is closed when the engine
is running and while driving. Among other
dangers, deadly carbon monoxide (CO) gases
may enter vehicle interior resulting in
unconsciousness and death. G
Warning!
To prevent possible personal injury, always
keep hands and fingers away from the trunk
opening when closing the trunk lid. Be
especially careful when small children are
around. G
Observe Safety notes, see page 45.
Do not leave the SmartKey in the open trunk.
You may lock yourself out.
If the vehicle was previously locked centrally
with the SmartKey, the trunk lid will lock automatically when closed. All turn signal
lamps flash three times to confirm locking.
i
When the hardtop is retracted, it must be
completely lowered in the trunk before the
trunk can be closed ( Y page 170). X
Lower the trunk lid using handle :.
X Close trunk lid with hands placed flat on
trunk lid. Trunk lid emergency release
The trunk lid can be opened from inside the
trunk with the emergency release button. X
Briefly press emergency release
button :.
The trunk lid unlocks and opens slightly.
X Push up the trunk lid to fully open.
The emergency release button unlocks the
trunk while the vehicle is standing still or in
motion. 60
Locking and unlockingControls in detail
171_AKB; 3; 60, en-US
d2ureepe,
Version: 2.11.8.1 2009-05-11T16:00:23+02:00 - Seite 60
Page 69 of 312

wheel together with the settings for the
seat position and the exterior rear view
mirrors.
Easy-entry/exit feature
This feature allows the driver an easier entry
into and exit from the vehicle. When entering
and exiting the vehicle, the steering wheel is
in its uppermost position.
The easy-entry/exit feature can be activated
or deactivated in the Convenience submenu
of the control system (Y page 108). G
Warning!
You must make sure no one can become
trapped or injured by the moving steering
wheel when the easy-entry/exit feature is
activated.
To stop steering wheel movement do one of
the following:
R Move steering wheel adjustment stalk.
R Press one of the memory position buttons.
R Press memory button M.
Do not leave children unattended in the
vehicle, or with access to an unlocked vehicle.
Children could open the driver’s door and
unintentionally activate the easy-entry/exit
feature, which could result in an accident
and/or serious personal injury.
With the easy-entry/exit feature activated,
the steering wheel will return to its last set
position when you close the driver’s door with
the ignition switched on. The steering wheel
will also return to its last set position when
you insert the SmartKey into the starter
switch.
i The last set steering wheel position is
stored when the ignition is switched off or
the position is stored in memory
(Y page 70).
With the easy-entry/exit feature activated,
the steering wheel tilts upwards when you
remove the SmartKey from the starter switch. The steering wheel also tilts upwards when
you open the driver’s door with the SmartKey
in starter switch position
0 or 1.
i When the current position for the steering
wheel is in the uppermost tilt position, the
steering wheel will no longer be able to
move upward when the easy-entry/exit
feature is activated.
The adjustment procedure is briefly
interrupted when the engine is started. G
Warning!
Let the system complete the adjustment
procedure before setting the vehicle in
motion. All steering wheel adjustment must
be completed before setting the vehicle in
motion. Driving off with the steering wheel
still adjusting could cause the driver to lose
control of the vehicle.
Crash-responsive exit aid When you open the driver’s door after an
accident has occurred, the steering column
moves up. The position of the SmartKey in the
starter switch is insignificant. This function
facilitates exiting as well as rescue of vehicle
occupants.
The crash-responsive exit aid can only be
triggered when the easy-entry/exit feature is
activated via the control system.
Heated steering wheel
The steering wheel heating warms up the
leather area of the steering wheel. Multifunction steering wheel
67Controls in detail
171_AKB; 3; 60, en-US
d2ureepe, Version: 2.11.8.1 2009-05-11T16:00:23+02:00 - Seite 67 Z
Page 79 of 312
!
Vehicles with rain sensor: Do not leave
windshield wipers on an intermittent
setting when the vehicle is taken to an
automatic car wash or during windshield
cleaning. Windshield wipers will operate in
the presence of water sprayed on the
windshield, and windshield wipers may be
damaged as a result.
! Vehicles with rain sensor: If you have set
intermittent wiping, dirt on the surface of
the
rain sensor or optical effects may cause
the windshield wipers to wipe in an
undesired fashion. This could then damage
the windshield wiper blades or scratch the
windshield. You should therefore switch off
the windshield wipers when weather
conditions are dry.
Vehicles with rain sensor: Intermittent wiping
interval is dependent on the wetness of the
windshield. After the initial wipe, pauses
between wipes are controlled by the rain
sensor automatically.
X Turn the combination switch to position I.
Intermittent wiping is interrupted when the
vehicle
is at a standstill and a door is opened.
This protects persons getting into or out of
the vehicle from being sprayed.
Intermittent wiping will be continued when all
doors are closed and
R the clutch pedal is depressed (vehicles with
manual transmission)
or
R the automatic transmission is in drive
position D or reverse gear R (vehicles with
automatic transmission)
the automatic transmission is in drive
position D or reverse gear R
or
R the wiper setting is changed using the
combination switch Single wipe X
Press the combination switch briefly in
direction of arrow A to the resistance
point.
The windshield wipers wipe one time
without washer fluid.
Wiping with washer fluid X
Press the combination switch in direction
of arrow A past the resistance point.
The
windshield wipers operate with washer
fluid.
i To prevent smears on the windshield or
noisy/chattering wiper blades, wipe with
washer
fluid every now and then even when
it is raining.
For information on filling up the washer
reservoir, see “Washer system and headlamp
cleaning system” ( Y page 196).
For information on cleaning the headlamps
with washer fluid, see “Headlamp cleaning
system” ( Y page 74). Problems with wipers
! If anything blocks the windshield wipers
(leaves, snow, etc.), switch them off
immediately.
For
safety reasons, do the following before
attempting to remove any blockage:
R Stop the vehicle in a safe location.
R Remove the SmartKey from the starter
switch.
R Engage the parking brake.
R Remove blockage.
R Turn the windshield wipers on again. Wipers
77
Controls in detail
171_AKB; 3; 60, en-US
d2ureepe, Version: 2.11.8.1 2009-05-11T16:00:23+02:00 - Seite 77 Z
Page 80 of 312
If the windshield wipers fail to function at
all with the combination switch in position
I,
R
set the combination switch to the next
higher wiper speed
R have the windshield wipers checked at
the nearest authorized Mercedes-Benz
Center Power windows
Opening and closing
The windows are opened and closed
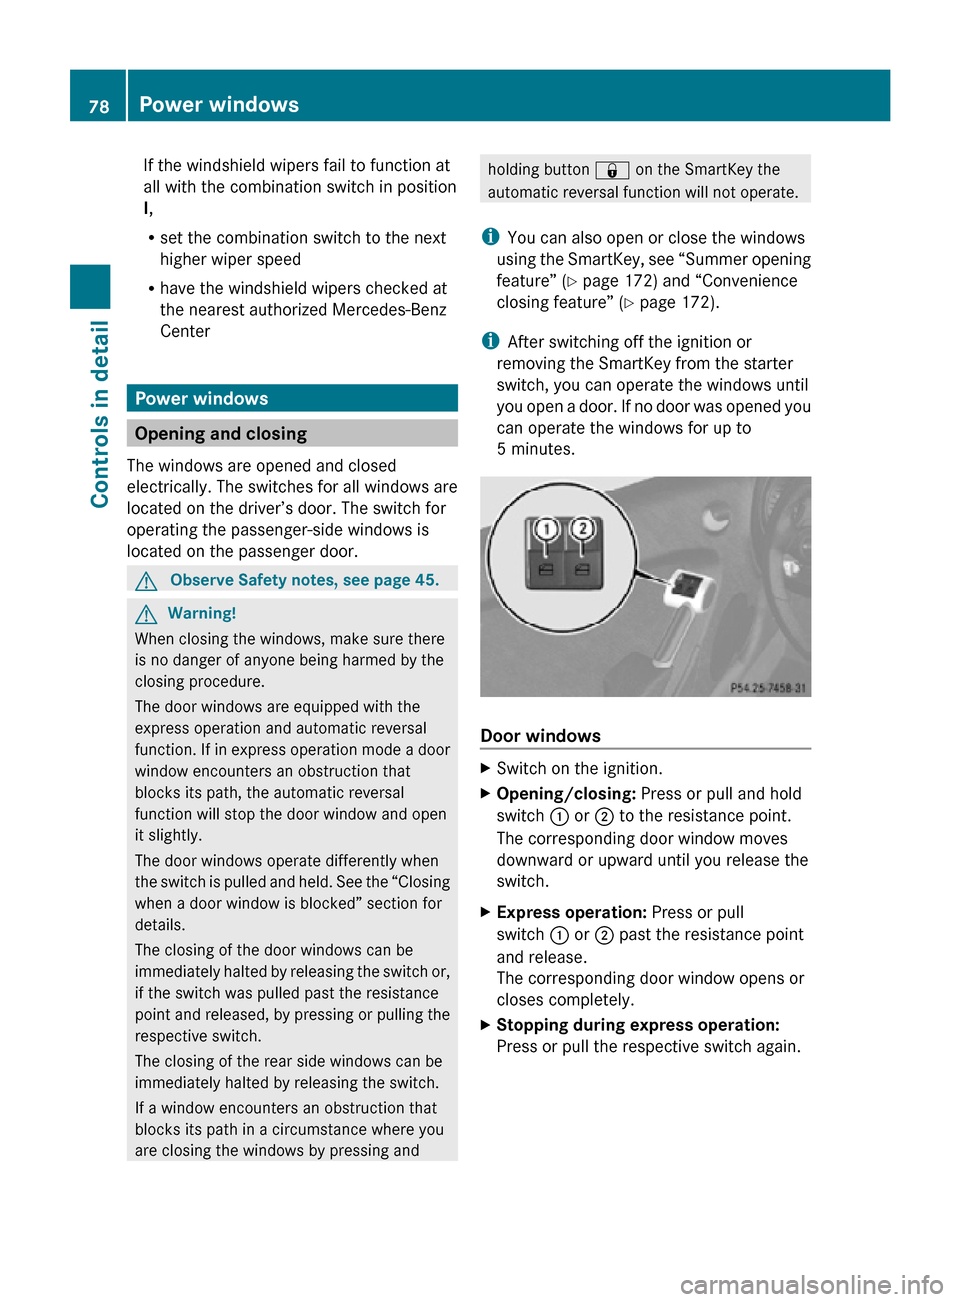
electrically. The switches for all windows are
located on the driver’s door. The switch for
operating the passenger-side windows is
located on the passenger door. G
Observe Safety notes, see page 45. G
Warning!
When closing the windows, make sure there
is no danger of anyone being harmed by the
closing procedure.
The door windows are equipped with the
express operation and automatic reversal
function. If in express operation mode a door
window encounters an obstruction that
blocks its path, the automatic reversal
function will stop the door window and open
it slightly.
The door windows operate differently when
the switch is pulled and held. See the “Closing
when a door window is blocked” section for
details.
The closing of the door windows can be
immediately halted by releasing the switch or,
if the switch was pulled past the resistance
point and released, by pressing or pulling the
respective switch.
The closing of the rear side windows can be
immediately halted by releasing the switch.
If a window encounters an obstruction that
blocks its path in a circumstance where you
are closing the windows by pressing and holding button & on the SmartKey the
automatic reversal function will not operate.
i You can also open or close the windows
using the SmartKey, see “Summer opening
feature” ( Y page 172) and “Convenience
closing feature” ( Y page 172).
i After switching off the ignition or
removing the SmartKey from the starter
switch, you can operate the windows until
you open a door. If no door was opened you
can operate the windows for up to
5 minutes. Door windows
X
Switch on the ignition.
X Opening/closing: Press or pull and hold
switch : or ; to the resistance point.
The corresponding door window moves
downward or upward until you release the
switch.
X Express operation: Press or pull
switch : or ; past the resistance point
and release.
The corresponding door window opens or
closes completely.
X Stopping during express operation:
Press or pull the respective switch again. 78
Power windowsControls in detail
171_AKB; 3; 60, en-US
d2ureepe,
Version: 2.11.8.1 2009-05-11T16:00:23+02:00 - Seite 78
Page 81 of 312
Closing when a door window is blocked
G
Warning!
Make sure that nobody can become trapped
and be seriously or even fatally injured when
closing a door window with greater force or
without automatic reversal function.
If the upward movement of a door window is
blocked during the closing procedure, the
door window will stop and open slightly.
X Immediately after the door window has
stopped because it was blocked, pull and
hold
the respective switch upward until the
door window is fully closed.
The door window closes with greater force.
If the door window is blocked again and opens
slightly:
X Immediately after the door window was
blocked, pull and hold the respective
switch
upward until the door window is fully
closed.
The door window closes without automatic
reversal function. G
Warning!
Pulling and holding the switch to close the
door window immediately after it had been
blocked
two times will cause the door window
to close without any reversal function for as
long as you hold the switch.
Opening and closing the rear side
windows when the hardtop is closed X
Opening: Open the door window.
X Press switch : or ; again.
The corresponding rear side window will
open completely.
X Closing: Close the door window.
X Pull and hold switch : or ;.
The
corresponding rear side window moves
upward until you release the switch. Synchronizing power windows
The windows must be synchronized after the
battery has been disconnected or if the
windows cannot be fully closed (express
operation).
Each window must be synchronized
separately.
X Close all doors.
X Switch on the ignition.
X Pull and hold switch : or ; (Y page 78)
until the respective window is closed.
The window opens again slightly.
X Pull and hold the respective switch once
more immediately until the window is
closed completely.
X Hold the respective switch for
approximately 1 second.
The window is synchronized. Driving and parking
Safety notes
G
Warning!
Make sure absolutely no objects are
obstructing the pedals’ range of movement.
Keep the driver’s footwell clear of all
obstacles. If there are any floormats or
carpets
in the footwell, make sure the pedals
still have sufficient clearance.
During sudden driving or braking maneuvers
the objects could get caught between or
under the pedals. You could then no longer
brake or accelerate. This could lead to
accidents and injury. G
Warning!
With the engine not running, there is no power
assistance for the brake and steering
systems. In this case, it is important to keep
in mind that a considerably higher degree of
effort is necessary to brake and steer the
vehicle. Adapt your driving accordingly. Driving and parking
79
Controls in detail
171_AKB; 3; 60, en-US
d2ureepe, Version: 2.11.8.1 2009-05-11T16:00:23+02:00 - Seite 79 Z