2010 MERCEDES-BENZ SLK300 tow
[x] Cancel search: towPage 225 of 312
parking brake is released. Observe
additional messages in the multifunction
display that may appear.
Brake
pad wear or a leak in the system may
be the reason for low brake fluid in the
reservoir.
Have the brake system inspected
immediately. Contact an authorized
Mercedes-Benz Center.
All checks and service work on the brake
system should be carried out by qualified
technicians only. Contact an authorized
Mercedes-Benz Center.
Only install brake pads and use brake fluid
recommended by Mercedes-Benz. G
Warning!
If other than recommended brake pads are
installed, or other than recommended brake
fluid is used, the braking properties of the
vehicle
can be degraded to an extent that safe
braking is substantially impaired. This could
result in an accident.
! Because the ESP ®
operates
automatically, the engine and ignition must
be shut off (SmartKey in starter switch
position 0 or 1) when the parking brake is
being tested on a brake test dynamometer
or when the vehicle is being towed with the
front axle raised.
Active braking action through the ESP ®
may otherwise seriously damage the brake
system which is not covered by the
Mercedes-Benz Limited Warranty.
If your brake system is only subjected to
moderate loads, you should occasionally test
the effectiveness of the brakes by applying
above-normal braking pressure at higher
speeds. This will also enhance the grip of the
brake pads. G
Warning!
Make sure not to endanger any other road
users when carrying out these braking
maneuvers. Refer to the description of the Brake Assist
System (BAS) (
Y page 49).
High-performance brake system The high-performance brake system is only
available on SLK 55 AMG.
G
Warning!
New vehicle brake pads and discs, and
replacement brake pads and discs may take
several hundred miles of driving until they
provide
optimum braking efficiency. Until that
time, you may need to use increased brake
pedal pressure while braking. Please be aware
of this and adjust your driving and braking
accordingly during this break-in period.
Excessive high-demand braking will cause
correspondingly high brake wear. Please be
attentive to the brake warning lamp in the
instrument cluster and brake condition
messages in the multifunction display.
Especially for high performance driving, it is
important to maintain and have the brake
system checked regularly.
The high-performance brake system is
designed to operate under the extremely high
operating demands required to
accommodate the performance capabilities
of the vehicle.
The brakes may produce a squeaking-type
noise depending on the
R vehicle speed
R brake force applied
R ambient conditions, e.g. temperature and
humidity
As with any brake system, the wear of
individual brake system components such as
brake pads or disks strongly depends on your
driving style and the conditions under which
you operate the vehicle. Thus, a driving style
calling for high-demand braking will cause
your vehicle’s brakes to wear more quickly. Driving instructions
223
Operation
171_AKB; 3; 60, en-US
d2ureepe, Version: 2.11.8.1 2009-05-11T16:00:23+02:00 - Seite 223 Z
Page 230 of 312
Scratches, corrosive deposits, corrosion or
damage due to negligent or incorrect care
cannot always be removed or repaired with
the vehicle-care products recommended
here.
In such cases it is best to seek aid at an
authorized Mercedes-Benz Center.
The following topics deal with the cleaning
and care of your vehicle and give important
“how-to” information as well as references to
Mercedes-Benz approved vehicle-care
products.
Power washer !
Follow the instructions provided by the
power washer manufacturer on
maintaining
a distance between the vehicle
and the nozzle of the power washer.
Never use a round nozzle to power-wash
tires. The intense jet of water can result in
damage to the tire.
Always replace a damaged tire.
Always keep the jet of water moving across
the surface. Do not aim directly at electrical
parts, electrical connectors, seals, or other
rubber parts.
Tar stains Quickly remove tar stains before they dry and
become more difficult to remove. A tar
remover is recommended.
Paintwork, painted body components
!
Affixing stickers, magnets, adhesive tape
or similar materials to painted body
components may damage the paintwork.
Mercedes-Benz approved Paint Care should
be applied when water drops on the paint
surface do not “bead up”. This should
normally be done every 3 to 5 months,
depending on the climate and washing
detergent used.
Mercedes-Benz approved Paint Cleaner
should be applied if the paint surface shows
signs of embedded dirt (i.e. loss of gloss). Do not apply any of these products or wax if
your
vehicle is parked in the sun or if the hood
is still hot.
X Use the appropriate MB-Touch-Up Stick for
quick
and provisional repairs of minor paint
damage (i.e. chips from stones, vehicle
doors, etc.).
Engine cleaning Prior to cleaning the engine compartment,
make sure to protect electrical components
and connectors from contact with water and
cleaning agents.
Corrosion protection, such as MB
Anticorrosion Wax should be applied to the
engine compartment after every engine
cleaning. Before applying, all control linkage
bushings
and joints should be lubricated. The
poly-V-belt and all pulleys should be
protected from any wax.
Vehicle washing In the winter, thoroughly remove all traces of
road salt as soon as possible.
When
washing the vehicle underbody, do not
forget to clean the inner sides of the wheels.
Hand-wash
X Do not use hot water or wash your vehicle
in direct sunlight.
X Only use a soft, wet cloth or sponge to
clean the vehicle.
X Only use a mild vehicle wash detergent,
such as Mercedes-Benz approved Car
Shampoo.
X Thoroughly spray the vehicle with a
diffused jet of water.
X Do not spray directly towards the
ventilation intake.
X Use plenty of water and rinse the sponge
and chamois frequently.
X Rinse with clean water and dry with a
chamois thoroughly. 228
Vehicle care
Operation
171_AKB; 3; 60, en-US
d2ureepe,
Version: 2.11.8.1 2009-05-11T16:00:23+02:00 - Seite 228
Page 235 of 312
Vehicle equipment ............................
234
Where will I find ...? .......................... 234
Vehicle status messages in the
multifunction display ....................... 236
What to do if … .................................. 256
Unlocking/locking manually ...........264
Opening/closing manually ..............266
Replacing SmartKey batteries ......... 266
Replacing bulbs ................................. 267
Replacing wiper blades ....................271
Flat tire .............................................. 273
Battery ............................................... 282
Jump starting .................................... 283
Towing the vehicle ............................285
Fuses .................................................. 288 233Practical hints
171_AKB; 3; 60, en-US
d2ureepe,
Version: 2.11.8.1 2009-05-11T16:00:23+02:00 - Seite 233
Page 236 of 312
Vehicle equipment
i This Operator’s Manual describes all
features, standard or optional, potentially
available for your vehicle at the time of
purchase. Please be aware that your
vehicle might not be equipped with all
features described in this manual. Where will I find ...?
First aid kit
i Check expiration dates and contents for
completeness at least once a year and
replace missing/expired items.
The first aid kit is located in a parcel net
behind the driver’s seat. Vehicle tool kit
The vehicle tool kit is located in the space
underneath the trunk floor.
i Vehicles without spare wheel are not
factory-equipped with the tools required for
a wheel change such as a jack or a wheel
wrench. Some tools required for a wheel
change are specific to your vehicle.
Contact an authorized Mercedes-Benz
Center to obtain the tools approved for
your vehicle.
X Removing: Open the trunk (Y page 59).
X Lift the trunk floor.
X Remove the spare wheel (if so equipped)
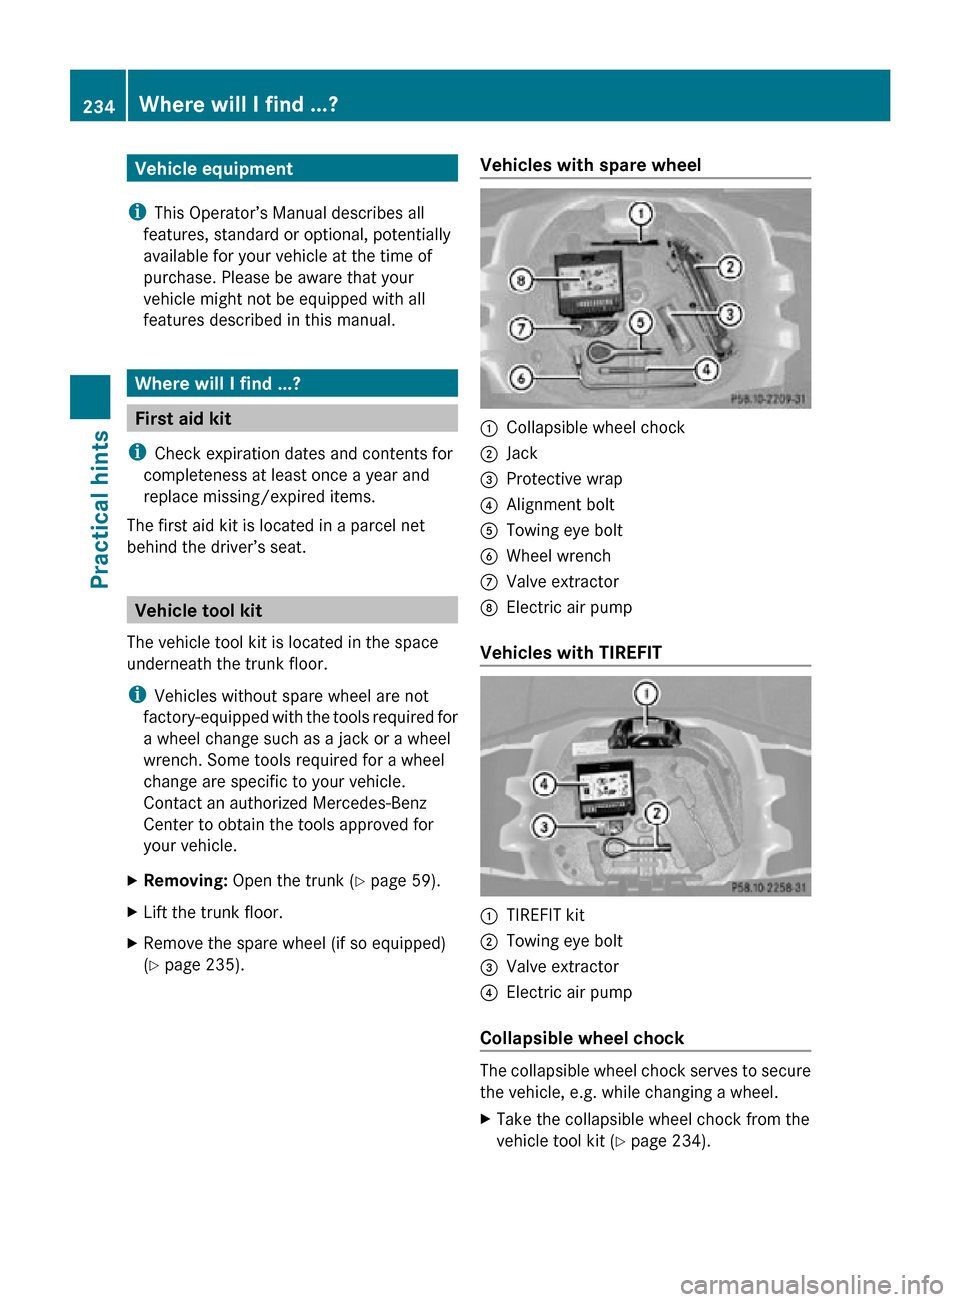
(Y page 235). Vehicles with spare wheel :
Collapsible wheel chock
; Jack
= Protective wrap
? Alignment bolt
A Towing eye bolt
B Wheel wrench
C Valve extractor
D Electric air pump
Vehicles with TIREFIT :
TIREFIT kit
; Towing eye bolt
= Valve extractor
? Electric air pump
Collapsible wheel chock The collapsible wheel chock serves to secure
the vehicle, e.g. while changing a wheel.
X
Take the collapsible wheel chock from the
vehicle tool kit (Y page 234). 234
Where will I find ...?Practical hints
171_AKB; 3; 60, en-US
d2ureepe,
Version: 2.11.8.1 2009-05-11T16:00:23+02:00 - Seite 234
Page 268 of 312
i
This procedure does not arm the anti-
theft alarm system, nor does it lock the fuel
filler flap and the storage compartments. Manually unlocking the gear selector
lever
If the vehicle’s electrical system is
malfunctioning, the gear selector lever could
remain locked in park position P. In this case
the gear selector lever can be unlocked
manually, e.g. to tow the vehicle.
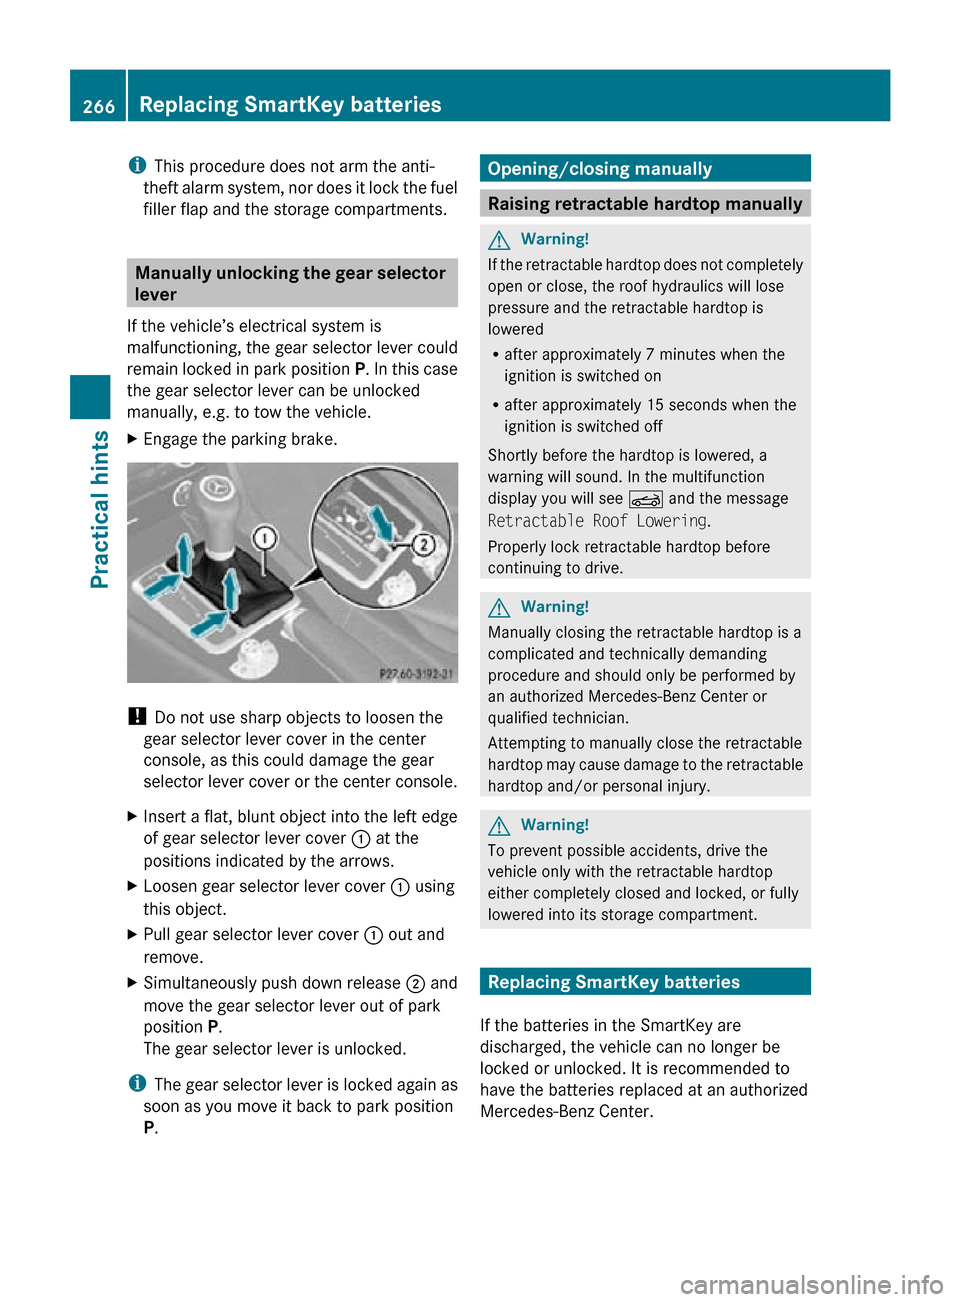
X Engage the parking brake. !
Do not use sharp objects to loosen the
gear selector lever cover in the center
console, as this could damage the gear
selector lever cover or the center console.
X Insert a flat, blunt object into the left edge
of gear selector lever cover : at the
positions indicated by the arrows.
X Loosen gear selector lever cover : using
this object.
X Pull gear selector lever cover : out and
remove.
X Simultaneously push down release ; and
move the gear selector lever out of park
position P.
The gear selector lever is unlocked.
i The gear selector lever is locked again as
soon as you move it back to park position
P. Opening/closing manually
Raising retractable hardtop manually
G
Warning!
If the retractable hardtop does not completely
open or close, the roof hydraulics will lose
pressure and the retractable hardtop is
lowered
R after approximately 7 minutes when the
ignition is switched on
R after approximately 15 seconds when the
ignition is switched off
Shortly before the hardtop is lowered, a
warning will sound. In the multifunction
display you will see K and the message
Retractable Roof Lowering.
Properly lock retractable hardtop before
continuing to drive. G
Warning!
Manually closing the retractable hardtop is a
complicated and technically demanding
procedure and should only be performed by
an authorized Mercedes-Benz Center or
qualified technician.
Attempting to manually close the retractable
hardtop may cause damage to the retractable
hardtop and/or personal injury. G
Warning!
To prevent possible accidents, drive the
vehicle only with the retractable hardtop
either completely closed and locked, or fully
lowered into its storage compartment. Replacing SmartKey batteries
If the batteries in the SmartKey are
discharged, the vehicle can no longer be
locked or unlocked. It is recommended to
have the batteries replaced at an authorized
Mercedes-Benz Center. 266
Replacing SmartKey batteriesPractical hints
171_AKB; 3; 60, en-US
d2ureepe,
Version: 2.11.8.1 2009-05-11T16:00:23+02:00 - Seite 266
Page 274 of 312
!
To avoid damage to the hood, the wiper
arms should only be folded forward when
in the vertical position.
! Never open the hood when a wiper arm is
folded forward.
Hold on to the wiper when folding a wiper
arm back. If released, the force of the
impact from the tensioning spring could
crack the windshield.
Do not allow a wiper arm to contact the
windshield glass without a wiper blade
inserted.
Mercedes-Benz recommends that you have
this work carried out at an authorized
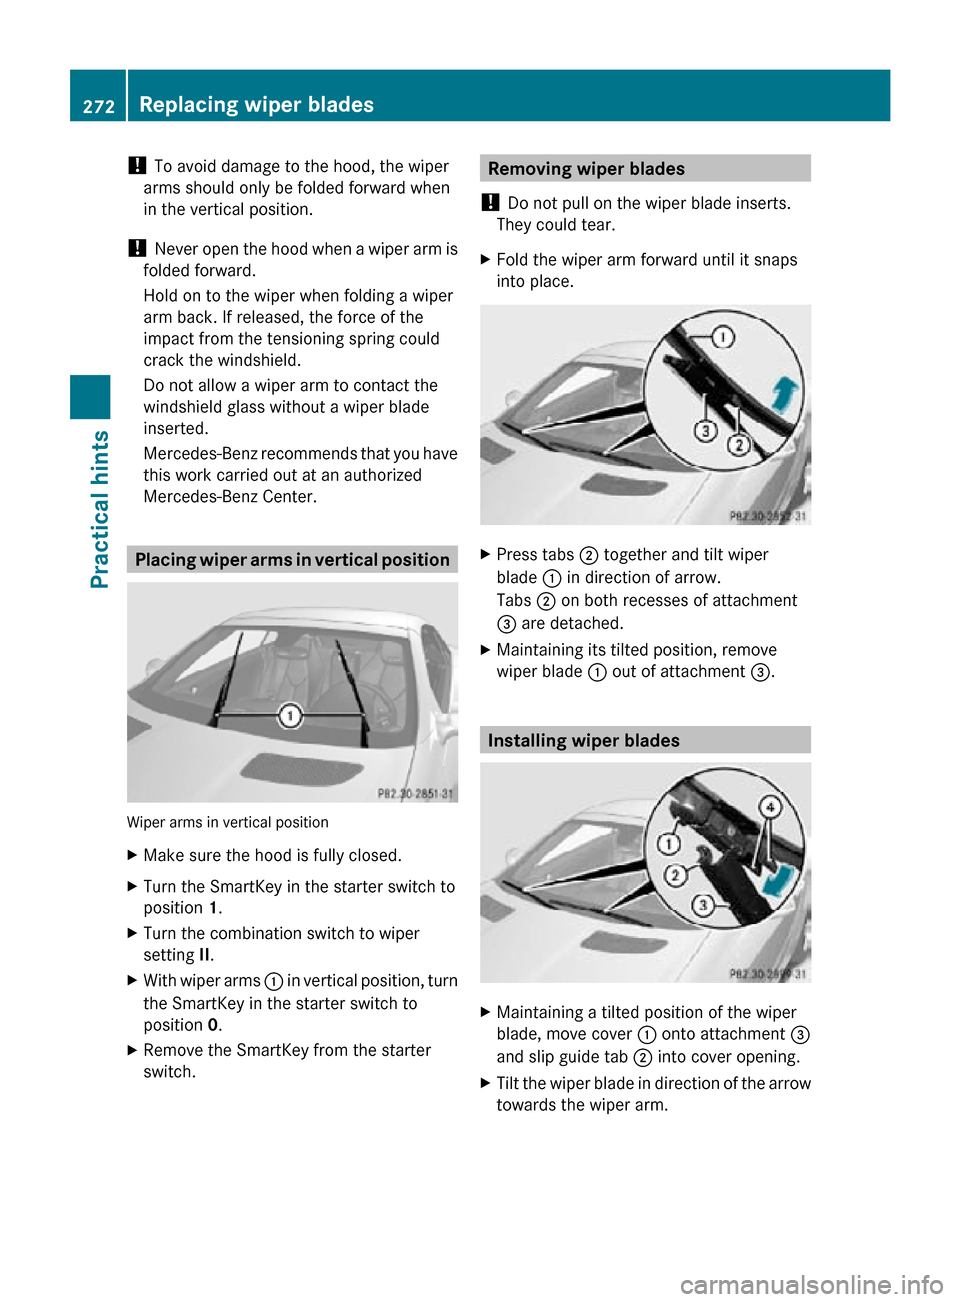
Mercedes-Benz Center. Placing wiper arms in vertical position
Wiper arms in vertical position
X
Make sure the hood is fully closed.
X Turn the SmartKey in the starter switch to
position 1.
X Turn the combination switch to wiper
setting II.
X With wiper arms : in vertical position, turn
the SmartKey in the starter switch to
position 0.
X Remove the SmartKey from the starter
switch. Removing wiper blades
! Do not pull on the wiper blade inserts.
They could tear.
X Fold the wiper arm forward until it snaps
into place. X
Press tabs ; together and tilt wiper
blade : in direction of arrow.
Tabs ; on both recesses of attachment
= are detached.
X Maintaining its tilted position, remove
wiper blade : out of attachment =. Installing wiper blades
X
Maintaining a tilted position of the wiper
blade, move cover : onto attachment =
and slip guide tab ; into cover opening.
X Tilt the wiper blade in direction of the arrow
towards the wiper arm. 272
Replacing wiper bladesPractical hints
171_AKB; 3; 60, en-US
d2ureepe,
Version: 2.11.8.1 2009-05-11T16:00:23+02:00 - Seite 272
Page 286 of 312
can lead to a battery explosion and severe
injury or death.
Never
lean over batteries while connecting or
jump starting. You might get injured.
Battery fluid contains sulfuric acid. Do not
allow this fluid to come in contact with eyes,
skin or clothing. In case it does, immediately
flush affected area with water, and seek
medical help if necessary.
A battery will also produce hydrogen gas,
which is flammable and explosive. Keep
flames or sparks away from battery, avoid
improper connection of jumper cables,
smoking, etc.
Attempting to jump start a frozen battery can
result in it exploding, causing personal injury.
Read all instructions before proceeding.
! Vehicles with automatic transmission:
Do not tow-start the vehicle. You could
otherwise seriously damage the automatic
transmission which is not covered by the
Mercedes-Benz Limited Warranty.
! Jump starting should only be performed
using the jump-start terminals located in
the engine compartment.
Avoid repeated and lengthy starting
attempts.
Do not attempt to start the engine using a
battery quick-charge unit.
If the engine does not run after several
unsuccessful starting attempts, have it
checked at the nearest authorized
Mercedes-Benz Center.
Excessive unburned fuel generated by
repeated failed starting attempts may
damage the catalytic converter and may
present a fire risk.
Make sure the jumper cables do not have
loose or missing insulation.
Make sure the cable clamps do not touch
any other metal part while the other end is
still attached to a battery. If the battery is discharged, the engine can be
started with jumper cables and the fully
charged battery of another vehicle or an
equivalent starter pack. Observe the
following:
R
Access
to the battery is not possible on all
vehicles. If you cannot access the battery
of the other vehicle, provide jump start
power by an external battery or starter
pack.
R Jump starting should only be performed
when the engine and catalytic converter
are cold.
R Do not jump start the engine or charge the
battery if the battery is frozen. Let the
battery thaw out first.
R Only jump start from batteries with the
same voltage rating (12 V). Jump starting
with a more powerful battery could damage
the vehicle’s electrical system. Such
damage will not be covered by the
Mercedes-Benz Limited Warranty.
R Only use jumper cables with sufficient
cross-section and insulated terminal
clamps.
R Always make sure the jumper cables are
not on or near pulleys, fans or other parts
that move when an engine is started or
running.
R Should the battery be drained completely,
let the donating power source charge the
vehicle for several minutes before
reattempting the starting process.
The jump-start contacts are located in the
engine compartment on the passenger side.
X Make sure the two vehicles do not touch.
X Switch off all electrical consumers.
X Engage the parking brake.
X Make sure the automatic transmission is in
park position P (manual transmission to
Neutral).
X Open the hood (Y page 192). 284
Jump starting
Practical hints
171_AKB; 3; 60, en-US
d2ureepe,
Version: 2.11.8.1 2009-05-11T16:00:23+02:00 - Seite 284
Page 287 of 312
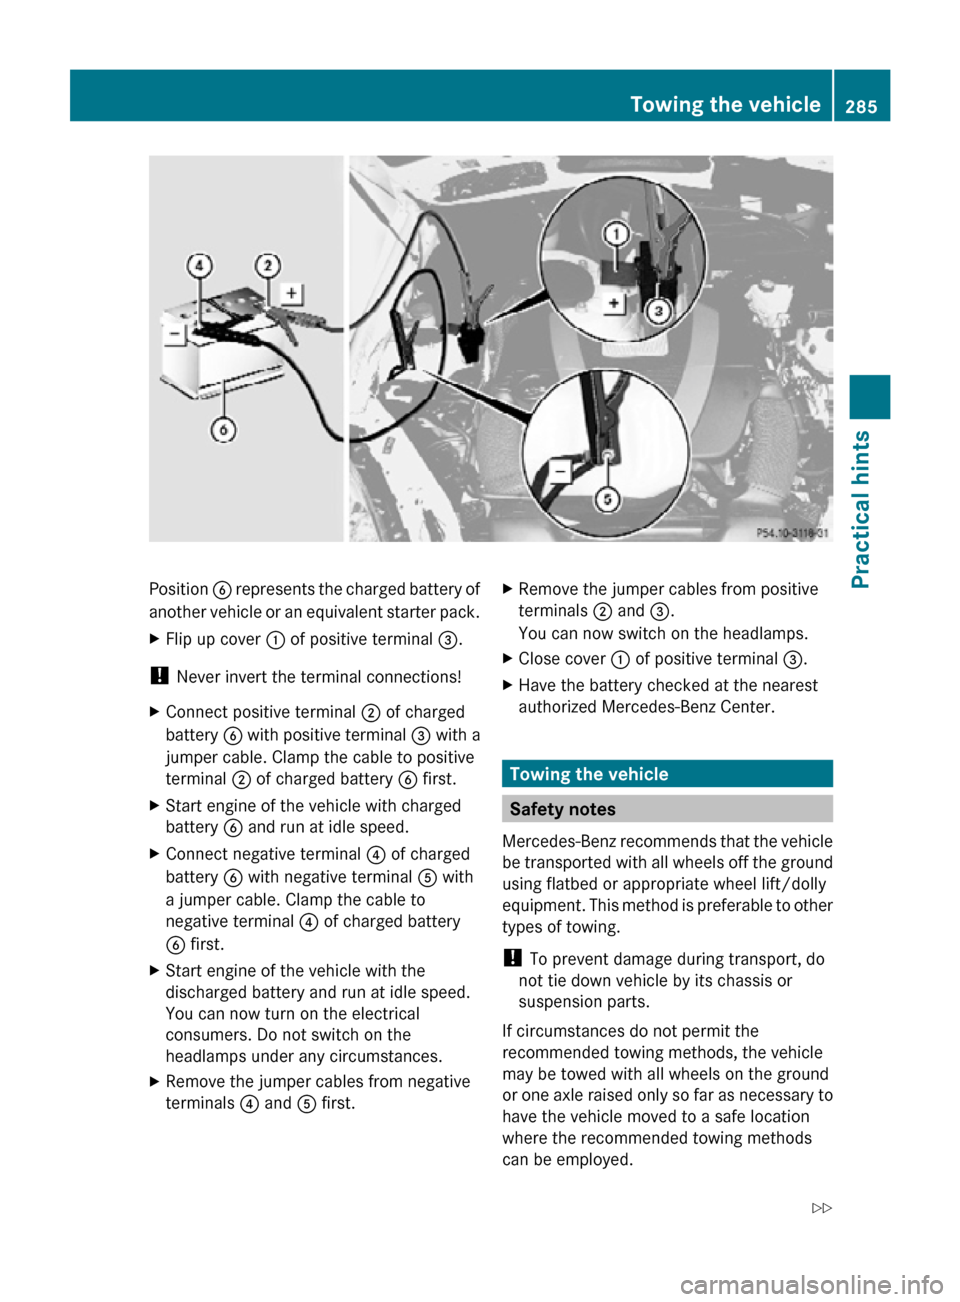
Position
B represents the charged battery of
another vehicle or an equivalent starter pack.
X Flip up cover : of positive terminal =.
! Never invert the terminal connections!
X Connect positive terminal ; of charged
battery B with positive terminal = with a
jumper cable. Clamp the cable to positive
terminal ; of charged battery B first.
X Start engine of the vehicle with charged
battery B and run at idle speed.
X Connect negative terminal ? of charged
battery B with negative terminal A with
a jumper cable. Clamp the cable to
negative terminal ? of charged battery
B first.
X Start engine of the vehicle with the
discharged battery and run at idle speed.
You can now turn on the electrical
consumers. Do not switch on the
headlamps under any circumstances.
X Remove the jumper cables from negative
terminals ? and A first. X
Remove the jumper cables from positive
terminals ; and =.
You can now switch on the headlamps.
X Close cover : of positive terminal =.
X Have the battery checked at the nearest
authorized Mercedes-Benz Center. Towing the vehicle
Safety notes
Mercedes-Benz recommends that the vehicle
be transported with all wheels off the ground
using flatbed or appropriate wheel lift/dolly
equipment. This method is preferable to other
types of towing.
! To prevent damage during transport, do
not tie down vehicle by its chassis or
suspension parts.
If circumstances do not permit the
recommended towing methods, the vehicle
may be towed with all wheels on the ground
or one axle raised only so far as necessary to
have the vehicle moved to a safe location
where the recommended towing methods
can be employed. Towing the vehicle
285Practical hints
171_AKB; 3; 60, en-US
d2ureepe, Version: 2.11.8.1 2009-05-11T16:00:23+02:00 - Seite 285 Z