2010 MERCEDES-BENZ SLK300 Controls
[x] Cancel search: ControlsPage 68 of 312
The AIRSCARF neck-level heating will switch
back on again automatically as soon as
sufficient voltage is available.
Multifunction steering wheel
Safety notes
G
Warning!
Do not adjust the steering wheel while driving.
Adjusting the steering wheel while driving, or
driving without the steering wheel adjustment
feature locked could cause the driver to lose
control of the vehicle.
The electrical steering wheel adjustment
feature can be operated at any time.
Therefore, do not leave children unattended
in the vehicle, or with access to an unlocked
vehicle. A child’s unsupervised access to a
vehicle could result in an accident and/or
serious personal injury.
Make sure
R you can reach the steering wheel with your
arms slightly bent at the elbows
R you can move your legs freely
R all displays (including malfunction and
indicator lamps) on the instrument cluster
are clearly visible Steering wheel adjustment, manual
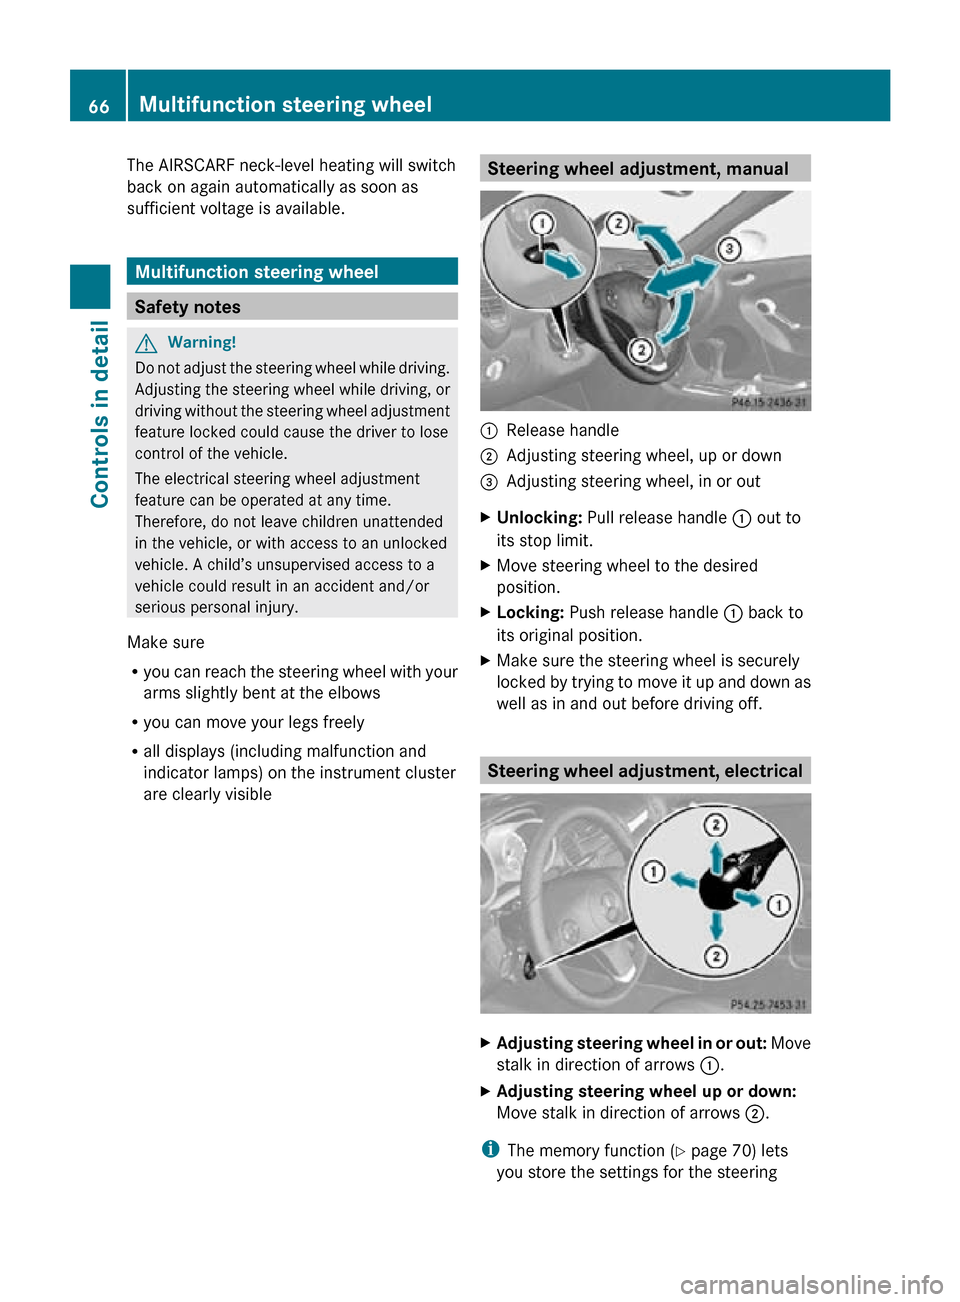
:
Release handle
; Adjusting steering wheel, up or down
= Adjusting steering wheel, in or out
X Unlocking: Pull release handle : out to
its stop limit.
X Move steering wheel to the desired
position.
X Locking: Push release handle : back to
its original position.
X Make sure the steering wheel is securely
locked by trying to move it up and down as
well as in and out before driving off. Steering wheel adjustment, electrical
X
Adjusting steering wheel in or out: Move
stalk in direction of arrows :.
X Adjusting steering wheel up or down:
Move stalk in direction of arrows ;.
i The memory function (Y page 70) lets
you store the settings for the steering 66
Multifunction steering wheelControls in detail
171_AKB; 3; 60, en-US
d2ureepe,
Version: 2.11.8.1 2009-05-11T16:00:23+02:00 - Seite 66
Page 69 of 312

wheel together with the settings for the
seat position and the exterior rear view
mirrors.
Easy-entry/exit feature
This feature allows the driver an easier entry
into and exit from the vehicle. When entering
and exiting the vehicle, the steering wheel is
in its uppermost position.
The easy-entry/exit feature can be activated
or deactivated in the Convenience submenu
of the control system (Y page 108). G
Warning!
You must make sure no one can become
trapped or injured by the moving steering
wheel when the easy-entry/exit feature is
activated.
To stop steering wheel movement do one of
the following:
R Move steering wheel adjustment stalk.
R Press one of the memory position buttons.
R Press memory button M.
Do not leave children unattended in the
vehicle, or with access to an unlocked vehicle.
Children could open the driver’s door and
unintentionally activate the easy-entry/exit
feature, which could result in an accident
and/or serious personal injury.
With the easy-entry/exit feature activated,
the steering wheel will return to its last set
position when you close the driver’s door with
the ignition switched on. The steering wheel
will also return to its last set position when
you insert the SmartKey into the starter
switch.
i The last set steering wheel position is
stored when the ignition is switched off or
the position is stored in memory
(Y page 70).
With the easy-entry/exit feature activated,
the steering wheel tilts upwards when you
remove the SmartKey from the starter switch. The steering wheel also tilts upwards when
you open the driver’s door with the SmartKey
in starter switch position
0 or 1.
i When the current position for the steering
wheel is in the uppermost tilt position, the
steering wheel will no longer be able to
move upward when the easy-entry/exit
feature is activated.
The adjustment procedure is briefly
interrupted when the engine is started. G
Warning!
Let the system complete the adjustment
procedure before setting the vehicle in
motion. All steering wheel adjustment must
be completed before setting the vehicle in
motion. Driving off with the steering wheel
still adjusting could cause the driver to lose
control of the vehicle.
Crash-responsive exit aid When you open the driver’s door after an
accident has occurred, the steering column
moves up. The position of the SmartKey in the
starter switch is insignificant. This function
facilitates exiting as well as rescue of vehicle
occupants.
The crash-responsive exit aid can only be
triggered when the easy-entry/exit feature is
activated via the control system.
Heated steering wheel
The steering wheel heating warms up the
leather area of the steering wheel. Multifunction steering wheel
67Controls in detail
171_AKB; 3; 60, en-US
d2ureepe, Version: 2.11.8.1 2009-05-11T16:00:23+02:00 - Seite 67 Z
Page 70 of 312

X
Switch on the ignition.
X Switching on: Turn switch at the tip of the
stalk in direction of arrow :.
Indicator lamp ; comes on.
i The steering wheel heating may be
suspended temporarily. However, indicator
lamp ; remains on. The steering wheel
heating is suspended when the
temperature of the vehicle interior is above
86‡ (30†). It is also suspended when the
temperature of the steering wheel is above
95‡ (35†).
When these conditions do not apply
anymore, steering wheel heating
continues.
X Switching off: Turn switch at the tip of
stalk in direction of arrow =.
Indicator lamp ; goes out.
i Indicator lamp ; flashes or goes out in
case of power surge or undervoltage or if
the steering wheel heating malfunctions.
i The steering wheel heating switches off
automatically when you remove the
SmartKey from the starter switch.
For more information on the steering wheel,
see “Multifunction steering wheel”
(Y page 94). Mirrors
Notes
Adjust the interior and exterior rear view
mirrors before driving so that you have a good
view of the road and traffic conditions. Interior rear view mirror
X Adjust the interior rear view mirror
manually. Interior rear view mirror, antiglare
position
X
Tilt the mirror to the antiglare position by
moving lever towards the windshield.
The interior rear view mirror is dimmed. Exterior rear view mirrors
G
Warning!
Exercise care when using the passenger-side
exterior rear view mirror. The mirror surface
is convex (outwardly curved surface for a
wider field of view). Objects in mirror are
closer than they appear. Check your interior
rear view mirror and glance over your
shoulder before changing lanes. X
Switch on the ignition.
X Press button : for the driver’s side
exterior rear view mirror or button = for 68
MirrorsControls in detail
171_AKB; 3; 60, en-US
d2ureepe,
Version: 2.11.8.1 2009-05-11T16:00:23+02:00 - Seite 68
Page 71 of 312

the passenger-side exterior rear view
mirror.
The indicator lamp in the respective button
comes on for approximately 10 seconds.
If you do not make adjustments to the
selected exterior rear view mirror within
10 seconds, the indicator lamp goes out.
You will then have to select the desired
exterior rear view mirror again before
adjustments can be made. Adjustments
can only be made with the indicator lamp
for the respective exterior rear view mirror
button illuminated.
X Press adjustment button ; up, down, left
or right according to the desired setting.
! If an exterior rear view mirror was forcibly
hit from the front, manually snap it back
into place.
i At low ambient temperatures, the exterior
rear view mirrors will be heated
automatically. Auto-dimming rear view mirrors
The exterior rear view mirror on the driver’s
side and the interior rear view mirror will
respond automatically to glare when the
ignition is switched on and incoming light
from headlamps falls on the sensor in the
interior rear view mirror.
The rear view mirrors will not react if reverse
gear R is engaged or the interior lighting is
switched on. G
Warning!
The auto dimming function does not react if
incoming light is not aimed directly at sensors
in the interior rear view mirror.
The interior rear view mirror and the exterior
rear view mirror on the driver’s side do not
react, for example, if the cloth wind screen is
installed.
Light hitting the mirror(s) at certain angles
(incident light) could blind you. As a result, you may not be able to observe traffic
conditions and could cause an accident.
Exterior rear view mirror parking
position
To assist during parking maneuvers, you can
set the passenger-side exterior rear view
mirror so that you can see the rear wheel and
the road curb.
Setting and storing the parking position X
Switch on the ignition.
X Press button =, to select the passenger-
side exterior rear view mirror.
X Shift the automatic transmission into
reverse gear R (manual transmission to
reverse gear).
The passenger-side exterior rear view
mirror moves to the preset parking
position.
X Adjust the passenger-side exterior rear
view mirror with adjustment button ; so
that you see the rear wheel and the road
curb.
X Press memory button M (Y page 70) and
within 3 seconds, press one of the arrows
of adjustment button ;.
The parking position is stored if the exterior
rear view mirror does not move. Mirrors
69Controls in detail
171_AKB; 3; 60, en-US
d2ureepe, Version: 2.11.8.1 2009-05-11T16:00:23+02:00 - Seite 69 Z
Page 72 of 312
Calling up the parking position
X
Switch on the ignition.
X Press button ;, to select the passenger-
side exterior rear view mirror.
X Shift the automatic transmission into
reverse gear R (manual transmission to
reverse gear).
The passenger-side exterior rear view
mirror moves to the stored parking
position.
The passenger-side exterior rear view mirror
returns to its previously stored driving
position
R 10 seconds after you have put the gear
selector lever out of reverse gear R (manual
transmission out of reverse)
R immediately once your vehicle exceeds a
speed of approximately 6 mph (10 km/h)
R immediately when you press button : to
select the driver’s side exterior rear view
mirror Memory function
Notes
With the memory function you can store up
to three different configurations per front
seat.
Each memory position button on the driver’s
side can store all of the following settings:
R Seat position
R Steering wheel position
R Exterior rear view mirrors’ position G
Warning!
Do not activate the memory function while
driving. Activating the memory function while
driving could cause the driver to lose control
of the vehicle.
Each memory position button on the
passenger side can store the setting of the
seat position. Storing positions into memory
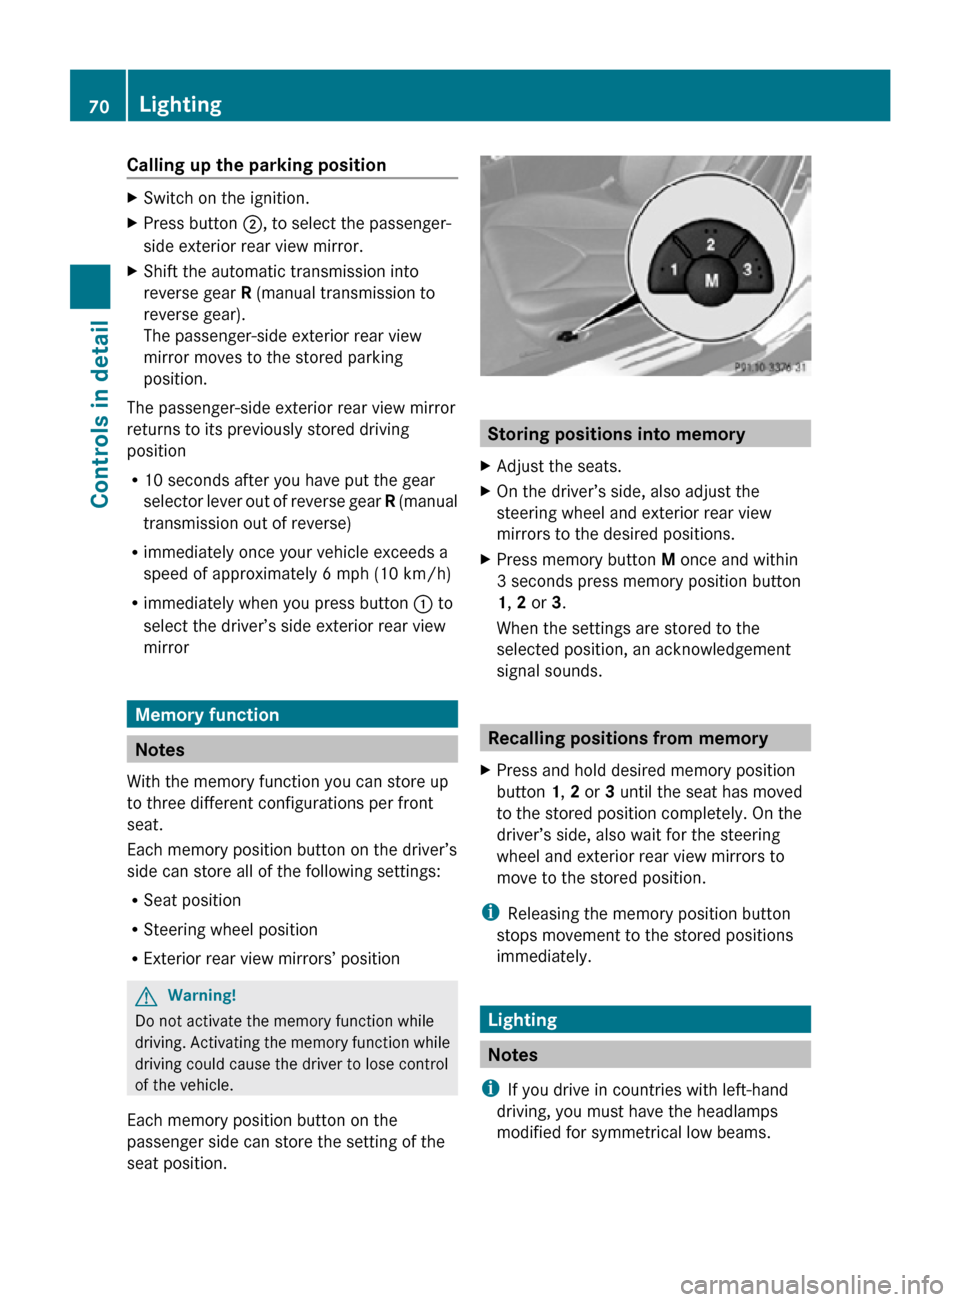
X Adjust the seats.
X On the driver’s side, also adjust the
steering wheel and exterior rear view
mirrors to the desired positions.
X Press memory button M once and within
3 seconds press memory position button
1, 2 or 3.
When the settings are stored to the
selected position, an acknowledgement
signal sounds. Recalling positions from memory
X Press and hold desired memory position
button 1, 2 or 3 until the seat has moved
to the stored position completely. On the
driver’s side, also wait for the steering
wheel and exterior rear view mirrors to
move to the stored position.
i Releasing the memory position button
stops movement to the stored positions
immediately. Lighting
Notes
i If you drive in countries with left-hand
driving, you must have the headlamps
modified for symmetrical low beams. 70
LightingControls in detail
171_AKB; 3; 60, en-US
d2ureepe,
Version: 2.11.8.1 2009-05-11T16:00:23+02:00 - Seite 70
Page 73 of 312
Relevant information can be obtained at
any authorized Mercedes-Benz Center.
i Vehicles equipped with active Bi-Xenon
headlamps:
The active Bi-Xenon headlamps increase
usable illumination over conventional
headlamps because they follow the
curvature of the road ahead. The beams of
the active Bi-Xenon headlamps shift to
either side according to the vehicle’s
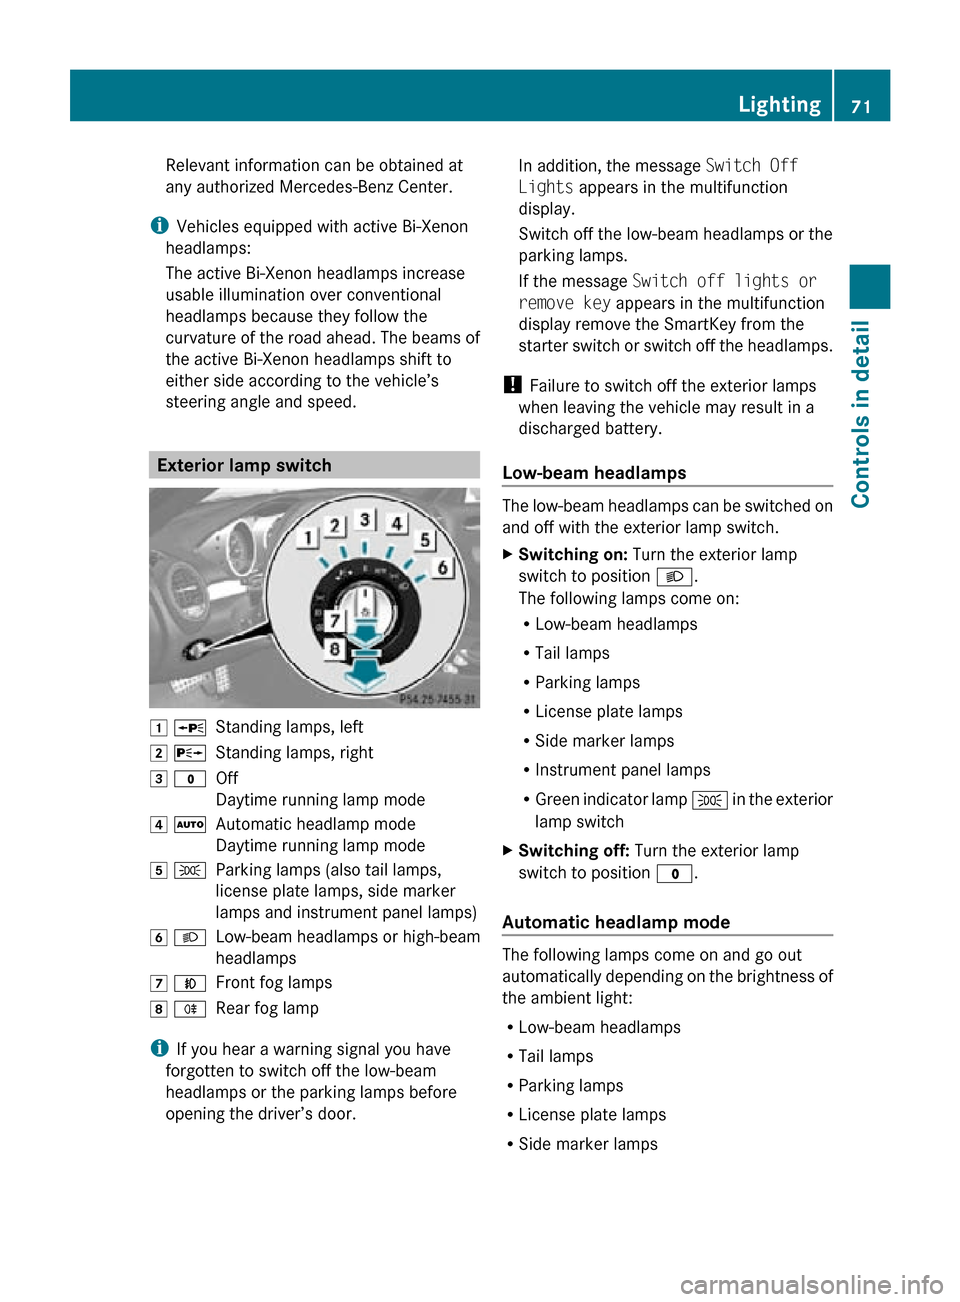
steering angle and speed. Exterior lamp switch
1 W
Standing lamps, left
2 X Standing lamps, right
3 $ Off
Daytime running lamp mode
4 Ã Automatic headlamp mode
Daytime running lamp mode
5 T Parking lamps (also tail lamps,
license plate lamps, side marker
lamps and instrument panel lamps)
6 L Low-beam headlamps or high-beam
headlamps
7 N Front fog lamps
8 R Rear fog lamp
i If you hear a warning signal you have
forgotten to switch off the low-beam
headlamps or the parking lamps before
opening the driver’s door. In addition, the message
Switch Off
Lights appears in the multifunction
display.
Switch off the low-beam headlamps or the
parking lamps.
If the message Switch off lights or
remove key appears in the multifunction
display remove the SmartKey from the
starter switch or switch off the headlamps.
! Failure to switch off the exterior lamps
when leaving the vehicle may result in a
discharged battery.
Low-beam headlamps The low-beam headlamps can be switched on
and off with the exterior lamp switch.
X
Switching on: Turn the exterior lamp
switch to position L.
The following lamps come on:
R Low-beam headlamps
R Tail lamps
R Parking lamps
R License plate lamps
R Side marker lamps
R Instrument panel lamps
R Green indicator lamp T in the exterior
lamp switch
X Switching off: Turn the exterior lamp
switch to position $.
Automatic headlamp mode The following lamps come on and go out
automatically depending on the brightness of
the ambient light:
R
Low-beam headlamps
R Tail lamps
R Parking lamps
R License plate lamps
R Side marker lamps Lighting
71Controls in detail
171_AKB; 3; 60, en-US
d2ureepe, Version: 2.11.8.1 2009-05-11T16:00:23+02:00 - Seite 71 Z
Page 74 of 312
G
Warning!
If the exterior lamp switch is set to Ã, the
headlamps will not automatically come on
under foggy conditions.
To
minimize risk to you and to others, activate
headlamps by turning exterior lamp switch to
L when driving or when traffic and/or
ambient lighting conditions require you to do
so.
In low ambient lighting conditions, only switch
from position à to L with the vehicle
at a standstill in a safe location. Switching
from à to L will briefly switch off the
headlamps. Doing so while driving in low
ambient lighting conditions may result in an
accident.
The automatic headlamp feature is only an aid
to the driver. The driver is responsible for the
operation of the vehicle’s lights at all times.
X Switching on: Turn the exterior lamp
switch to position Ã.
The following lamps come on and go out
depending on the brightness of the ambient
light with the SmartKey in starter switch
position 1:
R Tail lamps
R Parking lamps
R License plate lamps
R Side marker lamps
When the engine is running, the low-beam
headlamps will also come on and turn off
automatically.
Canada
only: High-beam headlamps are only
available with the exterior lamp switch in
position L.
Daytime running lamp mode In Canada, the daytime running lamp mode is
mandatory
and therefore in a constant mode.
In the USA, the daytime running lamp mode
is deactivated by default. X
Activate the daytime running lamp mode
using the control system, see “Switching
daytime
running lamp mode on or off (USA
only)” (Y page 106).
X Turn the exterior lamp switch to position
$ or Ã.
When the engine is running, the low-beam
headlamps come on.
In low ambient lighting conditions, the
following lamps will come on additionally:
R
Tail lamps
R Parking lamps
R License plate lamps
R Side marker lamps
With the daytime running lamp mode
activated
and the engine running, you cannot
switch off the low-beam headlamps manually.
Canada only
With the exterior lamp switch in position
$ or Ã, you cannot switch on the
high-beam headlamps.
The high-beam flasher is available at all times.
X For nighttime driving turn the exterior lamp
switch
to position L to permit activation
of the high-beam headlamps.
When the engine is running, and you
R shift from a driving position to neutral
position N or park position P with the
vehicle at a standstill (vehicles with
automatic transmission), the low-beam
headlamps will go out with a delay of
3 minutes
R turn the exterior lamp switch to position
T, the low-beam headlamps, the tail
and
parking lamps, the license plate lamps
and the side marker lamps come on
R turn the exterior lamp switch to position
L, the manual headlamp mode has
priority over the daytime running lamp
mode
The corresponding exterior lamps come on
(Y page 71). 72
Lighting
Controls in detail
171_AKB; 3; 60, en-US
d2ureepe,
Version: 2.11.8.1 2009-05-11T16:00:23+02:00 - Seite 72
Page 75 of 312
USA only
With the exterior lamp switch in position
$ or
Ã, you cannot switch on the high-
beam headlamps.
The high-beam flasher is available at all times.
X For nighttime driving turn the exterior lamp
switch to position L to permit activation
of the high-beam headlamps.
When the engine is running, and you turn the
exterior lamp switch to position T or
L, the manual headlamp mode has
priority over the daytime running lamp mode.
The corresponding exterior lamps come on
(Y page 71).
Fog lamps Fog lamps cannot be switched on with the
exterior lamp switch in position Ã.
G
Warning!
In low ambient lighting or foggy conditions,
only switch from position à to L with
the vehicle at a standstill in a safe location.
Switching from à to L will briefly
switch off the headlamps. Doing so while
driving in low ambient lighting conditions may
result in an accident.
Fog lamps will operate with the parking lamps
and/or the low-beam headlamps on. Fog
lamps should only be used in conjunction with
low-beam headlamps. Consult your State or
Province Motor Vehicle Regulations
regarding permissible lamp operation.
X Turn the exterior lamp switch to position
T or L (Y page 71).
X Switching on front fog lamps: Pull out the
exterior lamp switch to first stop.
The green indicator lamp N in the
exterior lamp switch comes on. X
Switching on rear fog lamp: Pull out the
exterior lamp switch to second stop.
The rear fog lamp, the front fog lamps, the
green N and the yellow indicator lamp
R in the exterior lamp switch come on.
X Switching off front fog lamps/rear fog
lamp: Push in the exterior lamp switch to
its stop.
Locator lighting and night security
illumination Locator lighting and night security
illumination are described in the “Control
system” section, see “Switching locator
lighting on or off” (Y page 106) and
“Switching night security illumination
(Headlamps delayed shut-off feature) on or
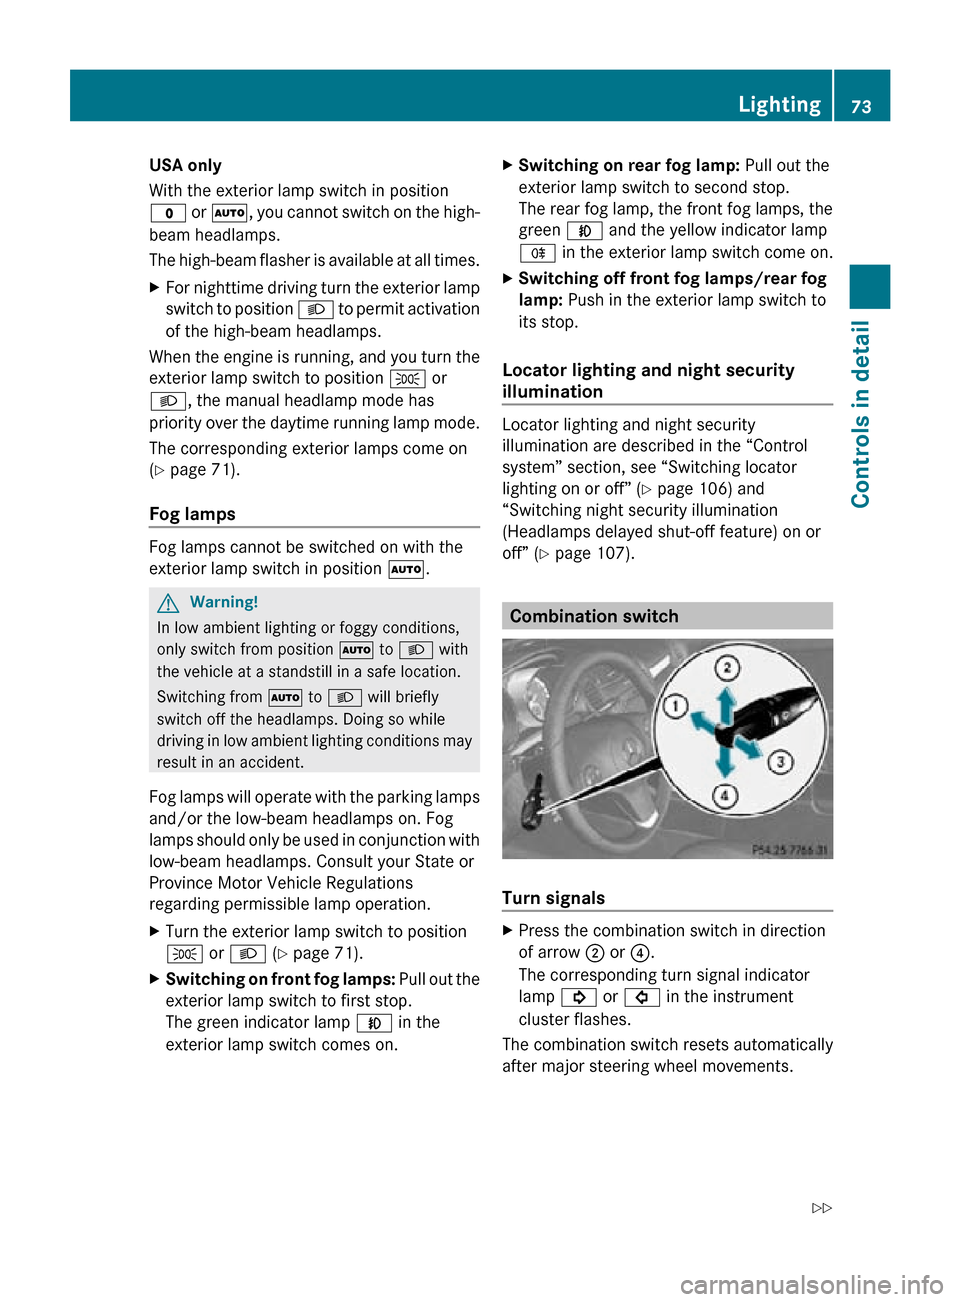
off” (Y page 107). Combination switch
Turn signals
X
Press the combination switch in direction
of arrow ; or ?.
The corresponding turn signal indicator
lamp ! or # in the instrument
cluster flashes.
The combination switch resets automatically
after major steering wheel movements. Lighting
73Controls in detail
171_AKB; 3; 60, en-US
d2ureepe, Version: 2.11.8.1 2009-05-11T16:00:23+02:00 - Seite 73 Z