2010 MERCEDES-BENZ S65AMG ECU
[x] Cancel search: ECUPage 155 of 548
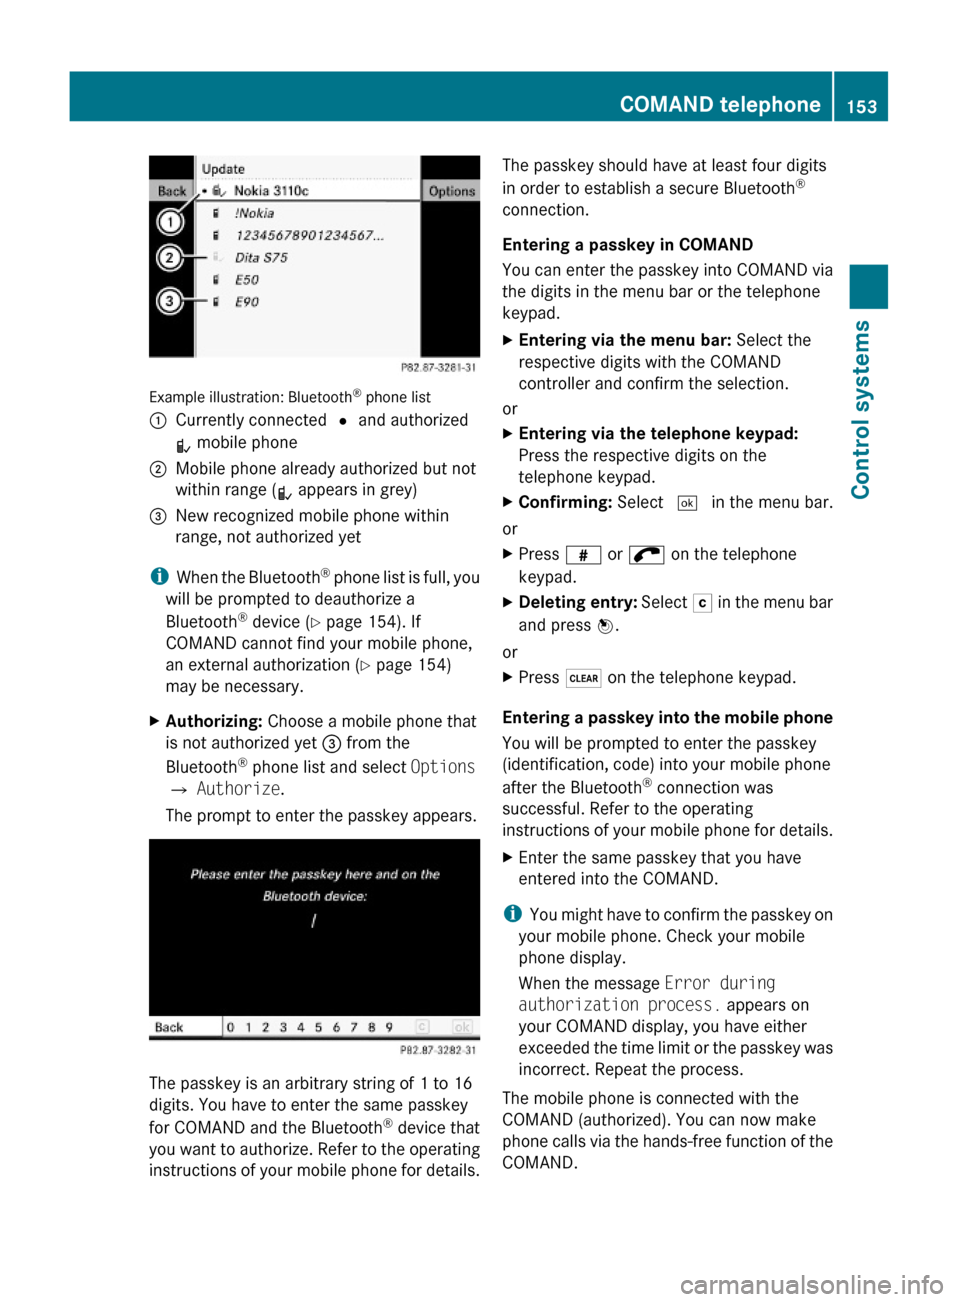
Example illustration: Bluetooth® phone list
:Currently connected # and authorized
L mobile phone
;Mobile phone already authorized but not
within range (L appears in grey)
=New recognized mobile phone within
range, not authorized yet
iWhen the Bluetooth® phone list is full, you
will be prompted to deauthorize a
Bluetooth® device (Y page 154). If
COMAND cannot find your mobile phone,
an external authorization (Y page 154)
may be necessary.
XAuthorizing: Choose a mobile phone that
is not authorized yet = from the
Bluetooth® phone list and select Options
Q Authorize.
The prompt to enter the passkey appears.
The passkey is an arbitrary string of 1 to 16
digits. You have to enter the same passkey
for COMAND and the Bluetooth® device that
you want to authorize. Refer to the operating
instructions of your mobile phone for details.
The passkey should have at least four digits
in order to establish a secure Bluetooth®
connection.
Entering a passkey in COMAND
You can enter the passkey into COMAND via
the digits in the menu bar or the telephone
keypad.
XEntering via the menu bar: Select the
respective digits with the COMAND
controller and confirm the selection.
or
XEntering via the telephone keypad:
Press the respective digits on the
telephone keypad.
XConfirming: Select ¬ in the menu bar.
or
XPress z or ; on the telephone
keypad.
XDeleting entry: Select F in the menu bar
and press W.
or
XPress $ on the telephone keypad.
Entering a passkey into the mobile phone
You will be prompted to enter the passkey
(identification, code) into your mobile phone
after the Bluetooth® connection was
successful. Refer to the operating
instructions of your mobile phone for details.
XEnter the same passkey that you have
entered into the COMAND.
iYou might have to confirm the passkey on
your mobile phone. Check your mobile
phone display.
When the message Error during
authorization process. appears on
your COMAND display, you have either
exceeded the time limit or the passkey was
incorrect. Repeat the process.
The mobile phone is connected with the
COMAND (authorized). You can now make
phone calls via the hands-free function of the
COMAND.
COMAND telephone153Control systems221_AKB; 6; 20, en-USd2ugruen,Version: 2.11.8.12009-09-24T13:28:17+02:00 - Seite 153Z
Page 156 of 548
External authorization
Certain security settings in your mobile
phone may prevent COMAND from finding
your mobile phone. In this case, you might
want to check if your mobile phone can
recognize the COMAND. The Bluetooth ®
device name of COMAND is MB Bluetooth.XSelect Data/Connections Q
Bluetooth Telephones .XGo to Update and select Options Q
External Authorization .XActivate the Bluetooth®
search on the
mobile phone. Refer to mobile phone
operating instructions for detail.XSelect MB Bluetooth on the mobile phone.XWhen prompted, enter the passkey into
COMAND and the mobile phone
( Y page 153).
Show details
Details can be displayed for each mobile
phone in the Bluetooth ®
phone list.
XSelect Data/Connections Q
Bluetooth Telephones .XChoose the mobile phone from the list and
select Options Q Details .
The following mobile phone details appear:
R Bluetooth ®
name
R Bluetooth ®
address
R Availability status
R Authorization
R Bluetooth ®
Class (mobile phone,
notebook, etc.)XClosing detail display: Slide XV Y.Deauthorizing the mobile phone XSelect Data/Connections Q
Bluetooth Telephones .XChoose the mobile phone from the list and
select Options Q De-authorize .
You will be asked whether you want to
deauthorize the device.XSelect Yes.
i
You should delete the device name MB
Bluetooth from the Bluetooth ®
list of the
mobile phone before authorizing that
mobile phone again.
Connecting another mobile phone
You can switch between several mobile
phones that you have authorized.
i Switching to another authorized mobile
phone is only possible while no phone calls
are being made.
XSelect Data/Connections Q
Bluetooth Telephones .XSelect the mobile phone from the
Bluetooth ®
phone list.XConfirm the selection.
The selected mobile phone is connected
provided it is within Bluetooth ®
range and
Bluetooth ®
is activated on the respective
device.
You can only connect one mobile phone at
a time. The currently connected mobile
phone is indicated by a dot # in the
Bluetooth ®
phone list ( Y page 153).
Main telephone menu
When the connected mobile phone is ready,
the following display appears:
154COMAND telephoneControl systems
221_AKB; 6; 20, en-USd2ugruen,Version: 2.11.8.12009-09-24T13:28:17+02:00 - Seite 154
Page 184 of 548
iShortcut button R takes you directly
to the previously set disc mode (audio CD/
DVD, MP3-CD/DVD, video DVD). The
number of times you have to press the
shortcut button depends on the previously
set mode.
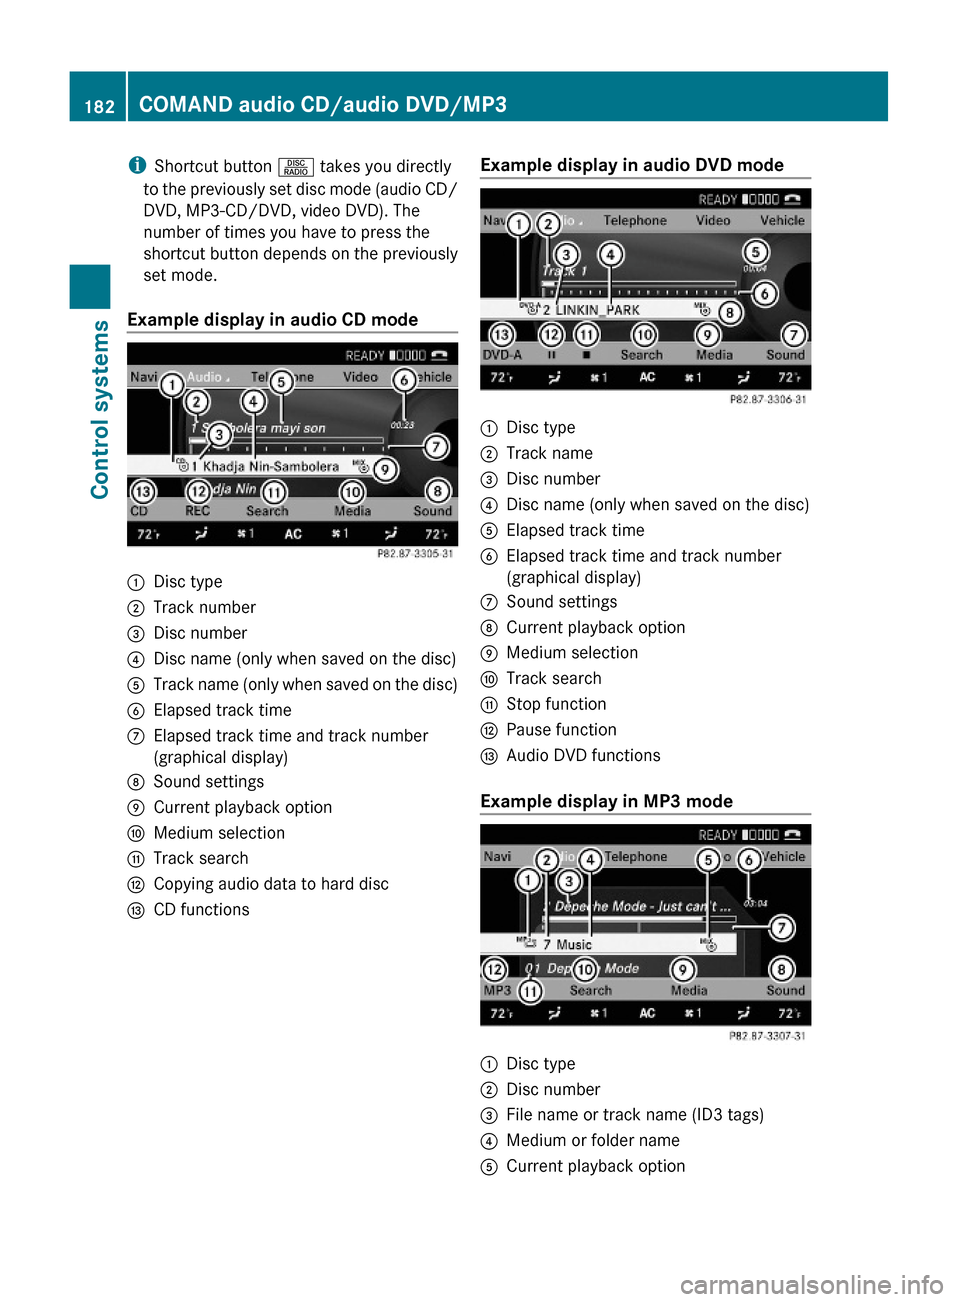
Example display in audio CD mode
:Disc type;Track number=Disc number?Disc name (only when saved on the disc)ATrack name (only when saved on the disc)BElapsed track timeCElapsed track time and track number
(graphical display)
DSound settingsECurrent playback optionFMedium selectionGTrack searchHCopying audio data to hard discICD functionsExample display in audio DVD mode:Disc type;Track name=Disc number?Disc name (only when saved on the disc)AElapsed track timeBElapsed track time and track number
(graphical display)
CSound settingsDCurrent playback optionEMedium selectionFTrack searchGStop functionHPause functionIAudio DVD functions
Example display in MP3 mode
:Disc type;Disc number=File name or track name (ID3 tags)?Medium or folder nameACurrent playback option182COMAND audio CD/audio DVD/MP3Control systems
221_AKB; 6; 20, en-USd2ugruen,Version: 2.11.8.12009-09-24T13:28:17+02:00 - Seite 182
Page 200 of 548
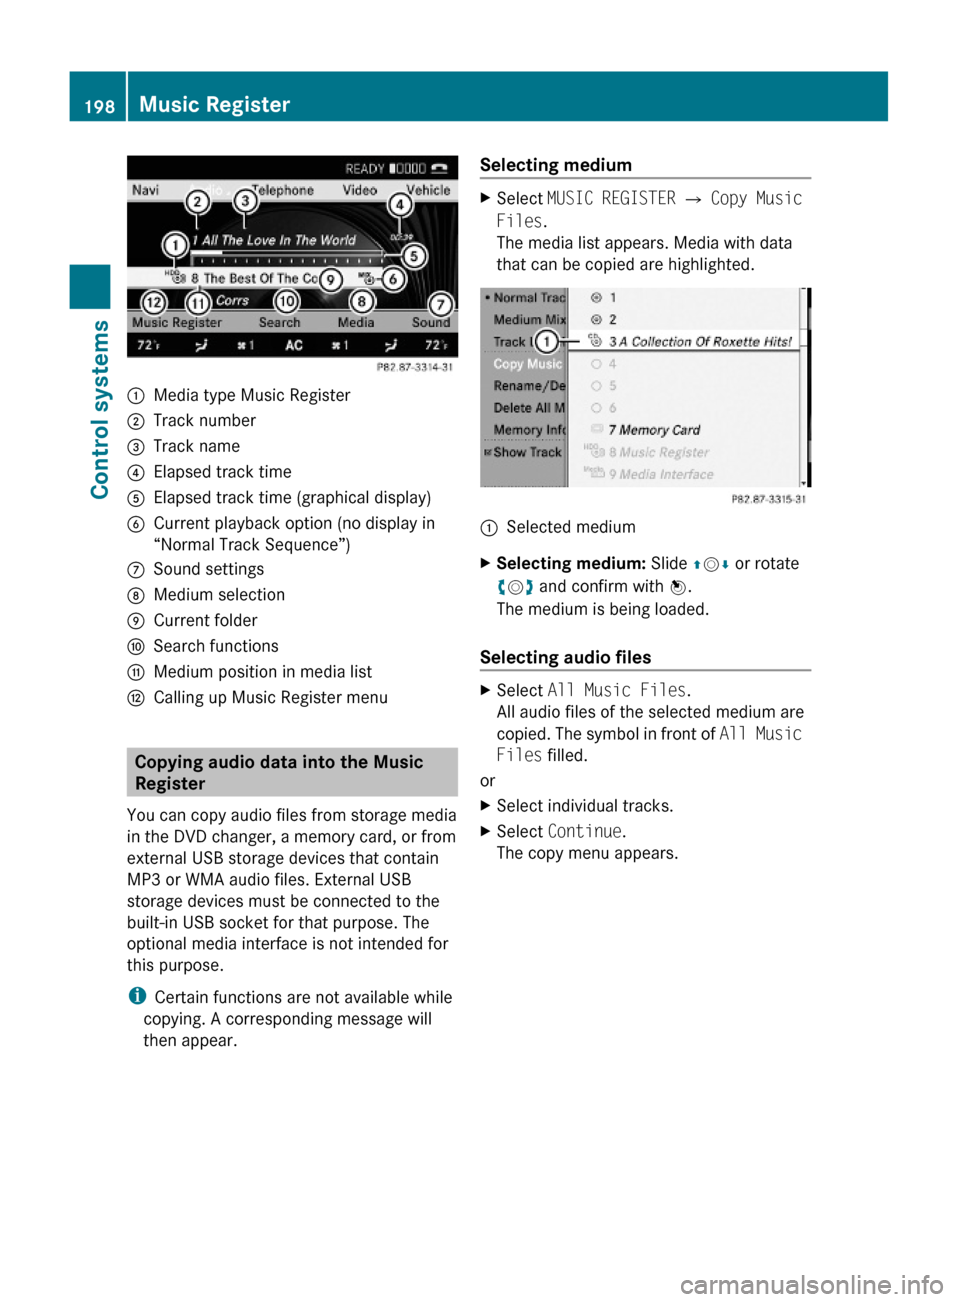
:Media type Music Register;Track number=Track name?Elapsed track timeAElapsed track time (graphical display)BCurrent playback option (no display in
“Normal Track Sequence”)
CSound settingsDMedium selectionECurrent folderFSearch functionsGMedium position in media listHCalling up Music Register menu
Copying audio data into the Music
Register
You can copy audio files from storage media
in the DVD changer, a memory card, or from
external USB storage devices that contain
MP3 or WMA audio files. External USB
storage devices must be connected to the
built-in USB socket for that purpose. The
optional media interface is not intended for
this purpose.
iCertain functions are not available while
copying. A corresponding message will
then appear.
Selecting mediumXSelect MUSIC REGISTER Q Copy Music
Files.
The media list appears. Media with data
that can be copied are highlighted.
:Selected mediumXSelecting medium: Slide ZVÆ or rotate
cVd and confirm with W.
The medium is being loaded.
Selecting audio files
XSelect All Music Files.
All audio files of the selected medium are
copied. The symbol in front of All Music
Files filled.
or
XSelect individual tracks.XSelect Continue.
The copy menu appears.
198Music RegisterControl systems
221_AKB; 6; 20, en-USd2ugruen,Version: 2.11.8.12009-09-24T13:28:17+02:00 - Seite 198
Page 210 of 548
Setting easy-entry/exit feature
iThe components and operating principles
of COMAND can be found on (Y page 76).
GWarning!
You must make sure no one can become
trapped or injured by the moving steering
wheel and driver’s seat when the easy-entry/
exit feature is activated.
To stop seat/steering wheel movement, do
one of the following:
RPress seat adjustment switch.
RMove steering wheel adjustment stalk.
RPress one of the memory position buttons
or the memory button M.
Do not leave children unattended in the
vehicle, or with access to an unlocked vehicle.
Children could open the driver’s door and
unintentionally activate the easy-entry/exit
feature, which could result in an accident
and/or serious personal injury.
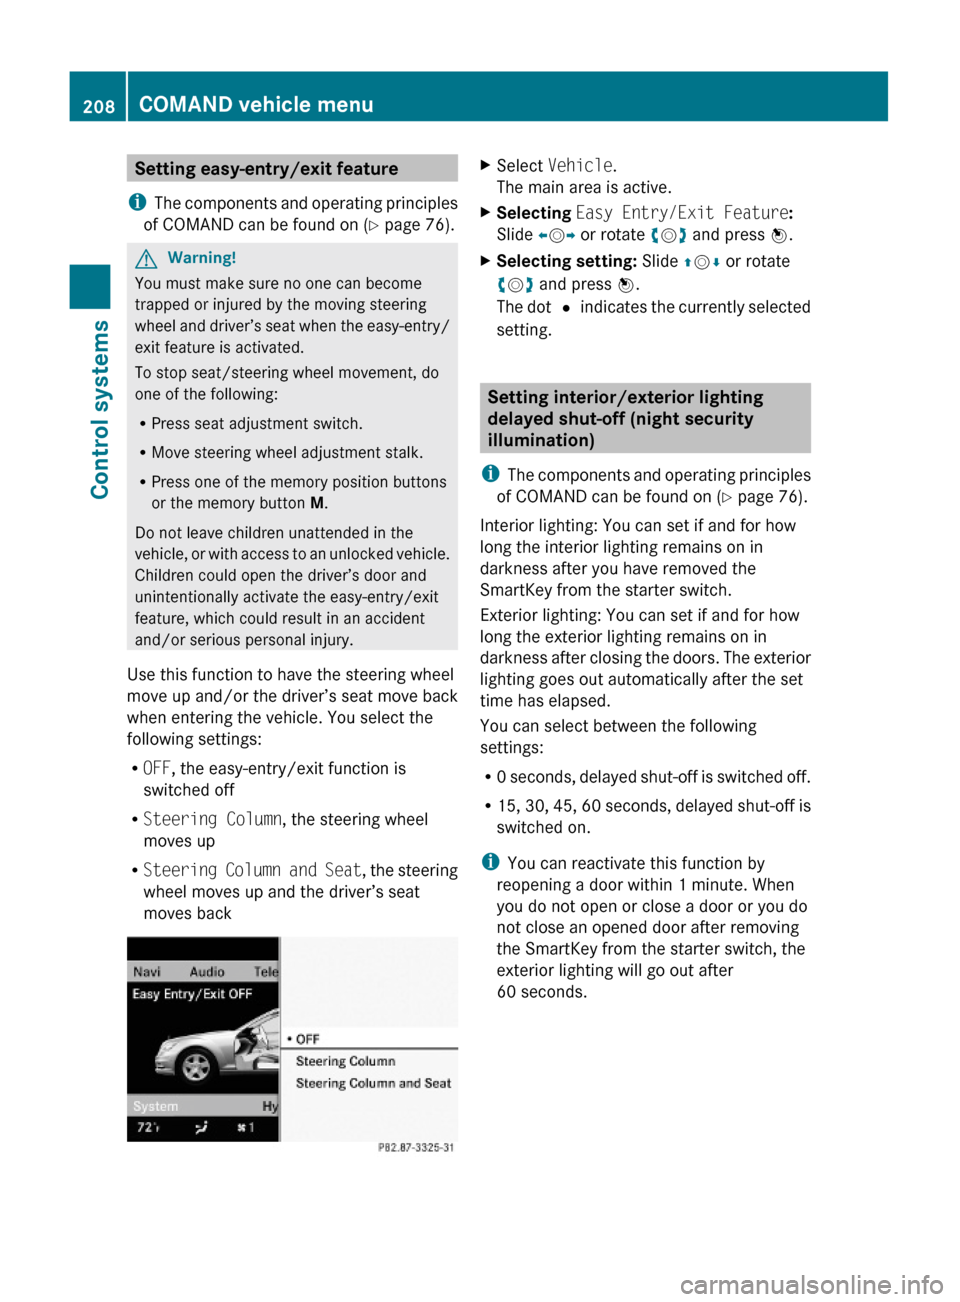
Use this function to have the steering wheel
move up and/or the driver’s seat move back
when entering the vehicle. You select the
following settings:
ROFF, the easy-entry/exit function is
switched off
RSteering Column, the steering wheel
moves up
RSteering Column and Seat, the steering
wheel moves up and the driver’s seat
moves back
XSelect Vehicle.
The main area is active.
XSelecting Easy Entry/Exit Feature:
Slide XVY or rotate cVd and press W.
XSelecting setting: Slide ZVÆ or rotate
cVd and press W.
The dot # indicates the currently selected
setting.
Setting interior/exterior lighting
delayed shut-off (night security
illumination)
iThe components and operating principles
of COMAND can be found on (Y page 76).
Interior lighting: You can set if and for how
long the interior lighting remains on in
darkness after you have removed the
SmartKey from the starter switch.
Exterior lighting: You can set if and for how
long the exterior lighting remains on in
darkness after closing the doors. The exterior
lighting goes out automatically after the set
time has elapsed.
You can select between the following
settings:
R0 seconds, delayed shut-off is switched off.
R15, 30, 45, 60 seconds, delayed shut-off is
switched on.
iYou can reactivate this function by
reopening a door within 1 minute. When
you do not open or close a door or you do
not close an opened door after removing
the SmartKey from the starter switch, the
exterior lighting will go out after
60 seconds.
208COMAND vehicle menuControl systems
221_AKB; 6; 20, en-USd2ugruen,Version: 2.11.8.12009-09-24T13:28:17+02:00 - Seite 208
Page 280 of 548
XHave the SmartKey deactivated by an
authorized Mercedes-Benz Center.
XReport the loss of the SmartKey or the
mechanical key to your car insurance
company immediately.
XHave the mechanical lock replaced if
necessary.
Any authorized Mercedes-Benz Center will be
glad to supply you with a replacement. For
information on replacing the SmartKey, see
“Replacing the SmartKey” (Y page 278).
Replacing the SmartKey
Only you, or someone authorized by you can
order a replacement key from any Mercedes-
Benz Center. In order to do so, the Mercedes-
Benz Center will require proof of identity and
vehicle ownership with original documents,
including the following:
If you are the current owner of the vehicle:
Rthe vehicle’s current state registration
Ra current identity card, passport, or drivers
license
If you are an authorized person:
Rthe vehicle’s current state registration
Ra current identity card, passport, or drivers
license for the authorized individual
Rsigned and dated authorization from the
owner of the vehicle for which the key is
being requested
iDuplicated or photocopied
documentation will not be accepted.
Activating the key
Once you, or an authorized person, has
provided the appropriate documents, the
Mercedes-Benz Center will need to
synchronize the key to your vehicle before it
can be used. In order to do so, the Mercedes-
Benz Center need access to your vehicle.
Opening the doors from the inside
You can open a door from the inside even
when it is locked unless it is secured with the
child safety lock (Y page 61).
Open door only when conditions are safe to
do so.
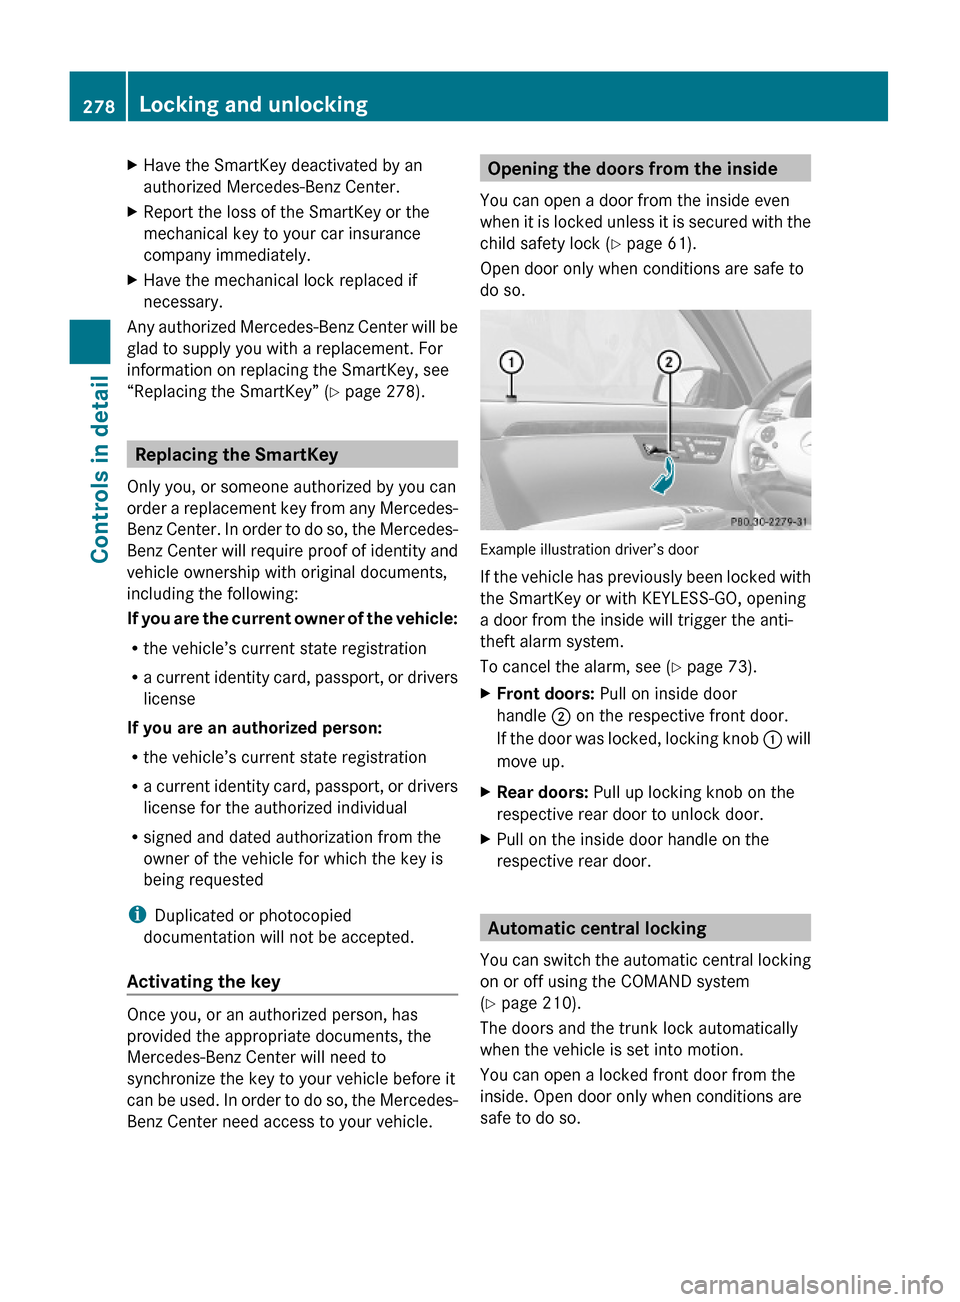
Example illustration driver’s door
If the vehicle has previously been locked with
the SmartKey or with KEYLESS-GO, opening
a door from the inside will trigger the anti-
theft alarm system.
To cancel the alarm, see (Y page 73).
XFront doors: Pull on inside door
handle ; on the respective front door.
If the door was locked, locking knob : will
move up.
XRear doors: Pull up locking knob on the
respective rear door to unlock door.
XPull on the inside door handle on the
respective rear door.
Automatic central locking
You can switch the automatic central locking
on or off using the COMAND system
(Y page 210).
The doors and the trunk lock automatically
when the vehicle is set into motion.
You can open a locked front door from the
inside. Open door only when conditions are
safe to do so.
278Locking and unlockingControls in detail
221_AKB; 6; 20, en-USd2ugruen,Version: 2.11.8.12009-09-24T13:28:17+02:00 - Seite 278
Page 288 of 548
iWhen you now press the KEYLESS-GO
start/stop button once and the driver’s
door is open, the power supply is switched
off.
Seats
Safety notes
GWarning!
In order to avoid possible loss of vehicle
control the following must be done before the
vehicle is put into motion:
R seat adjustment
R head restraint adjustment
R steering wheel adjustment
R rear view mirror adjustment
R fastening of seat belts
GWarning!
Do not adjust the driver’s seat while driving.
Adjusting the seat while driving could cause
the driver to lose control of the vehicle.
Never ride in a moving vehicle with the seat
backrest in an excessively reclined position as
this can be dangerous. You could slide under
the seat belt in a collision. If you slide under
it, the seat belt would apply force at the
abdomen or neck. That could cause serious
or fatal injuries. The seat backrest and seat
belts provide the best restraint when the
wearer is in a position that is as upright as
possible and seat belts are properly
positioned on the body.
GWarning!
Your seat must be adjusted so that you can
correctly fasten your seat belt.
Observe the following points:
R Adjust the seat backrest until your arms are
slightly angled when holding the steering
wheel.
R Adjust the seat to a comfortable seating
position that still allows you to reach the
accelerator/brake pedal safely. The
position should be as far back as possible
with the driver still able to operate the
controls properly.
R Adjust the head restraint so that it is as
close to the head as possible. The center of
the head restraint must support the back of
the head at eye level.
R Never place hands under the seat or near
any moving parts while a seat is being
adjusted.
Failure to do so could result in an accident
and/or serious personal injury.GWarning!
The power seats can be operated at any time.
Therefore, do not leave children unattended
in the vehicle, or with access to an unlocked
vehicle. A child’s unsupervised access to a
vehicle could result in an accident and/or
serious personal injury.
GWarning!
According to accident statistics, children are
safer when properly restrained in the rear
seating positions than in the front seating
position. Thus, we strongly recommend that
children be placed in the rear seats whenever
possible. Regardless of seating position,
children 12 years old and under must be
seated and properly secured in an
appropriately sized infant restraint, toddler
restraint, or booster seat recommended for
the size and weight of the child. For additional
information, see “Children in the vehicle”.
A child’s risk of serious or fatal injuries is
significantly increased if the child restraints
are not properly secured in the vehicle and/
286SeatsControls in detail
221_AKB; 6; 20, en-USd2ugruen,Version: 2.11.8.12009-09-24T13:28:17+02:00 - Seite 286
Page 289 of 548
or the child is not properly secured in the child
restraint.
GWarning!
For your protection, drive only with properly
positioned head restraints.
Adjust the head restraint so that it is as close
to the head as possible and the center of the
head restraint supports the back of the head
at eye level. This will reduce the potential for
injury to the head and neck in the event of an
accident or similar situation.
Do not drive the vehicle without the seat head
restraints. Head restraints are intended to
help reduce injuries during an accident.
Seat adjustment
You can adjust the lumbar support,
multicontour seats for driver and front
passenger, as well as drive-dynamic
multicontour seats using COMAND
(Y page 216).
! When moving the seats, make sure there
are no items in the footwell or behind the
seats. Otherwise, you could damage the
seats and/or the items.
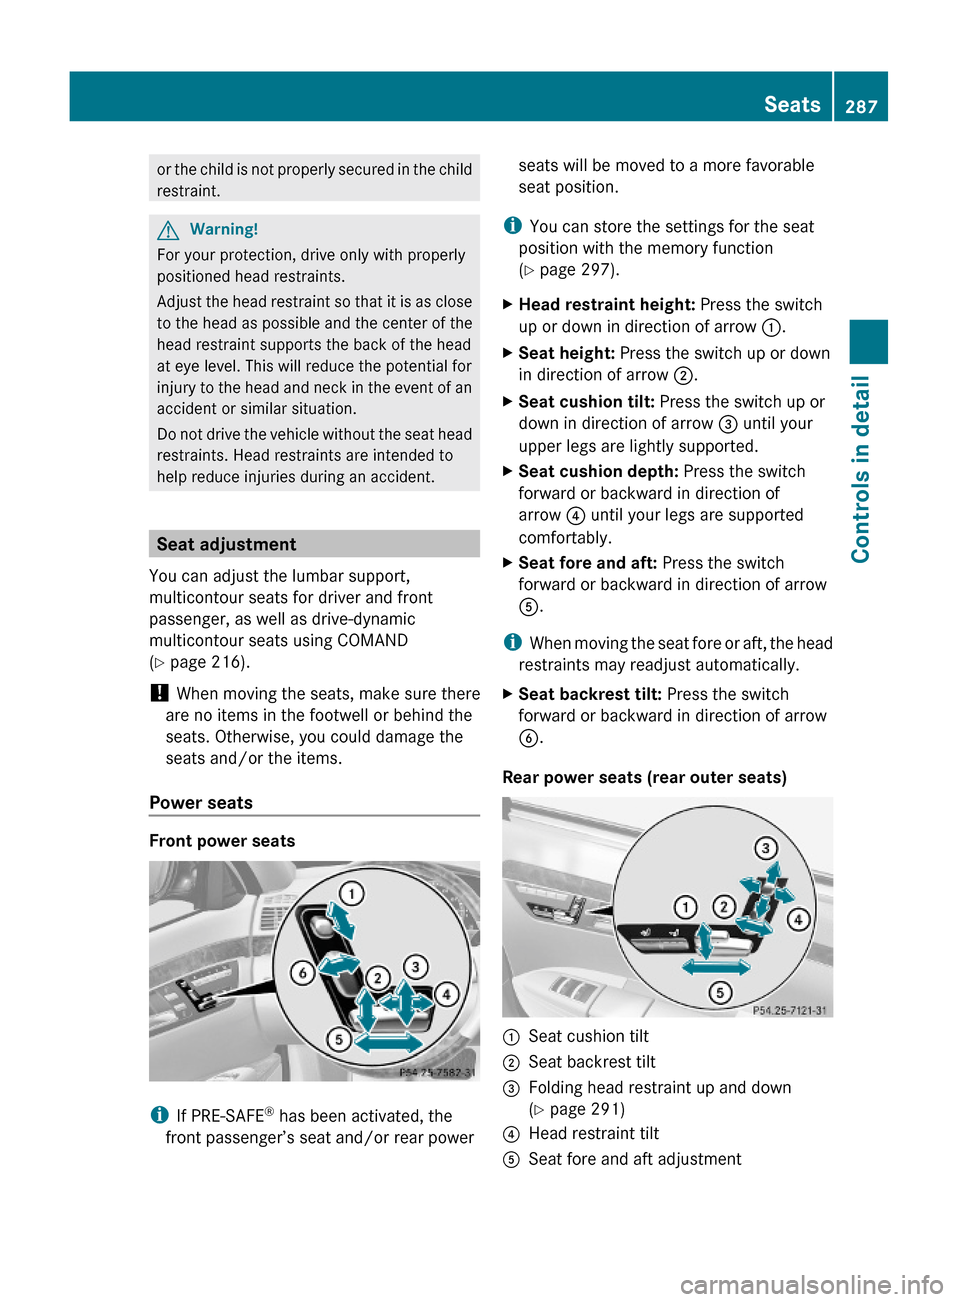
Power seats
Front power seats
iIf PRE-SAFE® has been activated, the
front passenger’s seat and/or rear power
seats will be moved to a more favorable
seat position.
iYou can store the settings for the seat
position with the memory function
(Y page 297).
XHead restraint height: Press the switch
up or down in direction of arrow :.
XSeat height: Press the switch up or down
in direction of arrow ;.
XSeat cushion tilt: Press the switch up or
down in direction of arrow = until your
upper legs are lightly supported.
XSeat cushion depth: Press the switch
forward or backward in direction of
arrow ? until your legs are supported
comfortably.
XSeat fore and aft: Press the switch
forward or backward in direction of arrow
A.
iWhen moving the seat fore or aft, the head
restraints may readjust automatically.
XSeat backrest tilt: Press the switch
forward or backward in direction of arrow
B.
Rear power seats (rear outer seats)
:Seat cushion tilt;Seat backrest tilt=Folding head restraint up and down
(Y page 291)
?Head restraint tiltASeat fore and aft adjustmentSeats287Controls in detail221_AKB; 6; 20, en-USd2ugruen,Version: 2.11.8.12009-09-24T13:28:17+02:00 - Seite 287Z