2010 MERCEDES-BENZ S65AMG seat adjustment
[x] Cancel search: seat adjustmentPage 291 of 548
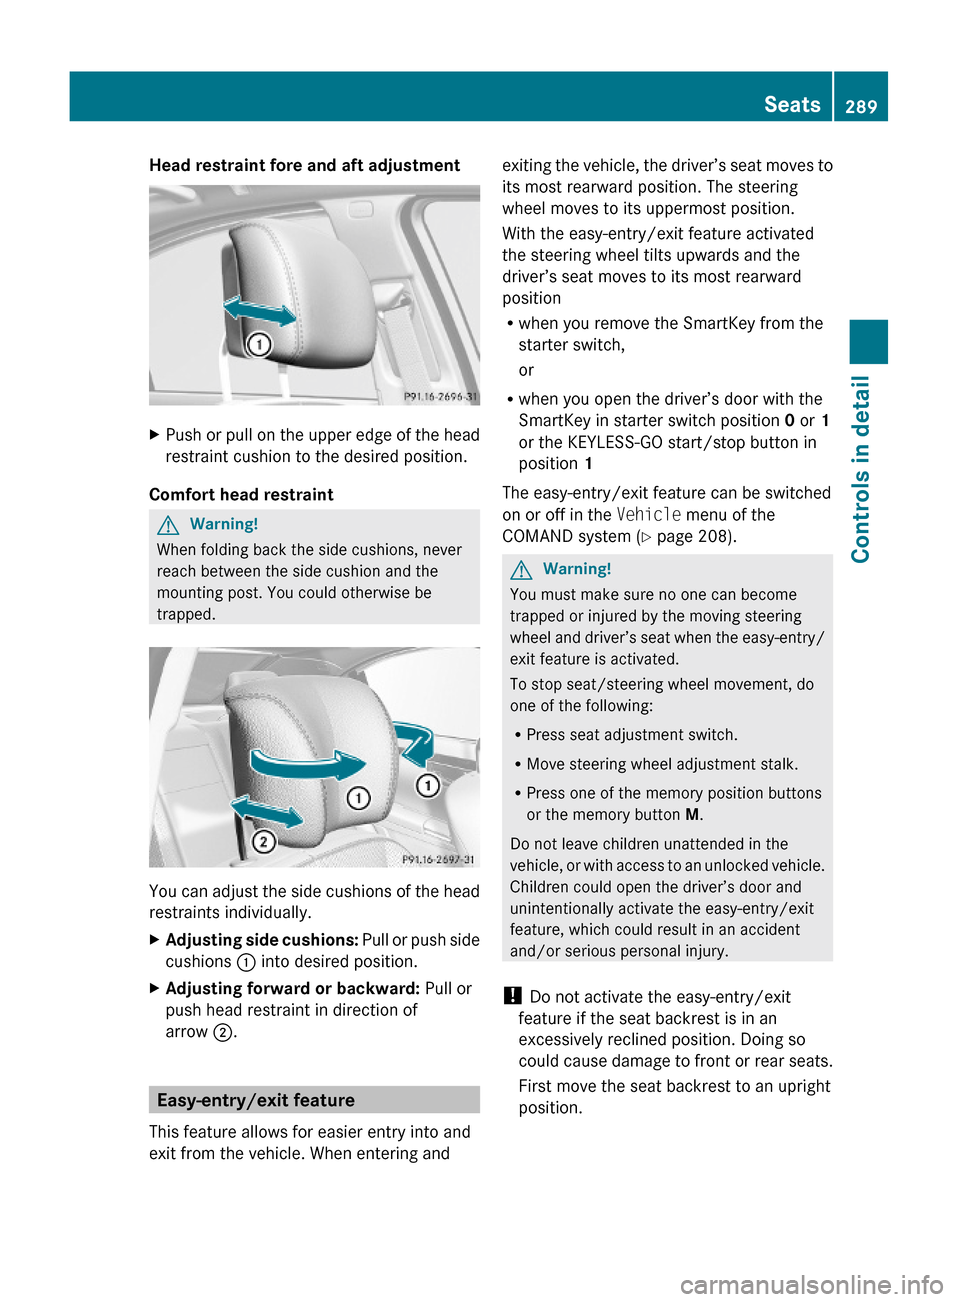
Head restraint fore and aft adjustment XPush or pull on the upper edge of the head
restraint cushion to the desired position.
Comfort head restraint
GWarning!
When folding back the side cushions, never
reach between the side cushion and the
mounting post. You could otherwise be
trapped.
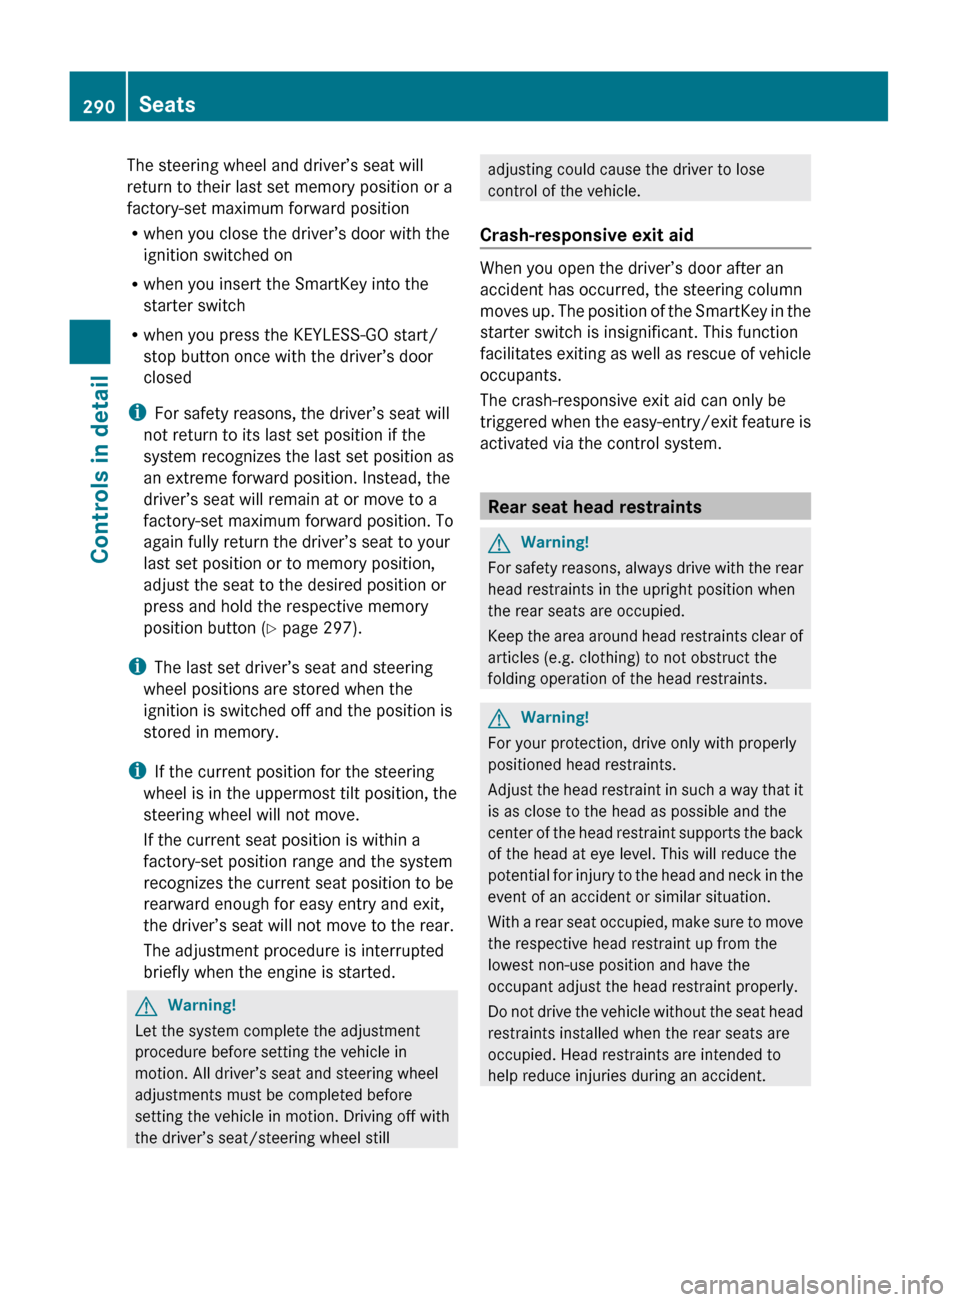
You can adjust the side cushions of the head
restraints individually.
XAdjusting side cushions: Pull or push side
cushions : into desired position.
XAdjusting forward or backward: Pull or
push head restraint in direction of
arrow ;.
Easy-entry/exit feature
This feature allows for easier entry into and
exit from the vehicle. When entering and
exiting the vehicle, the driver’s seat moves to
its most rearward position. The steering
wheel moves to its uppermost position.
With the easy-entry/exit feature activated
the steering wheel tilts upwards and the
driver’s seat moves to its most rearward
position
Rwhen you remove the SmartKey from the
starter switch,
or
Rwhen you open the driver’s door with the
SmartKey in starter switch position 0 or 1
or the KEYLESS-GO start/stop button in
position 1
The easy-entry/exit feature can be switched
on or off in the Vehicle menu of the
COMAND system (Y page 208).
GWarning!
You must make sure no one can become
trapped or injured by the moving steering
wheel and driver’s seat when the easy-entry/
exit feature is activated.
To stop seat/steering wheel movement, do
one of the following:
RPress seat adjustment switch.
RMove steering wheel adjustment stalk.
RPress one of the memory position buttons
or the memory button M.
Do not leave children unattended in the
vehicle, or with access to an unlocked vehicle.
Children could open the driver’s door and
unintentionally activate the easy-entry/exit
feature, which could result in an accident
and/or serious personal injury.
! Do not activate the easy-entry/exit
feature if the seat backrest is in an
excessively reclined position. Doing so
could cause damage to front or rear seats.
First move the seat backrest to an upright
position.
Seats289Controls in detail221_AKB; 6; 20, en-USd2ugruen,Version: 2.11.8.12009-09-24T13:28:17+02:00 - Seite 289Z
Page 292 of 548
The steering wheel and driver’s seat will
return to their last set memory position or a
factory-set maximum forward position
R when you close the driver’s door with the
ignition switched on
R when you insert the SmartKey into the
starter switch
R when you press the KEYLESS-GO start/
stop button once with the driver’s door
closed
i For safety reasons, the driver’s seat will
not return to its last set position if the
system recognizes the last set position as
an extreme forward position. Instead, the
driver’s seat will remain at or move to a
factory-set maximum forward position. To
again fully return the driver’s seat to your
last set position or to memory position,
adjust the seat to the desired position or
press and hold the respective memory
position button ( Y page 297).
i The last set driver’s seat and steering
wheel positions are stored when the
ignition is switched off and the position is
stored in memory.
i If the current position for the steering
wheel is in the uppermost tilt position, the
steering wheel will not move.
If the current seat position is within a
factory-set position range and the system
recognizes the current seat position to be
rearward enough for easy entry and exit,
the driver’s seat will not move to the rear.
The adjustment procedure is interrupted
briefly when the engine is started.GWarning!
Let the system complete the adjustment
procedure before setting the vehicle in
motion. All driver’s seat and steering wheel
adjustments must be completed before
setting the vehicle in motion. Driving off with
the driver’s seat/steering wheel still
adjusting could cause the driver to lose
control of the vehicle.
Crash-responsive exit aid
When you open the driver’s door after an
accident has occurred, the steering column
moves up. The position of the SmartKey in the
starter switch is insignificant. This function
facilitates exiting as well as rescue of vehicle
occupants.
The crash-responsive exit aid can only be
triggered when the easy-entry/exit feature is
activated via the control system.
Rear seat head restraints
GWarning!
For safety reasons, always drive with the rear
head restraints in the upright position when
the rear seats are occupied.
Keep the area around head restraints clear of
articles (e.g. clothing) to not obstruct the
folding operation of the head restraints.
GWarning!
For your protection, drive only with properly
positioned head restraints.
Adjust the head restraint in such a way that it
is as close to the head as possible and the
center of the head restraint supports the back
of the head at eye level. This will reduce the
potential for injury to the head and neck in the
event of an accident or similar situation.
With a rear seat occupied, make sure to move
the respective head restraint up from the
lowest non-use position and have the
occupant adjust the head restraint properly.
Do not drive the vehicle without the seat head
restraints installed when the rear seats are
occupied. Head restraints are intended to
help reduce injuries during an accident.
290SeatsControls in detail
221_AKB; 6; 20, en-USd2ugruen,Version: 2.11.8.12009-09-24T13:28:17+02:00 - Seite 290
Page 295 of 548
Multicontour seats, rear
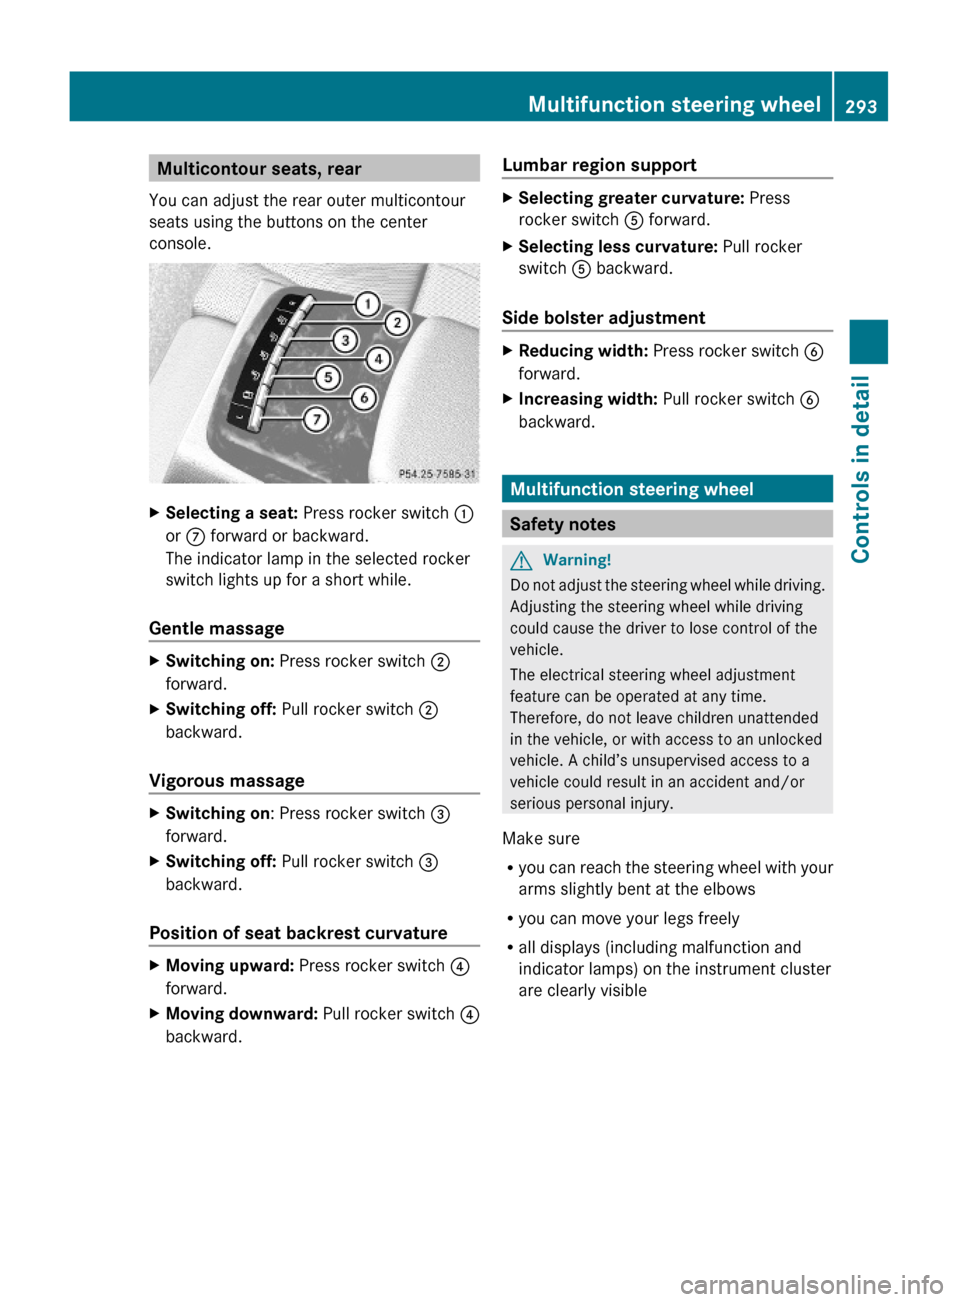
You can adjust the rear outer multicontour
seats using the buttons on the center
console.
XSelecting a seat: Press rocker switch :
or C forward or backward.
The indicator lamp in the selected rocker
switch lights up for a short while.
Gentle massage
XSwitching on: Press rocker switch ;
forward.
XSwitching off: Pull rocker switch ;
backward.
Vigorous massage
XSwitching on: Press rocker switch =
forward.
XSwitching off: Pull rocker switch =
backward.
Position of seat backrest curvature
XMoving upward: Press rocker switch ?
forward.
XMoving downward: Pull rocker switch ?
backward.
Lumbar region supportXSelecting greater curvature: Press
rocker switch A forward.
XSelecting less curvature: Pull rocker
switch A backward.
Side bolster adjustment
XReducing width: Press rocker switch B
forward.
XIncreasing width: Pull rocker switch B
backward.
Multifunction steering wheel
Safety notes
GWarning!
Do not adjust the steering wheel while driving.
Adjusting the steering wheel while driving
could cause the driver to lose control of the
vehicle.
The electrical steering wheel adjustment
feature can be operated at any time.
Therefore, do not leave children unattended
in the vehicle, or with access to an unlocked
vehicle. A child’s unsupervised access to a
vehicle could result in an accident and/or
serious personal injury.
Make sure
Ryou can reach the steering wheel with your
arms slightly bent at the elbows
Ryou can move your legs freely
Rall displays (including malfunction and
indicator lamps) on the instrument cluster
are clearly visible
Multifunction steering wheel293Controls in detail221_AKB; 6; 20, en-USd2ugruen,Version: 2.11.8.12009-09-24T13:28:17+02:00 - Seite 293Z
Page 296 of 548
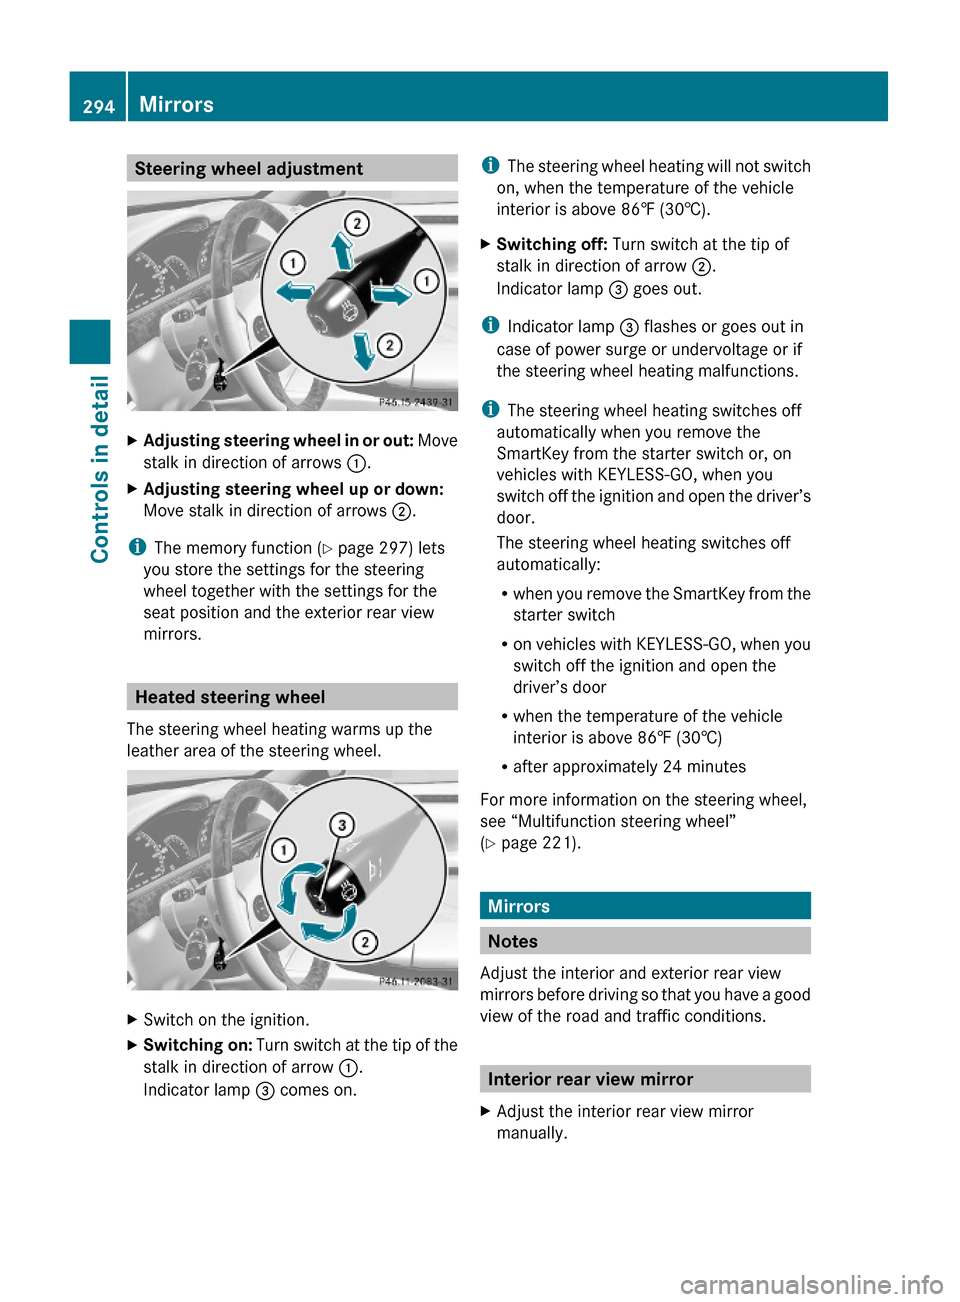
Steering wheel adjustmentXAdjusting steering wheel in or out: Move
stalk in direction of arrows :.
XAdjusting steering wheel up or down:
Move stalk in direction of arrows ;.
iThe memory function (Y page 297) lets
you store the settings for the steering
wheel together with the settings for the
seat position and the exterior rear view
mirrors.
Heated steering wheel
The steering wheel heating warms up the
leather area of the steering wheel.
XSwitch on the ignition.XSwitching on: Turn switch at the tip of the
stalk in direction of arrow :.
Indicator lamp = comes on.
iThe steering wheel heating will not switch
on, when the temperature of the vehicle
interior is above 86‡ (30†).
XSwitching off: Turn switch at the tip of
stalk in direction of arrow ;.
Indicator lamp = goes out.
iIndicator lamp = flashes or goes out in
case of power surge or undervoltage or if
the steering wheel heating malfunctions.
iThe steering wheel heating switches off
automatically when you remove the
SmartKey from the starter switch or, on
vehicles with KEYLESS-GO, when you
switch off the ignition and open the driver’s
door.
The steering wheel heating switches off
automatically:
Rwhen you remove the SmartKey from the
starter switch
Ron vehicles with KEYLESS-GO, when you
switch off the ignition and open the
driver’s door
Rwhen the temperature of the vehicle
interior is above 86‡ (30†)
Rafter approximately 24 minutes
For more information on the steering wheel,
see “Multifunction steering wheel”
(Y page 221).
Mirrors
Notes
Adjust the interior and exterior rear view
mirrors before driving so that you have a good
view of the road and traffic conditions.
Interior rear view mirror
XAdjust the interior rear view mirror
manually.
294MirrorsControls in detail
221_AKB; 6; 20, en-USd2ugruen,Version: 2.11.8.12009-09-24T13:28:17+02:00 - Seite 294
Page 299 of 548
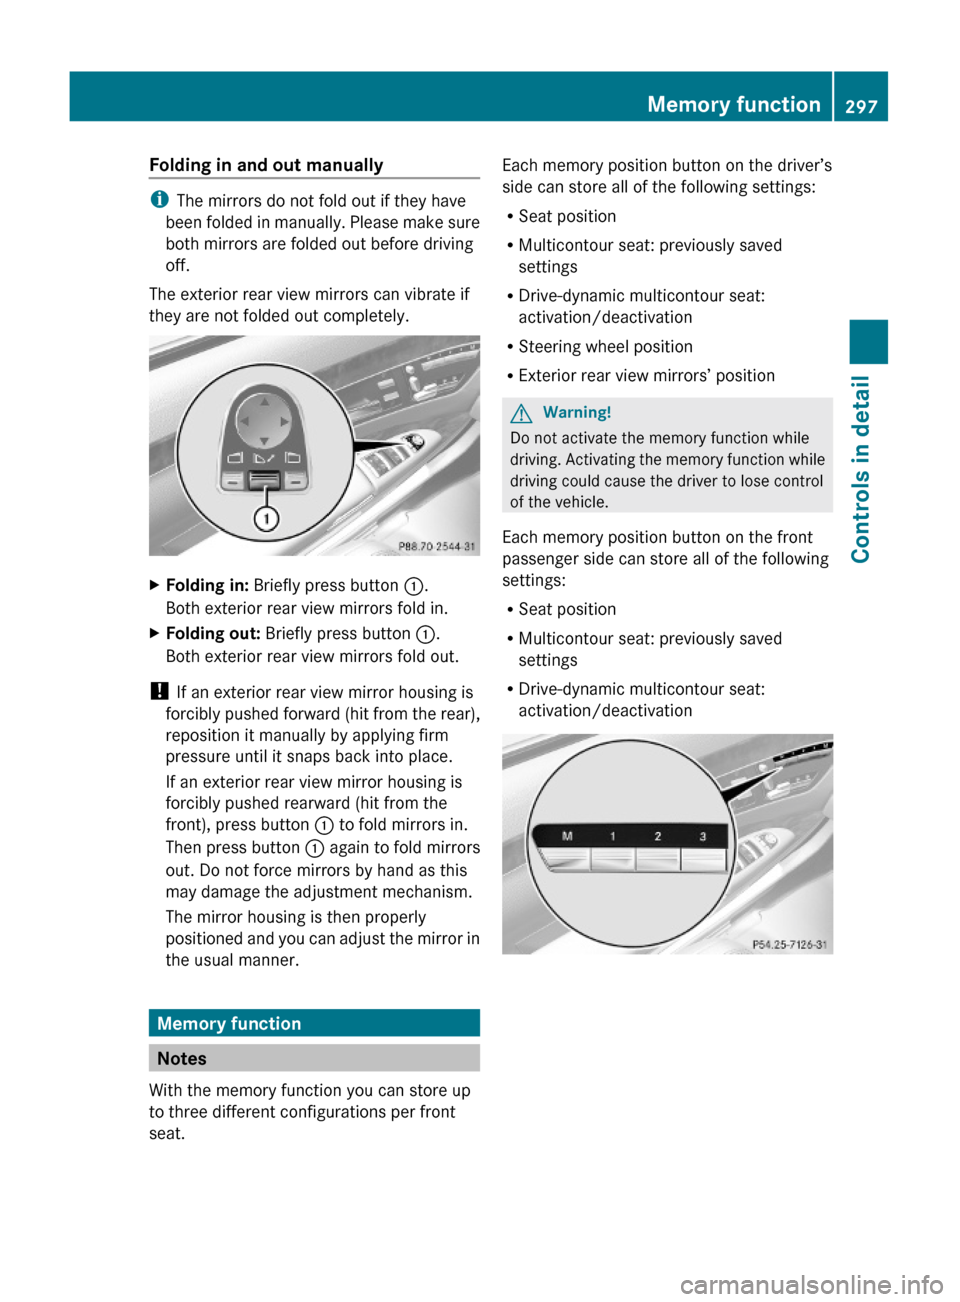
Folding in and out manually
iThe mirrors do not fold out if they have
been folded in manually. Please make sure
both mirrors are folded out before driving
off.
The exterior rear view mirrors can vibrate if
they are not folded out completely.
XFolding in: Briefly press button :.
Both exterior rear view mirrors fold in.
XFolding out: Briefly press button :.
Both exterior rear view mirrors fold out.
! If an exterior rear view mirror housing is
forcibly pushed forward (hit from the rear),
reposition it manually by applying firm
pressure until it snaps back into place.
If an exterior rear view mirror housing is
forcibly pushed rearward (hit from the
front), press button : to fold mirrors in.
Then press button : again to fold mirrors
out. Do not force mirrors by hand as this
may damage the adjustment mechanism.
The mirror housing is then properly
positioned and you can adjust the mirror in
the usual manner.
Memory function
Notes
With the memory function you can store up
to three different configurations per front
seat.
Each memory position button on the driver’s
side can store all of the following settings:
RSeat position
RMulticontour seat: previously saved
settings
RDrive-dynamic multicontour seat:
activation/deactivation
RSteering wheel position
RExterior rear view mirrors’ position
GWarning!
Do not activate the memory function while
driving. Activating the memory function while
driving could cause the driver to lose control
of the vehicle.
Each memory position button on the front
passenger side can store all of the following
settings:
RSeat position
RMulticontour seat: previously saved
settings
RDrive-dynamic multicontour seat:
activation/deactivation
Memory function297Controls in detail221_AKB; 6; 20, en-USd2ugruen,Version: 2.11.8.12009-09-24T13:28:17+02:00 - Seite 297Z
Page 339 of 548
StoppingGWarning!
The braking effect of the DISTRONIC PLUS is
canceled and the vehicle can start to roll if
R the DISTRONIC PLUS is switched off using
the DISTRONIC PLUS lever
R you accelerate
R the DISTRONIC PLUS system or the power
supply is malfunctioning, e.g. due to battery
failure
R the electrical components in the engine
compartment or the fuses have been
manipulated
R the battery is disconnected
GWarning!
Never get out of the vehicle while the
DISTRONIC PLUS is switched on!
The DISTRONIC PLUS must never be operated
or switched off by passengers or from outside
the vehicle.
The DISTRONIC PLUS is not a substitute for
the electronic parking brake. It must not be
used to secure the vehicle when parking.
When you get out of the vehicle or switch off
the engine, deactivate the DISTRONIC PLUS
and secure the vehicle from rolling away by
engaging the electronic parking brake.
When the DISTRONIC PLUS detects that the
preceding vehicle is stopping, the vehicle
brakes until it also stops. Once the vehicle is
at a standstill, it remains stationary, without
depressing the brake pedal.
After a short while, the vehicle is secured in
place by the electronic parking brake so that
the operating brake can be relieved of load.
Depending on the following distance set
using the distance setting switch on the
DISTRONIC PLUS lever ( Y page 339), the
vehicle will stop adequate away from the
preceding vehicle.
When the DISTRONIC PLUS is activated and
the vehicle is at a standstill, the automatic
transmission shifts into park position P
automatically when
R opening the driver’s door and releasing the
seat belt
R turning off the engine
R opening the hood
R a system malfunction occurs
R the on-board voltage is insufficient
The DISTRONIC PLUS is deactivated.
Setting the current speedXAccelerate or decelerate to the desired
speed.XBriefly lift the DISTRONIC PLUS lever in
direction of arrow : or depress in
direction of arrow ; (Y page 335).
The current speed is set.XRemove your foot from the accelerator
pedal.
i If you do not take your foot off of the
accelerator pedal and continue to
accelerate past the set speed, the following
message will appear in the multifunction
display:
DISTRONIC PLUS Override
The distance to a slower moving vehicle in
front of you will not be set. Your vehicle
speed will then be determined only by the
accelerator pedal position.
Changing the set speed
GWarning!
Keep in mind that it may take a brief moment
until the vehicle has made the necessary
adjustments.
Increase or decrease the set vehicle speed to
a value that the prevailing road conditions and
legal speed limits permit. Otherwise, sudden
and unexpected acceleration or deceleration
of the vehicle could cause an accident and/
or serious injury to you and others.
Driving systems337Controls in detail221_AKB; 6; 20, en-USd2ugruen,Version: 2.11.8.12009-09-24T13:28:17+02:00 - Seite 337Z
Page 504 of 548
XFirmly press the head restraint cushion
backward towards the head restraint cover
in direction of arrow = until it engages.
XRepeat this procedure for the second front
seat.
XAfter resetting the NECK-PRO active front
head restraints store reset tool : in the
Mercedes-Benz literature pouch.
For information on NECK-PRO active front
head restraints, see “NECK-PRO active front
head restraints” (Y page 55).
For information on head restraint adjustment,
see “Seats” (Y page 286).
Replacing batteries (SmartKey,
remote control, headphone)
Notes
If the batteries in the SmartKey are
discharged, the vehicle can no longer be
locked or unlocked. It is recommended to
have the batteries replaced at an authorized
Mercedes-Benz Center.
GWarning!
Batteries contain poisonous and corrosive
substances. Therefore, keep the batteries out
of reach of children.
If a battery is swallowed, seek medical help
immediately.
GWarning!
SmartKey batteries contain perchlorate
material, which may require special handling
and regard for the environment. Check with
your local government’s disposal guidelines.
California residents, see www.dtsc.ca.gov/
HazardousWaste/Perchlorate/
index.cfm.
Batteries contain materials that can harm the
environment if disposed of improperly.
Recycling of batteries is the preferred method
of disposal. Many states (USA only) or
provinces (Canada only) require sellers of
batteries to accept old batteries for recycling.
SmartKey
When inserting the batteries, make sure they
are clean and free of lint.
When replacing batteries, always replace
both batteries.
iThe required replacement batteries are
available at any authorized Mercedes-Benz
Center.
Replacement batteries: Lithium, type
CR 2025 or equivalent.
XRemove the mechanical key from the
SmartKey (Y page 499).
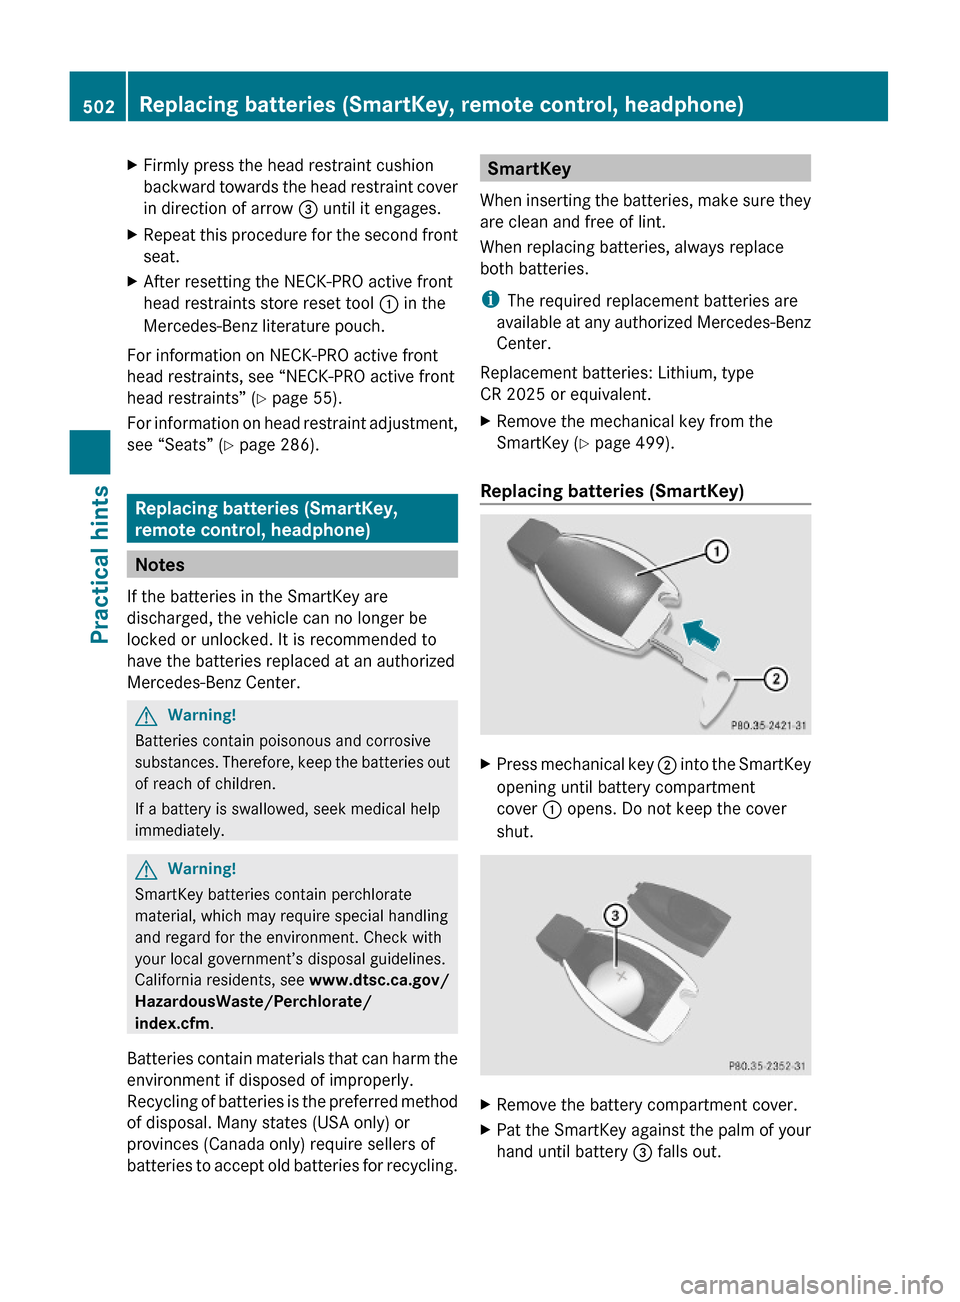
Replacing batteries (SmartKey)
XPress mechanical key ; into the SmartKey
opening until battery compartment
cover : opens. Do not keep the cover
shut.
XRemove the battery compartment cover.XPat the SmartKey against the palm of your
hand until battery = falls out.
502Replacing batteries (SmartKey, remote control, headphone)Practical hints
221_AKB; 6; 20, en-USd2ugruen,Version: 2.11.8.12009-09-24T13:28:17+02:00 - Seite 502