2010 MERCEDES-BENZ S65AMG seat adjustment
[x] Cancel search: seat adjustmentPage 63 of 548
XVehicles with rear center seat: Make sure
that the seat belt for the rear center seat
can operate freely with a child seat
installed.
GWarning!
Vehicles with rear power seats:
Never change the rear seat position after
installing the child restraint. This could
Rdamage the child restraint
Rintroduce undesirable slack or tension into
the seat belt
Rloosen the child restraint
Rmisposition the child restraint
All of the above will lessen the
effectiveness of the child restraint and thus
increase the chance or severity of injury in
an accident.
Child safety
Child safety locks
GObserve Safety notes, see page 56.GWarning!
Children could open a rear door from the
inside. This may cause serious personal injury
or an accident. Therefore, secure the rear
doors with the child safety locks whenever
children are riding in the back seats of the
vehicle.
The child safety locks on the rear doors
enable you to secure each rear door
individually. You cannot open a secured rear
door from the inside. You can open the rear
door from the outside when the vehicle is
unlocked.
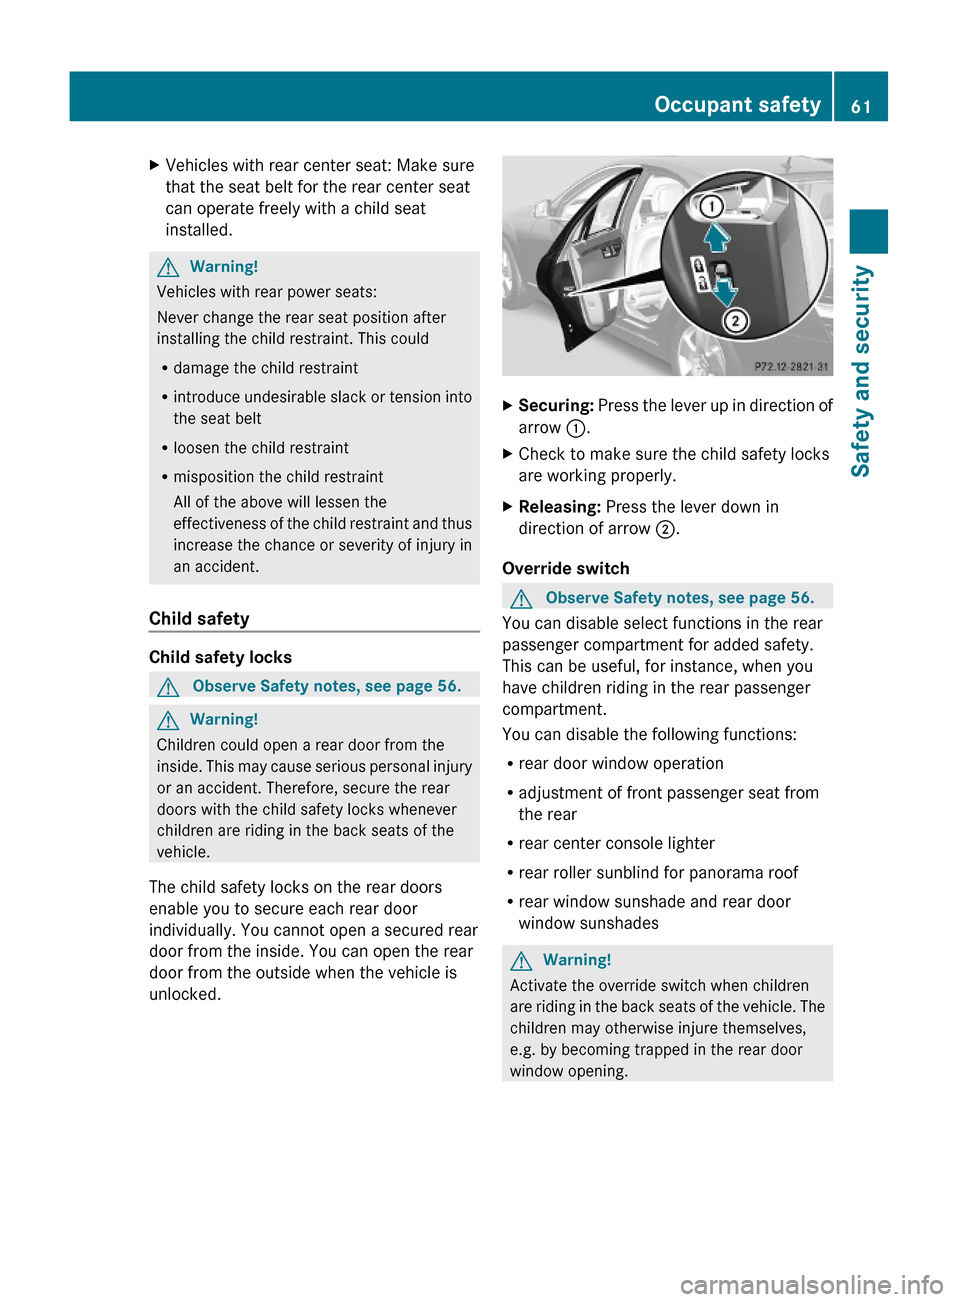
XSecuring: Press the lever up in direction of
arrow :.
XCheck to make sure the child safety locks
are working properly.
XReleasing: Press the lever down in
direction of arrow ;.
Override switch
GObserve Safety notes, see page 56.
You can disable select functions in the rear
passenger compartment for added safety.
This can be useful, for instance, when you
have children riding in the rear passenger
compartment.
You can disable the following functions:
Rrear door window operation
Radjustment of front passenger seat from
the rear
Rrear center console lighter
Rrear roller sunblind for panorama roof
Rrear window sunshade and rear door
window sunshades
GWarning!
Activate the override switch when children
are riding in the back seats of the vehicle. The
children may otherwise injure themselves,
e.g. by becoming trapped in the rear door
window opening.
Occupant safety61Safety and security221_AKB; 6; 20, en-USd2ugruen,Version: 2.11.8.12009-09-24T13:28:17+02:00 - Seite 61Z
Page 210 of 548
Setting easy-entry/exit feature
iThe components and operating principles
of COMAND can be found on (Y page 76).
GWarning!
You must make sure no one can become
trapped or injured by the moving steering
wheel and driver’s seat when the easy-entry/
exit feature is activated.
To stop seat/steering wheel movement, do
one of the following:
RPress seat adjustment switch.
RMove steering wheel adjustment stalk.
RPress one of the memory position buttons
or the memory button M.
Do not leave children unattended in the
vehicle, or with access to an unlocked vehicle.
Children could open the driver’s door and
unintentionally activate the easy-entry/exit
feature, which could result in an accident
and/or serious personal injury.
Use this function to have the steering wheel
move up and/or the driver’s seat move back
when entering the vehicle. You select the
following settings:
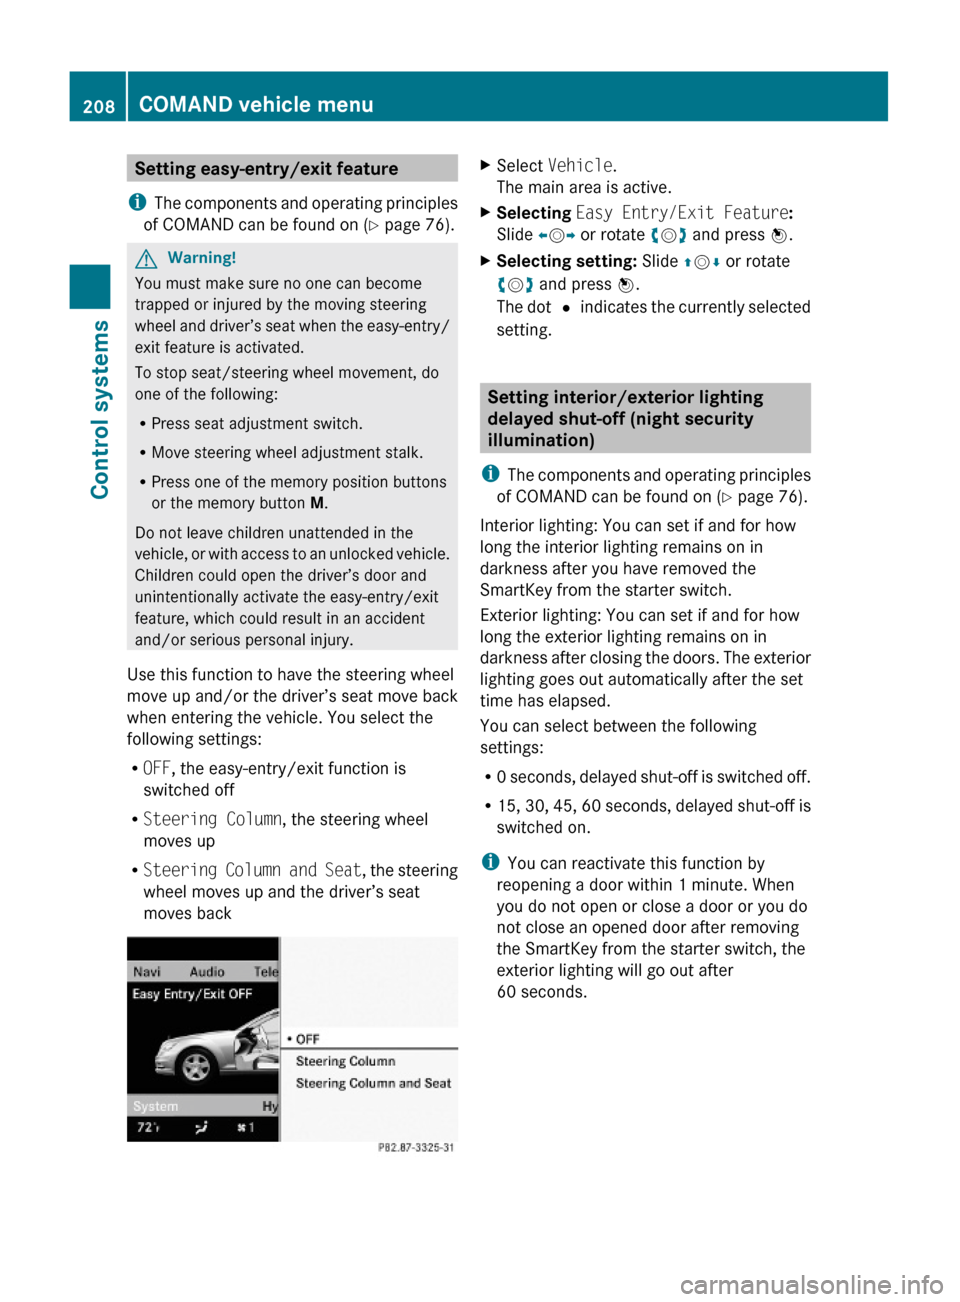
ROFF, the easy-entry/exit function is
switched off
RSteering Column, the steering wheel
moves up
RSteering Column and Seat, the steering
wheel moves up and the driver’s seat
moves back
XSelect Vehicle.
The main area is active.
XSelecting Easy Entry/Exit Feature:
Slide XVY or rotate cVd and press W.
XSelecting setting: Slide ZVÆ or rotate
cVd and press W.
The dot # indicates the currently selected
setting.
Setting interior/exterior lighting
delayed shut-off (night security
illumination)
iThe components and operating principles
of COMAND can be found on (Y page 76).
Interior lighting: You can set if and for how
long the interior lighting remains on in
darkness after you have removed the
SmartKey from the starter switch.
Exterior lighting: You can set if and for how
long the exterior lighting remains on in
darkness after closing the doors. The exterior
lighting goes out automatically after the set
time has elapsed.
You can select between the following
settings:
R0 seconds, delayed shut-off is switched off.
R15, 30, 45, 60 seconds, delayed shut-off is
switched on.
iYou can reactivate this function by
reopening a door within 1 minute. When
you do not open or close a door or you do
not close an opened door after removing
the SmartKey from the starter switch, the
exterior lighting will go out after
60 seconds.
208COMAND vehicle menuControl systems
221_AKB; 6; 20, en-USd2ugruen,Version: 2.11.8.12009-09-24T13:28:17+02:00 - Seite 208
Page 219 of 548
The following seat adjustments can be made
via COMAND:
SettingsLumbar support (Y page 217)Multicontour seats, front (Y page 218)Drive-dynamic multicontour seats
(Y page 219)
Selecting a seat
You must first select the seat for which you
would like to make adjustments.
XPress button T.
The main area is active.
XSwitching to the bottom menu line: Slide
ZVÆ.
Example illustration: Drive-dynamic multicontourseat
XSelecting seat: Slide XVY or rotate
cVd.
XConfirming selection: Press W.Exiting menu
There are several ways to exit the
multicontour seat menu.
XPress button T again.
or
XPress any shortcut button.
or
XSelect another main function from the main
menu line.
Lumbar support
To support the spine, you can adjust the
curvature of the front seat backrests.
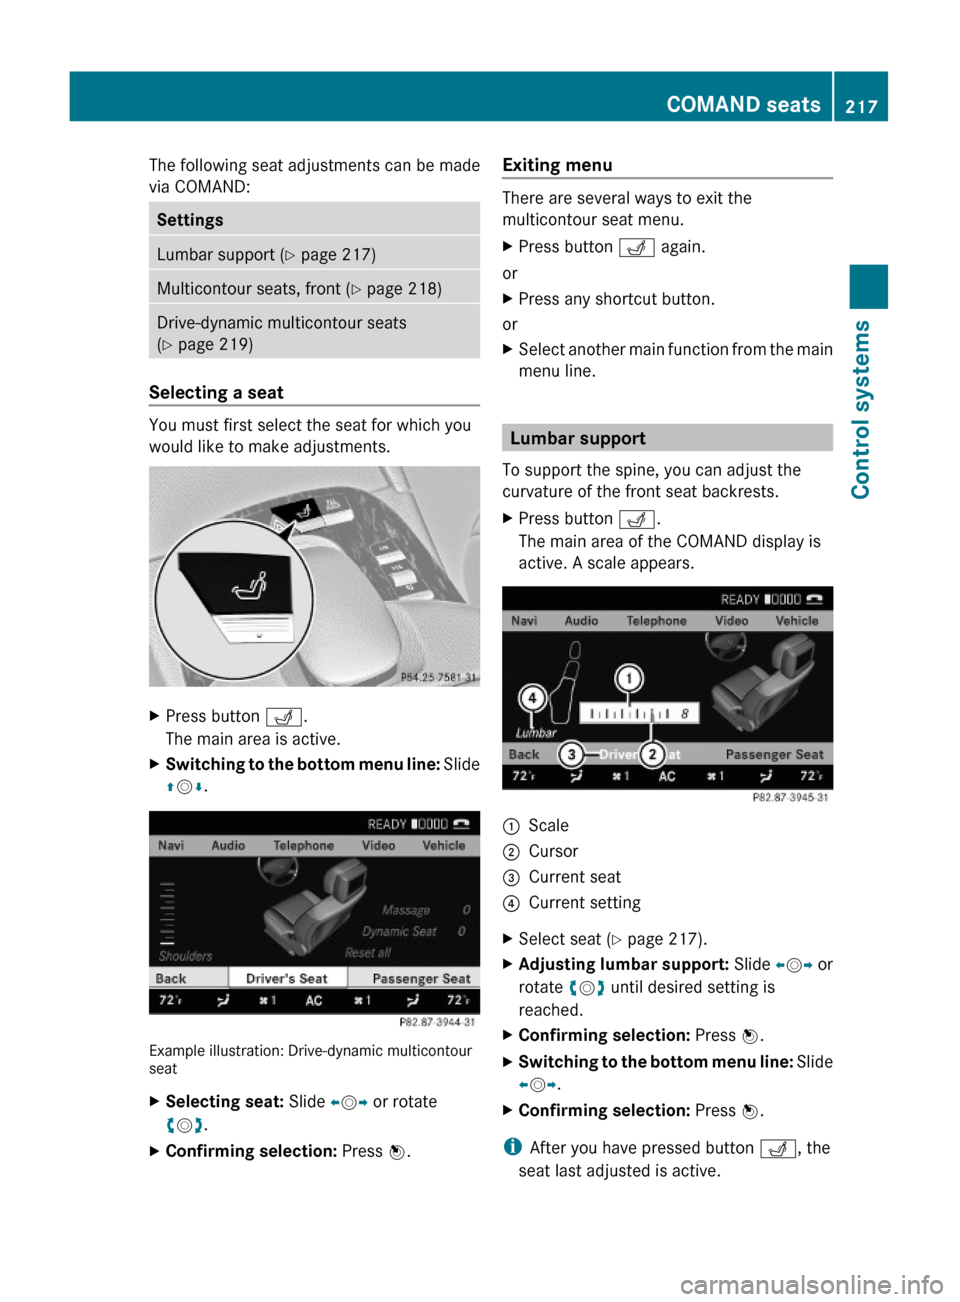
XPress button T.
The main area of the COMAND display is
active. A scale appears.
:Scale;Cursor=Current seat?Current settingXSelect seat (Y page 217).XAdjusting lumbar support: Slide XVY or
rotate cVd until desired setting is
reached.
XConfirming selection: Press W.XSwitching to the bottom menu line: Slide
XVY.
XConfirming selection: Press W.
iAfter you have pressed button T, the
seat last adjusted is active.
COMAND seats217Control systems221_AKB; 6; 20, en-USd2ugruen,Version: 2.11.8.12009-09-24T13:28:17+02:00 - Seite 217Z
Page 236 of 548
display and are based on conditions or
system status the vehicle’s system has
recorded.
The vehicle status message memory function
only appears if there are any messages
stored.
GWarning!
Malfunction and warning messages are only
indicated for certain systems and are
intentionally not very detailed. The
malfunction and warning messages are
simply a reminder with respect to the
operation of certain systems. They do not
replace the owner’s and/or driver’s
responsibility to maintain the vehicle’s
operating safety. Have all required
maintenance and safety checks performed on
the vehicle. Bring the vehicle to an authorized
Mercedes-Benz Center to address the
malfunction and warning messages.
XPress button = or ; to select the
Service menu.
If conditions have occurred causing status
messages to be recorded, the number of
messages appears in the multifunction
display: 2 Messages.
XPress button : or 9 to select the
Messages function.
XPress button a to confirm.
For malfunction and warning messages,
see “Vehicle status messages in the
multifunction display” (Y page 452).
XUse button : or 9 to scroll through
the messages.
If you turn the SmartKey in the starter switch
to position 0 and then back to position 2, all
messages will be deleted from the message
memory.
Settings menu
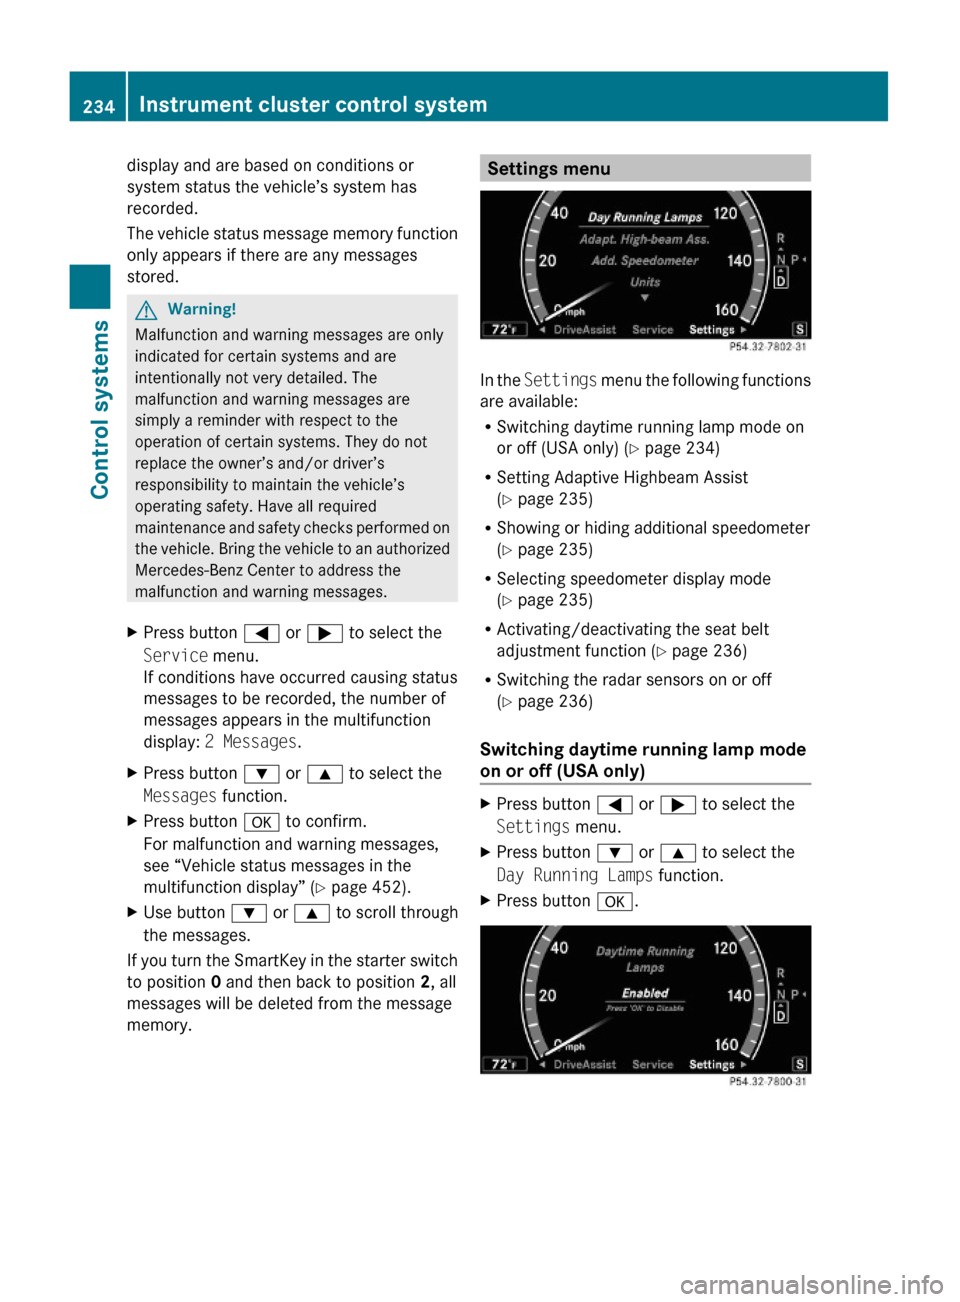
In the Settings menu the following functions
are available:
RSwitching daytime running lamp mode on
or off (USA only) (Y page 234)
RSetting Adaptive Highbeam Assist
(Y page 235)
RShowing or hiding additional speedometer
(Y page 235)
RSelecting speedometer display mode
(Y page 235)
RActivating/deactivating the seat belt
adjustment function (Y page 236)
RSwitching the radar sensors on or off
(Y page 236)
Switching daytime running lamp mode
on or off (USA only)
XPress button = or ; to select the
Settings menu.
XPress button : or 9 to select the
Day Running Lamps function.
XPress button a.234Instrument cluster control systemControl systems
221_AKB; 6; 20, en-USd2ugruen,Version: 2.11.8.12009-09-24T13:28:17+02:00 - Seite 234
Page 238 of 548
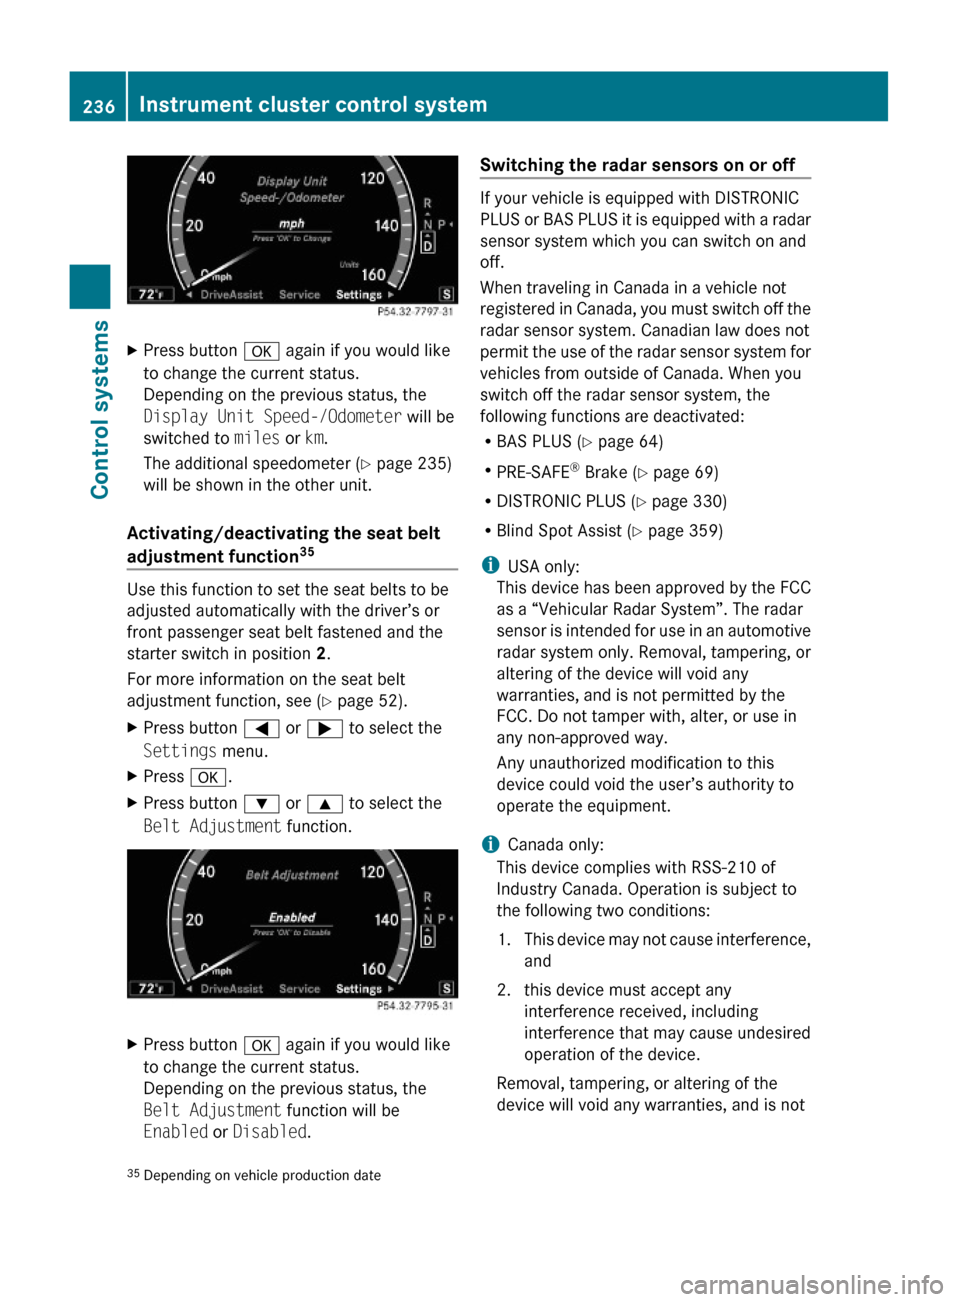
XPress button a again if you would like
to change the current status.
Depending on the previous status, the
Display Unit Speed-/Odometer will be
switched to miles or km.
The additional speedometer (Y page 235)
will be shown in the other unit.
Activating/deactivating the seat belt
adjustment function35
Use this function to set the seat belts to be
adjusted automatically with the driver’s or
front passenger seat belt fastened and the
starter switch in position 2.
For more information on the seat belt
adjustment function, see (Y page 52).
XPress button = or ; to select the
Settings menu.
XPress a.XPress button : or 9 to select the
Belt Adjustment function.
XPress button a again if you would like
to change the current status.
Depending on the previous status, the
Belt Adjustment function will be
Enabled or Disabled.
Switching the radar sensors on or off
If your vehicle is equipped with DISTRONIC
PLUS or BAS PLUS it is equipped with a radar
sensor system which you can switch on and
off.
When traveling in Canada in a vehicle not
registered in Canada, you must switch off the
radar sensor system. Canadian law does not
permit the use of the radar sensor system for
vehicles from outside of Canada. When you
switch off the radar sensor system, the
following functions are deactivated:
RBAS PLUS (Y page 64)
RPRE-SAFE® Brake (Y page 69)
RDISTRONIC PLUS (Y page 330)
RBlind Spot Assist (Y page 359)
iUSA only:
This device has been approved by the FCC
as a “Vehicular Radar System”. The radar
sensor is intended for use in an automotive
radar system only. Removal, tampering, or
altering of the device will void any
warranties, and is not permitted by the
FCC. Do not tamper with, alter, or use in
any non-approved way.
Any unauthorized modification to this
device could void the user’s authority to
operate the equipment.
iCanada only:
This device complies with RSS-210 of
Industry Canada. Operation is subject to
the following two conditions:
1.This device may not cause interference,
and
2. this device must accept any
interference received, including
interference that may cause undesired
operation of the device.
Removal, tampering, or altering of the
device will void any warranties, and is not
35Depending on vehicle production date236Instrument cluster control systemControl systems
221_AKB; 6; 20, en-USd2ugruen,Version: 2.11.8.12009-09-24T13:28:17+02:00 - Seite 236
Page 288 of 548
iWhen you now press the KEYLESS-GO
start/stop button once and the driver’s
door is open, the power supply is switched
off.
Seats
Safety notes
GWarning!
In order to avoid possible loss of vehicle
control the following must be done before the
vehicle is put into motion:
R seat adjustment
R head restraint adjustment
R steering wheel adjustment
R rear view mirror adjustment
R fastening of seat belts
GWarning!
Do not adjust the driver’s seat while driving.
Adjusting the seat while driving could cause
the driver to lose control of the vehicle.
Never ride in a moving vehicle with the seat
backrest in an excessively reclined position as
this can be dangerous. You could slide under
the seat belt in a collision. If you slide under
it, the seat belt would apply force at the
abdomen or neck. That could cause serious
or fatal injuries. The seat backrest and seat
belts provide the best restraint when the
wearer is in a position that is as upright as
possible and seat belts are properly
positioned on the body.
GWarning!
Your seat must be adjusted so that you can
correctly fasten your seat belt.
Observe the following points:
R Adjust the seat backrest until your arms are
slightly angled when holding the steering
wheel.
R Adjust the seat to a comfortable seating
position that still allows you to reach the
accelerator/brake pedal safely. The
position should be as far back as possible
with the driver still able to operate the
controls properly.
R Adjust the head restraint so that it is as
close to the head as possible. The center of
the head restraint must support the back of
the head at eye level.
R Never place hands under the seat or near
any moving parts while a seat is being
adjusted.
Failure to do so could result in an accident
and/or serious personal injury.GWarning!
The power seats can be operated at any time.
Therefore, do not leave children unattended
in the vehicle, or with access to an unlocked
vehicle. A child’s unsupervised access to a
vehicle could result in an accident and/or
serious personal injury.
GWarning!
According to accident statistics, children are
safer when properly restrained in the rear
seating positions than in the front seating
position. Thus, we strongly recommend that
children be placed in the rear seats whenever
possible. Regardless of seating position,
children 12 years old and under must be
seated and properly secured in an
appropriately sized infant restraint, toddler
restraint, or booster seat recommended for
the size and weight of the child. For additional
information, see “Children in the vehicle”.
A child’s risk of serious or fatal injuries is
significantly increased if the child restraints
are not properly secured in the vehicle and/
286SeatsControls in detail
221_AKB; 6; 20, en-USd2ugruen,Version: 2.11.8.12009-09-24T13:28:17+02:00 - Seite 286
Page 289 of 548
or the child is not properly secured in the child
restraint.
GWarning!
For your protection, drive only with properly
positioned head restraints.
Adjust the head restraint so that it is as close
to the head as possible and the center of the
head restraint supports the back of the head
at eye level. This will reduce the potential for
injury to the head and neck in the event of an
accident or similar situation.
Do not drive the vehicle without the seat head
restraints. Head restraints are intended to
help reduce injuries during an accident.
Seat adjustment
You can adjust the lumbar support,
multicontour seats for driver and front
passenger, as well as drive-dynamic
multicontour seats using COMAND
(Y page 216).
! When moving the seats, make sure there
are no items in the footwell or behind the
seats. Otherwise, you could damage the
seats and/or the items.
Power seats
Front power seats
iIf PRE-SAFE® has been activated, the
front passenger’s seat and/or rear power
seats will be moved to a more favorable
seat position.
iYou can store the settings for the seat
position with the memory function
(Y page 297).
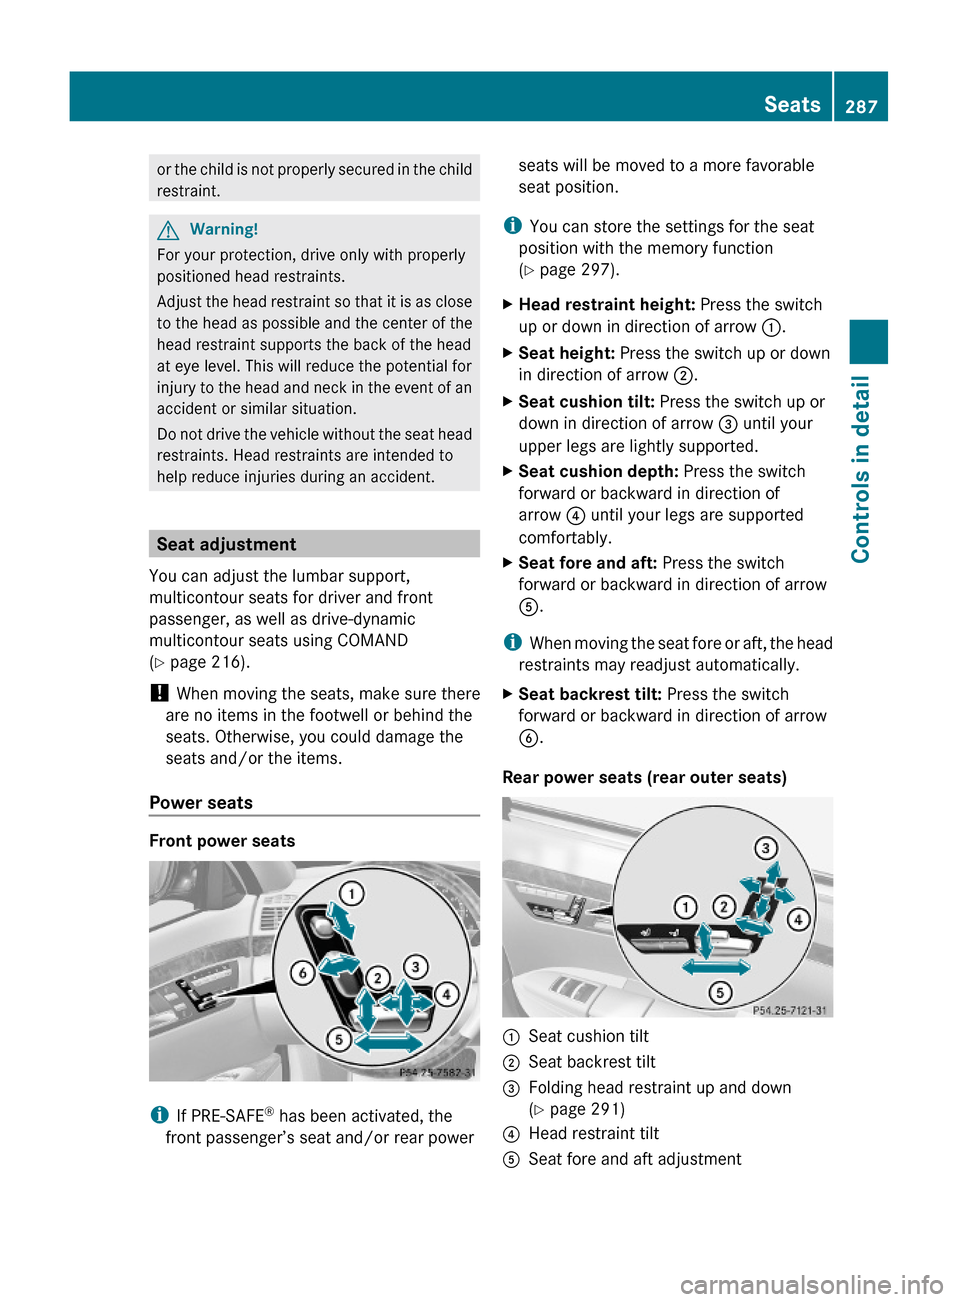
XHead restraint height: Press the switch
up or down in direction of arrow :.
XSeat height: Press the switch up or down
in direction of arrow ;.
XSeat cushion tilt: Press the switch up or
down in direction of arrow = until your
upper legs are lightly supported.
XSeat cushion depth: Press the switch
forward or backward in direction of
arrow ? until your legs are supported
comfortably.
XSeat fore and aft: Press the switch
forward or backward in direction of arrow
A.
iWhen moving the seat fore or aft, the head
restraints may readjust automatically.
XSeat backrest tilt: Press the switch
forward or backward in direction of arrow
B.
Rear power seats (rear outer seats)
:Seat cushion tilt;Seat backrest tilt=Folding head restraint up and down
(Y page 291)
?Head restraint tiltASeat fore and aft adjustmentSeats287Controls in detail221_AKB; 6; 20, en-USd2ugruen,Version: 2.11.8.12009-09-24T13:28:17+02:00 - Seite 287Z
Page 290 of 548
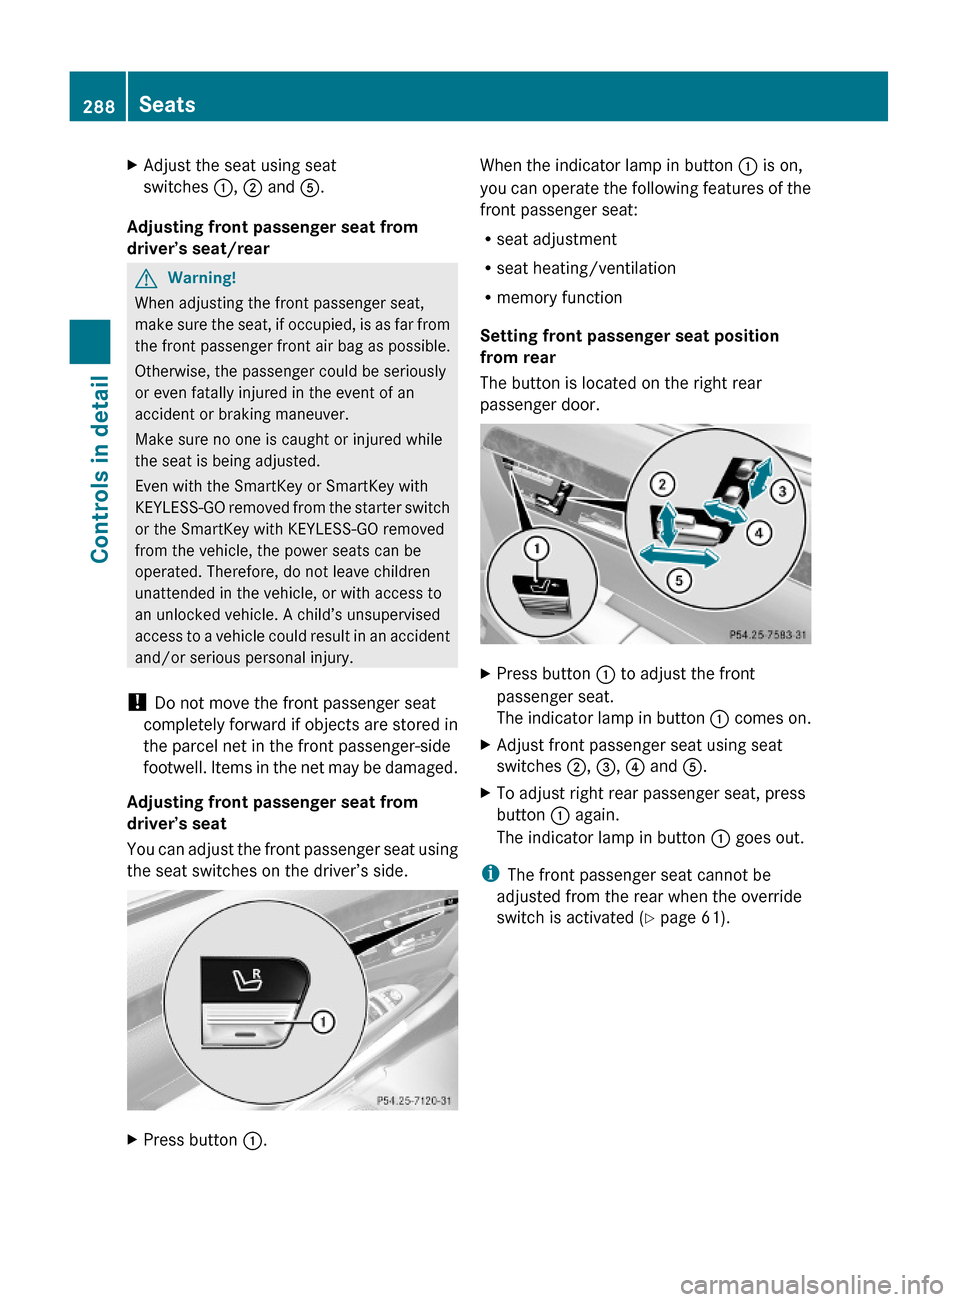
XAdjust the seat using seat
switches :, ; and A.
Adjusting front passenger seat from
driver’s seat/rear
GWarning!
When adjusting the front passenger seat,
make sure the seat, if occupied, is as far from
the front passenger front air bag as possible.
Otherwise, the passenger could be seriously
or even fatally injured in the event of an
accident or braking maneuver.
Make sure no one is caught or injured while
the seat is being adjusted.
Even with the SmartKey or SmartKey with
KEYLESS-GO removed from the starter switch
or the SmartKey with KEYLESS-GO removed
from the vehicle, the power seats can be
operated. Therefore, do not leave children
unattended in the vehicle, or with access to
an unlocked vehicle. A child’s unsupervised
access to a vehicle could result in an accident
and/or serious personal injury.
! Do not move the front passenger seat
completely forward if objects are stored in
the parcel net in the front passenger-side
footwell. Items in the net may be damaged.
Adjusting front passenger seat from
driver’s seat
You can adjust the front passenger seat using
the seat switches on the driver’s side.
XPress button :.When the indicator lamp in button : is on,
you can operate the following features of the
front passenger seat:
Rseat adjustment
Rseat heating/ventilation
Rmemory function
Setting front passenger seat position
from rear
The button is located on the right rear
passenger door.
XPress button : to adjust the front
passenger seat.
The indicator lamp in button : comes on.
XAdjust front passenger seat using seat
switches ;, =, ? and A.
XTo adjust right rear passenger seat, press
button : again.
The indicator lamp in button : goes out.
iThe front passenger seat cannot be
adjusted from the rear when the override
switch is activated (Y page 61).
288SeatsControls in detail
221_AKB; 6; 20, en-USd2ugruen,Version: 2.11.8.12009-09-24T13:28:17+02:00 - Seite 288