2010 MERCEDES-BENZ S65AMG height
[x] Cancel search: heightPage 345 of 548
Ryou depress the brake pedal fully again
until the message HOLD in the multifunction
display disappears
Ryou engage the electronic parking brake
Ryou activate the DISTRONIC PLUS
iAfter a while, the vehicle will be secured
by the electronic parking brake to relieve
the service brake.
GWarning!
The braking effect of the HOLD function is
canceled and the vehicle can start to roll if
Rthe HOLD function is deactivated by
depressing the accelerator pedal or the
brake pedal
Rthe HOLD function or the power supply is
malfunctioning, e.g. due to battery failure
Rthe electrical components in the engine
compartment or the fuses have been
manipulated
Rthe battery is disconnected
GWarning!
Never get out of the vehicle while the HOLD
function is activated!
The HOLD function must never be operated
or deactivated by passengers or from outside
the vehicle.
The HOLD function does not replace the
electronic parking brake. It must not be used
to secure the vehicle when parking.
Deactivate the HOLD function when leaving
or parking the vehicle. Use the electronic
parking brake to secure the vehicle.
When the HOLD function is activated, the
automatic transmission shifts into park
position P automatically when
Ropening the driver’s door and releasing the
seat belt
Rturning off the engine
Ropening the hood
Ra system malfunction occurs
Rthe on-board voltage is insufficient
The HOLD function is deactivated.
AIRMATIC
Introduction
The AIRMATIC lets you select the chassis and
suspension setup. The chassis and
suspension setup adjusts the damping
behavior and the ride height for your vehicle.
The AIRMATIC consists of two components.
The Adaptive Damping System (ADS)
(Y page 343) and the vehicle level control
(Y page 344).
Adaptive Damping System (ADS)
The Adaptive Damping System (ADS) is
controlled electronically and operates
continuously. It adjusts the damping
characteristics to the current operating and
driving conditions. The damping is adjusted
individually for each wheel. Driving safety and
tire comfort are increased.
The fine tuning of the damping is dependent
on
Ryour driving style
Rroad surface conditions
Ryour personal settings
The selected setting remains stored in
memory even if the SmartKey is removed
from the starter switch.
Driving systems343Controls in detail221_AKB; 6; 20, en-USd2ugruen,Version: 2.11.8.12009-09-24T13:28:17+02:00 - Seite 343Z
Page 346 of 548
XStart the engine.
Sporty damping adjustment
The firmer suspension tuning in sport driving
mode provides enhanced road contact.
Select this mode for example, on winding
highways.
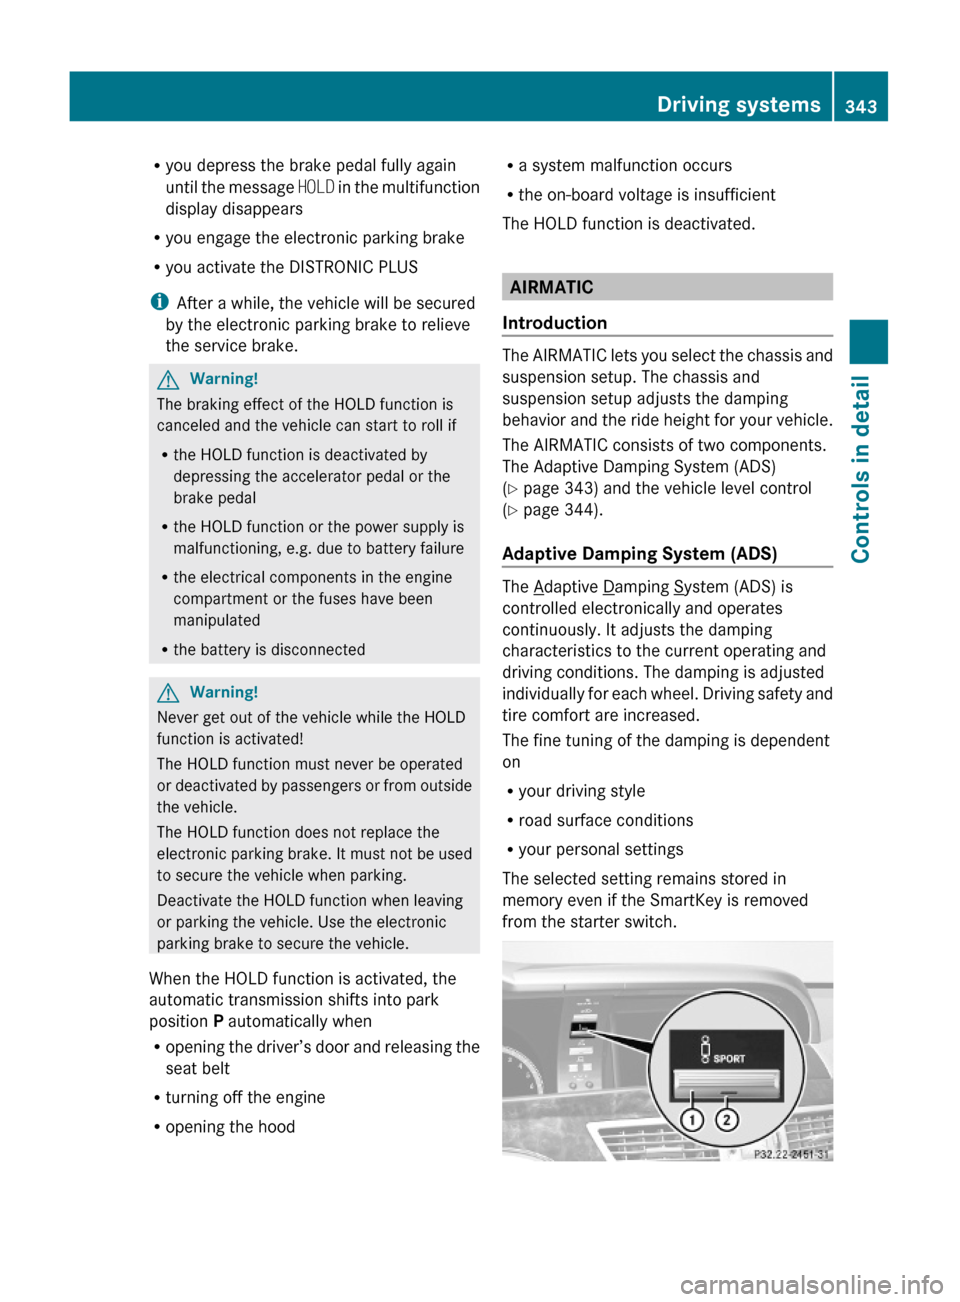
XIf indicator lamp ; is not lit: Press ADS
switch :.
Indicator lamp ; comes on. The sport
driving mode with a firmer suspension
tuning is selected. The message
AIRMATIC SPORT appears in the
multifunction display.
Comfort damping adjustment
Vehicle handling in comfort driving mode is
softer. Select this mode when you prefer a
more comfortable driving style on straight
freeways.
XIf indicator lamp ; is lit: Press ADS
switch :.
Indicator lamp ; goes out. The comfort
driving mode is selected. The message
AIRMATIC COMFORT appears in the
multifunction display.
Vehicle level control
Your vehicle automatically adjusts its ride
height.
The all-around vehicle level control provides
best possible suspension and constant
ground clearance. The vehicle lowers at high
speed automatically in order to increase
driving safety and to reduce fuel
consumption.
The following vehicle levels are available:
Rnormal
Rraised; the vehicle is raised by
approximately 1.0 in (25 mm) compared to
normal level
Rlowered; the vehicle is lowered by
approximately 0.4 in (10 mm) compared to
normal level
You can choose between normal or raised
level when the vehicle is stationary and the
engine is running.
The vehicle chassis ride height is raised or
lowered according to the selected level
setting and to the vehicle speed. With
increasing speed, ride height is reduced by up
to approximately 0.8 in (20 mm). With
decreasing speed, the ride height is again
raised to the selected vehicle level.
iThese height adjustments are so small
that you may not notice any change.
Adjusting vehicle level manually
GWarning!
To help avoid personal injury, keep hands and
feet away from wheel housing area, and stay
away from under the vehicle when lowering
the vehicle chassis.
Select the normal level for driving on normal
roads. Select the raised level for driving on
rough roads or with snow chains. Select the
raised level only when required by current
driving conditions. Otherwise, the handling
may be impaired and the fuel consumption
may increase.
The selected vehicle level setting remains
stored in memory even if the SmartKey is
removed from the starter switch.
Selecting raised level
XStart the engine.
When indicator lamp ; is off:
344Driving systemsControls in detail
221_AKB; 6; 20, en-USd2ugruen,Version: 2.11.8.12009-09-24T13:28:17+02:00 - Seite 344
Page 347 of 548
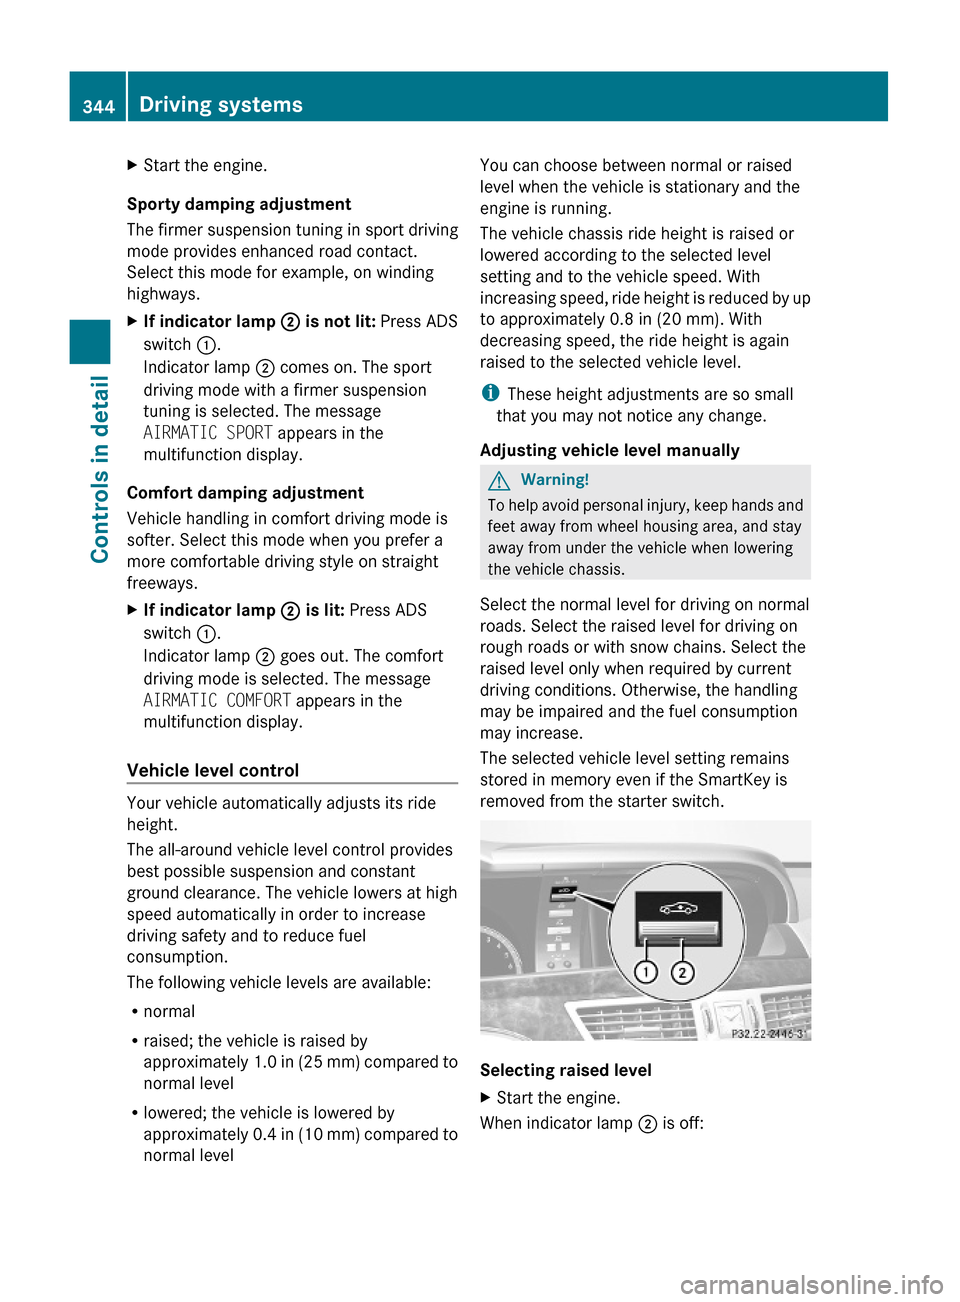
XBriefly press vehicle level control
switch :.
Indicator lamp ; comes on. The vehicle
adjusts from normal level to raised level.
The message: Vehicle Rising appears in
the multifunction display when adjusting
from normal level to raised level. The
message disappears when the vehicle is
raised. Indicator lamp ; is then lit.
When the vehicle is in raised level, pressing
vehicle level control switch : will return
the vehicle to normal level.
The vehicle is lowered to the normal level
automatically when
R the vehicle speed is above 75 mph
(120 km/h)
R the vehicle speed stays between 50 mph
(80 km/h) and 75 mph (120 km/h) for
approximately 3 minutes.
Indicator lamp ; in
vehicle level control switch : goes out.
If you do not drive in this speed range, the
selected vehicle level setting remains stored
in memory even if the SmartKey is removed
from the starter switch.
Selecting normal level
XStart the engine.
When indicator lamp ; is on:
XBriefly press vehicle level control
switch :.
Indicator lamp ; goes out. The vehicle
adjusts from raised level to normal level.
ABC
The ABC system is an active, computer-
controlled system that adjusts the
suspension hydraulically at all four wheels in
response to various driving situations. It
selects the optimum suspension tuning and
ride height for your vehicle automatically.
Vehicle level control
Your vehicle adjusts its ride height
automatically to increase vehicle safety and
to reduce fuel consumption.
The vehicle chassis ride height is raised or
lowered according to the selected level
setting and to the vehicle speed. With
increasing speed, the ride height is reduced
by up to approximately 0.6 in (15 mm). With
decreasing speed, the ride height is again
raised to the selected vehicle level.
These height adjustments are so small that
you may not notice any change.
GWarning!
When you turn off the engine, the entire
vehicle is lowered. You should therefore make
sure that no one is near the wheel housing or
under the vehicle when you turn off the
engine. Otherwise, parts of the individuals
body could be trapped.
! When you turn off the engine, the entire
vehicle is lowered. When parking, position
your vehicle in such a way that it will not
scrape against a curb, for example, when it
is lowered. Your vehicle could otherwise be
damaged.
i S 63 AMG and S 65 AMG only:
When you turn off the engine, the entire
vehicle is lowered by 0.4 in (10 mm).
Setting the vehicle level
GWarning!
To help avoid personal injury, keep hands and
feet away from wheel housing area, and stay
away from under the vehicle when lowering
the vehicle chassis.
Driving systems345Controls in detail221_AKB; 6; 20, en-USd2ugruen,Version: 2.11.8.12009-09-24T13:28:17+02:00 - Seite 345Z
Page 350 of 548
in the front bumper and four sensors in the
rear bumper.
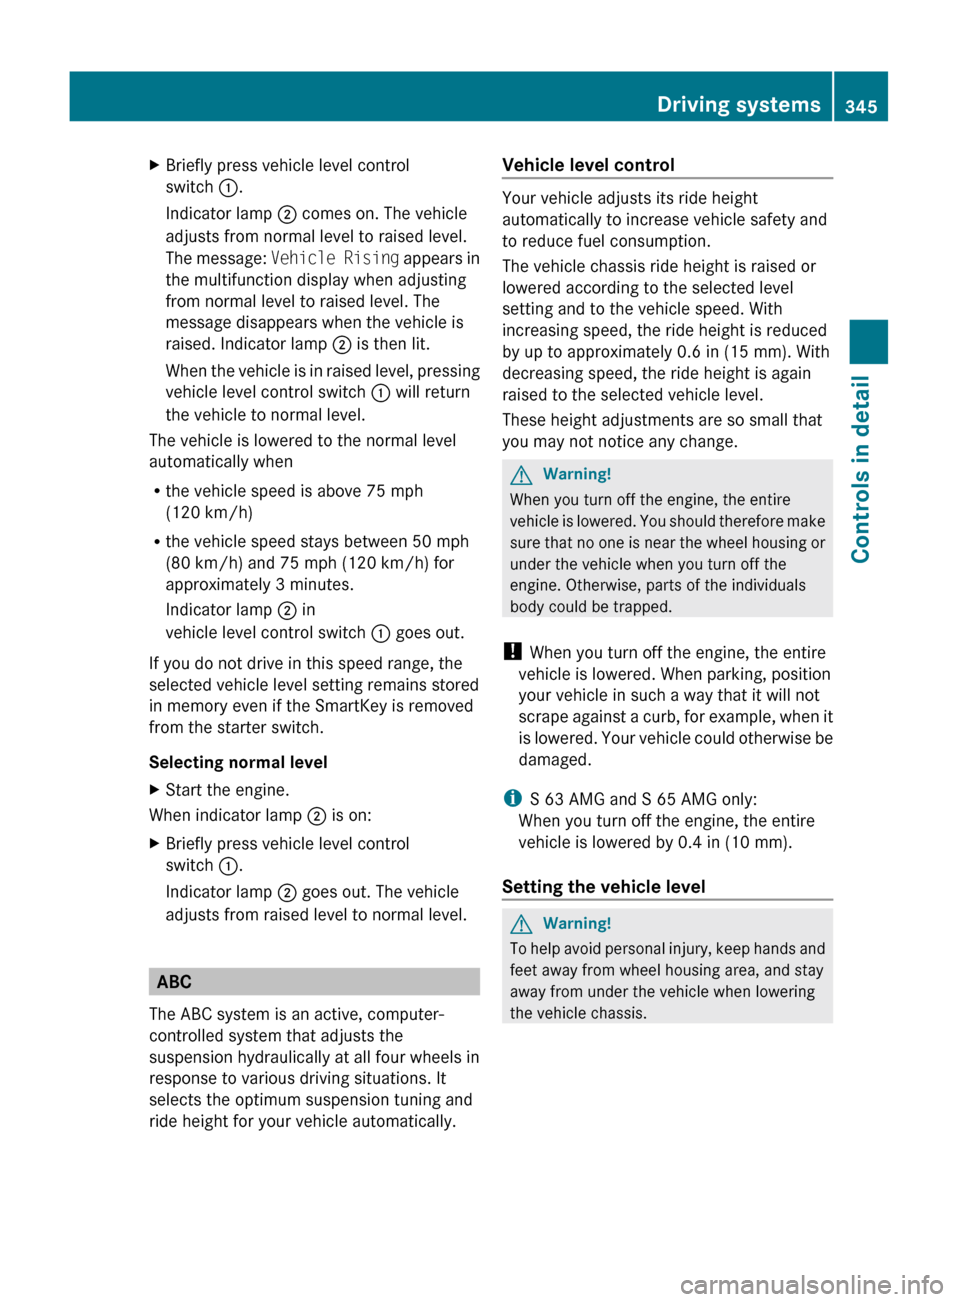
Example illustration, sensors in the front bumper
To function properly, sensors : must be free
of dirt, ice, snow and slush. Clean
sensors : regularly. Be careful not to
scratch or damage sensors :, see “Cleaning
the driving systems sensors” (Y page 443).
GWarning!
The Parktronic is a supplemental system. It is
not intended to, nor does it replace, the need
for extreme care. The responsibility during
parking and other critical maneuvers always
remains with the driver.
GWarning!
Make sure no persons or animals are in or
near the area in which you are parking/
maneuvering. Otherwise, they could be
injured.
! Special attention must be paid to objects
with smooth surfaces or low silhouettes
(e.g. trailer couplings, painted posts,
elevated crossbars or road curbs). Such
objects may not be detected by the system
and can damage the vehicle.
During parking maneuvers, pay special
attention to objects located above or below
the height of the sensors (e.g. street curbs,
painted posts, or trailer hitches etc.). The
Parktronic system will not detect such
objects at close range and damage to your
vehicle or the object may result.
! Ultrasonic signals from outside sources
(e.g. truck air brakes, car wash, or
jackhammers) may impair the operation of
the Parktronic system.
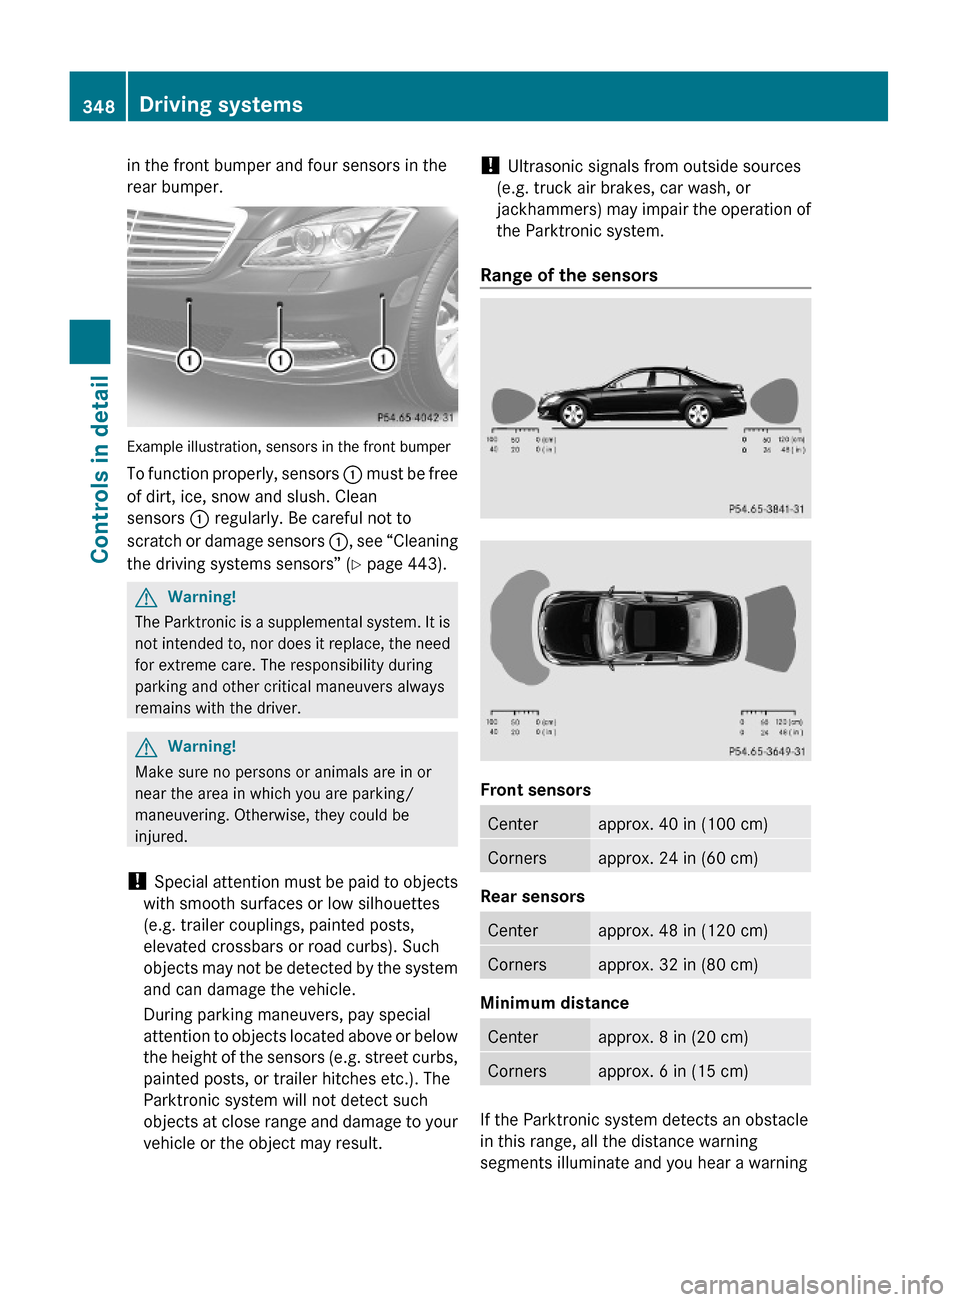
Range of the sensors
Front sensors
Centerapprox. 40 in (100 cm)Cornersapprox. 24 in (60 cm)
Rear sensors
Centerapprox. 48 in (120 cm)Cornersapprox. 32 in (80 cm)
Minimum distance
Centerapprox. 8 in (20 cm)Cornersapprox. 6 in (15 cm)
If the Parktronic system detects an obstacle
in this range, all the distance warning
segments illuminate and you hear a warning
348Driving systemsControls in detail
221_AKB; 6; 20, en-USd2ugruen,Version: 2.11.8.12009-09-24T13:28:17+02:00 - Seite 348
Page 386 of 548
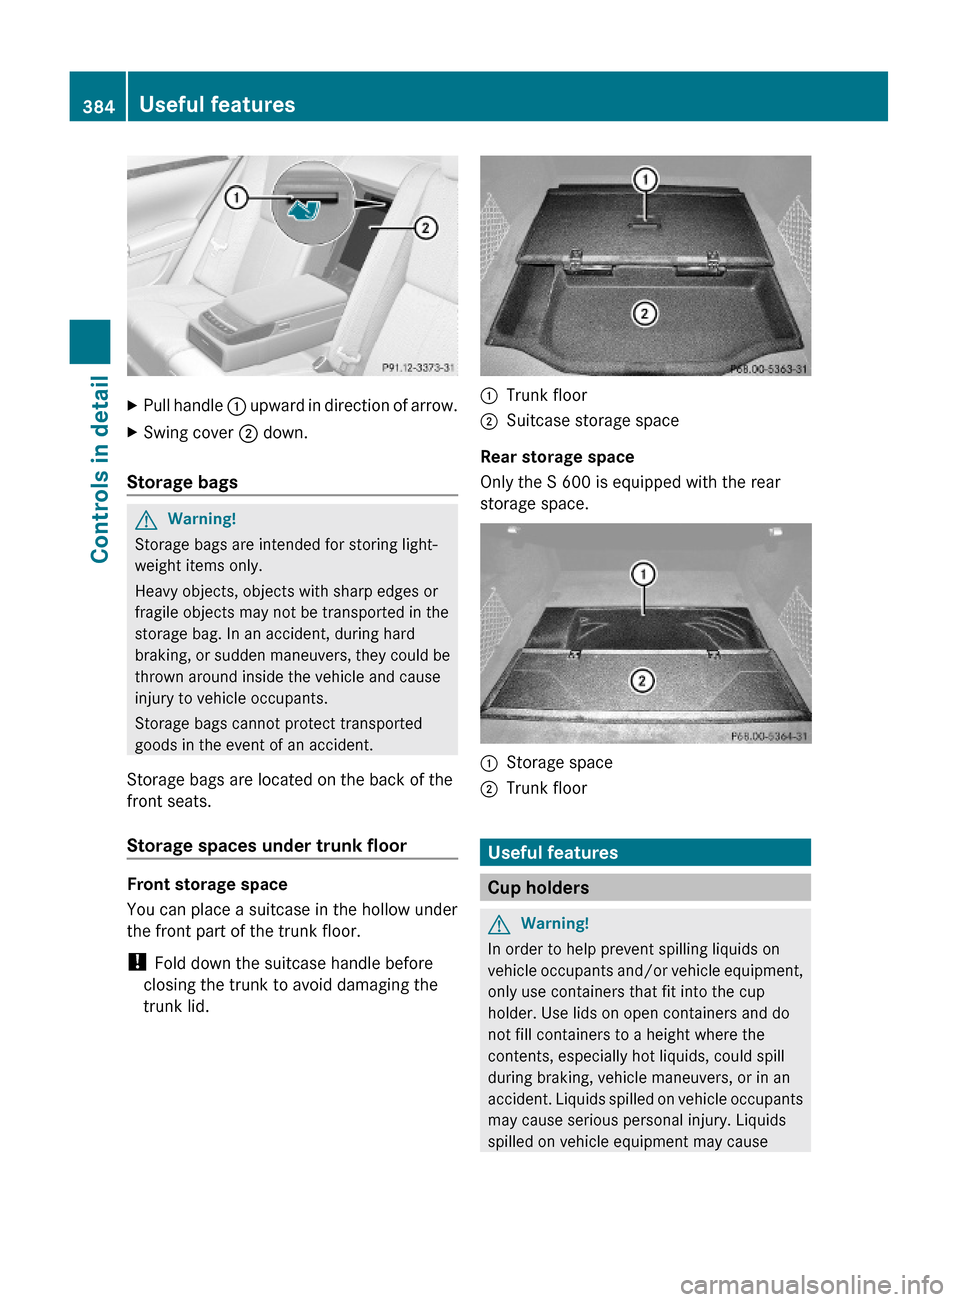
XPull handle : upward in direction of arrow.XSwing cover ; down.
Storage bags
GWarning!
Storage bags are intended for storing light-
weight items only.
Heavy objects, objects with sharp edges or
fragile objects may not be transported in the
storage bag. In an accident, during hard
braking, or sudden maneuvers, they could be
thrown around inside the vehicle and cause
injury to vehicle occupants.
Storage bags cannot protect transported
goods in the event of an accident.
Storage bags are located on the back of the
front seats.
Storage spaces under trunk floor
Front storage space
You can place a suitcase in the hollow under
the front part of the trunk floor.
! Fold down the suitcase handle before
closing the trunk to avoid damaging the
trunk lid.
:Trunk floor;Suitcase storage space
Rear storage space
Only the S 600 is equipped with the rear
storage space.
:Storage space;Trunk floor
Useful features
Cup holders
GWarning!
In order to help prevent spilling liquids on
vehicle occupants and/or vehicle equipment,
only use containers that fit into the cup
holder. Use lids on open containers and do
not fill containers to a height where the
contents, especially hot liquids, could spill
during braking, vehicle maneuvers, or in an
accident. Liquids spilled on vehicle occupants
may cause serious personal injury. Liquids
spilled on vehicle equipment may cause
384Useful featuresControls in detail
221_AKB; 6; 20, en-USd2ugruen,Version: 2.11.8.12009-09-24T13:28:17+02:00 - Seite 384
Page 407 of 548
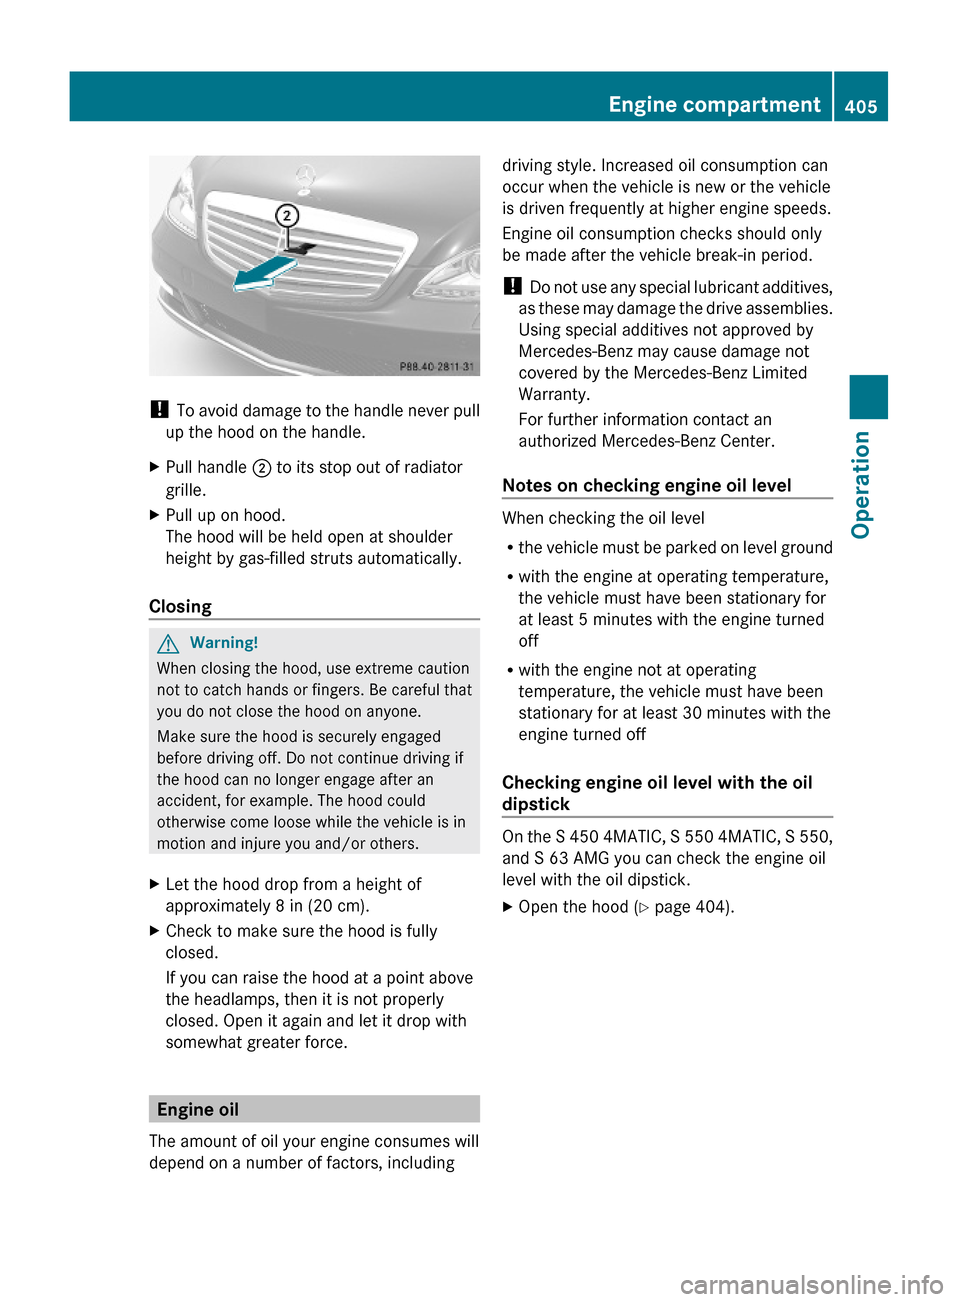
! To avoid damage to the handle never pull
up the hood on the handle.
XPull handle ; to its stop out of radiator
grille.
XPull up on hood.
The hood will be held open at shoulder
height by gas-filled struts automatically.
Closing
GWarning!
When closing the hood, use extreme caution
not to catch hands or fingers. Be careful that
you do not close the hood on anyone.
Make sure the hood is securely engaged
before driving off. Do not continue driving if
the hood can no longer engage after an
accident, for example. The hood could
otherwise come loose while the vehicle is in
motion and injure you and/or others.
XLet the hood drop from a height of
approximately 8 in (20 cm).
XCheck to make sure the hood is fully
closed.
If you can raise the hood at a point above
the headlamps, then it is not properly
closed. Open it again and let it drop with
somewhat greater force.
Engine oil
The amount of oil your engine consumes will
depend on a number of factors, including
driving style. Increased oil consumption can
occur when the vehicle is new or the vehicle
is driven frequently at higher engine speeds.
Engine oil consumption checks should only
be made after the vehicle break-in period.
! Do not use any special lubricant additives,
as these may damage the drive assemblies.
Using special additives not approved by
Mercedes-Benz may cause damage not
covered by the Mercedes-Benz Limited
Warranty.
For further information contact an
authorized Mercedes-Benz Center.
Notes on checking engine oil level
When checking the oil level
Rthe vehicle must be parked on level ground
Rwith the engine at operating temperature,
the vehicle must have been stationary for
at least 5 minutes with the engine turned
off
Rwith the engine not at operating
temperature, the vehicle must have been
stationary for at least 30 minutes with the
engine turned off
Checking engine oil level with the oil
dipstick
On the S 450 4MATIC, S 550 4MATIC, S 550,
and S 63 AMG you can check the engine oil
level with the oil dipstick.
XOpen the hood (Y page 404).Engine compartment405Operation221_AKB; 6; 20, en-USd2ugruen,Version: 2.11.8.12009-09-24T13:28:17+02:00 - Seite 405Z
Page 429 of 548
Letter “T” preceding the size designation:
Temporary spare tires which are high
pressure compact spares designed for
temporary emergency use only.
Tire width
Tire width : indicates the nominal tire width
in millimeters.
Aspect ratio
Aspect ratio ; is the dimensional
relationship between tire section height and
section width and is expressed in percentage.
The aspect ratio is arrived at by dividing
section height by section width.
Tire code
Tire code = indicates the tire construction
type. The “R” stands for radial tire type. Letter
“D” means diagonal or bias ply construction;
letter “B” means belted-bias ply construction.
At the tire manufacturer’s option, any tire
with a speed capability above 149 mph
(240 km/h) can include a “ZR” in the size
designation (for example: 245/40 ZR 18). For
additional information, see “Tire speed
rating” ( Y page 427).
Rim diameter
Rim diameter ? is the diameter of the bead
seat, not the diameter of the rim edge. The
rim diameter is indicated in inches (in).
Load indexGWarning!
The tire load rating must always be at least
half of the GAWR of your vehicle. Otherwise,
tire failure may be the result which may cause
an accident and/or serious injury to you or
others.
Always replace rims and tires with the same
designation, manufacturer and type as shown
on the original part.
GWarning!
Do not overload the tires by exceeding the
specified load limit as indicated on the Tire
and Loading Information placard on the
driver’s door B-pillar. Overloading the tires
can overheat them, possibly causing a
blowout. Overloading the tires can also result
in handling or steering problems, or brake
failure.
Load index A is a numerical code associated
with the maximum load a tire can support.
For example, a load rating of 91 corresponds
to a maximum load of 1356 lb (615 kg) the
tire is designed to support. See also
“Maximum tire load” (Y page 422) where the
maximum load associated with the load index
is indicated in kilograms and lbs.
For additional information on the load index,
see “Load identification” ( Y page 429).
Speed symbol GWarning!
Even when permitted by law, never operate a
vehicle at speeds greater than the maximum
speed rating of the tires.
Exceeding the maximum speed for which tires
are rated can lead to sudden tire failure,
causing loss of vehicle control and possibly
resulting in an accident and/or serious
personal injury and possible death, for you
and for others.
Regardless of the tire speed rating, local
speed limits should be obeyed. Use prudent
driving speeds appropriate to prevailing
conditions.
Speed symbol B indicates the approved
maximum speed (tire speed rating) for the
tire.
Summer tires
IndexSpeed ratingQup to 100 mph (160 km/h)Rup to 106 mph (170 km/h)Sup to 112 mph (180 km/h)Tup to 118 mph (190 km/h)Tires and wheels427Operation221_AKB; 6; 20, en-USd2ugruen,Version: 2.11.8.12009-09-24T13:28:17+02:00 - Seite 427Z
Page 432 of 548
Tire type code
Tire type code ? may, at the option of the
manufacturer, be used as a descriptive code
for identifying significant characteristics of
the tire.
Date of manufacture
The date of manufacture A identifies the
week and year of manufacture.
The first two figures identify the week,
starting with “01” to represent the first full
week of the calendar year. The second two
figures represent the year.
For example, “3208” represents the 32nd
week of 2008.
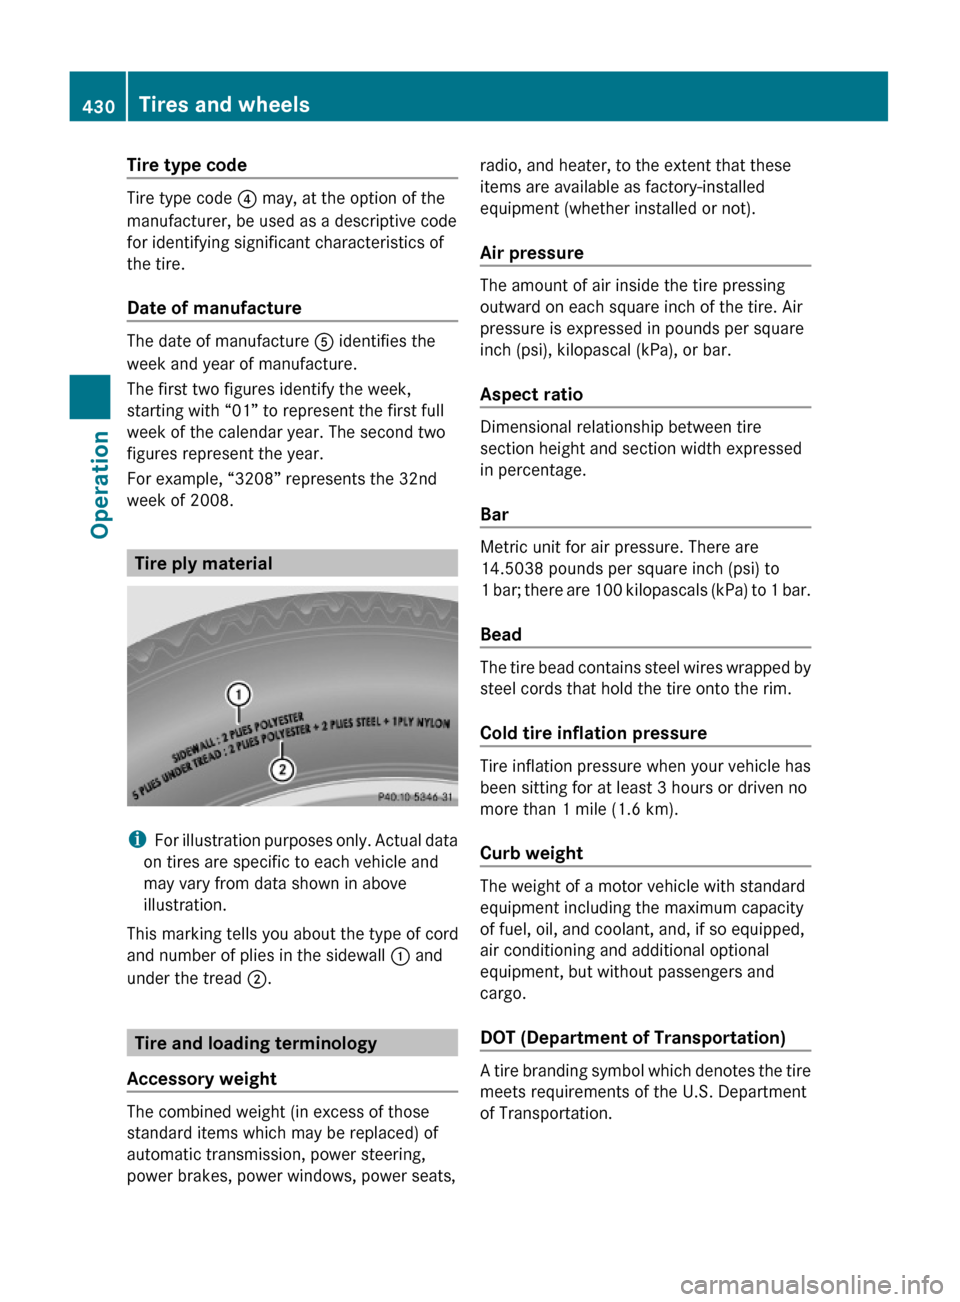
Tire ply material
iFor illustration purposes only. Actual data
on tires are specific to each vehicle and
may vary from data shown in above
illustration.
This marking tells you about the type of cord
and number of plies in the sidewall : and
under the tread ;.
Tire and loading terminology
Accessory weight
The combined weight (in excess of those
standard items which may be replaced) of
automatic transmission, power steering,
power brakes, power windows, power seats,
radio, and heater, to the extent that these
items are available as factory-installed
equipment (whether installed or not).
Air pressure
The amount of air inside the tire pressing
outward on each square inch of the tire. Air
pressure is expressed in pounds per square
inch (psi), kilopascal (kPa), or bar.
Aspect ratio
Dimensional relationship between tire
section height and section width expressed
in percentage.
Bar
Metric unit for air pressure. There are
14.5038 pounds per square inch (psi) to
1 bar; there are 100 kilopascals (kPa) to 1 bar.
Bead
The tire bead contains steel wires wrapped by
steel cords that hold the tire onto the rim.
Cold tire inflation pressure
Tire inflation pressure when your vehicle has
been sitting for at least 3 hours or driven no
more than 1 mile (1.6 km).
Curb weight
The weight of a motor vehicle with standard
equipment including the maximum capacity
of fuel, oil, and coolant, and, if so equipped,
air conditioning and additional optional
equipment, but without passengers and
cargo.
DOT (Department of Transportation)
A tire branding symbol which denotes the tire
meets requirements of the U.S. Department
of Transportation.
430Tires and wheelsOperation
221_AKB; 6; 20, en-USd2ugruen,Version: 2.11.8.12009-09-24T13:28:17+02:00 - Seite 430