2010 MERCEDES-BENZ S65AMG height
[x] Cancel search: heightPage 62 of 548
XSecurely fasten hook =, which is part of
top tether strap ?, to anchorage ring ;.
XFor safety, make sure hook = is attached
to anchorage ring ; beyond the safety
catch, as illustrated.
Once hook = is attached, the child restraint
itself can be secured.
XInstall the child restraint system and
tighten top tether strap ? according to the
child restraint manufacturer’s instructions.
After removing the child restraint system and
top tether strap ?:
XReinstall anchorage ring cover :.GWarning!
Vehicles with rear power seats:
Never change the rear seat position after
installing the child restraint. This could
Rdamage the child restraint
Rintroduce undesirable slack or tension into
the seat belt
Rloosen the child restraint
Rmisposition the child restraint
All of the above will lessen the
effectiveness of the child restraint and thus
increase the chance or severity of injury in
an accident.
Child seat anchors – LATCH-type
(ISOFIX)
GObserve Safety notes, see page 56.GWarning!
Children too big for a toddler restraint must
ride in seats using regular seat belts. Position
shoulder belt across chest and shoulder, not
face or neck.
A booster seat may be necessary to achieve
proper seat belt positioning for children over
41 lb (18 kg) until they reach a height where
a lap/shoulder belt fits properly without a
booster.
Install child seat according to manufacturer’s
instructions.
The child seat must be firmly attached to both
anchors.
An incorrectly mounted child seat may come
loose during an accident which could result in
serious injury or death to the child.
Damaged or impact damaged child seats or
child seat mounting fittings must be replaced.
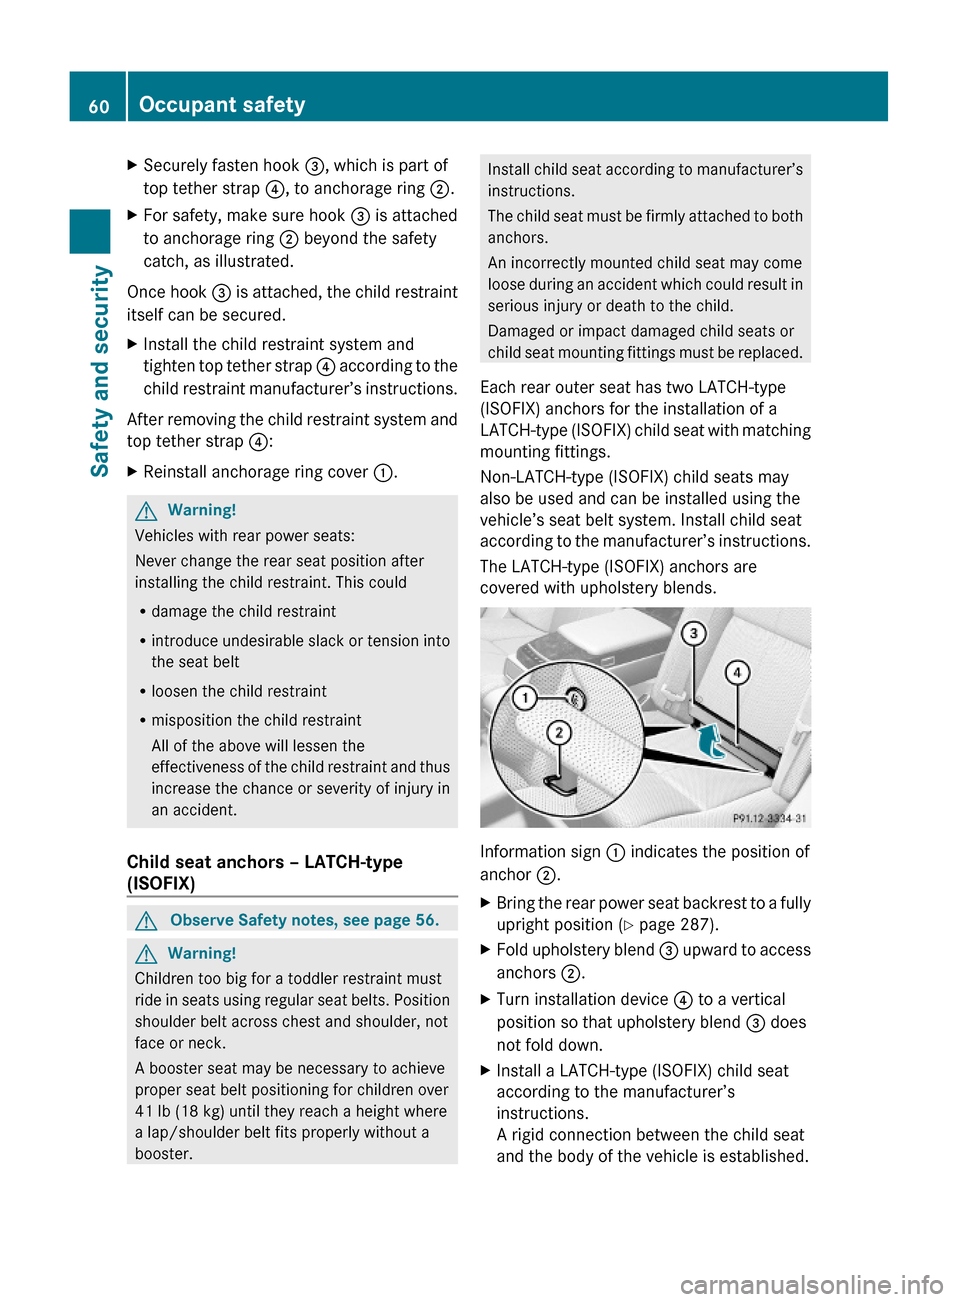
Each rear outer seat has two LATCH-type
(ISOFIX) anchors for the installation of a
LATCH-type (ISOFIX) child seat with matching
mounting fittings.
Non-LATCH-type (ISOFIX) child seats may
also be used and can be installed using the
vehicle’s seat belt system. Install child seat
according to the manufacturer’s instructions.
The LATCH-type (ISOFIX) anchors are
covered with upholstery blends.
Information sign : indicates the position of
anchor ;.
XBring the rear power seat backrest to a fully
upright position (Y page 287).
XFold upholstery blend = upward to access
anchors ;.
XTurn installation device ? to a vertical
position so that upholstery blend = does
not fold down.
XInstall a LATCH-type (ISOFIX) child seat
according to the manufacturer’s
instructions.
A rigid connection between the child seat
and the body of the vehicle is established.
60Occupant safetySafety and security
221_AKB; 6; 20, en-USd2ugruen,Version: 2.11.8.12009-09-24T13:28:17+02:00 - Seite 60
Page 87 of 548

NaviAudioTelephoneVideoVehicleModeFM/AM RadioVideo DVDMulti-function
Contour Seat
Settings/
Lumbar Settings
Map OrientationSat. RadioAUXRear Window
Sunshade
POI Symbols On MapDiscVideo OFFEasy Entry/ExitTraffic Symbols on
Map
Memory CardExterior Lighting
Delayed Shut-off
Text Information on
Map
Music RegisterInterior Lighting
Delayed Shut-off
ªTopographical
Map
Media InterfaceAmbient LightingªCity (3D)USBªAutomatic
Mirror Folding
ªHighway
Information
RearªLocator
Lighting
ªAudio FadeoutAUXªAutomatic
Locking
SIRIUS ServiceAudio OFFªTrunk
Opening-height
Restriction
Map VersionCalling up the main menu
Example illustration: Audio main menu
You can call up the main menu of a main
function in the following manner:
XMoving to the main function line: Slide
ZV.
XSelecting a main function: Slide XVY or
rotate cVd.
XConfirming selection: Press W.
iWhen a main function (e.g. Navi) is open
and you want to open the menu of the
Audio function for example, the main
function Audio must be selected twice.
Upon selecting the first time, the COMAND
system selects the main function Audio.
COMAND introduction85Control systems221_AKB; 6; 20, en-USd2ugruen,Version: 2.11.8.12009-09-24T13:28:17+02:00 - Seite 85Z
Page 209 of 548
FunctionAutomatic Locking (Y page 210)Trunk Opening-height Restriction
(Y page 210)
You can select the individual vehicle
functions in two ways.
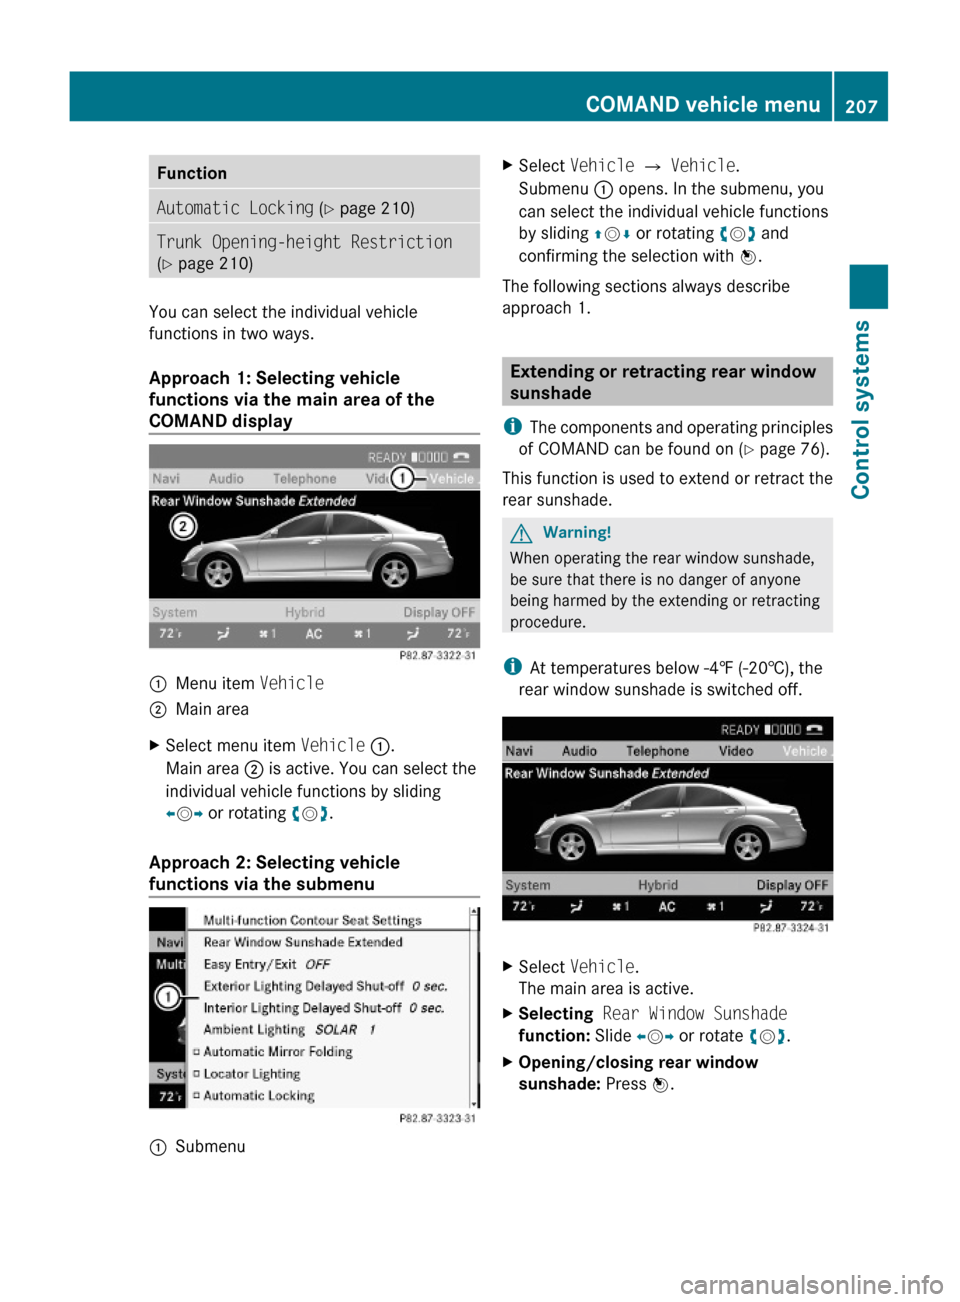
Approach 1: Selecting vehicle
functions via the main area of the
COMAND display
:Menu item Vehicle;Main areaXSelect menu item Vehicle :.
Main area ; is active. You can select the
individual vehicle functions by sliding
XVY or rotating cVd.
Approach 2: Selecting vehicle
functions via the submenu
:SubmenuXSelect Vehicle Q Vehicle.
Submenu : opens. In the submenu, you
can select the individual vehicle functions
by sliding ZVÆ or rotating cVd and
confirming the selection with W.
The following sections always describe
approach 1.
Extending or retracting rear window
sunshade
iThe components and operating principles
of COMAND can be found on (Y page 76).
This function is used to extend or retract the
rear sunshade.
GWarning!
When operating the rear window sunshade,
be sure that there is no danger of anyone
being harmed by the extending or retracting
procedure.
iAt temperatures below -4‡ (-20†), the
rear window sunshade is switched off.
XSelect Vehicle.
The main area is active.
XSelecting Rear Window Sunshade
function: Slide XVY or rotate cVd.
XOpening/closing rear window
sunshade: Press W.
COMAND vehicle menu207Control systems221_AKB; 6; 20, en-USd2ugruen,Version: 2.11.8.12009-09-24T13:28:17+02:00 - Seite 207Z
Page 212 of 548
XSelect Vehicle.
The main area is active.
XSelecting Automatic Mirror Folding:
Slide XVY or rotate cVd.
XSwitching automatic fold-in function
on/off: Press W.
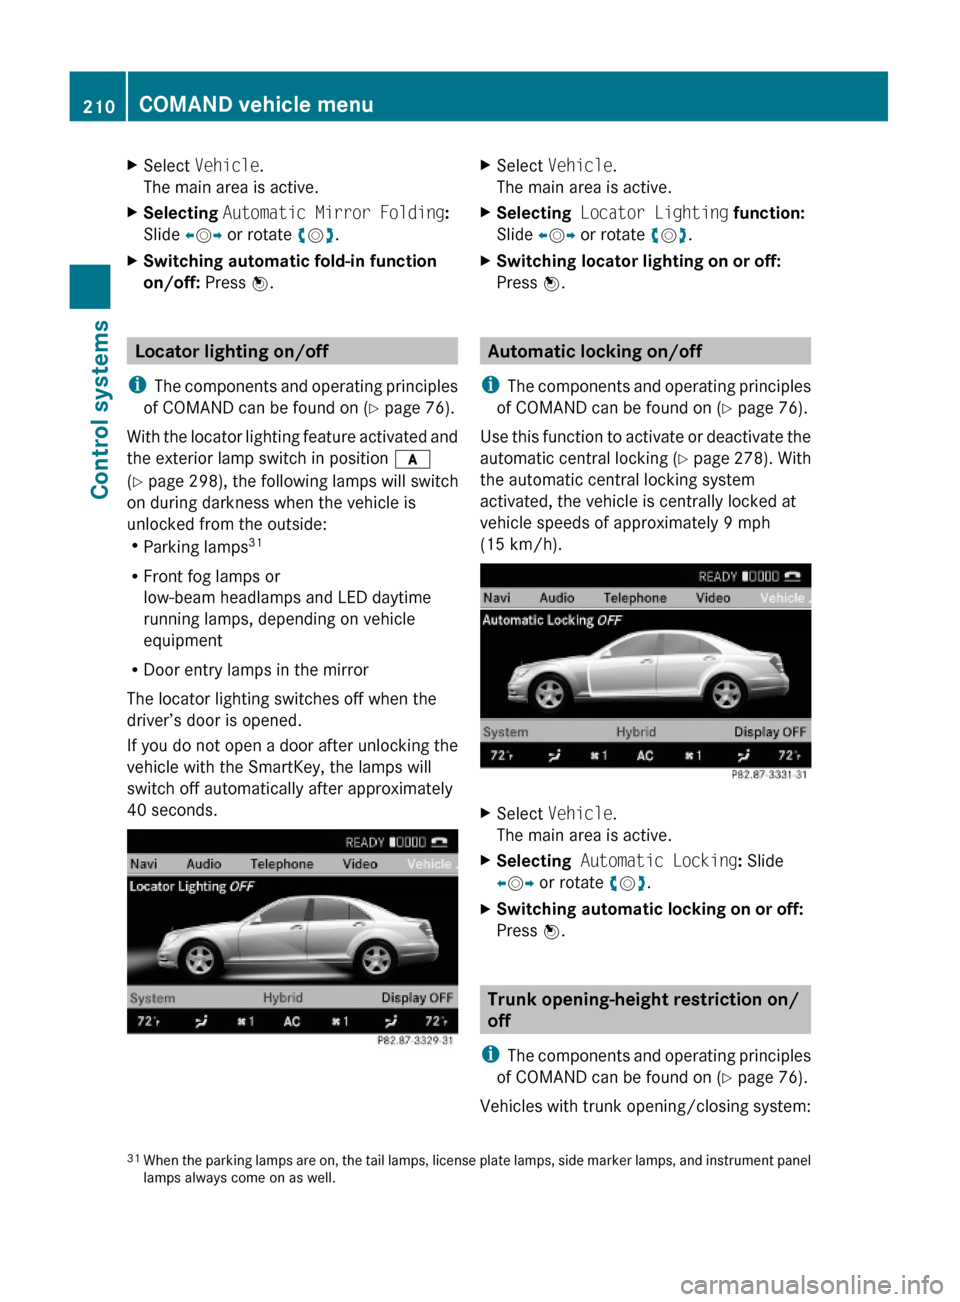
Locator lighting on/off
iThe components and operating principles
of COMAND can be found on (Y page 76).
With the locator lighting feature activated and
the exterior lamp switch in position c
(Y page 298), the following lamps will switch
on during darkness when the vehicle is
unlocked from the outside:RParking lamps31
RFront fog lamps or
low-beam headlamps and LED daytime
running lamps, depending on vehicle
equipment
RDoor entry lamps in the mirror
The locator lighting switches off when the
driver’s door is opened.
If you do not open a door after unlocking the
vehicle with the SmartKey, the lamps will
switch off automatically after approximately
40 seconds.
XSelect Vehicle.
The main area is active.
XSelecting Locator Lighting function:
Slide XVY or rotate cVd.
XSwitching locator lighting on or off:
Press W.
Automatic locking on/off
iThe components and operating principles
of COMAND can be found on (Y page 76).
Use this function to activate or deactivate the
automatic central locking (Y page 278). With
the automatic central locking system
activated, the vehicle is centrally locked at
vehicle speeds of approximately 9 mph
(15 km/h).
XSelect Vehicle.
The main area is active.
XSelecting Automatic Locking: Slide
XVY or rotate cVd.
XSwitching automatic locking on or off:
Press W.
Trunk opening-height restriction on/
off
iThe components and operating principles
of COMAND can be found on (Y page 76).
Vehicles with trunk opening/closing system:
31When the parking lamps are on, the tail lamps, license plate lamps, side marker lamps, and instrument panellamps always come on as well.
210COMAND vehicle menuControl systems
221_AKB; 6; 20, en-USd2ugruen,Version: 2.11.8.12009-09-24T13:28:17+02:00 - Seite 210
Page 213 of 548
You can select whether the trunk lid should
open fully or only to the height of the roof.
XSelect Vehicle.
The main area is active.
XSelecting Trunk Opening-height
Restriction: Slide XVY or rotate cVd.
XSwitching trunk opening-height
restriction on or off: Press W.
COMAND automatic climate control
Introduction
iThe components and operating principles
of COMAND can be found on (Y page 76).
GWarning!
Follow the recommended settings for heating
and cooling given on the following pages and
pages in the “Controls in detail” chapter.
Otherwise the windows could fog up,
impairing visibility and endangering you and
others.
You can operate the climate control via
COMAND or via the buttons on the climate
control panel (Y page 363).
Some of the special climate control functions
can only be operated via COMAND.
The following climate control functions can
be operated via COMAND:
RTemperature (Y page 211)
RAir distribution (Y page 212)
RAir volume (Y page 212)
RSwitching off cooling (Æ)
(Y page 213)
RCentral climate control (Mono)
(Y page 214)
RFootwell temperature (Y page 214)
RAir flow from air vents (Y page 215)
RRear climate control (Y page 215)
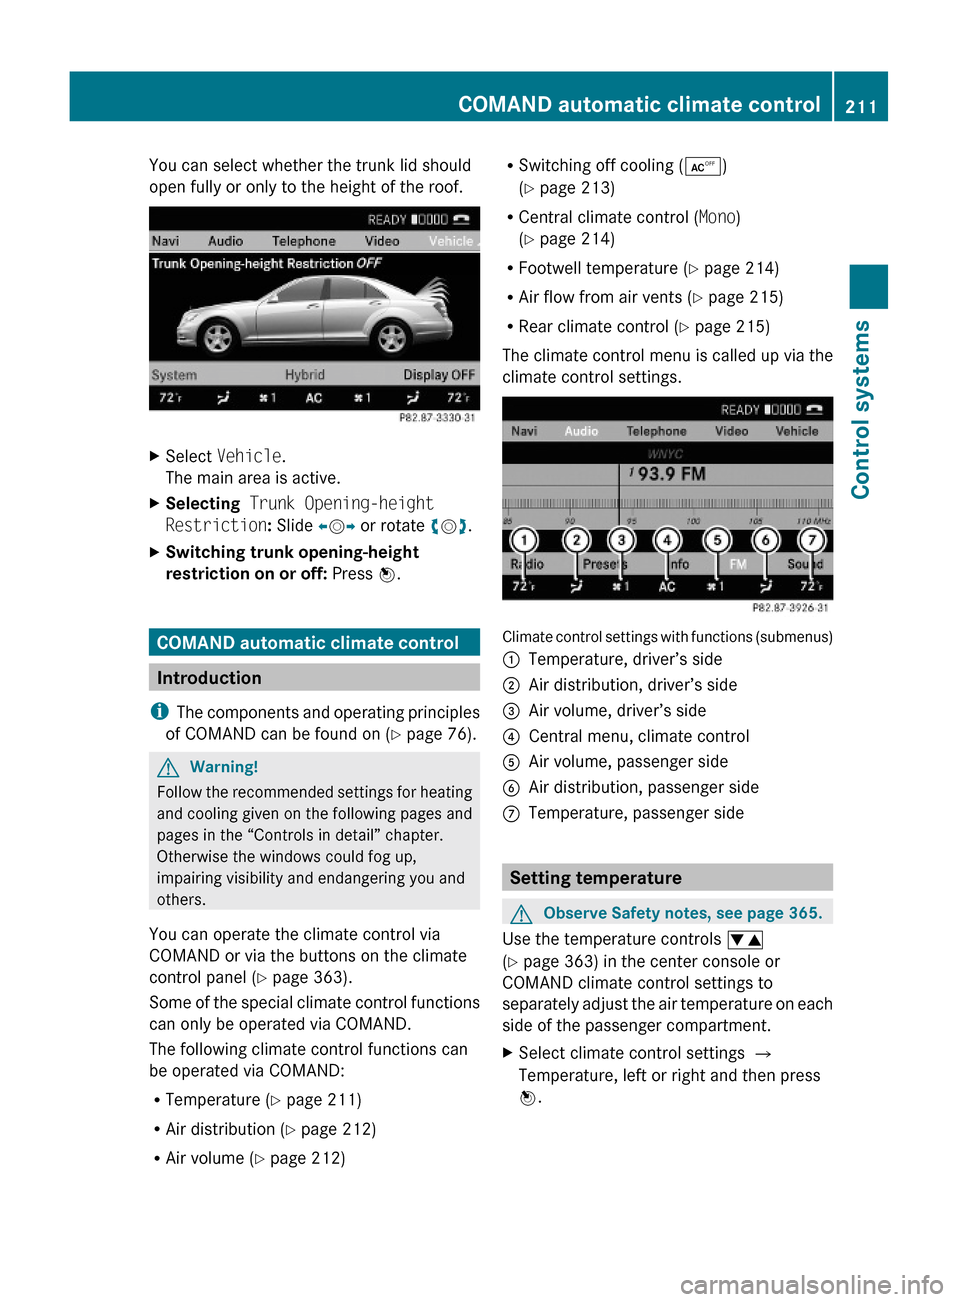
The climate control menu is called up via the
climate control settings.
Climate control settings with functions (submenus)
:Temperature, driver’s side;Air distribution, driver’s side=Air volume, driver’s side?Central menu, climate controlAAir volume, passenger sideBAir distribution, passenger sideCTemperature, passenger side
Setting temperature
GObserve Safety notes, see page 365.
Use the temperature controls w
(Y page 363) in the center console or
COMAND climate control settings to
separately adjust the air temperature on each
side of the passenger compartment.
XSelect climate control settings Q
Temperature, left or right and then press
W.
COMAND automatic climate control211Control systems221_AKB; 6; 20, en-USd2ugruen,Version: 2.11.8.12009-09-24T13:28:17+02:00 - Seite 211Z
Page 281 of 548
The doors are designed to unlock
automatically after an accident if the force of
the impact exceeds a preset threshold.
The vehicle locks automatically when the
ignition is switched on and the wheels are
turning at a vehicle speed of above 9 mph
(15 km/h). You could therefore lock yourself
out when the vehicle is pushed or towed or is
on a test stand.
Locking and unlocking from the inside
GObserve Safety notes, see page 56.
You can lock or unlock the vehicle from the
inside using the central locking or unlocking
switch. This can be useful, for example, if you
want to lock the vehicle before starting to
drive.
The central locking or unlocking switch does
not lock or unlock the fuel filler flap or the
interior storage compartments, such as the
glove box.
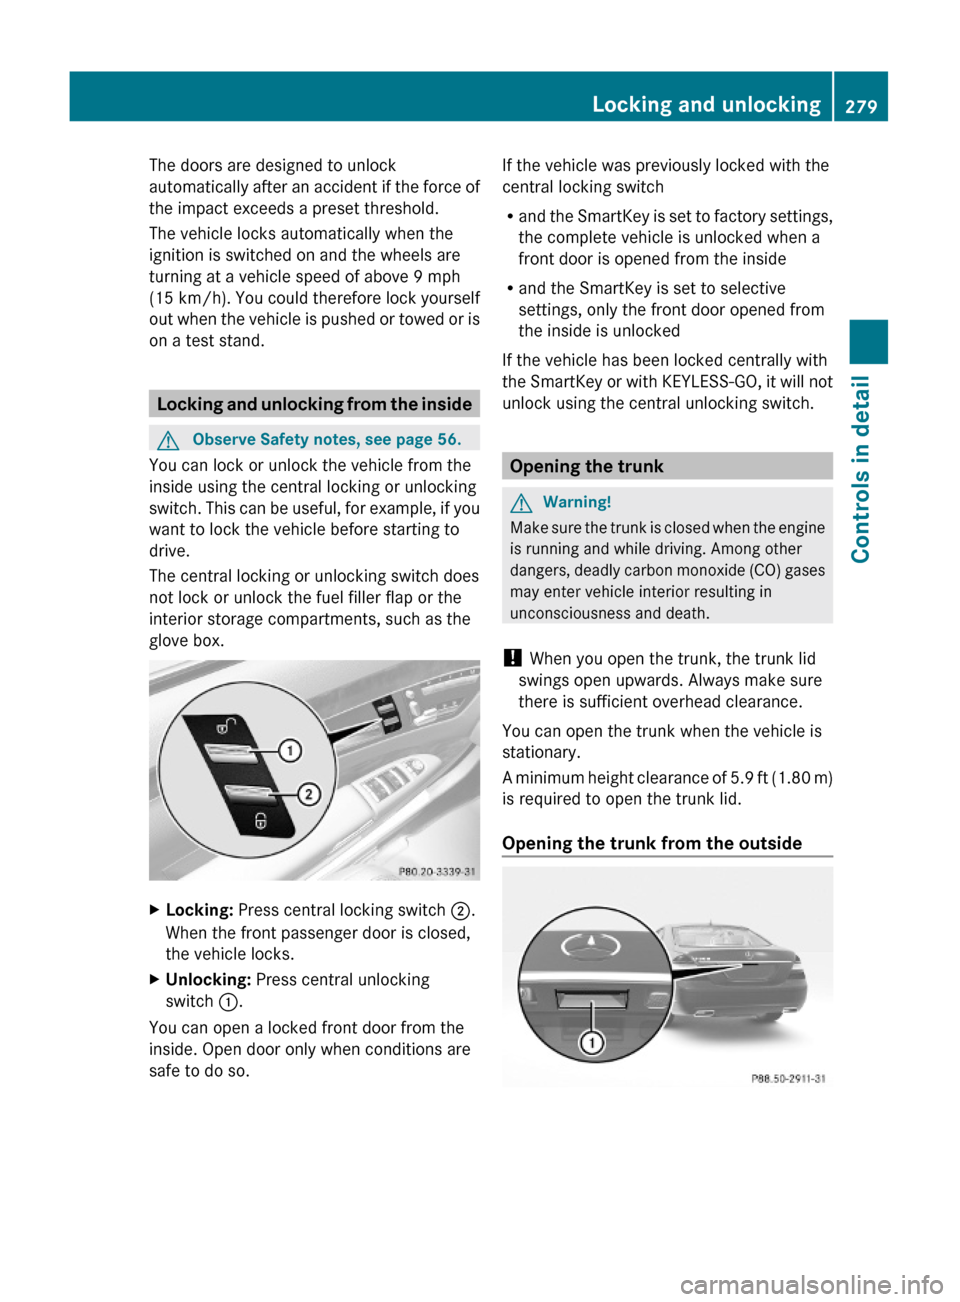
XLocking: Press central locking switch ;.
When the front passenger door is closed,
the vehicle locks.
XUnlocking: Press central unlocking
switch :.
You can open a locked front door from the
inside. Open door only when conditions are
safe to do so.
If the vehicle was previously locked with the
central locking switch
Rand the SmartKey is set to factory settings,
the complete vehicle is unlocked when a
front door is opened from the inside
Rand the SmartKey is set to selective
settings, only the front door opened from
the inside is unlocked
If the vehicle has been locked centrally with
the SmartKey or with KEYLESS-GO, it will not
unlock using the central unlocking switch.
Opening the trunk
GWarning!
Make sure the trunk is closed when the engine
is running and while driving. Among other
dangers, deadly carbon monoxide (CO) gases
may enter vehicle interior resulting in
unconsciousness and death.
! When you open the trunk, the trunk lid
swings open upwards. Always make sure
there is sufficient overhead clearance.
You can open the trunk when the vehicle is
stationary.
A minimum height clearance of 5.9 ft (1.80 m)
is required to open the trunk lid.
Opening the trunk from the outside
Locking and unlocking279Controls in detail221_AKB; 6; 20, en-USd2ugruen,Version: 2.11.8.12009-09-24T13:28:17+02:00 - Seite 279Z
Page 282 of 548
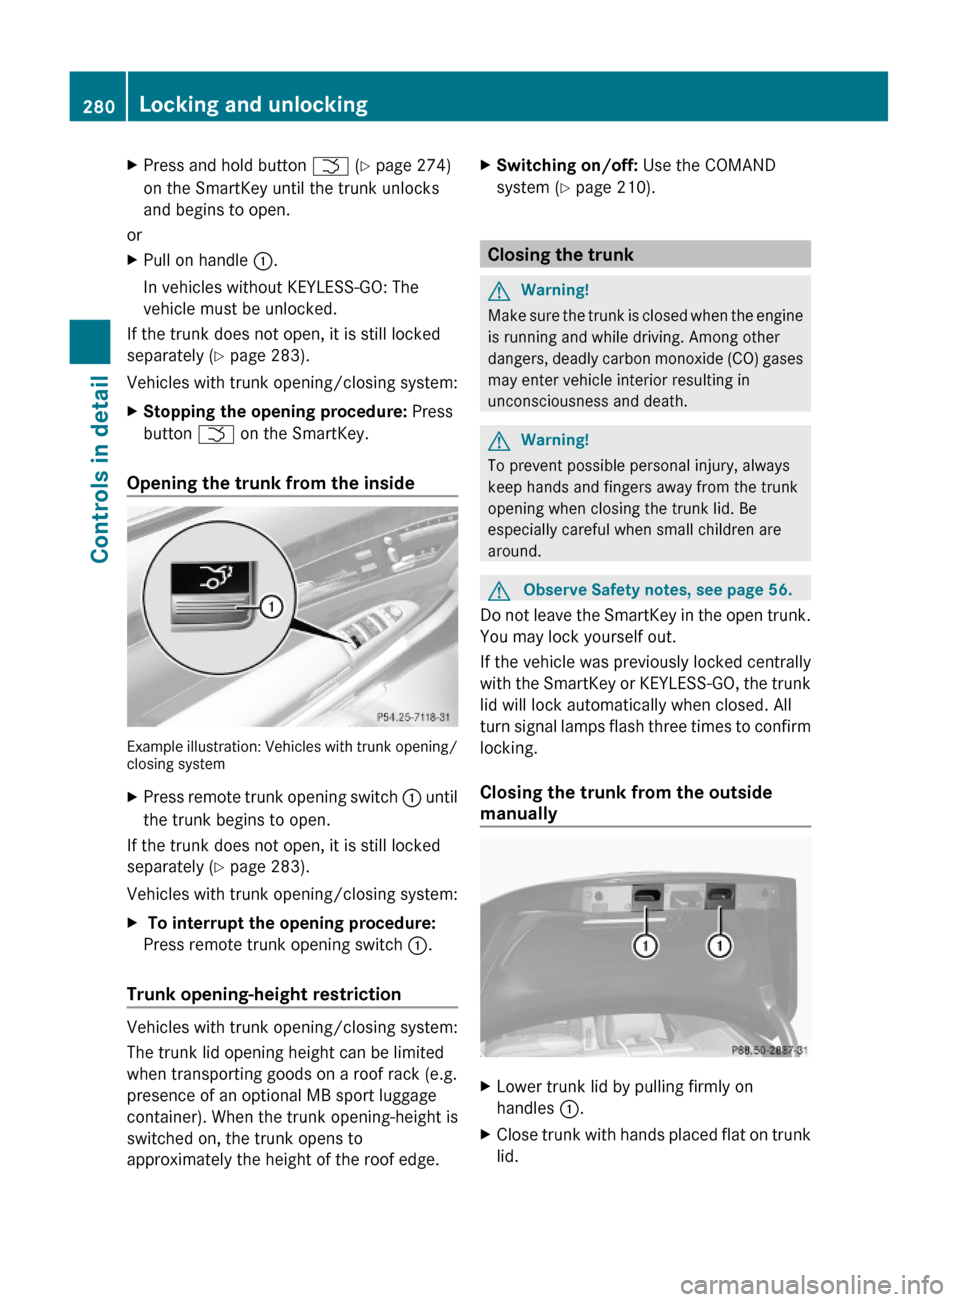
XPress and hold button F (Y page 274)
on the SmartKey until the trunk unlocks
and begins to open.
or
XPull on handle :.
In vehicles without KEYLESS-GO: The
vehicle must be unlocked.
If the trunk does not open, it is still locked
separately (Y page 283).
Vehicles with trunk opening/closing system:
XStopping the opening procedure: Press
button F on the SmartKey.
Opening the trunk from the inside
Example illustration: Vehicles with trunk opening/closing system
XPress remote trunk opening switch : until
the trunk begins to open.
If the trunk does not open, it is still locked
separately (Y page 283).
Vehicles with trunk opening/closing system:
X To interrupt the opening procedure:
Press remote trunk opening switch :.
Trunk opening-height restriction
Vehicles with trunk opening/closing system:
The trunk lid opening height can be limited
when transporting goods on a roof rack (e.g.
presence of an optional MB sport luggage
container). When the trunk opening-height is
switched on, the trunk opens to
approximately the height of the roof edge.
XSwitching on/off: Use the COMAND
system (Y page 210).
Closing the trunk
GWarning!
Make sure the trunk is closed when the engine
is running and while driving. Among other
dangers, deadly carbon monoxide (CO) gases
may enter vehicle interior resulting in
unconsciousness and death.
GWarning!
To prevent possible personal injury, always
keep hands and fingers away from the trunk
opening when closing the trunk lid. Be
especially careful when small children are
around.
GObserve Safety notes, see page 56.
Do not leave the SmartKey in the open trunk.
You may lock yourself out.
If the vehicle was previously locked centrally
with the SmartKey or KEYLESS-GO, the trunk
lid will lock automatically when closed. All
turn signal lamps flash three times to confirm
locking.
Closing the trunk from the outside
manually
XLower trunk lid by pulling firmly on
handles :.
XClose trunk with hands placed flat on trunk
lid.
280Locking and unlockingControls in detail
221_AKB; 6; 20, en-USd2ugruen,Version: 2.11.8.12009-09-24T13:28:17+02:00 - Seite 280
Page 289 of 548
or the child is not properly secured in the child
restraint.
GWarning!
For your protection, drive only with properly
positioned head restraints.
Adjust the head restraint so that it is as close
to the head as possible and the center of the
head restraint supports the back of the head
at eye level. This will reduce the potential for
injury to the head and neck in the event of an
accident or similar situation.
Do not drive the vehicle without the seat head
restraints. Head restraints are intended to
help reduce injuries during an accident.
Seat adjustment
You can adjust the lumbar support,
multicontour seats for driver and front
passenger, as well as drive-dynamic
multicontour seats using COMAND
(Y page 216).
! When moving the seats, make sure there
are no items in the footwell or behind the
seats. Otherwise, you could damage the
seats and/or the items.
Power seats
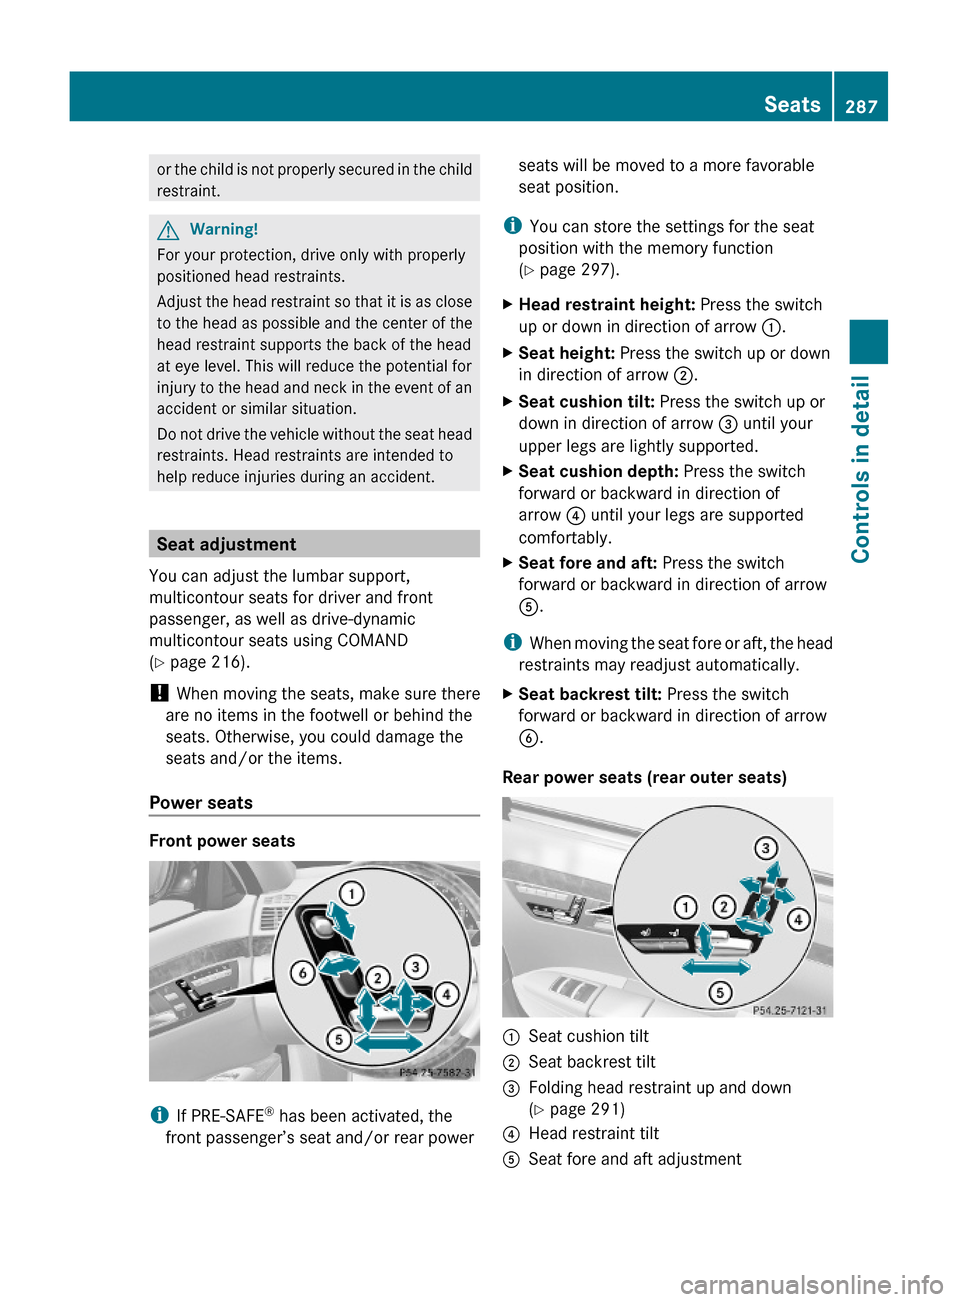
Front power seats
iIf PRE-SAFE® has been activated, the
front passenger’s seat and/or rear power
seats will be moved to a more favorable
seat position.
iYou can store the settings for the seat
position with the memory function
(Y page 297).
XHead restraint height: Press the switch
up or down in direction of arrow :.
XSeat height: Press the switch up or down
in direction of arrow ;.
XSeat cushion tilt: Press the switch up or
down in direction of arrow = until your
upper legs are lightly supported.
XSeat cushion depth: Press the switch
forward or backward in direction of
arrow ? until your legs are supported
comfortably.
XSeat fore and aft: Press the switch
forward or backward in direction of arrow
A.
iWhen moving the seat fore or aft, the head
restraints may readjust automatically.
XSeat backrest tilt: Press the switch
forward or backward in direction of arrow
B.
Rear power seats (rear outer seats)
:Seat cushion tilt;Seat backrest tilt=Folding head restraint up and down
(Y page 291)
?Head restraint tiltASeat fore and aft adjustmentSeats287Controls in detail221_AKB; 6; 20, en-USd2ugruen,Version: 2.11.8.12009-09-24T13:28:17+02:00 - Seite 287Z