2010 MERCEDES-BENZ S65AMG Multicontour
[x] Cancel search: MulticontourPage 171 of 548
XSelect Audio Q FM/AM Radio Q WB
Q Channel.
or
XPress W when the main area is selected.
The channel list appears. The dot # in
front of a list entry indicates the currently
selected channel.
XSelect channel by rotating cVd or sliding
ZVÆ and press W.
iVehicles with rear multicontour seats:
Rear occupants can also select a channel
using the buttons on the rear armrest
(Y page 80).
Saving stations
iTwenty stations can be saved in each
wave band except for Weather Band.
You have the following options:
RSaving stations manually
RSaving stations using the autostore
function
Saving stations manually
Option 1
XSelect Audio Q FM/AM Radio Q FM or
AM.
XSelect Radio Q Save Station.
Option 2
XPress W when the main area is selected.
Option 3
XSelect Audio Q FM/AM Radio Q FM or
AM.
XSelect Presets.
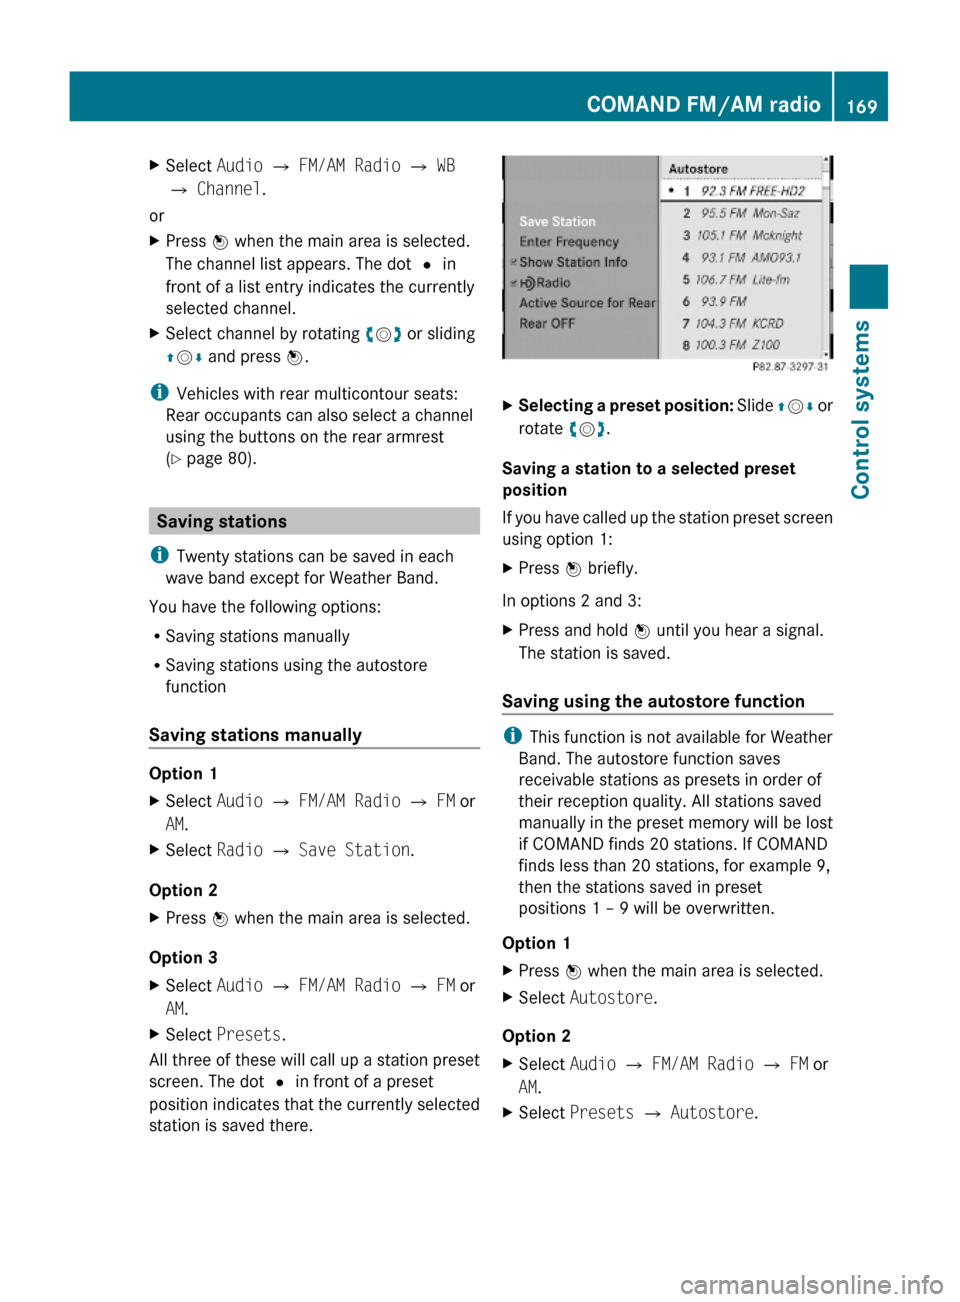
All three of these will call up a station preset
screen. The dot # in front of a preset
position indicates that the currently selected
station is saved there.
XSelecting a preset position: Slide ZVÆ or
rotate cVd.
Saving a station to a selected preset
position
If you have called up the station preset screen
using option 1:
XPress W briefly.
In options 2 and 3:
XPress and hold W until you hear a signal.
The station is saved.
Saving using the autostore function
iThis function is not available for Weather
Band. The autostore function saves
receivable stations as presets in order of
their reception quality. All stations saved
manually in the preset memory will be lost
if COMAND finds 20 stations. If COMAND
finds less than 20 stations, for example 9,
then the stations saved in preset
positions 1 – 9 will be overwritten.
Option 1
XPress W when the main area is selected.XSelect Autostore.
Option 2
XSelect Audio Q FM/AM Radio Q FM or
AM.
XSelect Presets Q Autostore.COMAND FM/AM radio169Control systems221_AKB; 6; 20, en-USd2ugruen,Version: 2.11.8.12009-09-24T13:28:17+02:00 - Seite 169Z
Page 176 of 548
XSelect station preset and briefly press W.
or
XEnter a position number with the telephone
keypad using buttons ´ - Ã
( Y page 79).
COMAND tunes in the corresponding
channel as long as it is included in your
subscription and is still available.
i Vehicles with rear multicontour seats:
Rear occupants can also select a channel
using the buttons on the rear armrest
( Y page 80).
If the channel is not included in your
subscription, you will see the message
described in the section “Satellite radio
service is not activated” ( Y page 171).
If the channel is no longer available, you will
see the message Invalid Channel .
XClosing message: Press W.
Tuning in channels using manual
channel number entry
i If you try to tune in a channel when the
satellite radio service is not activated, you
will see the screen described in the section
“Satellite radio service is not activated”
( Y page 171).
Entering the channel number using the
COMAND controller
XSelect Audio Q Audio Q Sat. Radio
Q Sat. Radio Q Channel Entry .
The menu for manual channel number entry
appears.XExiting menu without making an entry:
Press back button % in the center
console ( Y page 87).XIncrease or decreasing number: Slide
Z V Æ or rotate cV d.XSelecting next number: Slide XV Y.XConfirming channel entry: Press W.
Further operation depends on whether the
selected channel number is valid or if the
channel is included in your subscription.
Entering the channel number using the
telephone keypad
XPress button à on the telephone
keypad ( Y page 79).XEnter channel number using buttons Å
- Ã .
Further operation depends on whether the
selected channel number is valid or if the
channel is included in your subscription.
Channel number is valid and channel is
included in subscription
COMAND tunes in the channel entered.
Channel number is invalid
You will see the message Invalid Channel.
XClosing message: Press W.
Channel number is valid but channel is
not included in subscription
You will see the screen described in the
section “Satellite radio service is not
activated” ( Y page 171).
XClosing display: Press W.
Tuning in channels using the channel
list
XSelect Audio Q Audio Q Sat. Radio
Q Sat. Radio Q Channel List .
The channel list appears. The dot # in
front of a list entry indicates the currently
selected channel.XSelect channel by rotating cV d or sliding
Z V Æ and press W.
i
The contents of the channel list depends
on which channels are included in your
subscription and which program category
you have selected (Y page 173). If satellite
174COMAND satellite radioControl systems
221_AKB; 6; 20, en-USd2ugruen,Version: 2.11.8.12009-09-24T13:28:17+02:00 - Seite 174
Page 196 of 548
XPause playback: Select II.
In the display, II changes to M.XContinue playback: Select M.
Play is continued from the point at which it
was stopped.
Selecting scene/chapter
Entering scene/chapter using the
COMAND controller
XMake sure that the control menu is shown
( Y page 192).XSkipping forwards or back: Slide XV Y or
turn cV d.
or
XPress button 9 or : on the
multifunction steering wheel 28
.
i Vehicles with rear multicontour seats:
Rear occupants can also select a scene/
chapter using the buttons on the rear
armrest ( Y page 80).
Entering the scene/chapter using the
telephone keypad
XPress button à on the telephone
keypad ( Y page 79).XEnter scene/chapter using buttons j -
x .
COMAND tunes in to the scene/chapter
entered.
Selecting film/track
i This function is only available if the DVD
is comprised of several films/tracks.
XSelect Video Q Video DVD .XShow the menu system, if necessary
( Y page 193).XSelect DVD-V Q DVD Functions Q
Title Selection .
A selection list appears.XSelect a film/track.
Screen settings
Setting brightness, contrast and color
XSelect Video Q Video DVD .XShow the menu system, if necessary
( Y page 193).XSelect DVD-V Q Brightness Q
Contrast or Color .XChanging settings: Slide ZV Æ or turn
c V d until you reach the desired setting.XSaving settings: Press W.
Changing the picture format
XSelect Video Q Video DVD .XShow the menu system, if necessary
( Y page 193).XSelect DVD-V.
The DVD-V menu appears. The dot # in
front of a menu item - 16:9 Optimized,
4:3 or Widescreen indicates the current
format.XChanging the format: Slide ZV Æ or turn
c V d, until you reach the desired setting.XSaving the format: Press W.
DVD menu
The DVD menu is the menu stored on the DVD
itself. It is structured in various ways
according to the individual DVD and permits
certain actions and settings.
28 Function is only available if the Audio menu is selected in the instrument cluster.194COMAND video DVDControl systems
221_AKB; 6; 20, en-USd2ugruen,Version: 2.11.8.12009-09-24T13:28:17+02:00 - Seite 194
Page 219 of 548
The following seat adjustments can be made
via COMAND:
SettingsLumbar support (Y page 217)Multicontour seats, front (Y page 218)Drive-dynamic multicontour seats
(Y page 219)
Selecting a seat
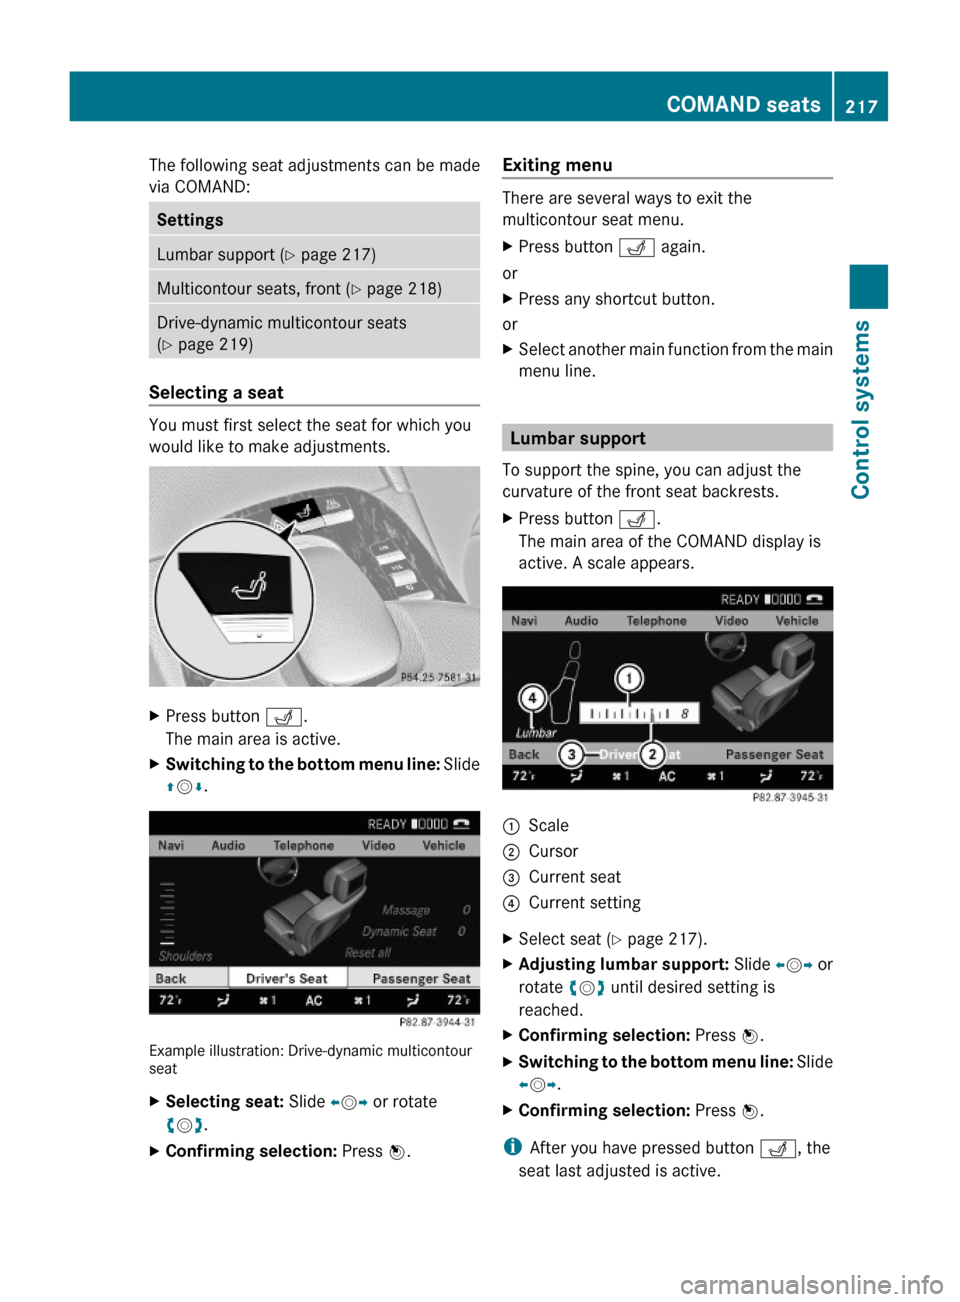
You must first select the seat for which you
would like to make adjustments.
XPress button T.
The main area is active.
XSwitching to the bottom menu line: Slide
ZVÆ.
Example illustration: Drive-dynamic multicontourseat
XSelecting seat: Slide XVY or rotate
cVd.
XConfirming selection: Press W.Exiting menu
There are several ways to exit the
multicontour seat menu.
XPress button T again.
or
XPress any shortcut button.
or
XSelect another main function from the main
menu line.
Lumbar support
To support the spine, you can adjust the
curvature of the front seat backrests.
XPress button T.
The main area of the COMAND display is
active. A scale appears.
:Scale;Cursor=Current seat?Current settingXSelect seat (Y page 217).XAdjusting lumbar support: Slide XVY or
rotate cVd until desired setting is
reached.
XConfirming selection: Press W.XSwitching to the bottom menu line: Slide
XVY.
XConfirming selection: Press W.
iAfter you have pressed button T, the
seat last adjusted is active.
COMAND seats217Control systems221_AKB; 6; 20, en-USd2ugruen,Version: 2.11.8.12009-09-24T13:28:17+02:00 - Seite 217Z
Page 220 of 548
Multicontour seats, front
iIf PRE-SAFE® has been activated, the air
pressure in the air chambers (on the sides
of the seat cushion and seat backrest) of
the front multicontour seats is increased.
iWhen you adjust the multicontour seat,
noises may result from pumping air into or
releasing air out of the air chambers.
To support the spine, you can individually
adjust the seat backrest contour of the front
seats by regulating the air pressure in the air
chambers of the multicontour seat.
You can adjust the following air chambers:
RSides of seat cushion
RSides of seat backrest
RSeat backrest curvature in lumbar area
RSeat backrest curvature in shoulder area
The settings are made on the COMAND
display.
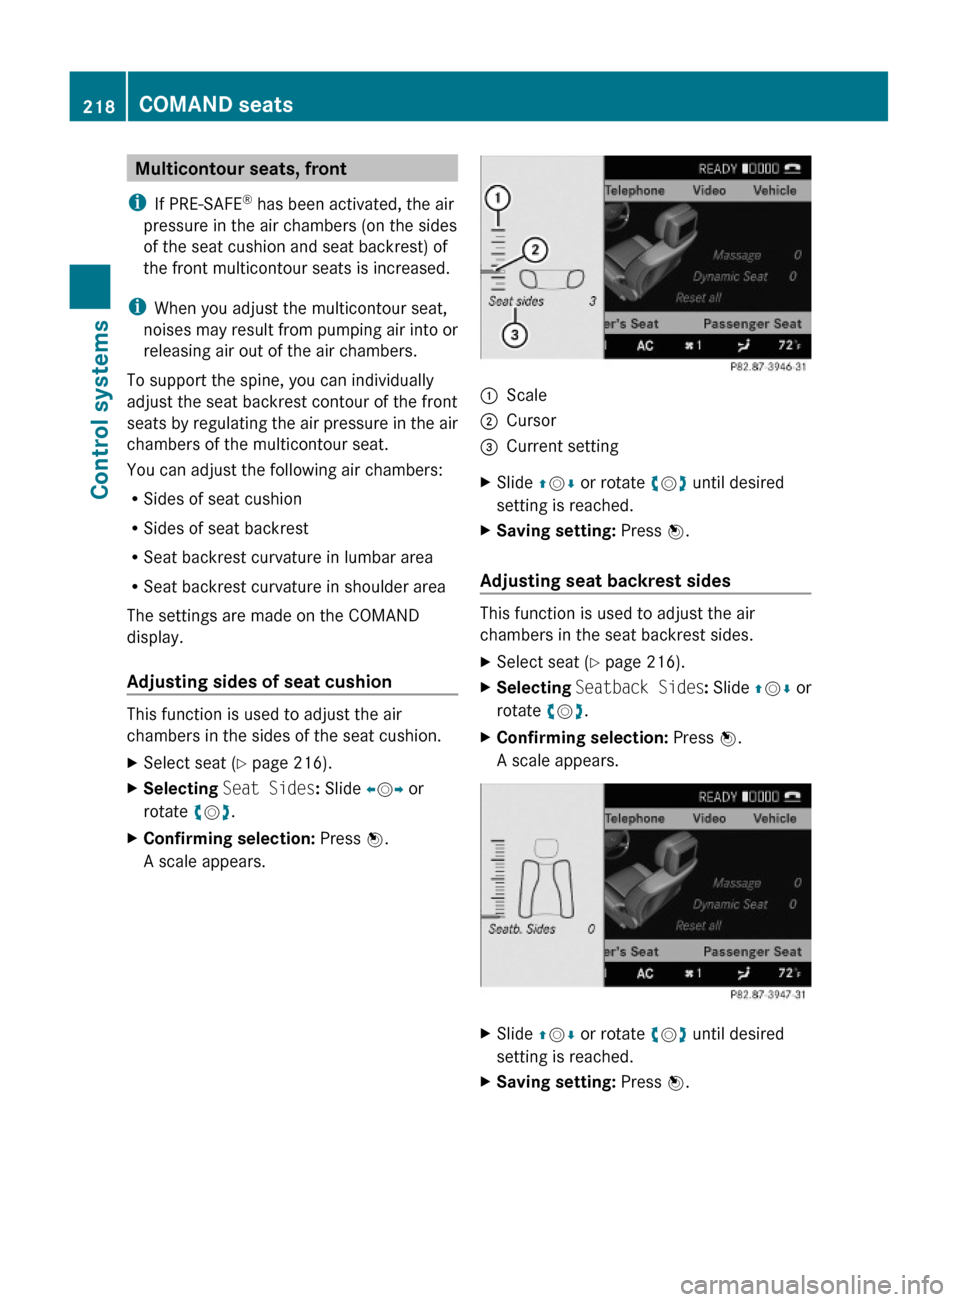
Adjusting sides of seat cushion
This function is used to adjust the air
chambers in the sides of the seat cushion.
XSelect seat (Y page 216).XSelecting Seat Sides: Slide XVY or
rotate cVd.
XConfirming selection: Press W.
A scale appears.
:Scale;Cursor=Current settingXSlide ZVÆ or rotate cVd until desired
setting is reached.
XSaving setting: Press W.
Adjusting seat backrest sides
This function is used to adjust the air
chambers in the seat backrest sides.
XSelect seat (Y page 216).XSelecting Seatback Sides: Slide ZVÆ or
rotate cVd.
XConfirming selection: Press W.
A scale appears.
XSlide ZVÆ or rotate cVd until desired
setting is reached.
XSaving setting: Press W.218COMAND seatsControl systems
221_AKB; 6; 20, en-USd2ugruen,Version: 2.11.8.12009-09-24T13:28:17+02:00 - Seite 218
Page 221 of 548
Adjusting seat backrest curvature in
lumbar area
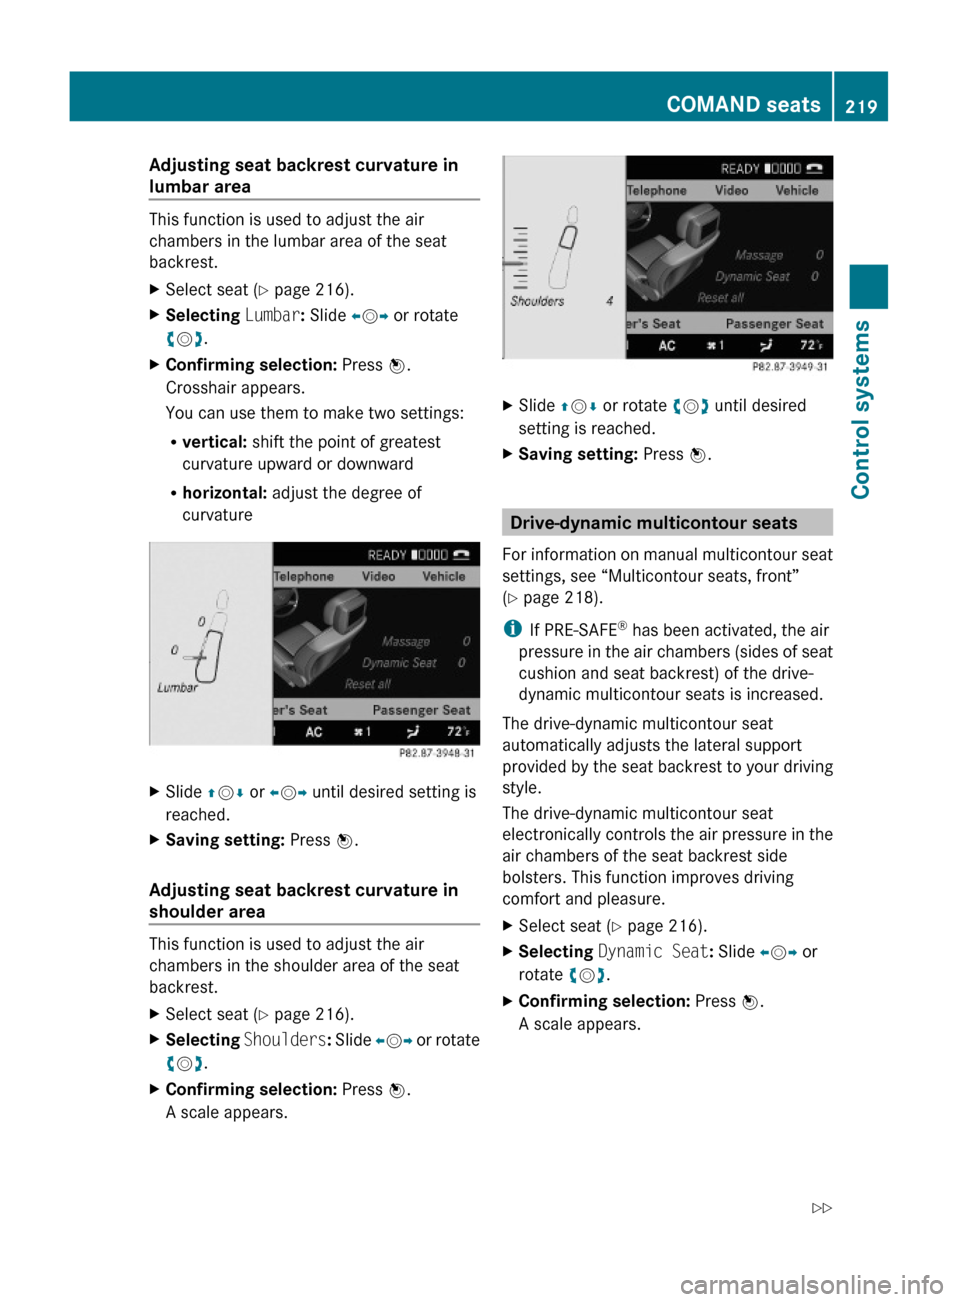
This function is used to adjust the air
chambers in the lumbar area of the seat
backrest.
XSelect seat (Y page 216).XSelecting Lumbar: Slide XVY or rotate
cVd.
XConfirming selection: Press W.
Crosshair appears.
You can use them to make two settings:
Rvertical: shift the point of greatest
curvature upward or downward
Rhorizontal: adjust the degree of
curvature
XSlide ZVÆ or XVY until desired setting is
reached.
XSaving setting: Press W.
Adjusting seat backrest curvature in
shoulder area
This function is used to adjust the air
chambers in the shoulder area of the seat
backrest.
XSelect seat (Y page 216).XSelecting Shoulders: Slide XVY or rotate
cVd.
XConfirming selection: Press W.
A scale appears.
XSlide ZVÆ or rotate cVd until desired
setting is reached.
XSaving setting: Press W.
Drive-dynamic multicontour seats
For information on manual multicontour seat
settings, see “Multicontour seats, front”
(Y page 218).
iIf PRE-SAFE® has been activated, the air
pressure in the air chambers (sides of seat
cushion and seat backrest) of the drive-
dynamic multicontour seats is increased.
The drive-dynamic multicontour seat
automatically adjusts the lateral support
provided by the seat backrest to your driving
style.
The drive-dynamic multicontour seat
electronically controls the air pressure in the
air chambers of the seat backrest side
bolsters. This function improves driving
comfort and pleasure.
XSelect seat (Y page 216).XSelecting Dynamic Seat: Slide XVY or
rotate cVd.
XConfirming selection: Press W.
A scale appears.
COMAND seats219Control systems221_AKB; 6; 20, en-USd2ugruen,Version: 2.11.8.12009-09-24T13:28:17+02:00 - Seite 219Z
Page 289 of 548
or the child is not properly secured in the child
restraint.
GWarning!
For your protection, drive only with properly
positioned head restraints.
Adjust the head restraint so that it is as close
to the head as possible and the center of the
head restraint supports the back of the head
at eye level. This will reduce the potential for
injury to the head and neck in the event of an
accident or similar situation.
Do not drive the vehicle without the seat head
restraints. Head restraints are intended to
help reduce injuries during an accident.
Seat adjustment
You can adjust the lumbar support,
multicontour seats for driver and front
passenger, as well as drive-dynamic
multicontour seats using COMAND
(Y page 216).
! When moving the seats, make sure there
are no items in the footwell or behind the
seats. Otherwise, you could damage the
seats and/or the items.
Power seats
Front power seats
iIf PRE-SAFE® has been activated, the
front passenger’s seat and/or rear power
seats will be moved to a more favorable
seat position.
iYou can store the settings for the seat
position with the memory function
(Y page 297).
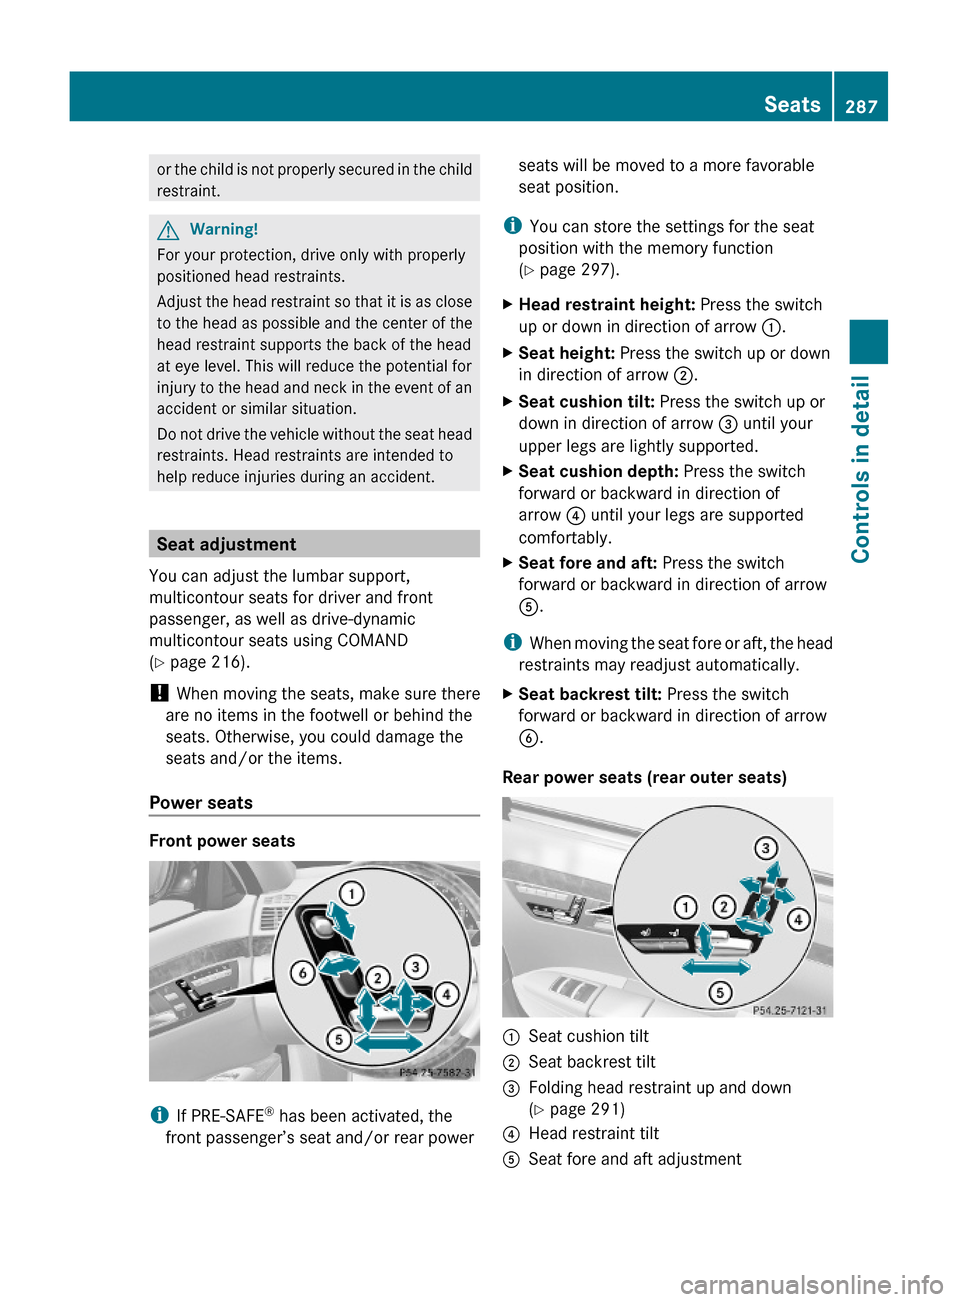
XHead restraint height: Press the switch
up or down in direction of arrow :.
XSeat height: Press the switch up or down
in direction of arrow ;.
XSeat cushion tilt: Press the switch up or
down in direction of arrow = until your
upper legs are lightly supported.
XSeat cushion depth: Press the switch
forward or backward in direction of
arrow ? until your legs are supported
comfortably.
XSeat fore and aft: Press the switch
forward or backward in direction of arrow
A.
iWhen moving the seat fore or aft, the head
restraints may readjust automatically.
XSeat backrest tilt: Press the switch
forward or backward in direction of arrow
B.
Rear power seats (rear outer seats)
:Seat cushion tilt;Seat backrest tilt=Folding head restraint up and down
(Y page 291)
?Head restraint tiltASeat fore and aft adjustmentSeats287Controls in detail221_AKB; 6; 20, en-USd2ugruen,Version: 2.11.8.12009-09-24T13:28:17+02:00 - Seite 287Z
Page 295 of 548
Multicontour seats, rear
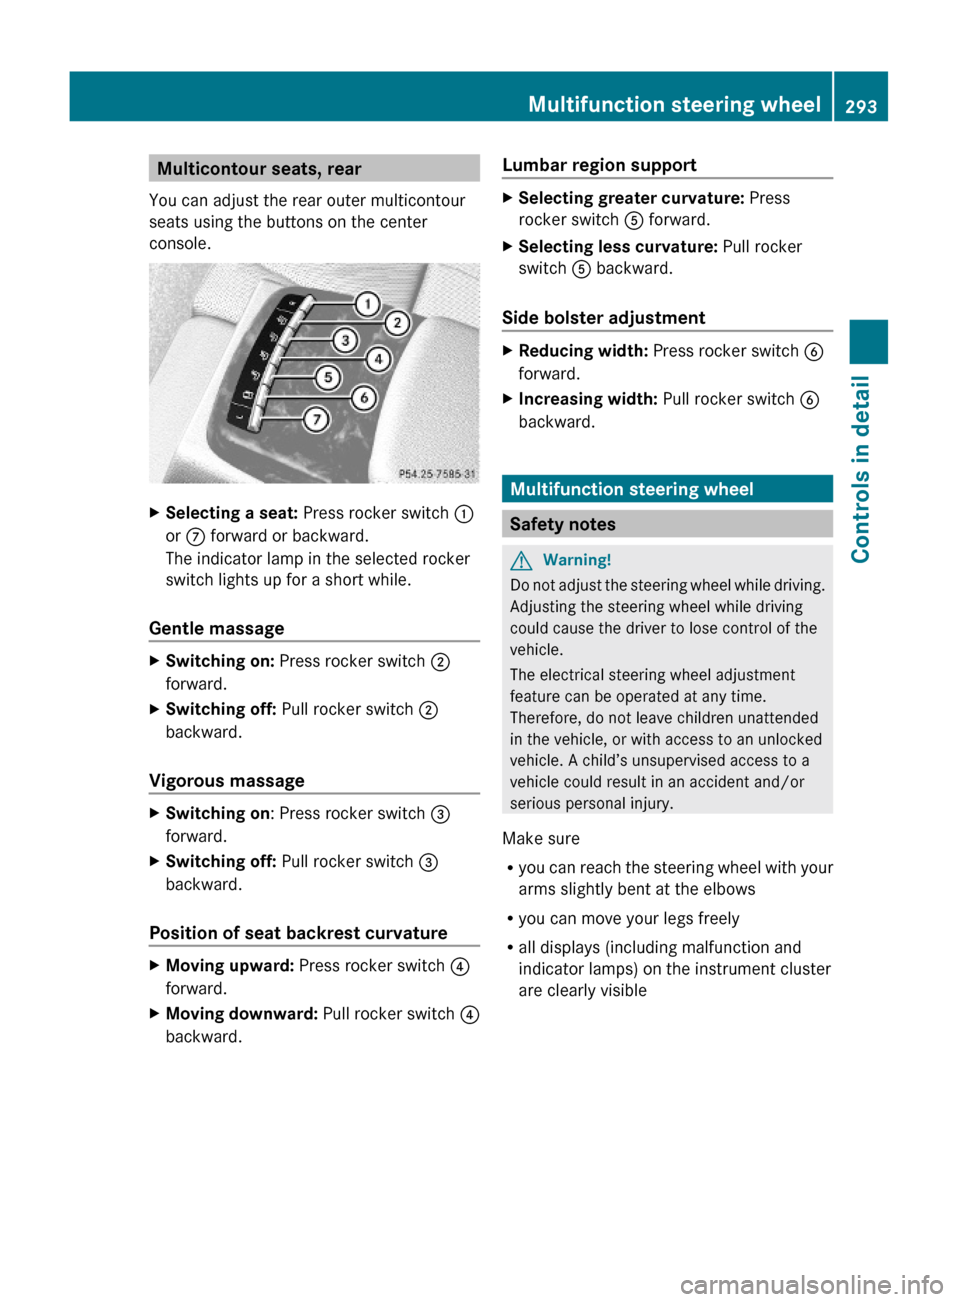
You can adjust the rear outer multicontour
seats using the buttons on the center
console.
XSelecting a seat: Press rocker switch :
or C forward or backward.
The indicator lamp in the selected rocker
switch lights up for a short while.
Gentle massage
XSwitching on: Press rocker switch ;
forward.
XSwitching off: Pull rocker switch ;
backward.
Vigorous massage
XSwitching on: Press rocker switch =
forward.
XSwitching off: Pull rocker switch =
backward.
Position of seat backrest curvature
XMoving upward: Press rocker switch ?
forward.
XMoving downward: Pull rocker switch ?
backward.
Lumbar region supportXSelecting greater curvature: Press
rocker switch A forward.
XSelecting less curvature: Pull rocker
switch A backward.
Side bolster adjustment
XReducing width: Press rocker switch B
forward.
XIncreasing width: Pull rocker switch B
backward.
Multifunction steering wheel
Safety notes
GWarning!
Do not adjust the steering wheel while driving.
Adjusting the steering wheel while driving
could cause the driver to lose control of the
vehicle.
The electrical steering wheel adjustment
feature can be operated at any time.
Therefore, do not leave children unattended
in the vehicle, or with access to an unlocked
vehicle. A child’s unsupervised access to a
vehicle could result in an accident and/or
serious personal injury.
Make sure
Ryou can reach the steering wheel with your
arms slightly bent at the elbows
Ryou can move your legs freely
Rall displays (including malfunction and
indicator lamps) on the instrument cluster
are clearly visible
Multifunction steering wheel293Controls in detail221_AKB; 6; 20, en-USd2ugruen,Version: 2.11.8.12009-09-24T13:28:17+02:00 - Seite 293Z