2010 MERCEDES-BENZ S600 reset
[x] Cancel search: resetPage 336 of 548
You must also apply the brakes yourself to
avoid a collision. The DISTRONIC PLUS brakes
the vehicle in an effort to restore the preset
distance or to maintain the set speed. The
brake pedal is automatically applied as this
happens which results in the brake pedal
moving
Keep driver’s foot area clear at all times,
including the area under the brake pedal.
Objects stored in this area may impair pedal
movement which could interfere with the
braking ability of the DISTRONIC PLUS
system.
Do not place your foot under the brake pedal
– your foot could become caught.
GWarning!
If you do not receive visual or acoustic
warning signals during a critical traffic
situation, DISTRONIC PLUS has either not
recognized the collision risk, has been
deactivated or is malfunctioning.
Remember, whether or not DISTRONIC PLUS
is operating, it is ultimately always the drivers
responsibility to apply the brakes in order to
control the vehicle and avoid a collision.
Displaying the distance graphic
In the DriveAssist menu under Distance
Display you see the current settings for
DISTRONIC PLUS. The Information shown in
the multifunction display depends on whether
DISTRONIC PLUS is activated or deactivated.
For activating or deactivating the DISTRONIC
PLUS system, see “Activating DISTRONIC
PLUS” (Y page 335) or “Deactivating
DISTRONIC PLUS” (Y page 338).
The menu overview can be found on
(Y page 222).
XPress = or ; to select the
DriveAssist menu.
XPress : or 9 to select the
Distance Display function.
XPress a.
The DISTRONIC PLUS distance graphic
appears and you will see one of the
following displays in the multifunction
display.
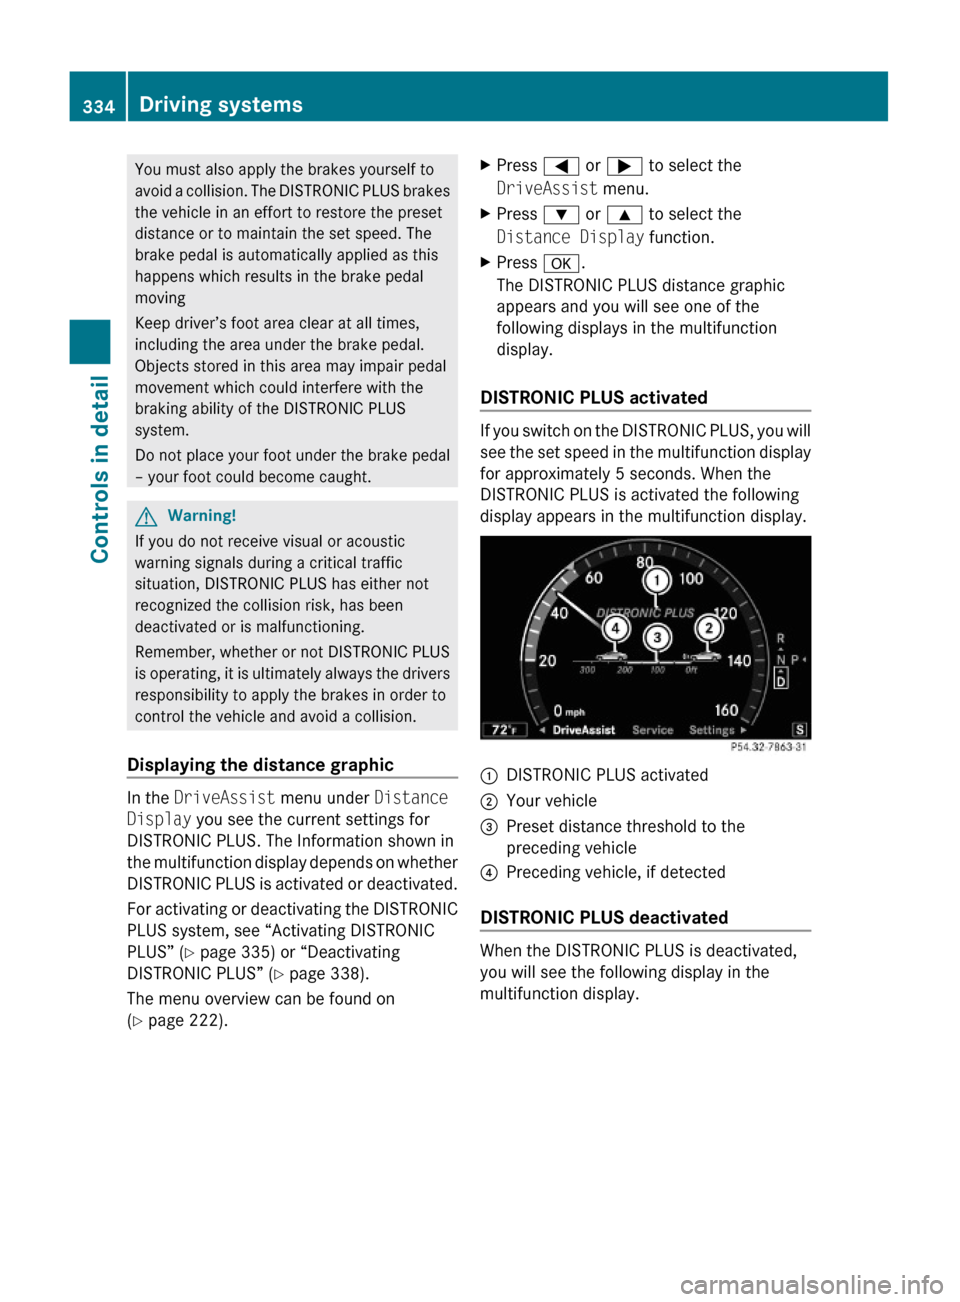
DISTRONIC PLUS activated
If you switch on the DISTRONIC PLUS, you will
see the set speed in the multifunction display
for approximately 5 seconds. When the
DISTRONIC PLUS is activated the following
display appears in the multifunction display.
:DISTRONIC PLUS activated;Your vehicle=Preset distance threshold to the
preceding vehicle
?Preceding vehicle, if detected
DISTRONIC PLUS deactivated
When the DISTRONIC PLUS is deactivated,
you will see the following display in the
multifunction display.
334Driving systemsControls in detail
221_AKB; 6; 20, en-USd2ugruen,Version: 2.11.8.12009-09-24T13:28:17+02:00 - Seite 334
Page 337 of 548
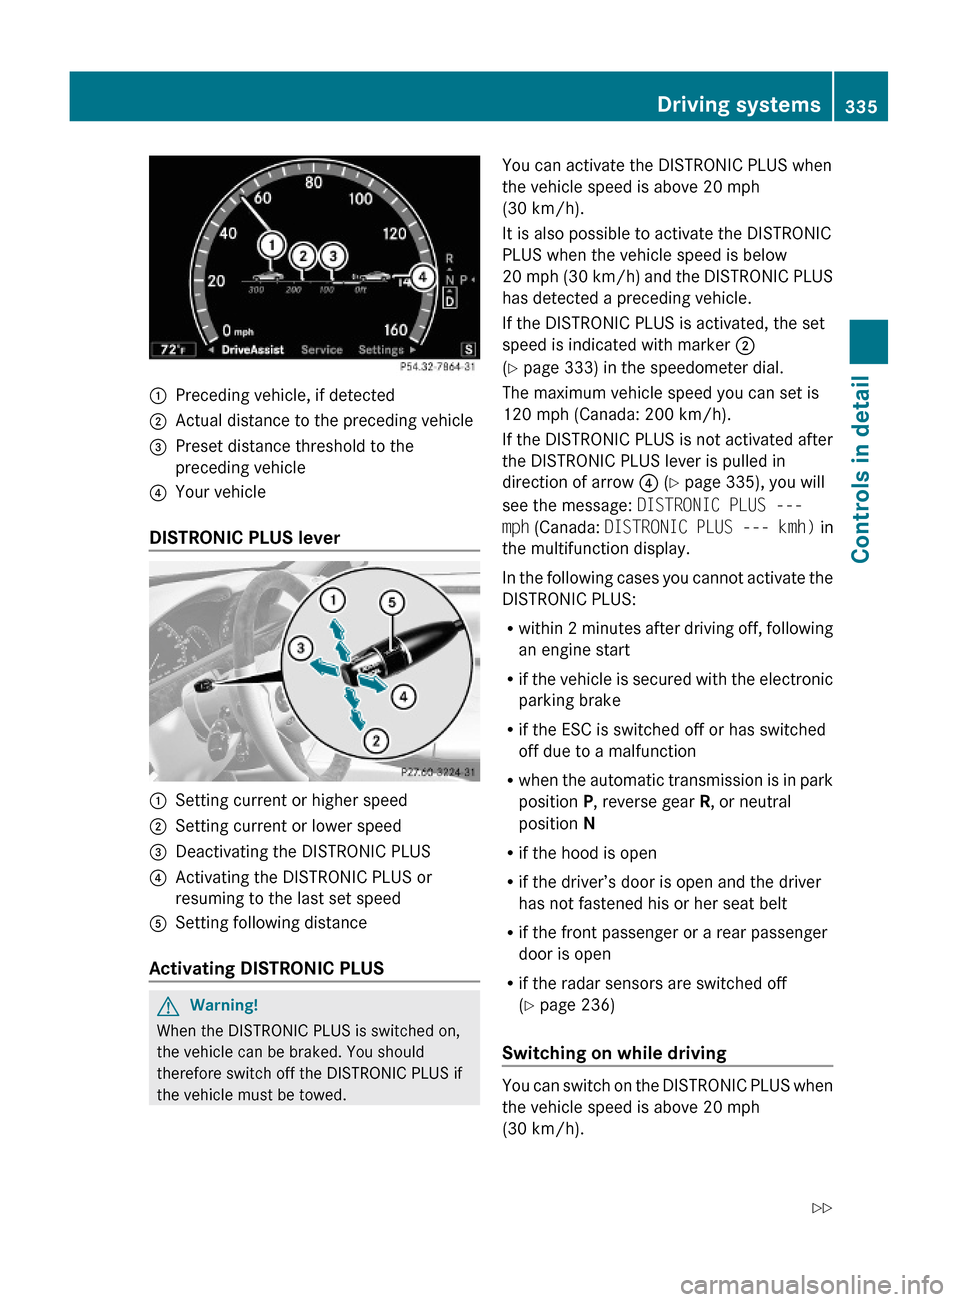
:Preceding vehicle, if detected;Actual distance to the preceding vehicle=Preset distance threshold to the
preceding vehicle
?Your vehicle
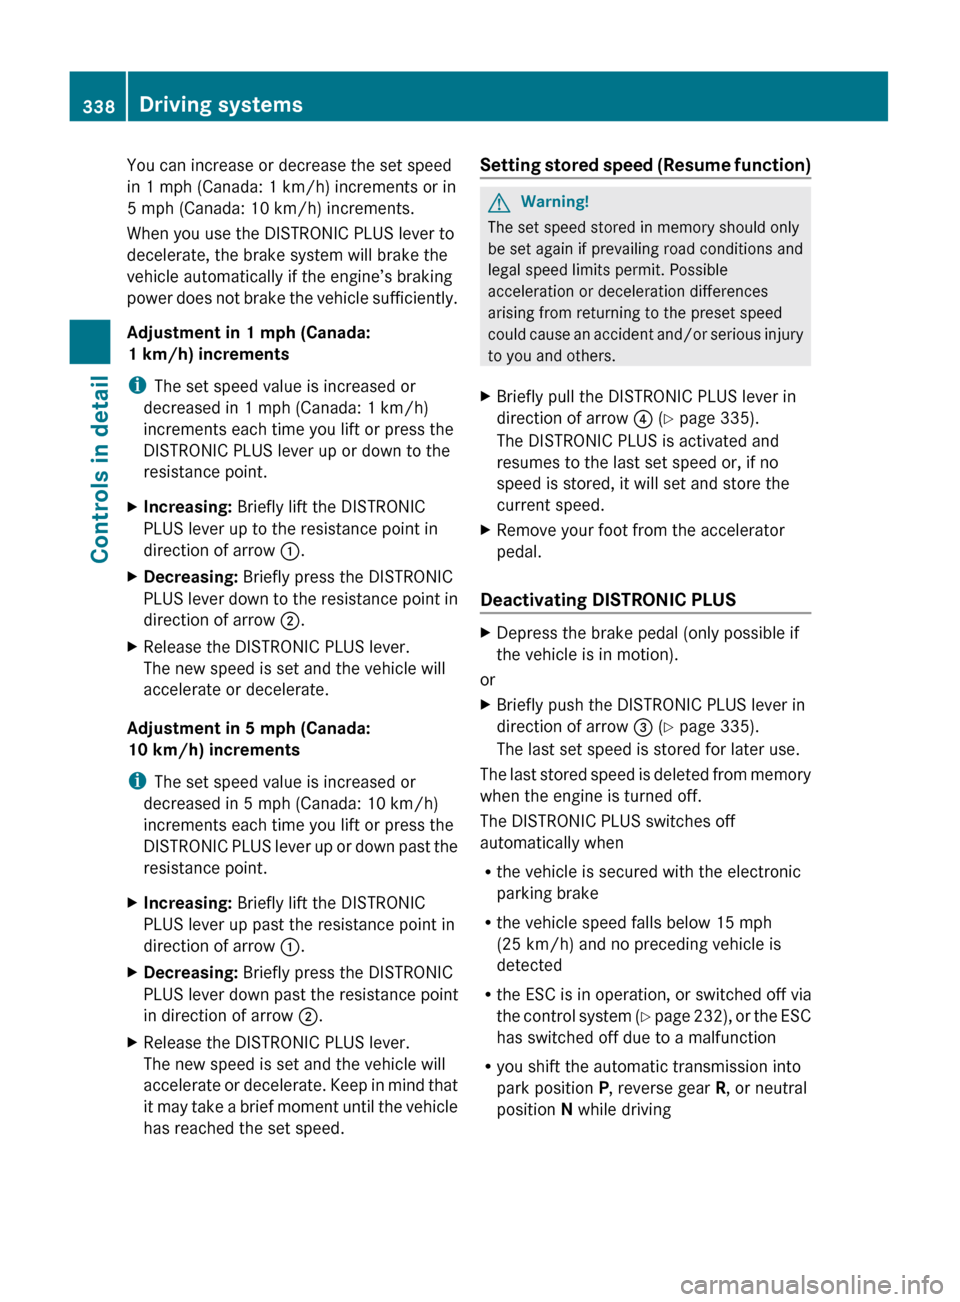
DISTRONIC PLUS lever
:Setting current or higher speed;Setting current or lower speed=Deactivating the DISTRONIC PLUS?Activating the DISTRONIC PLUS or
resuming to the last set speed
ASetting following distance
Activating DISTRONIC PLUS
GWarning!
When the DISTRONIC PLUS is switched on,
the vehicle can be braked. You should
therefore switch off the DISTRONIC PLUS if
the vehicle must be towed.
You can activate the DISTRONIC PLUS when
the vehicle speed is above 20 mph
(30 km/h).
It is also possible to activate the DISTRONIC
PLUS when the vehicle speed is below
20 mph (30 km/h) and the DISTRONIC PLUS
has detected a preceding vehicle.
If the DISTRONIC PLUS is activated, the set
speed is indicated with marker ;
(Y page 333) in the speedometer dial.
The maximum vehicle speed you can set is
120 mph (Canada: 200 km/h).
If the DISTRONIC PLUS is not activated after
the DISTRONIC PLUS lever is pulled in
direction of arrow ? (Y page 335), you will
see the message: DISTRONIC PLUS ---
mph (Canada: DISTRONIC PLUS --- kmh) in
the multifunction display.
In the following cases you cannot activate the
DISTRONIC PLUS:
Rwithin 2 minutes after driving off, following
an engine start
Rif the vehicle is secured with the electronic
parking brake
Rif the ESC is switched off or has switched
off due to a malfunction
Rwhen the automatic transmission is in park
position P, reverse gear R, or neutral
position N
Rif the hood is open
Rif the driver’s door is open and the driver
has not fastened his or her seat belt
Rif the front passenger or a rear passenger
door is open
Rif the radar sensors are switched off
(Y page 236)
Switching on while driving
You can switch on the DISTRONIC PLUS when
the vehicle speed is above 20 mph
(30 km/h).
Driving systems335Controls in detail221_AKB; 6; 20, en-USd2ugruen,Version: 2.11.8.12009-09-24T13:28:17+02:00 - Seite 335Z
Page 340 of 548
You can increase or decrease the set speed
in 1 mph (Canada: 1 km/h) increments or in
5 mph (Canada: 10 km/h) increments.
When you use the DISTRONIC PLUS lever to
decelerate, the brake system will brake the
vehicle automatically if the engine’s braking
power does not brake the vehicle sufficiently.
Adjustment in 1 mph (Canada:
1 km/h) increments
i The set speed value is increased or
decreased in 1 mph (Canada: 1 km/h)
increments each time you lift or press the
DISTRONIC PLUS lever up or down to the
resistance point.XIncreasing: Briefly lift the DISTRONIC
PLUS lever up to the resistance point in
direction of arrow :.XDecreasing: Briefly press the DISTRONIC
PLUS lever down to the resistance point in
direction of arrow ;.XRelease the DISTRONIC PLUS lever.
The new speed is set and the vehicle will
accelerate or decelerate.
Adjustment in 5 mph (Canada:
10 km/h) increments
i The set speed value is increased or
decreased in 5 mph (Canada: 10 km/h)
increments each time you lift or press the
DISTRONIC PLUS lever up or down past the
resistance point.
XIncreasing: Briefly lift the DISTRONIC
PLUS lever up past the resistance point in
direction of arrow :.XDecreasing: Briefly press the DISTRONIC
PLUS lever down past the resistance point
in direction of arrow ;.XRelease the DISTRONIC PLUS lever.
The new speed is set and the vehicle will
accelerate or decelerate. Keep in mind that
it may take a brief moment until the vehicle
has reached the set speed.Setting stored speed (Resume function)GWarning!
The set speed stored in memory should only
be set again if prevailing road conditions and
legal speed limits permit. Possible
acceleration or deceleration differences
arising from returning to the preset speed
could cause an accident and/or serious injury
to you and others.
XBriefly pull the DISTRONIC PLUS lever in
direction of arrow ? (Y page 335).
The DISTRONIC PLUS is activated and
resumes to the last set speed or, if no
speed is stored, it will set and store the
current speed.XRemove your foot from the accelerator
pedal.
Deactivating DISTRONIC PLUS
XDepress the brake pedal (only possible if
the vehicle is in motion).
or
XBriefly push the DISTRONIC PLUS lever in
direction of arrow = (Y page 335).
The last set speed is stored for later use.
The last stored speed is deleted from memory
when the engine is turned off.
The DISTRONIC PLUS switches off
automatically when
R the vehicle is secured with the electronic
parking brake
R the vehicle speed falls below 15 mph
(25 km/h) and no preceding vehicle is
detected
R the ESC is in operation, or switched off via
the control system (Y page 232), or the ESC
has switched off due to a malfunction
R you shift the automatic transmission into
park position P, reverse gear R, or neutral
position N while driving
338Driving systemsControls in detail
221_AKB; 6; 20, en-USd2ugruen,Version: 2.11.8.12009-09-24T13:28:17+02:00 - Seite 338
Page 358 of 548
GWarning!
The ATTENTION ASSIST is only an aid to the
driver. It might not recognize fatigue or
increasing inattentiveness in time or fail to
recognize them at all. The system cannot
substitute a rested and attentive driver.
Fatigue can cause you to recognize dangers
too late, to misjudge potential dangers, or to
react slower. Therefore, make sure to be
rested before and during your trip. Take rests
early enough and regularly, especially during
long trips. Failure to do so could cause you to
recognize dangers too late which could result
in an accident and serious injury to you and/
or others.
The ATTENTION ASSIST interprets your
fatigue or increasing inattentiveness
considering the following criteria:
Rthe individual driving style, for example the
way you steer
Rthe driving conditions such as time of day
and duration of the ride
The ATTENTION ASSIST function is restricted
and warnings will be delayed or not issued at
all when
Rroad conditions are bad, e.g. heavy bumps
or potholes
Rcrosswinds are strong
Rdriving in a sporty manner with high speed
in curves or rapid acceleration
Rdriving slower than 50 mph (80 km/h) or
faster than 112 mph (180 km/h) most of
the time
Roperating the COMAND or making phone
calls via COMAND
Rchanging lanes or varying the vehicle
speed, i.e. you intervene actively
Warnings and displays in the
multifunction display
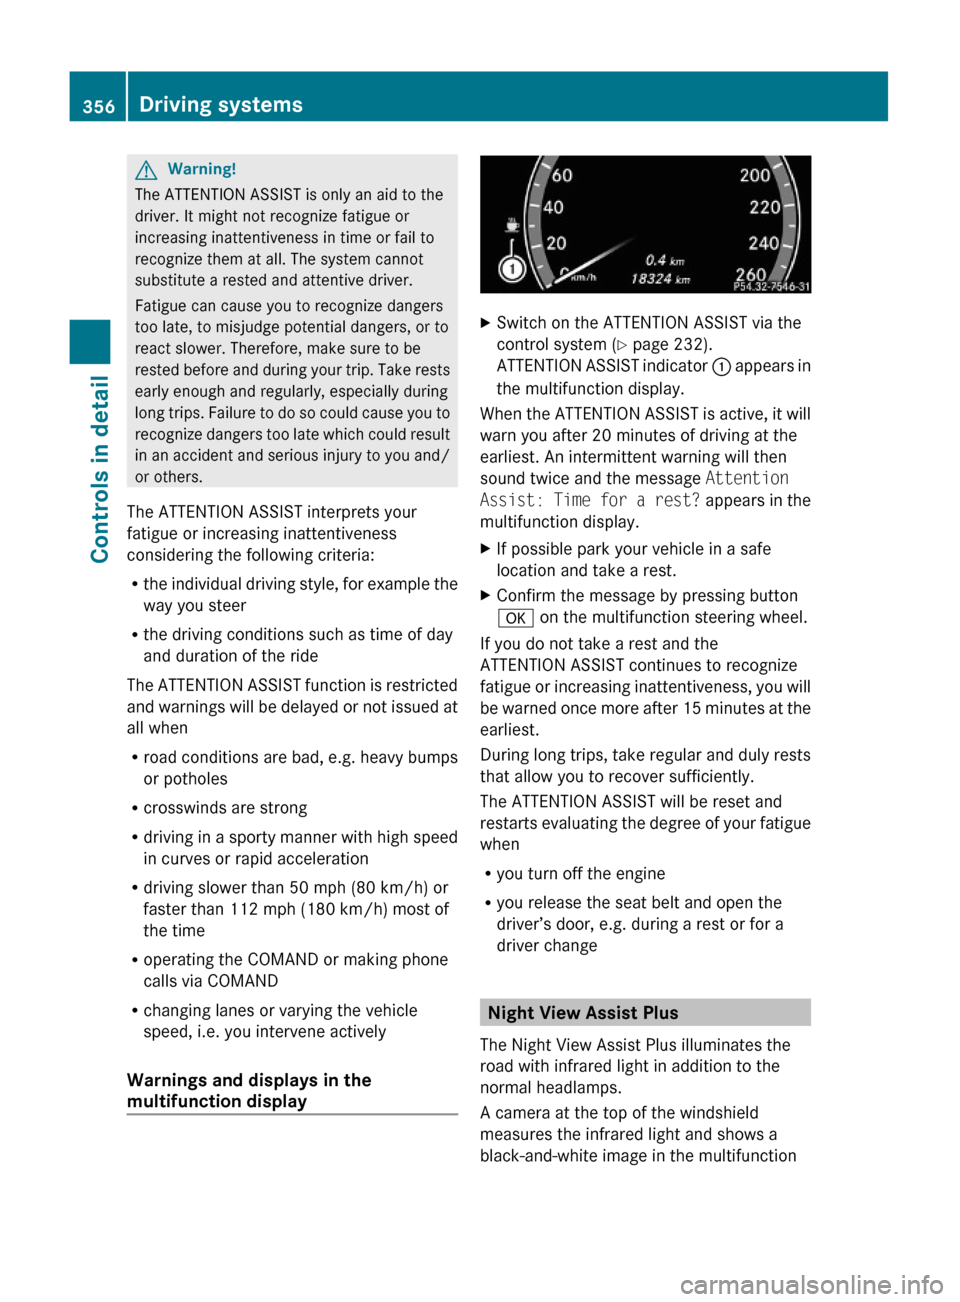
XSwitch on the ATTENTION ASSIST via the
control system (Y page 232).
ATTENTION ASSIST indicator : appears in
the multifunction display.
When the ATTENTION ASSIST is active, it will
warn you after 20 minutes of driving at the
earliest. An intermittent warning will then
sound twice and the message Attention
Assist: Time for a rest? appears in the
multifunction display.
XIf possible park your vehicle in a safe
location and take a rest.
XConfirm the message by pressing button
a on the multifunction steering wheel.
If you do not take a rest and the
ATTENTION ASSIST continues to recognize
fatigue or increasing inattentiveness, you will
be warned once more after 15 minutes at the
earliest.
During long trips, take regular and duly rests
that allow you to recover sufficiently.
The ATTENTION ASSIST will be reset and
restarts evaluating the degree of your fatigue
when
Ryou turn off the engine
Ryou release the seat belt and open the
driver’s door, e.g. during a rest or for a
driver change
Night View Assist Plus
The Night View Assist Plus illuminates the
road with infrared light in addition to the
normal headlamps.
A camera at the top of the windshield
measures the infrared light and shows a
black-and-white image in the multifunction
356Driving systemsControls in detail
221_AKB; 6; 20, en-USd2ugruen,Version: 2.11.8.12009-09-24T13:28:17+02:00 - Seite 356
Page 441 of 548
vehicle damage not covered by the
Mercedes-Benz Limited Warranty.
Maintenance service indicator
message
Information on maintenance work and
maintenance intervals are specified in the
Maintenance Booklet. Contact an authorized
Mercedes-Benz Center, or visit
www.mbusa.com (USA only) for additional
information.
The maintenance service indicator message
will notify you when the next maintenance
service is required.
Starting approximately 1 month before the
next maintenance service is required, one of
the following messages will appear in the
multifunction display. The messages will
appear while you are driving or when you
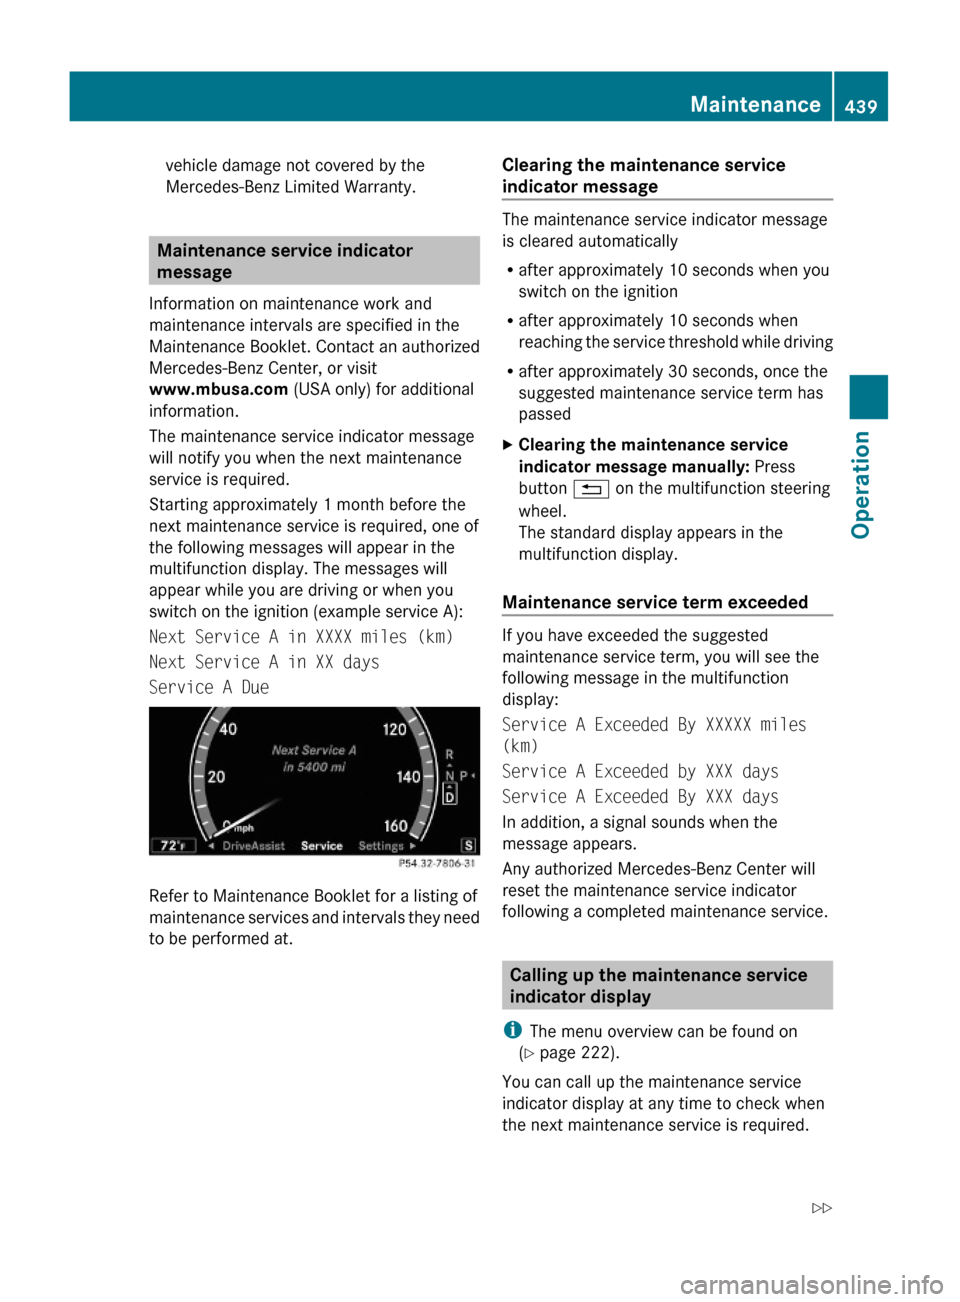
switch on the ignition (example service A):
Next Service A in XXXX miles (km)
Next Service A in XX days
Service A Due
Refer to Maintenance Booklet for a listing of
maintenance services and intervals they need
to be performed at.
Clearing the maintenance service
indicator message
The maintenance service indicator message
is cleared automatically
Rafter approximately 10 seconds when you
switch on the ignition
Rafter approximately 10 seconds when
reaching the service threshold while driving
Rafter approximately 30 seconds, once the
suggested maintenance service term has
passed
XClearing the maintenance service
indicator message manually: Press
button % on the multifunction steering
wheel.
The standard display appears in the
multifunction display.
Maintenance service term exceeded
If you have exceeded the suggested
maintenance service term, you will see the
following message in the multifunction
display:
Service A Exceeded By XXXXX miles
(km)
Service A Exceeded by XXX days
Service A Exceeded By XXX days
In addition, a signal sounds when the
message appears.
Any authorized Mercedes-Benz Center will
reset the maintenance service indicator
following a completed maintenance service.
Calling up the maintenance service
indicator display
iThe menu overview can be found on
(Y page 222).
You can call up the maintenance service
indicator display at any time to check when
the next maintenance service is required.
Maintenance439Operation221_AKB; 6; 20, en-USd2ugruen,Version: 2.11.8.12009-09-24T13:28:17+02:00 - Seite 439Z
Page 442 of 548
XSwitch on the ignition.
The standard display of the control system
appears ( Y page 223).XPress button = or ; on the
multifunction steering wheel to select the
Service menu.XPress button : or 9 to select
ASSYST PLUS .XPress button a on the multifunction
steering wheel to confirm.
The maintenance service indicator display
with the maintenance service deadline
appears in the multifunction display.
i If the battery was disconnected, the days
of disconnection will not be included in the
count shown by the maintenance service
indicator. To arrive at the true maintenance
service deadline, you will need to subtract
these days from the days shown in the
maintenance service indicator message or
maintenance service indicator display.
Resetting the maintenance service
indicator
In the event that the maintenance service on
your vehicle is not carried out at an authorized
Mercedes-Benz Center, you can have the
maintenance service indicator reset.
The automotive maintenance facility carrying
out the maintenance service will find the
information for resetting the maintenance
service indicator in the maintenance-relevant
literature for your vehicle.
Such literature is available at any authorized
Mercedes-Benz Center or directly from
Mercedes-Benz.
! If the maintenance service indicator was
reset inadvertently, have an authorized
Mercedes-Benz Center correct it.
Only reset the maintenance service
indicator if the proper maintenance service
has been performed. Not following the
proper maintenance service as described
in the Maintenance Booklet will result in
engine damage and/or other vehicle
damage not covered by the Mercedes-Benz
Limited Warranty.
Vehicle care
Cleaning and care of the vehicle
Notes
Regular and proper care will help to maintain
the value of your vehicle.
GWarning!
Many cleaning products can be hazardous.
Some are poisonous, others are flammable.
Always follow the instructions on the
particular container. Always open your
vehicle’s doors or windows when cleaning the
inside.
Never use fluids or solvents that are not
designed for cleaning your vehicle.
Always lock away cleaning products and keep
them out of reach of children.
! When cleaning the vehicle, do not use
scouring agents. Never apply strong force
and only use a soft, wet cloth or sponge.
Otherwise you may scratch or damage the
surface to be cleaned.
While in operation, even while parked, your
vehicle is subjected to varying external
influences which, if gone unchecked, can
attack the paintwork as well as the vehicle
underbody and cause lasting damage.
Such damage is caused not only by extreme
and varying climatic conditions, but also by:
R Air pollution
R Road salt
R Tar
R Gravel and stone chipping
440Vehicle careOperation
221_AKB; 6; 20, en-USd2ugruen,Version: 2.11.8.12009-09-24T13:28:17+02:00 - Seite 440
Page 451 of 548
Vehicle equipment ............................450
Where will I find ...? ..........................450
Vehicle status messages in the
multifunction display .......................452
What to do if … ..................................489
Unlocking/locking manually ...........499
Resetting activated NECK-PRO
active front head restraints .............501
Replacing batteries (SmartKey,
remote control, headphone) ............502
Replacing bulbs .................................504
Replacing wiper blades ....................507
Flat tire ..............................................508
Battery ...............................................512
Jump starting ....................................514
Towing the vehicle ............................516
Fuses ..................................................519
449Practical hints221_AKB; 6; 20, en-USd2ugruen,Version: 2.11.8.12009-09-24T13:28:17+02:00 - Seite 449
Page 503 of 548
XExit the vehicle.XClose the rear left door.
The vehicle is locked.
iThis procedure does not arm the anti-
theft alarm system, nor does it lock the fuel
filler flap.
Resetting activated NECK-PRO active
front head restraints
If the NECK-PRO active front head restraints
have been triggered in a rear-end collision,
they must be reset.
You can tell that the NECK-PRO active front
head restraints have been triggered when
they have been moved forward and cannot be
adjusted.
GWarning!
For safety reasons, have the NECK-PRO active
front head restraints checked at an
authorized Mercedes-Benz Center after a
rear-end collision.
GWarning!
When pushing back the head restraint
cushion, make sure your fingers do not
become caught between the head restraint
cushion and the cover. Failing to do so may
lead to injury.
! Be careful not to damage upholstery.
iPressing the head restraint cushion back
requires high force. If you encounter
difficulties when pushing the head restraint
back, please have the procedure
performed at an authorized Mercedes-Benz
Center.
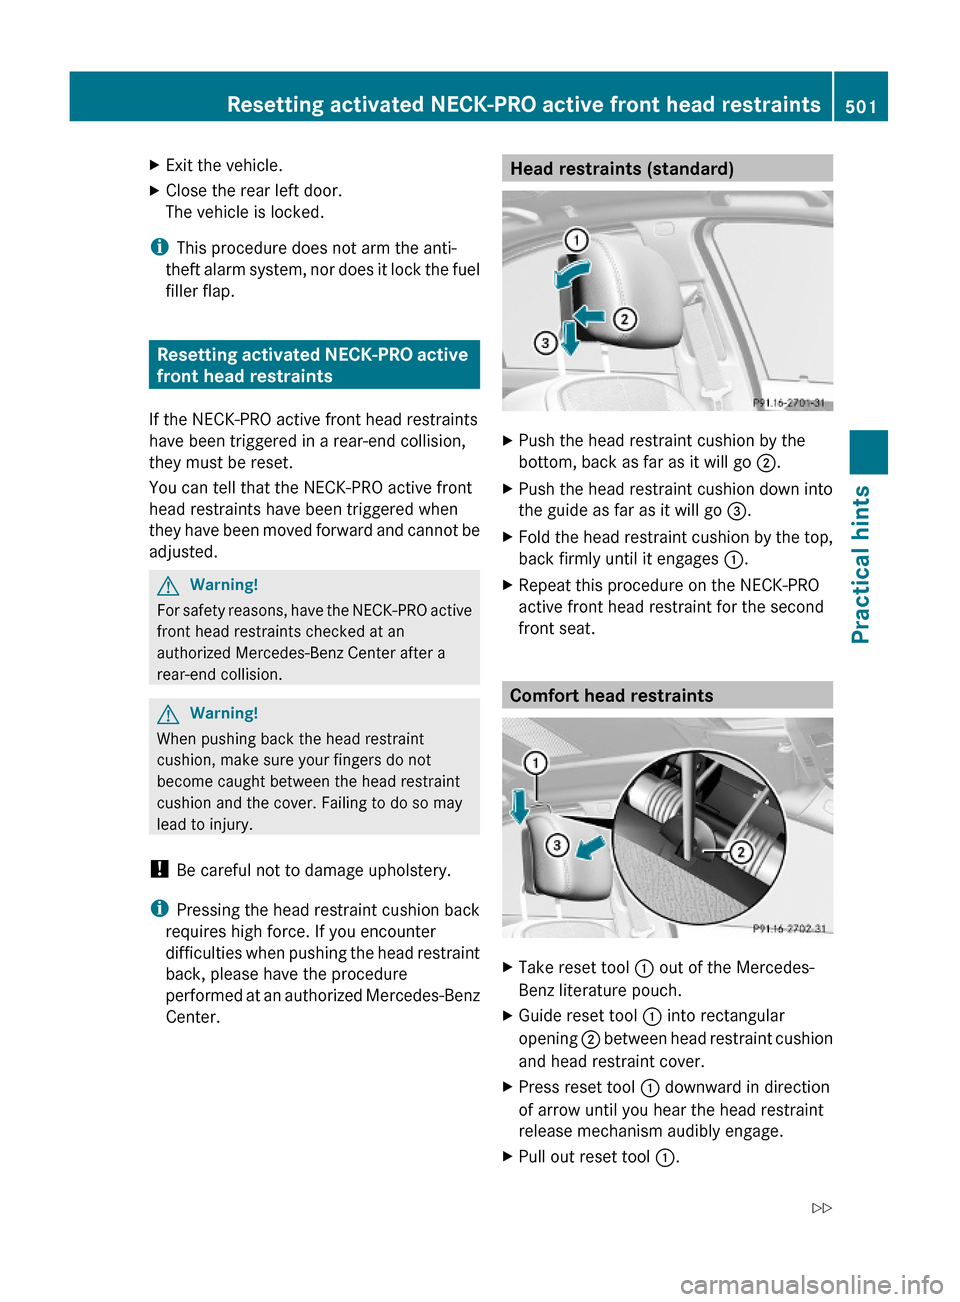
Head restraints (standard)XPush the head restraint cushion by the
bottom, back as far as it will go ;.
XPush the head restraint cushion down into
the guide as far as it will go =.
XFold the head restraint cushion by the top,
back firmly until it engages :.
XRepeat this procedure on the NECK-PRO
active front head restraint for the second
front seat.
Comfort head restraints
XTake reset tool : out of the Mercedes-
Benz literature pouch.
XGuide reset tool : into rectangular
opening ; between head restraint cushion
and head restraint cover.
XPress reset tool : downward in direction
of arrow until you hear the head restraint
release mechanism audibly engage.
XPull out reset tool :.Resetting activated NECK-PRO active front head restraints501Practical hints221_AKB; 6; 20, en-USd2ugruen,Version: 2.11.8.12009-09-24T13:28:17+02:00 - Seite 501Z