2010 MERCEDES-BENZ S600 light
[x] Cancel search: lightPage 130 of 548
XSwitching manually to the POI list
without predictive speller: Slide ZV.
or
XSelect ¬ in the second line from the
bottom and press W.
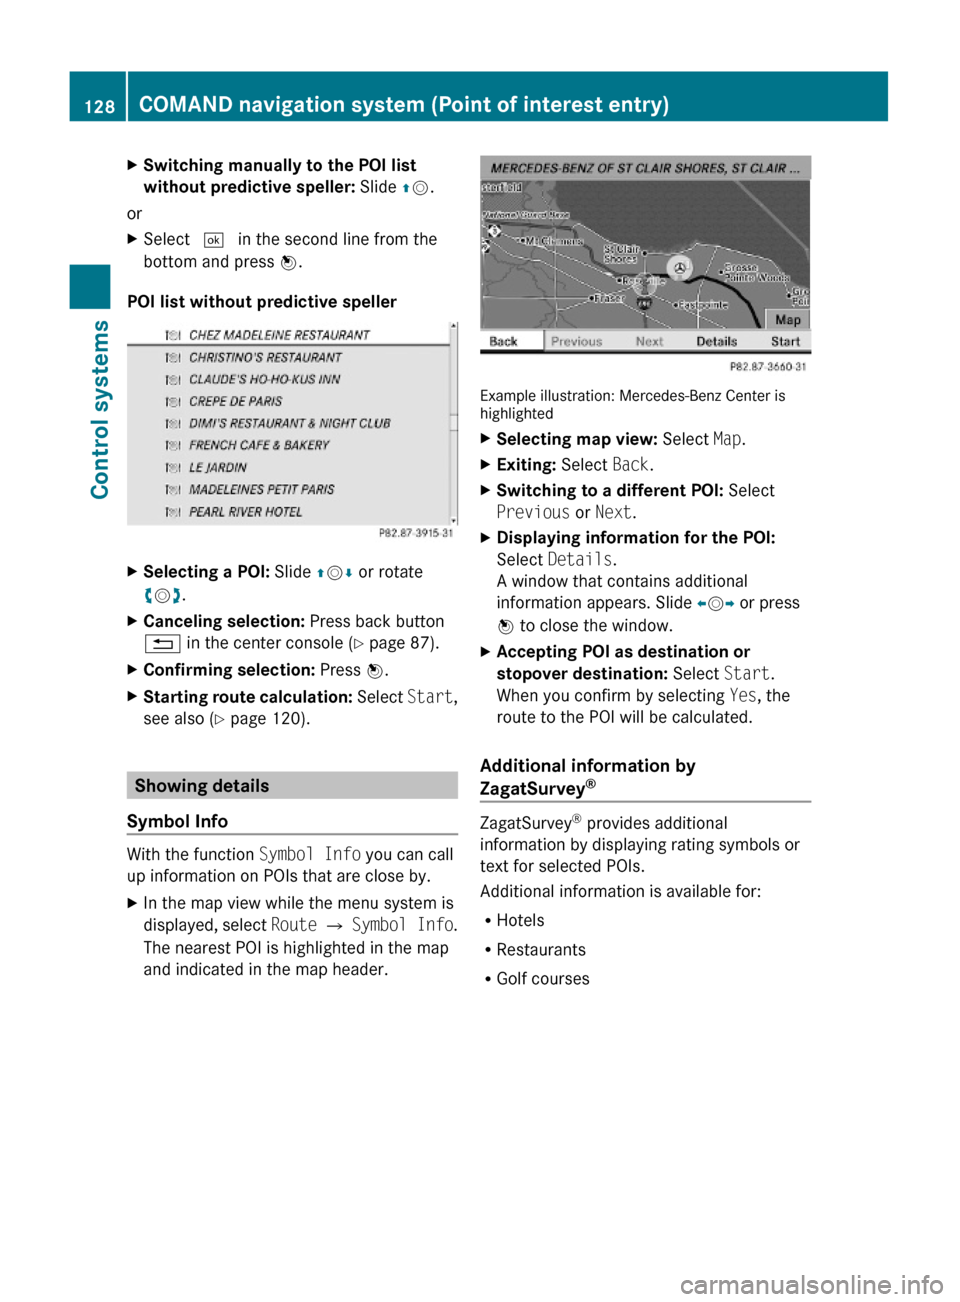
POI list without predictive speller
XSelecting a POI: Slide ZVÆ or rotate
cVd.
XCanceling selection: Press back button
% in the center console (Y page 87).
XConfirming selection: Press W.XStarting route calculation: Select Start,
see also (Y page 120).
Showing details
Symbol Info
With the function Symbol Info you can call
up information on POIs that are close by.
XIn the map view while the menu system is
displayed, select Route Q Symbol Info.
The nearest POI is highlighted in the map
and indicated in the map header.
Example illustration: Mercedes-Benz Center ishighlighted
XSelecting map view: Select Map.XExiting: Select Back.XSwitching to a different POI: Select
Previous or Next.
XDisplaying information for the POI:
Select Details.
A window that contains additional
information appears. Slide omp or press
n to close the window.
XAccepting POI as destination or
stopover destination: Select Start.
When you confirm by selecting Yes, the
route to the POI will be calculated.
Additional information by
ZagatSurvey®
ZagatSurvey® provides additional
information by displaying rating symbols or
text for selected POIs.
Additional information is available for:
RHotels
RRestaurants
RGolf courses
128COMAND navigation system (Point of interest entry)Control systems
221_AKB; 6; 20, en-USd2ugruen,Version: 2.11.8.12009-09-24T13:28:17+02:00 - Seite 128
Page 132 of 548
Examples of displays and
announcements for a driving
maneuver
Driving maneuvers have three phases:
RPreparation phase
RAnnouncement phase
RManeuver phase
Preparation phase
COMAND prepares you for the upcoming
driving maneuver. Based on the example
display below, the driving maneuver is
announced with the Prepare to turn
left message. The display is not split and
shows the map over the full screen.
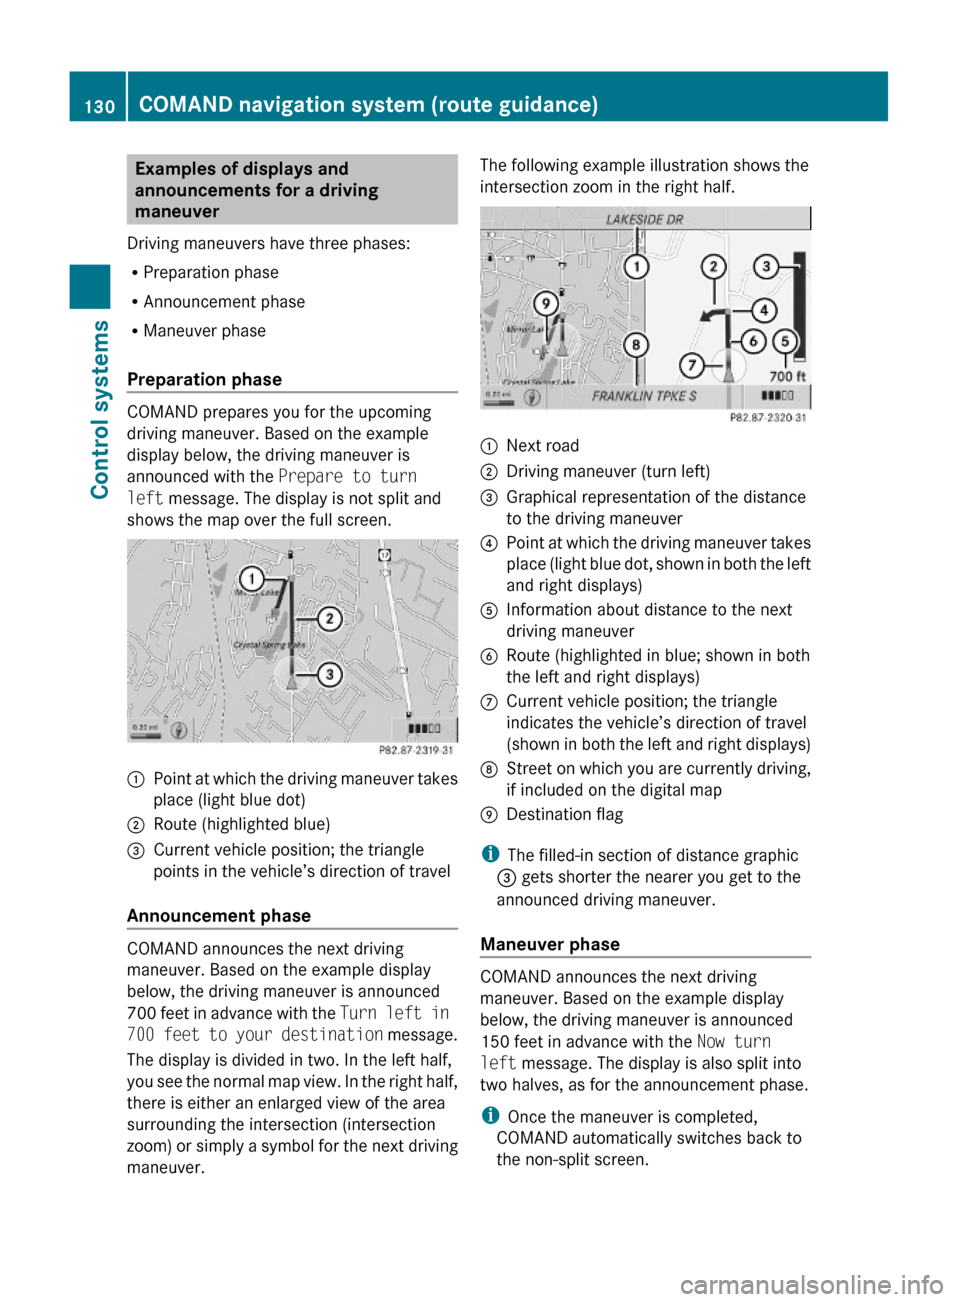
:Point at which the driving maneuver takes
place (light blue dot)
;Route (highlighted blue)=Current vehicle position; the triangle
points in the vehicle’s direction of travel
Announcement phase
COMAND announces the next driving
maneuver. Based on the example display
below, the driving maneuver is announced
700 feet in advance with the Turn left in
700 feet to your destination message.
The display is divided in two. In the left half,
you see the normal map view. In the right half,
there is either an enlarged view of the area
surrounding the intersection (intersection
zoom) or simply a symbol for the next driving
maneuver.
The following example illustration shows the
intersection zoom in the right half.:Next road;Driving maneuver (turn left)=Graphical representation of the distance
to the driving maneuver
?Point at which the driving maneuver takes
place (light blue dot, shown in both the left
and right displays)
AInformation about distance to the next
driving maneuver
BRoute (highlighted in blue; shown in both
the left and right displays)
CCurrent vehicle position; the triangle
indicates the vehicle’s direction of travel
(shown in both the left and right displays)
DStreet on which you are currently driving,
if included on the digital map
EDestination flag
iThe filled-in section of distance graphic
= gets shorter the nearer you get to the
announced driving maneuver.
Maneuver phase
COMAND announces the next driving
maneuver. Based on the example display
below, the driving maneuver is announced
150 feet in advance with the Now turn
left message. The display is also split into
two halves, as for the announcement phase.
iOnce the maneuver is completed,
COMAND automatically switches back to
the non-split screen.
130COMAND navigation system (route guidance)Control systems
221_AKB; 6; 20, en-USd2ugruen,Version: 2.11.8.12009-09-24T13:28:17+02:00 - Seite 130
Page 134 of 548
Day modeNight modeRecommended
lane E = deep blue
Recommended
lane E = light blue
Possible lane D =
light blue
Possible lane D =
deep blue
Lane not
recommended C: =
grey
Lane not
recommended C: =
grey
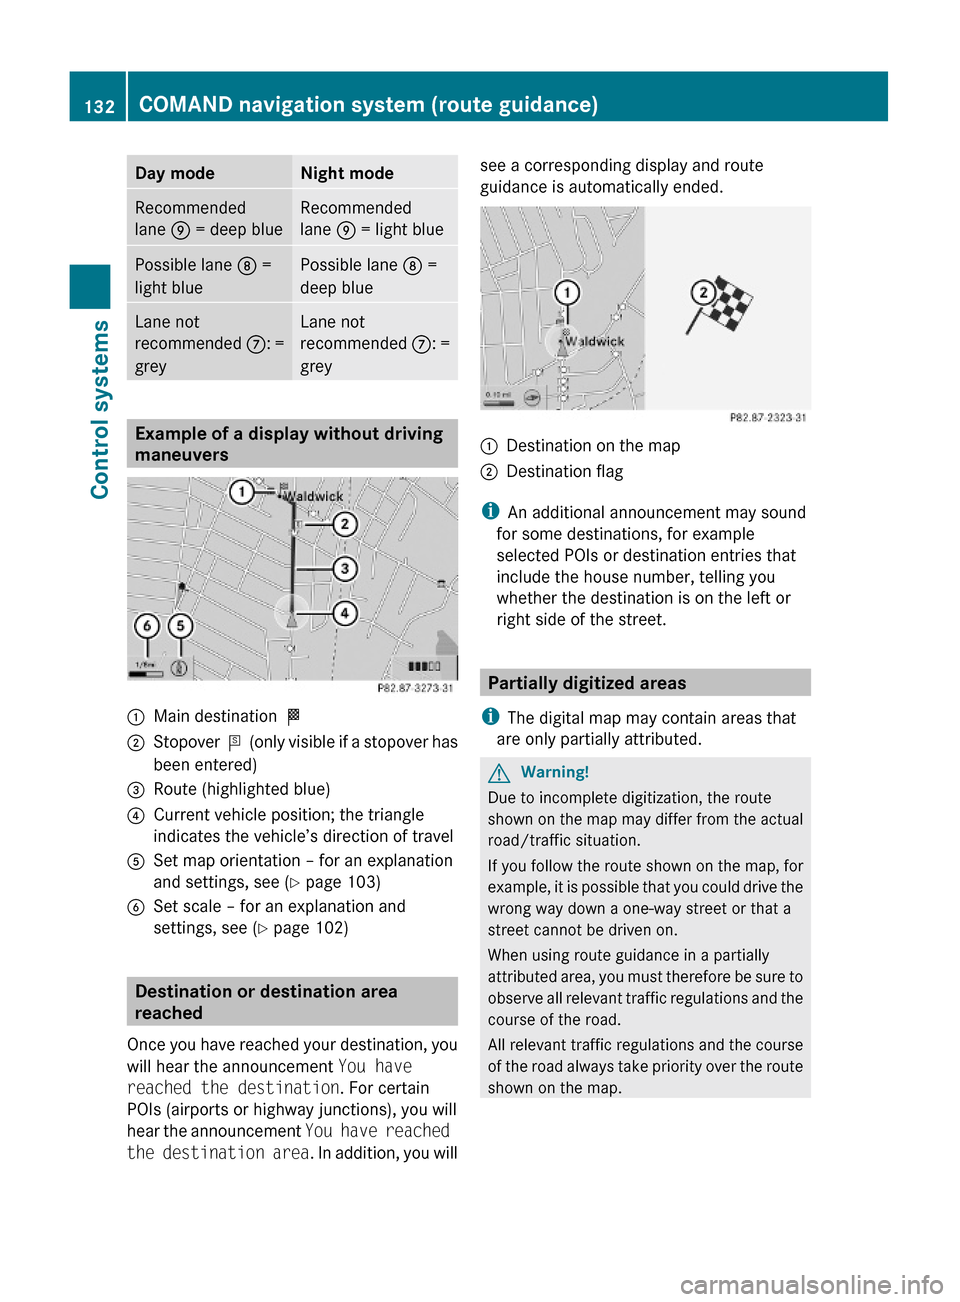
Example of a display without driving
maneuvers
:Main destination O;Stopover P (only visible if a stopover has
been entered)
=Route (highlighted blue)?Current vehicle position; the triangle
indicates the vehicle’s direction of travel
ASet map orientation – for an explanation
and settings, see (Y page 103)
BSet scale – for an explanation and
settings, see (Y page 102)
Destination or destination area
reached
Once you have reached your destination, you
will hear the announcement You have
reached the destination. For certain
POIs (airports or highway junctions), you will
hear the announcement You have reached
the destination area. In addition, you will
see a corresponding display and route
guidance is automatically ended.:Destination on the map;Destination flag
iAn additional announcement may sound
for some destinations, for example
selected POIs or destination entries that
include the house number, telling you
whether the destination is on the left or
right side of the street.
Partially digitized areas
iThe digital map may contain areas that
are only partially attributed.
GWarning!
Due to incomplete digitization, the route
shown on the map may differ from the actual
road/traffic situation.
If you follow the route shown on the map, for
example, it is possible that you could drive the
wrong way down a one-way street or that a
street cannot be driven on.
When using route guidance in a partially
attributed area, you must therefore be sure to
observe all relevant traffic regulations and the
course of the road.
All relevant traffic regulations and the course
of the road always take priority over the route
shown on the map.
132COMAND navigation system (route guidance)Control systems
221_AKB; 6; 20, en-USd2ugruen,Version: 2.11.8.12009-09-24T13:28:17+02:00 - Seite 132
Page 136 of 548
Off-road and off-map
Route guidance to an off-road
destination
GWarning!
The COMAND navigation system may direct
you to off-road routes that your vehicle may
not be capable of traversing through without
damaging your tires, wheels or vehicle. It is
the driver’s sole responsibility to determine
the suitability of the route. Off-road routes
may be of varying conditions and their
appropriateness for use may be affected by
various factors such as time of day, time of
year and immediate weather conditions that
cannot be judged or taken into consideration
by the COMAND system.
COMAND can guide you to destinations
within the area covered by the digital map,
even if a destination is not located at a road
known to the system.
These destinations are shown as off-road
destinations, which you can enter using the
map, for example. In these cases, COMAND
guides you for as long as possible with
navigation announcements and displays on
roads known to the system.
Shortly before you reach the last known the
point to leave the digitized road network, you
will hear the announcement The
destination is nearby. Follow the
arrow on the display.
You will then see an arrow that indicates the
direction to the off-road destination. When
the off-road destination is close to the road,
Area of dest. reached appears in addition
below the arrow.
The section of the route from the last known
point on the map to the off-road destination
is indicated with a dashed line after a certain
length. It simply shows the direction to the
off-road destination without taking account of
any type of obstacles in the way.
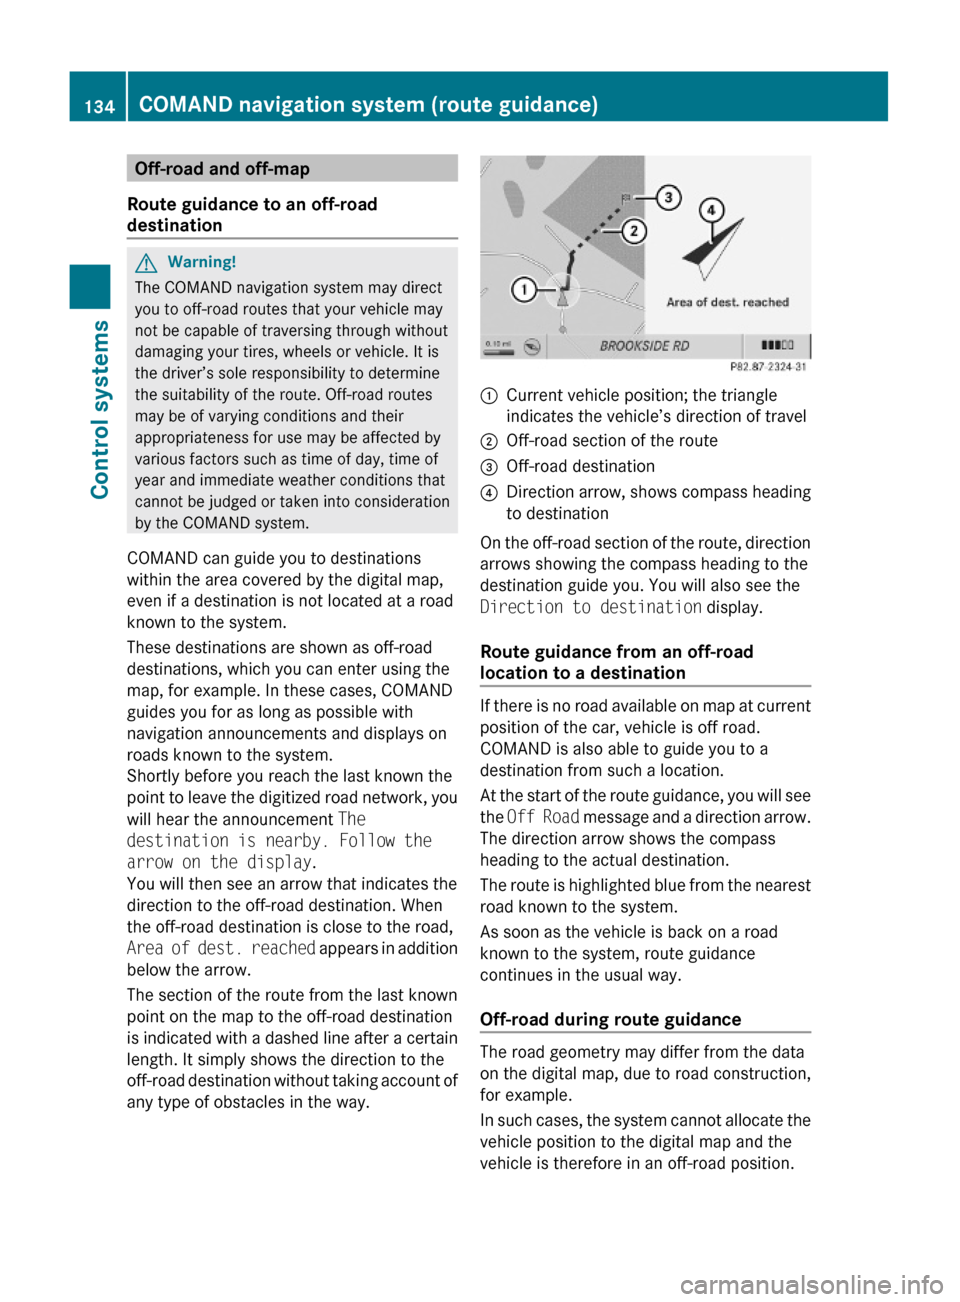
:Current vehicle position; the triangle
indicates the vehicle’s direction of travel
;Off-road section of the route=Off-road destination?Direction arrow, shows compass heading
to destination
On the off-road section of the route, direction
arrows showing the compass heading to the
destination guide you. You will also see the
Direction to destination display.
Route guidance from an off-road
location to a destination
If there is no road available on map at current
position of the car, vehicle is off road.
COMAND is also able to guide you to a
destination from such a location.
At the start of the route guidance, you will see
the Off Road message and a direction arrow.
The direction arrow shows the compass
heading to the actual destination.
The route is highlighted blue from the nearest
road known to the system.
As soon as the vehicle is back on a road
known to the system, route guidance
continues in the usual way.
Off-road during route guidance
The road geometry may differ from the data
on the digital map, due to road construction,
for example.
In such cases, the system cannot allocate the
vehicle position to the digital map and the
vehicle is therefore in an off-road position.
134COMAND navigation system (route guidance)Control systems
221_AKB; 6; 20, en-USd2ugruen,Version: 2.11.8.12009-09-24T13:28:17+02:00 - Seite 134
Page 138 of 548

Displaying infoXSelect Info in map view with the menu
system displayed (Y page 102).
The route information appears.
Example illustration: Display with main destinationand stopover
:Distance/estimated time of arrival/
estimated journey time to the stopover
destination
;Stopover destination P=Street, city and state/province?Main destination OADistance/estimated time of arrival/
estimated journey time to the main
destination
iCOMAND uses the time set in COMAND
as the basis for calculating the estimated
arrival time. The clock must be set correctly
in COMAND (Y page 92). The arrival time is
displayed in local vehicle time, based on
the time zone set in the vehicle.
The following data cannot be seen until the
route calculation has been completed:
RDistance to destination
REstimated arrival time
REstimated remaining travel time
If the destination is located within a
partially digitized area, the following data
may differ from the facts:
RDistance to destination
REstimated arrival time
REstimated remaining travel time
Displaying route information
XSelect Route Q Route Info in map view
with the menu system displayed
(Y page 102).
The route information appears.
:Information for highlighted portion of
route
;Highlighted portion of route=Next portion of routeXClosing route info: Select Back and press
W or press back button % in the center
console (Y page 87).
XDisplaying next or previous route
section: Select Next or Previous.
XZooming into or out of route: Select N
or M.
Where am I?
You can display your current position while
route guidance is active as well as when route
guidance has been canceled.
136COMAND navigation system (during route guidance)Control systems
221_AKB; 6; 20, en-USd2ugruen,Version: 2.11.8.12009-09-24T13:28:17+02:00 - Seite 136
Page 140 of 548

:Blocked route section;Current vehicle position; the triangle
indicates the vehicle’s direction of travel
=Information about the blocked route
section
iBlocked route section : is always
highlighted in red/white. The information
about blocked route section = shows
which section of the route is blocked and
the length of the blocked section.
XStarting route calculation: Select Start,
see also (Y page 120).
XDeleting blockage: Select Navi Q
Route Q Detour Q Delete.
Alternative Route
You can calculate and display alternative
routes in addition to the route that COMAND
displays automatically. The original route is
displayed in light blue while the alternative
route is dark blue.
XWith the menu system displayed
(Y page 102), select Route Q
Alternative Route.
:Route distance, time, and time of arrival
for the currently selected alternative
route marked in deep blue
;On the Route: Symbols indicate special
parts, such as tunnels, ferries or toll
roads, on the displayed alternative route.
=Mode: Current settings for the displayed
alternative route
Avoid: Symbols of route parts to avoid,
for example tunnels, ferries or toll roads
XDisplaying/selecting other alternative
routes: Select Previous or Next.
XAccepting the currently selected, deep
blue route for route guidance: Select
Start.
COMAND navigation system (real-
time traffic)
Traffic messages
iA subscription to SIRIUS XM Satellite
Radio service provider is required for the
satellite radio reception referred to here.
You can find more information on satellite
radio in chapter “Satellite Radio”
(Y page 170).
COMAND can receive and incorporate traffic
messages via satellite radio into the
navigation system. Traffic report messages
and map symbols can then be viewed in the
COMAND display.
138COMAND navigation system (real-time traffic)Control systems
221_AKB; 6; 20, en-USd2ugruen,Version: 2.11.8.12009-09-24T13:28:17+02:00 - Seite 138
Page 145 of 548
XBack to list: Select Back.XDisplaying previous or next traffic
message: Select Previous or Next.
XDisplaying details for selected traffic
message: Select Details.
XSwitching to map view: Select Map.
COMAND navigation system
(destination memory)
My address
iThe destination memory always contains
an entry called My Address. You can save
your home address, for example, under this
entry.
Assigning your address for the first
time or changing your own address
Assigning and/or changing your own
address
XSelect Navi Q Destination Q From
Memory.
Depending on the number of entries in the
destination memory, you will see the
destination memory list with or without
predictive speller.
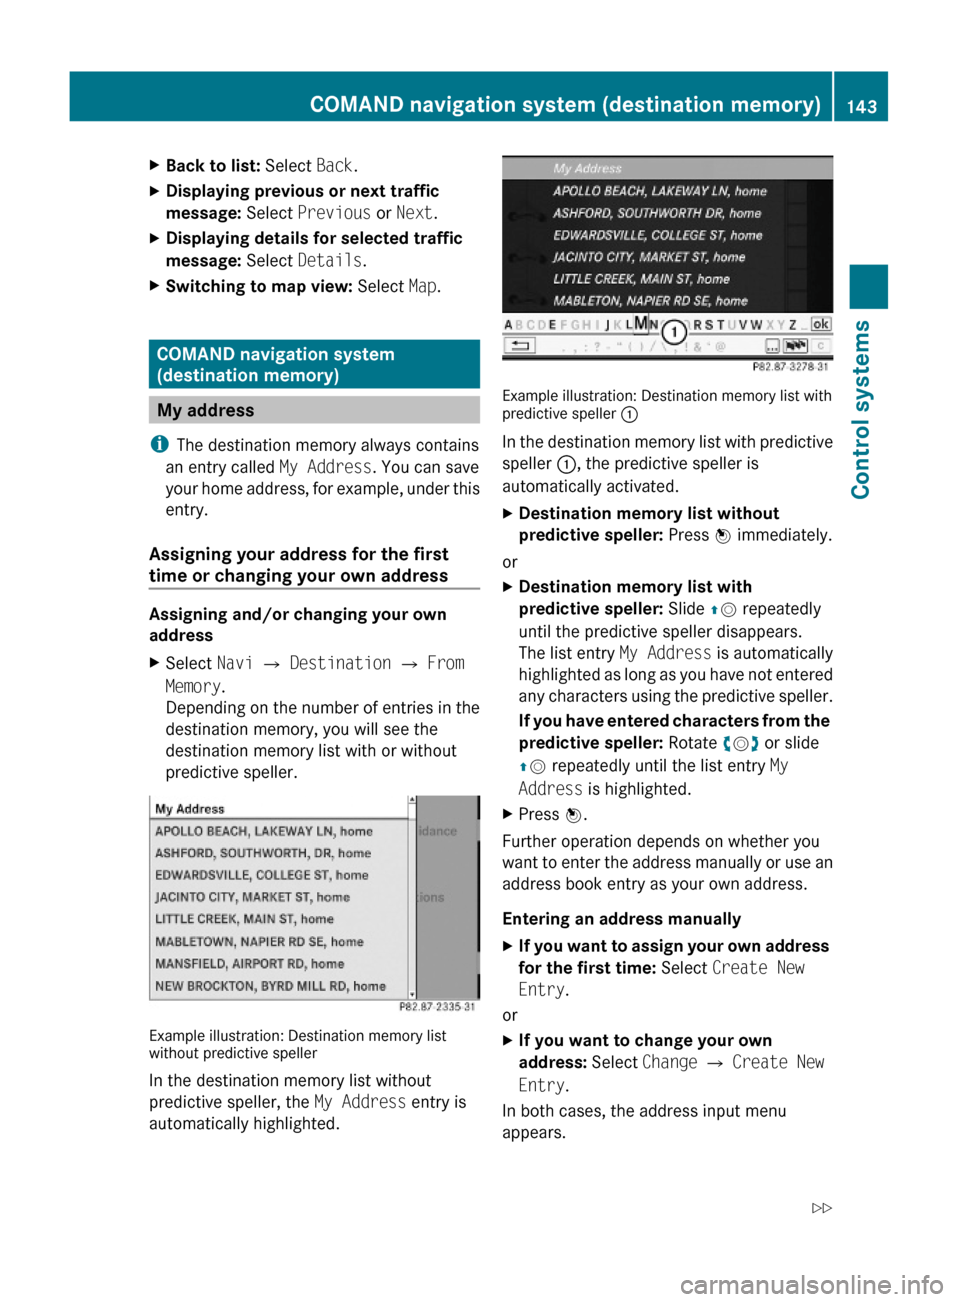
Example illustration: Destination memory listwithout predictive speller
In the destination memory list without
predictive speller, the My Address entry is
automatically highlighted.
Example illustration: Destination memory list withpredictive speller :
In the destination memory list with predictive
speller :, the predictive speller is
automatically activated.
XDestination memory list without
predictive speller: Press W immediately.
or
XDestination memory list with
predictive speller: Slide ZV repeatedly
until the predictive speller disappears.
The list entry My Address is automatically
highlighted as long as you have not entered
any characters using the predictive speller.
If you have entered characters from the
predictive speller: Rotate cVd or slide
ZV repeatedly until the list entry My
Address is highlighted.
XPress W.
Further operation depends on whether you
want to enter the address manually or use an
address book entry as your own address.
Entering an address manually
XIf you want to assign your own address
for the first time: Select Create New
Entry.
or
XIf you want to change your own
address: Select Change Q Create New
Entry.
In both cases, the address input menu
appears.
COMAND navigation system (destination memory)143Control systems221_AKB; 6; 20, en-USd2ugruen,Version: 2.11.8.12009-09-24T13:28:17+02:00 - Seite 143Z
Page 147 of 548
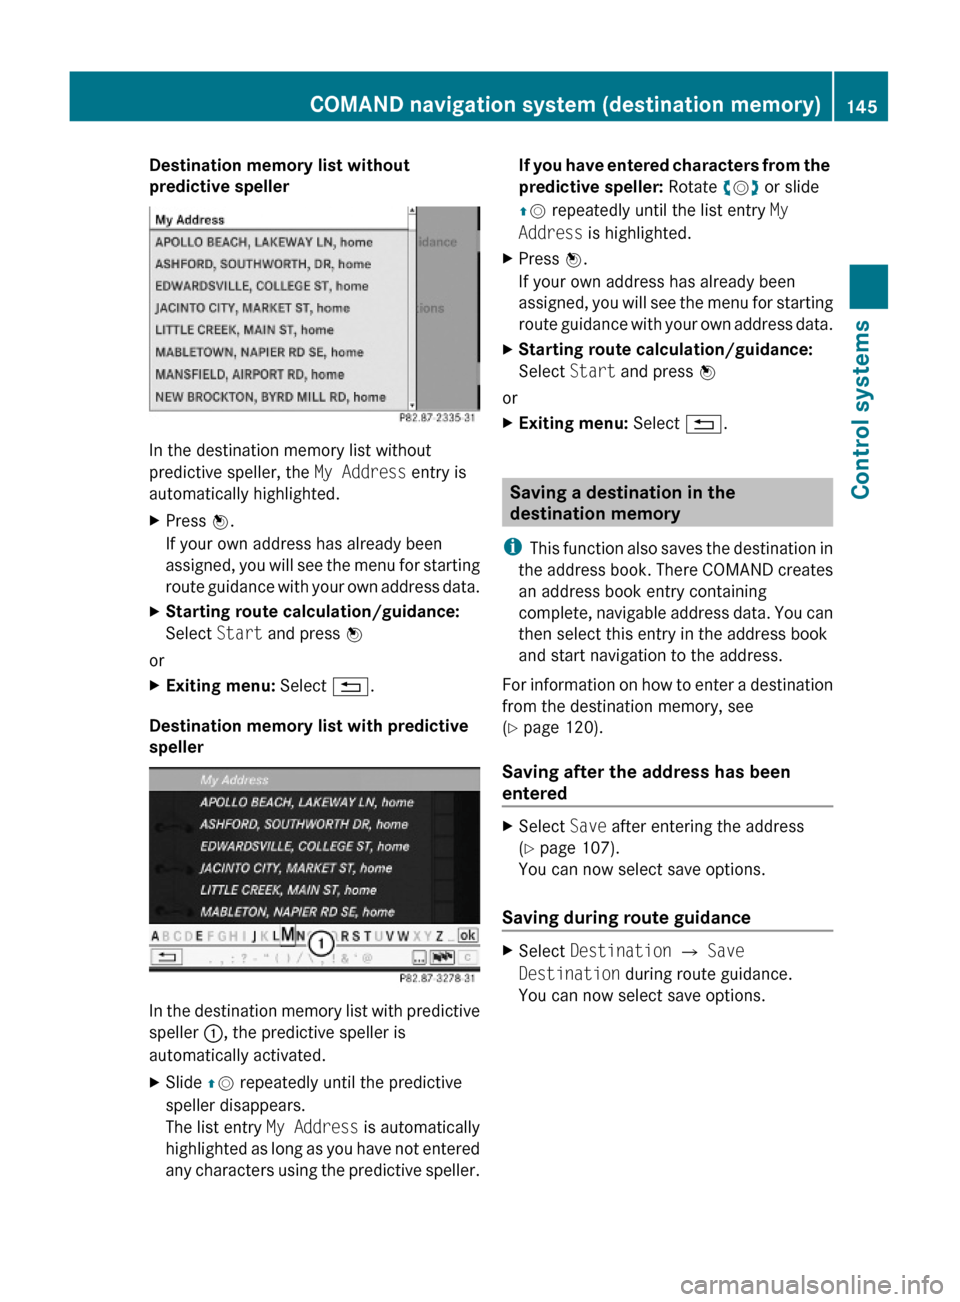
Destination memory list without
predictive speller
In the destination memory list without
predictive speller, the My Address entry is
automatically highlighted.
XPress W.
If your own address has already been
assigned, you will see the menu for starting
route guidance with your own address data.
XStarting route calculation/guidance:
Select Start and press W
or
XExiting menu: Select %.
Destination memory list with predictive
speller
In the destination memory list with predictive
speller :, the predictive speller is
automatically activated.
XSlide ZV repeatedly until the predictive
speller disappears.
The list entry My Address is automatically
highlighted as long as you have not entered
any characters using the predictive speller.
If you have entered characters from the
predictive speller: Rotate cVd or slide
ZV repeatedly until the list entry My
Address is highlighted.
XPress W.
If your own address has already been
assigned, you will see the menu for starting
route guidance with your own address data.
XStarting route calculation/guidance:
Select Start and press W
or
XExiting menu: Select %.
Saving a destination in the
destination memory
iThis function also saves the destination in
the address book. There COMAND creates
an address book entry containing
complete, navigable address data. You can
then select this entry in the address book
and start navigation to the address.
For information on how to enter a destination
from the destination memory, see
(Y page 120).
Saving after the address has been
entered
XSelect Save after entering the address
(Y page 107).
You can now select save options.
Saving during route guidance
XSelect Destination Q Save
Destination during route guidance.
You can now select save options.
COMAND navigation system (destination memory)145Control systems221_AKB; 6; 20, en-USd2ugruen,Version: 2.11.8.12009-09-24T13:28:17+02:00 - Seite 145Z