2010 MERCEDES-BENZ S600 light
[x] Cancel search: lightPage 80 of 548

Function?T Seat menu button
(Y page 216)
AS Shortcut button for:
RTelephone (Y page 148)
RNavigation (Y page 95)
Bu COMAND on/off button
(Y page 77)
CH Volume control (Y page 88)Dh Favorite button (Y page 94)
COMAND display
In the COMAND display, you will find the
function currently selected and the
corresponding menus. The COMAND display
is divided into several areas.
:Status line;Main functions=Main area?SubmenusAClimate control settings
The currently selected main function is
highlighted.
Once you have selected a main function, main
area = is active.
iThe layout of the menus may vary
depending on your vehicle’s equipment.
This manual shows the menus for a fully
equipped vehicle.
Adjusting COMAND display illuminationXIncreasing the illumination: Turn
knob : clockwise.
XDimming the illumination: Turn knob :
counterclockwise.
Swiveling COMAND display
iThis function is not available in vehicles
with SPLITVIEW.
With button : or ; you can swivel the
COMAND display to the left or right.
Instrument cluster multifunction
display
This section describes features and controls
via the COMAND controller, display and
shortcut buttons only.
Related COMAND features are described in
the “Instrument cluster control system”
section (Y page 220). It contains function
descriptions and operation of the instrument
cluster multifunction display and the
multifunction steering wheel buttons.
78COMAND introductionControl systems
221_AKB; 6; 20, en-USd2ugruen,Version: 2.11.8.12009-09-24T13:28:17+02:00 - Seite 78
Page 83 of 548
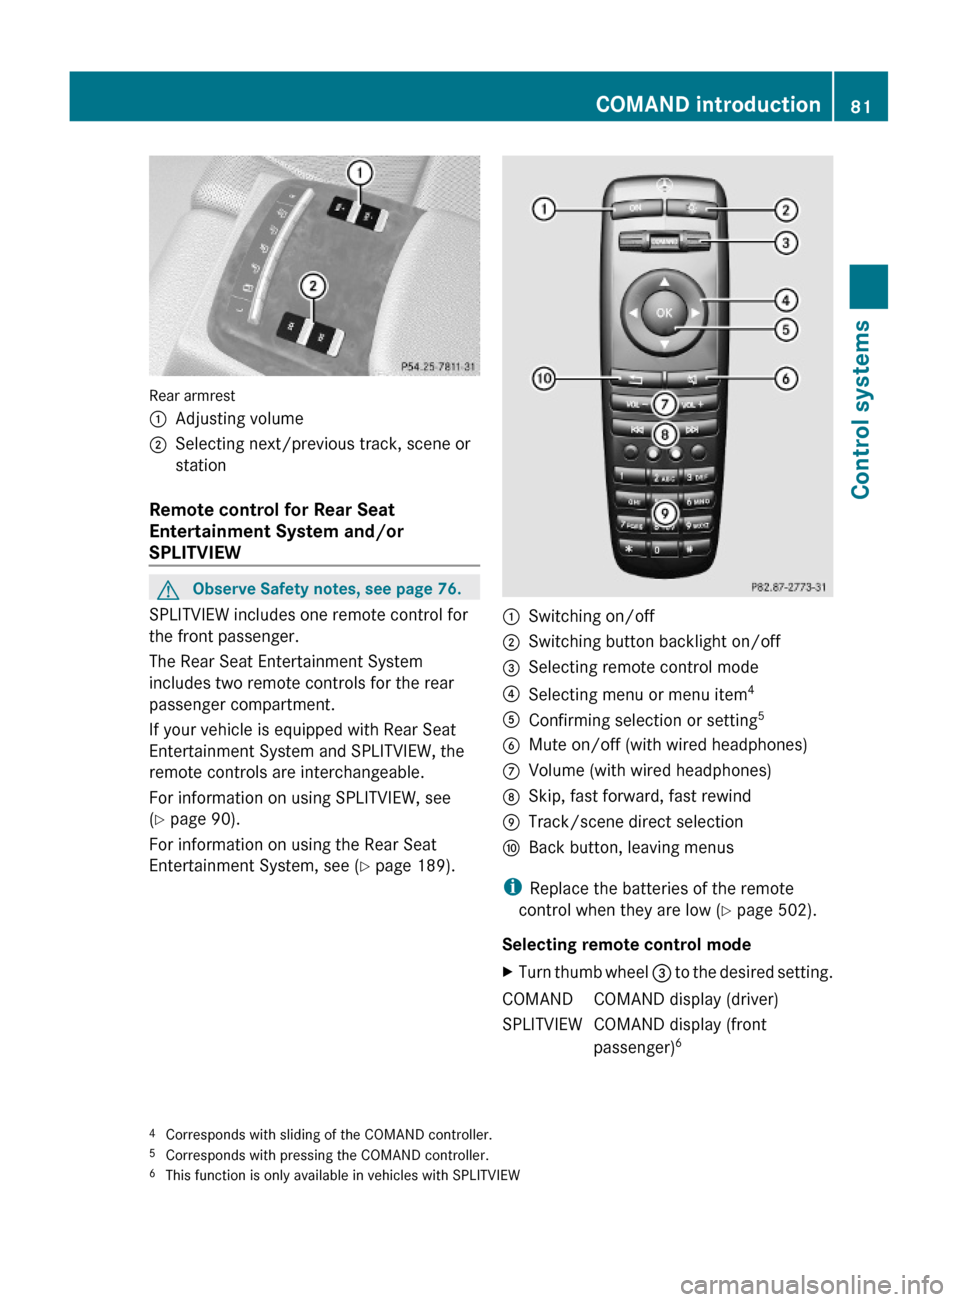
Rear armrest
:Adjusting volume;Selecting next/previous track, scene or
station
Remote control for Rear Seat
Entertainment System and/or
SPLITVIEW
GObserve Safety notes, see page 76.
SPLITVIEW includes one remote control for
the front passenger.
The Rear Seat Entertainment System
includes two remote controls for the rear
passenger compartment.
If your vehicle is equipped with Rear Seat
Entertainment System and SPLITVIEW, the
remote controls are interchangeable.
For information on using SPLITVIEW, see
(Y page 90).
For information on using the Rear Seat
Entertainment System, see (Y page 189).
:Switching on/off;Switching button backlight on/off=Selecting remote control mode?Selecting menu or menu item4AConfirming selection or setting5BMute on/off (with wired headphones)CVolume (with wired headphones)DSkip, fast forward, fast rewindETrack/scene direct selectionFBack button, leaving menus
iReplace the batteries of the remote
control when they are low (Y page 502).
Selecting remote control mode
XTurn thumb wheel = to the desired setting.COMANDCOMAND display (driver)SPLITVIEWCOMAND display (front
passenger)64Corresponds with sliding of the COMAND controller.5Corresponds with pressing the COMAND controller.6This function is only available in vehicles with SPLITVIEW
COMAND introduction81Control systems221_AKB; 6; 20, en-USd2ugruen,Version: 2.11.8.12009-09-24T13:28:17+02:00 - Seite 81Z
Page 84 of 548
REAR LLeft screen7REAR RRight screen 7
i
In position COMAND, you can operate
various COMAND functions via remote
control buttons ? and A.
Switching SPLITVIEW or rear screens on/
off
i When the SmartKey is in starter switch
position 0 or 1 or removed from the starter
switch, the rear screens switch off after 30
minutes automatically. A corresponding
message appears on the screens prior to
switching off.
You can switch the screens back on. Keep
in mind however that this will drain the
vehicle battery.
XSwitching on with the COMAND system
already on: Aim the remote control on the
screen.XPress button :.XSwitching off: Aim the remote control on
the screen.XPress button :.
Switching button backlight on/off
XPress button ;.
i
When you do not use the remote control
for approximately 15 seconds, the button
backlight switches off automatically.
Mute on/off (for wired headphones or
COMAND)
XPress button B.Selecting menu or menu item and
confirming selectionXSelecting menu or menu item: Press
arrow buttons ?.XConfirming selection: Press button A.
Headphone
GWarning!
The driver should not wear a headphone while
operating the vehicle under any
circumstances. The use of a headphone while
driving the vehicle could drastically impair the
ability to react to audible traffic conditions
(e.g. emergency sirens from police/fire/
ambulance, another car’s horn, etc.).
GWarning!
When not in use, headphones or external
video sources should be stored in a safe
location (e.g. one of the vehicle’s storage
compartments) so that they are not loose
within the passenger compartment during
braking, vehicle maneuvers or a traffic
accident. Objects moving within the
passenger compartment could cause serious
personal injury to vehicle occupants.
GWarning!
Due to a potential choking hazard, wired
headphone usage by children should only
occur with adult supervision.
For information on using SPLITVIEW, see
( Y page 90).
For information on using the Rear Seat
Entertainment System, see ( Y page 189).
7
This function is only available in vehicles with Rear Seat Entertainment System82COMAND introductionControl systems
221_AKB; 6; 20, en-USd2ugruen,Version: 2.11.8.12009-09-24T13:28:17+02:00 - Seite 82
Page 87 of 548

NaviAudioTelephoneVideoVehicleModeFM/AM RadioVideo DVDMulti-function
Contour Seat
Settings/
Lumbar Settings
Map OrientationSat. RadioAUXRear Window
Sunshade
POI Symbols On MapDiscVideo OFFEasy Entry/ExitTraffic Symbols on
Map
Memory CardExterior Lighting
Delayed Shut-off
Text Information on
Map
Music RegisterInterior Lighting
Delayed Shut-off
ªTopographical
Map
Media InterfaceAmbient LightingªCity (3D)USBªAutomatic
Mirror Folding
ªHighway
Information
RearªLocator
Lighting
ªAudio FadeoutAUXªAutomatic
Locking
SIRIUS ServiceAudio OFFªTrunk
Opening-height
Restriction
Map VersionCalling up the main menu
Example illustration: Audio main menu
You can call up the main menu of a main
function in the following manner:
XMoving to the main function line: Slide
ZV.
XSelecting a main function: Slide XVY or
rotate cVd.
XConfirming selection: Press W.
iWhen a main function (e.g. Navi) is open
and you want to open the menu of the
Audio function for example, the main
function Audio must be selected twice.
Upon selecting the first time, the COMAND
system selects the main function Audio.
COMAND introduction85Control systems221_AKB; 6; 20, en-USd2ugruen,Version: 2.11.8.12009-09-24T13:28:17+02:00 - Seite 85Z
Page 94 of 548

RBluetooth Q Search for Bluetooth
Devices, Bluetooth activated. For
information on the Bluetooth® interface
see (Y page 151).
RUpload/Download Data Q Copy Data
to Storage Medium, Import Data from
Storage Medium (Y page 95)
RReset: Resetting the COMAND system to
factory settings
Display settings
Switching the display on or off
XSwitching off: Select Vehicle Q
Display OFF.
XSwitching back on: Rotate cVd or slide
ZVÆ, XVY or press W.
or
XPress button u.
Setting the display design
XSelect Vehicle Q System Q Display.XSelect Day Mode, Night Mode or
Automatic.
iIn the Automatic setting, COMAND sets
the display design automatically. The
setting depends on the information
retrieved from the vehicle's light sensor.
Time settings
The time of day is set automatically according
to the GPS signal and the selected time zone.
All time information always applies to the
local time at the current vehicle position.
Time information changes when entering a
different time zone.
iThe correct time zone, daylight savings
time/standard time and the time itself
must be set for the following navigation
system functions to operate correctly:
RRoute guidance on routes with time-
dependent traffic guidance
RCalculation of estimated arrival time
The settings are adopted for the analog
clock in the dashboard.
Change the settings in the following order:
1. Time zone
2. Daylight savings time/standard time
3. Time lag (only necessary in exceptional
cases)
Setting the time zone and switching
between daylight savings time and
standard time
XSetting time zone: Select Vehicle Q
System Q Time Q Time Zone.
The country list appears. The dot # in front
of a list entry indicates the current setting.
XSelect the country in which you are.
A time zone list may also be displayed,
depending on the selected country.
XSelect the desired time zone.
Subsequent operation depends on
Rwhether your navigation system has GPS
reception
Rwhich country you have set previously
You may either switch between Daylight
Savings Time (Summer) and Standard
Time.
92COMAND system settings Control systems
221_AKB; 6; 20, en-USd2ugruen,Version: 2.11.8.12009-09-24T13:28:17+02:00 - Seite 92
Page 95 of 548
XSelect Daylight Savings Time
(Summer) or Standard Time .
The dot # in front of a list entry indicates
the current setting.XSaving setting and exit the menu: Slide
X V Y.
Adjusting time lags
i
In some exceptional cases, e.g. where
time zones border, the displayed time and
the local time may show a time lag.
This time lag can be adjusted in steps of 30
minutes.
XSelect Vehicle Q System Q Time Q
Time .XSelecting hour or minutes: Slide XV Y.XSetting value: Rotate cV d or slide ZV Æ.XSaving setting: Press W.
Setting the date
XSelect Vehicle Q System Q Time Q
Date .XSelecting month, day, or year: Slide
X V Y.XSetting value: Rotate cV d or slide ZV Æ.XSaving setting: Press W.
i
Setting the date is only necessary or even
possible if the COMAND system does not
receive a GPS signal.
Setting the time/date format
XSelect Vehicle Q System Q Time Q
Format .
The format list appears. The dots # in
front of the list entries indicate the current
setting.XChanging format setting: Select desired
format.XSaving setting and exit the menu: Slide
X V Y.Voice Control System settings
Switching help window on or offXSelect Vehicle Q System Q Voice
Control .XSelect Help Window .
A checkmark appears when the help
window is switched on.
Individualization
Using individualization, you can fine-tune the
Voice Control System to your own voice and
thus improve voice recognition. The ability of
the system to recognize the commands of
other users does not deteriorate as a result.
Individualization consists of two parts. You
train the system to recognize digits in the first
part and specific commands in the second
part.
Starting new individualization
i The vehicle must be stationary to start
individualization. After starting the session,
acoustic instructions will guide you through
the individualization.
XSelect Vehicle Q System Q Voice
Control Q Start New
Individualization .
A prompt appears asking whether you
would like further information.XSelect Yes or No.
If you select No, the first part of
individualization begins.
If you select Yes, an information display will
be shown with audio instruction.XClosing display: Select OK.
The first part of individualization begins.
At the end of the first part, you will see a
prompt asking whether you want to begin
the second part.XSelect Yes or No.
If you select No, individualization will be
canceled. The data from the first part is
saved automatically.COMAND system settings 93Control systems221_AKB; 6; 20, en-USd2ugruen,Version: 2.11.8.12009-09-24T13:28:17+02:00 - Seite 93Z
Page 97 of 548
Upload/Download of Data
This function lets you transfer COMAND data
to a memory card or a USB storage device and
vice versa.
The following COMAND data can be
transferred:
R Navigation destination memory and last
destination
R Address book entries
R Audio/Video presets memory
R System settings
i You can use this function, for example, to
save your COMAND data and transfer them
to another vehicle.XInsert an SD card into the SD card slot
( Y page 180) or connect a USB storage
device to the built-in USB socket in the
glove box (Y page 80). The USB jack of the
optional media interface is not intended for
this purpose.XSelect Vehicle Q System Q Upload/
Download Data .XDownload: Select Copy Data to
Storage Medium Q On the Memory
Card or On USB .XSelect Start Copying .XUpload: Select Import Data from
Storage Medium Q From Memory Card
or From USB .XSelect Start Data Import .XExiting menu without data transfer:
Select Back.
Reset
i You can reset COMAND back to its
factory settings.
Among other things, all personal data are
deleted, for example
R the address book entries
R the entries in the destination memory
R the list of last destinations of the
navigation systemXSelect Vehicle Q System Q Reset .
A prompt appears asking whether you
really want to reset.XSelect Yes or No.
If you select Yes another prompt will
appear asking whether you really want to
reset.XSelect Yes or No.
If you select Yes, COMAND will be reset
and restarted.
COMAND navigation (introduction)
Safety notes
GWarning!
For safety reasons, only enter a destination
when the vehicle is stationary. When the
vehicle is in motion, a passenger should enter
the destination. Study manual and select
route before driving.
Bear in mind that at a speed of just 30 mph
(approximately 50 km/h), your vehicle is
covering a distance of 44 feet (approximately
14 m) every second.
COMAND calculates the route to the
destination without taking account of the
following, for example:
R Traffic lights
R Stop and right-of-way signs
R Parking or stopping in prohibited areas
R Lane merging
R Other road and traffic rules and regulations
R Narrow bridges
COMAND navigation (introduction)95Control systems221_AKB; 6; 20, en-USd2ugruen,Version: 2.11.8.12009-09-24T13:28:17+02:00 - Seite 95Z
Page 125 of 548
RRestaurant
R Other
With the option Other you can enter stopover
destinations from the destination memory,
last selected destinations, POIs, or via the
address ( Y page 123).
You can enter stopover destinations on the
route or in the vicinity of the route.
You can use the stopover function to
influence the route guidance calculation to
the main destination. When you have reached
your stopover, COMAND automatically
calculates the route to the main destination.
Entering predefined destinationsXSelect Navi Q Destination Q
Stopover .
If a stopover has already been entered, you
can change it.
Changing: Select Change Stopover .
You can now select a category.XSelecting a category: Select category,
e.g. Gas station .
COMAND first looks for destinations along
the vehicle’s route and within the immediate
vicinity of the vehicle. If there are no
destinations available there, COMAND
searches for destinations in an area around
the vehicle position.
If COMAND does not find any destinations,
you will see a message to this effect.
XSelect OK.
You can now select a different category.
If COMAND finds destinations, you will see a
list of the destinations and details of how far
away they are in the right-hand side of the
display. The information about how far away
the destinations are can take a few seconds
to be displayed.
The left-hand part of the display shows the
destinations on the map. The destination
marked in the list is highlighted in the map.
XSelecting a destination: Select the
desired destination from list.
The address of the destination appears.XStarting route calculation: Select Start,
see also ( Y page 120).
Entering another destination as a
stopover
XSelect Navi Q Destination Q
Stopover .XEntering: Select Other.
You can select between the following menu
items:
R Address Entry
R From Memory
R From Last Destinations
R From POIsXSelect a menu item.
Subsequent destination entries may differ,
depending on your selection:
R Address Entry selection:
XEnter a destination by address
( Y page 107).
R
From Memory selection:
XEnter a destination from the
destination memory ( Y page 120).
R
From Last Destinations selection:
XEnter a destination from the list of last
destinations ( Y page 122).
R
From POIs selection:
XEnter a point of interest (POI)
( Y page 124).XStarting route calculation: After entering
a destination, select Start (Y page 120).
Changing a stopover
If a stopover has already been entered, you
can change it.
COMAND navigation system (entering a destination)123Control systems221_AKB; 6; 20, en-USd2ugruen,Version: 2.11.8.12009-09-24T13:28:17+02:00 - Seite 123Z