2010 MERCEDES-BENZ S600 roof
[x] Cancel search: roofPage 378 of 548
required direction of arrow :, ; or =
until the front roller sunblind has reached
its desired position.
XExpress operation: Move the roof panel
switch past the resistance point in
direction of arrow :, ; or = and release.
The front roller sunblind retracts/extends
completely.
XStopping during express operation:
Move the roof panel switch in any direction.
Operating rear roller sunblind from
front
GWarning!
When extending the rear roller sunblind, make
sure no one is in danger of being injured by
the extending procedure.
The rear roller sunblind is equipped with the
express operation and automatic reversal
function. If the movement of the rear roller
sunblind is blocked during the extending
procedure, the rear roller sunblind will stop
and retract slightly.
The extending of the rear roller sunblind can
be immediately halted by pressing the
sunblind switch again.
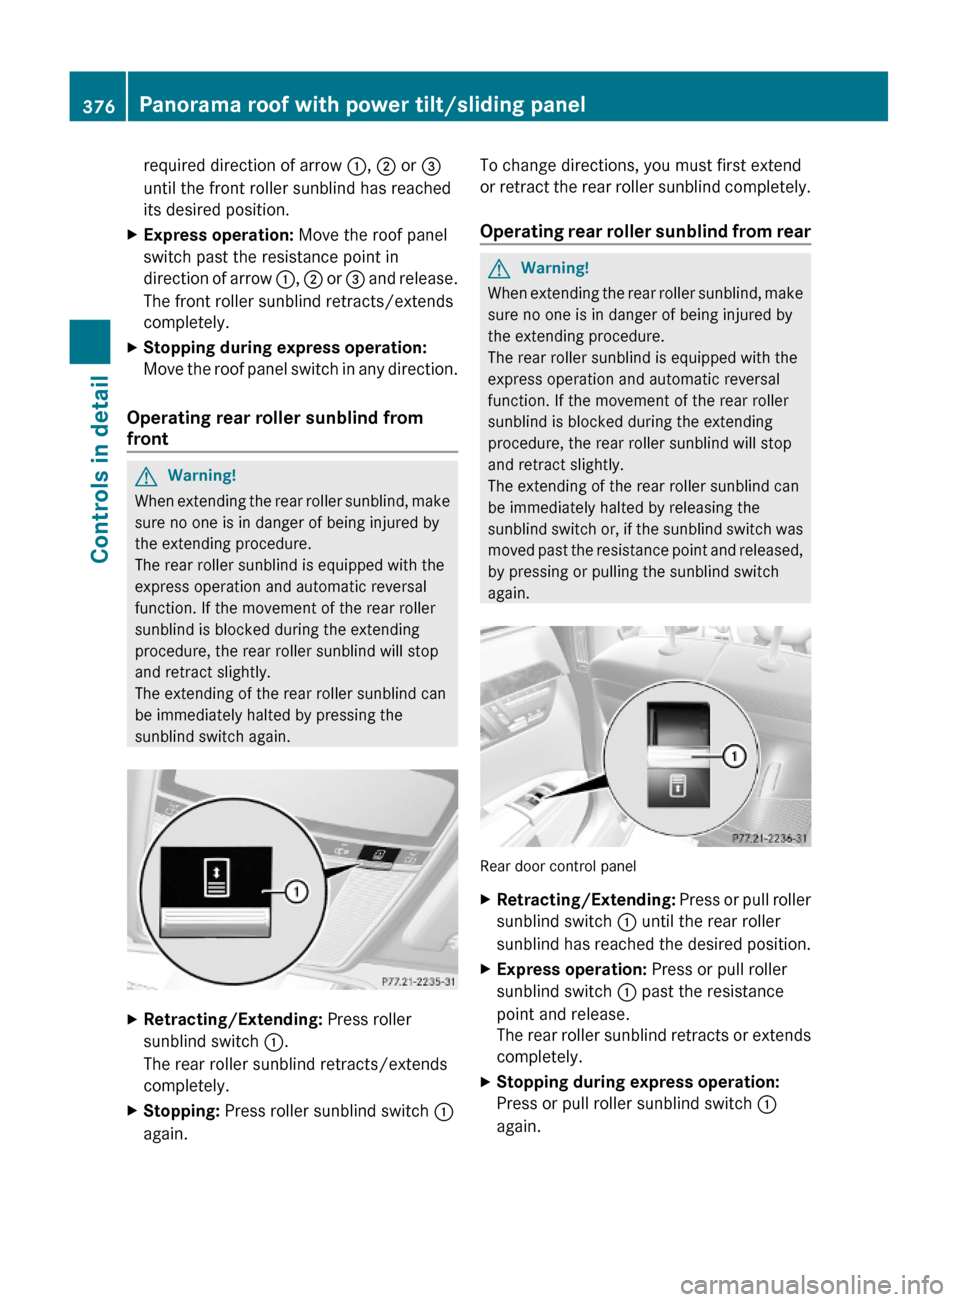
XRetracting/Extending: Press roller
sunblind switch :.
The rear roller sunblind retracts/extends
completely.
XStopping: Press roller sunblind switch :
again.
To change directions, you must first extend
or retract the rear roller sunblind completely.
Operating rear roller sunblind from rear
GWarning!
When extending the rear roller sunblind, make
sure no one is in danger of being injured by
the extending procedure.
The rear roller sunblind is equipped with the
express operation and automatic reversal
function. If the movement of the rear roller
sunblind is blocked during the extending
procedure, the rear roller sunblind will stop
and retract slightly.
The extending of the rear roller sunblind can
be immediately halted by releasing the
sunblind switch or, if the sunblind switch was
moved past the resistance point and released,
by pressing or pulling the sunblind switch
again.
Rear door control panel
XRetracting/Extending: Press or pull roller
sunblind switch : until the rear roller
sunblind has reached the desired position.
XExpress operation: Press or pull roller
sunblind switch : past the resistance
point and release.
The rear roller sunblind retracts or extends
completely.
XStopping during express operation:
Press or pull roller sunblind switch :
again.
376Panorama roof with power tilt/sliding panelControls in detail
221_AKB; 6; 20, en-USd2ugruen,Version: 2.11.8.12009-09-24T13:28:17+02:00 - Seite 376
Page 379 of 548
Opening and closing the panorama
roof with power tilt/sliding panel
GObserve Safety notes, see page 56.GWarning!
When opening or closing the tilt/sliding panel,
make sure there is no danger of anyone being
harmed by the opening/closing procedure.
The tilt/sliding panel is equipped with the
express operation and automatic reversal
function. If the movement of the tilt/sliding
panel is blocked during the closing procedure,
the tilt/sliding panel will stop and open
slightly.
The tilt/sliding panel operates differently
when the roof panel switch is pressed and
held. See the “Closing when the tilt/sliding
panel is blocked” section in this chapter for
details.
The opening/closing procedure of the tilt/
sliding panel can be immediately halted by
releasing the roof panel switch or, if the roof
panel switch was moved past the resistance
point and released, by moving the roof panel
switch in any direction.
GWarning!
The panorama roof with tilt/sliding panel is
made out of glass. In the event of an accident,
the glass may shatter. This may result in an
opening in the roof.
In a vehicle rollover, occupants not wearing
their seat belts or not wearing them properly
may be thrown out of the opening. Such an
opening also presents a potential for injury for
occupants wearing their seat belts properly as
entire body parts or portions of them may
protrude from the passenger compartment.
! To avoid damaging the seals, do not
transport any objects with sharp edges
which can stick out of the tilt/sliding panel.
Do not open the tilt/sliding panel if there is
snow or ice on the roof, as this could result
in malfunctions.
! Please keep in mind that weather
conditions can sometimes change rapidly.
Make sure to close the tilt/sliding panel
when leaving the vehicle. If water enters
the vehicle interior, vehicle electronics
could be damaged which is not covered by
the Mercedes-Benz Limited Warranty.
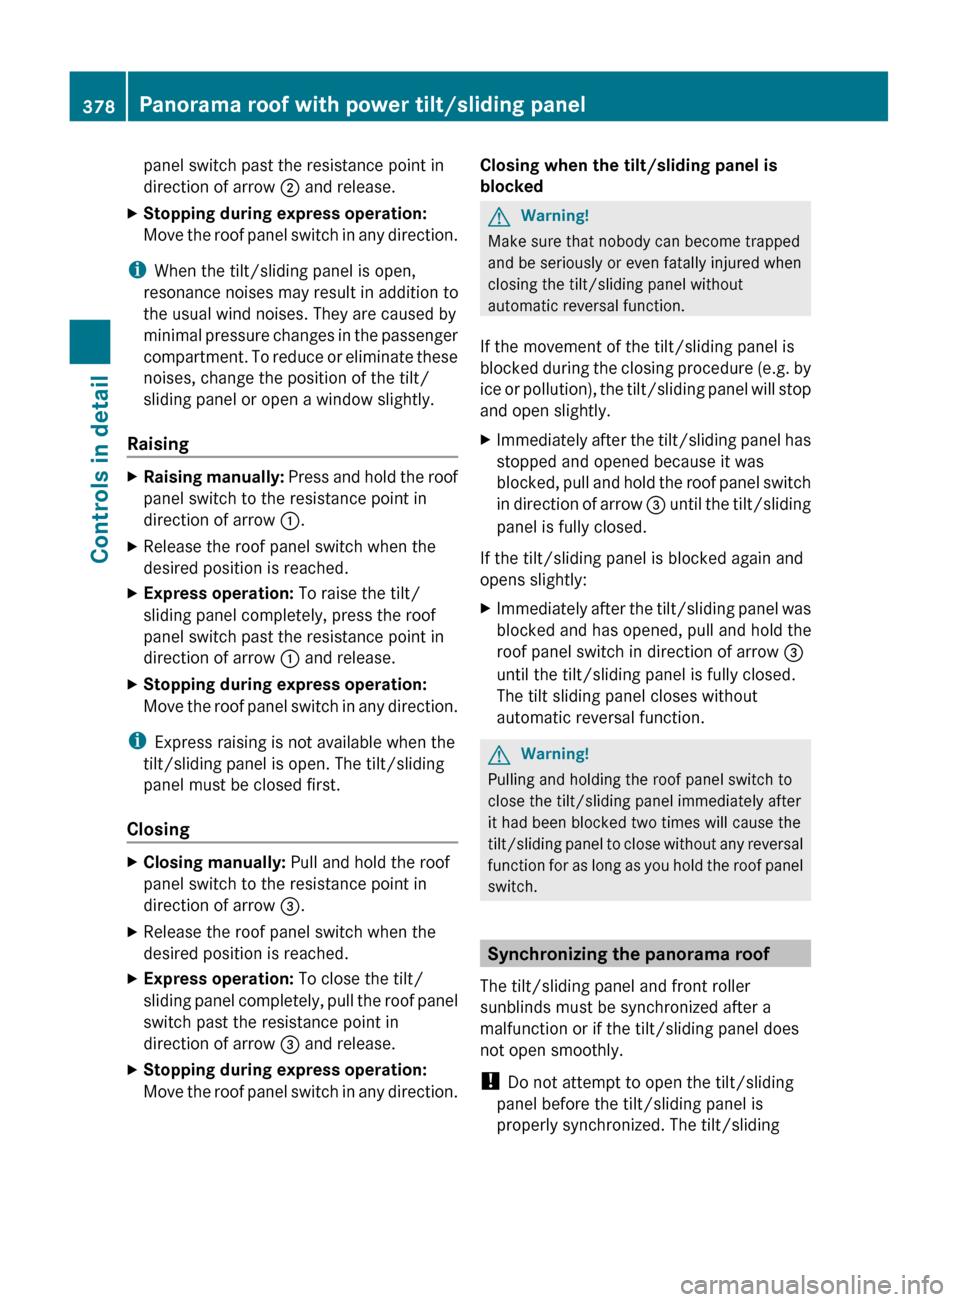
Roof panel switch
:Raising;Opening=Closing
The tilt/sliding panel only operates with the
roller sunblinds retracted.
iYou can also open or close the tilt/sliding
panel using the SmartKey, see “Summer
opening feature” (Y page 309) or see
“Convenience closing feature”
(Y page 309).
iIf the front roller sunblind is extended
while the tilt/sliding panel is being raised,
the roller sunblind will retract first.
XSwitch on the ignition.
Opening
XOpening manually: Press and hold the
roof panel switch to the resistance point in
direction of arrow ;.
XRelease the roof panel switch when the
desired position is reached.
XExpress operation: To open the tilt/
sliding panel completely, press the roof
Panorama roof with power tilt/sliding panel377Controls in detail221_AKB; 6; 20, en-USd2ugruen,Version: 2.11.8.12009-09-24T13:28:17+02:00 - Seite 377Z
Page 380 of 548
panel switch past the resistance point in
direction of arrow ; and release.XStopping during express operation:
Move the roof panel switch in any direction.
i When the tilt/sliding panel is open,
resonance noises may result in addition to
the usual wind noises. They are caused by
minimal pressure changes in the passenger
compartment. To reduce or eliminate these
noises, change the position of the tilt/
sliding panel or open a window slightly.
Raising
XRaising manually: Press and hold the roof
panel switch to the resistance point in
direction of arrow :.XRelease the roof panel switch when the
desired position is reached.XExpress operation: To raise the tilt/
sliding panel completely, press the roof
panel switch past the resistance point in
direction of arrow : and release.XStopping during express operation:
Move the roof panel switch in any direction.
i Express raising is not available when the
tilt/sliding panel is open. The tilt/sliding
panel must be closed first.
Closing
XClosing manually: Pull and hold the roof
panel switch to the resistance point in
direction of arrow =.XRelease the roof panel switch when the
desired position is reached.XExpress operation: To close the tilt/
sliding panel completely, pull the roof panel
switch past the resistance point in
direction of arrow = and release.XStopping during express operation:
Move the roof panel switch in any direction.Closing when the tilt/sliding panel is
blockedGWarning!
Make sure that nobody can become trapped
and be seriously or even fatally injured when
closing the tilt/sliding panel without
automatic reversal function.
If the movement of the tilt/sliding panel is
blocked during the closing procedure (e.g. by
ice or pollution), the tilt/sliding panel will stop
and open slightly.
XImmediately after the tilt/sliding panel has
stopped and opened because it was
blocked, pull and hold the roof panel switch
in direction of arrow = until the tilt/sliding
panel is fully closed.
If the tilt/sliding panel is blocked again and
opens slightly:
XImmediately after the tilt/sliding panel was
blocked and has opened, pull and hold the
roof panel switch in direction of arrow =
until the tilt/sliding panel is fully closed.
The tilt sliding panel closes without
automatic reversal function.GWarning!
Pulling and holding the roof panel switch to
close the tilt/sliding panel immediately after
it had been blocked two times will cause the
tilt/sliding panel to close without any reversal
function for as long as you hold the roof panel
switch.
Synchronizing the panorama roof
The tilt/sliding panel and front roller
sunblinds must be synchronized after a
malfunction or if the tilt/sliding panel does
not open smoothly.
! Do not attempt to open the tilt/sliding
panel before the tilt/sliding panel is
properly synchronized. The tilt/sliding
378Panorama roof with power tilt/sliding panelControls in detail
221_AKB; 6; 20, en-USd2ugruen,Version: 2.11.8.12009-09-24T13:28:17+02:00 - Seite 378
Page 381 of 548
panel could otherwise lock-up in the open
position.
If the tilt/sliding panel cannot be closed or
synchronized, contact an authorized
Mercedes-Benz Center or call Roadside
Assistance.
Tilt/sliding panel and front roller
sunblindXSwitch on the ignition.XPull and hold the roof panel switch several
times in direction of arrow =
( Y page 375) until the tilt/sliding panel is
fully closed.XKeep holding the roof panel switch in
direction of arrow = for approximately
1 second.XPull and hold the roof panel switch several
times in direction of arrow = until the front
roller sunblind is fully extended.XKeep holding the roof panel switch in
direction of arrow = for approximately
1 second.XCheck the express operation feature of the
front roller sunblind.
If the front roller sunblind retracts
completely, the front roller sunblind is
synchronized. Otherwise repeat the above
steps.XCheck the express operation feature of the
tilt/sliding panel ( Y page 377).
If the tilt/sliding panel opens completely,
the tilt/sliding panel is synchronized.
Otherwise repeat the above steps.
Rear roller sunblind
XSwitch on the ignition.XPull roller sunblind switch :
( Y page 376) in the rear door control panel
several times until the rear roller sunblind
is fully extended.XKeep holding roller sunblind switch : for
approximately 1 second.XCheck the express operation feature of the
front roller sunblind.
If the rear roller sunblind retracts
completely, the rear roller sunblind is
synchronized. Otherwise repeat the above
steps.
Loading and storing
Loading instructions
GWarning!
Always fasten items being carried as securely
as possible using cargo tie-down hooks and
fastening materials appropriate for the weight
and size of the load.
In an accident, during hard braking or sudden
maneuvers, loose items will be thrown around
inside the vehicle. This can cause injury to
vehicle occupants unless the items are
securely fastened in the vehicle.
To help avoid personal injury during a collision
or sudden maneuver, exercise care when
transporting cargo. Do not pile luggage or
cargo higher than the seat backrests.
The trunk is the preferred place to carry
objects. Always use cargo tie-down hooks
when transporting cargo. Do not place
anything on the rear-window shelf.
Never drive a vehicle with the trunk open.
Deadly carbon monoxide (CO) gases may
enter vehicle interior resulting in
unconsciousness and death.
Load distribution
The total load weight including vehicle
occupants and luggage/cargo should not
exceed the total load limit indicated on the
corresponding Tire and Loading Information
placard located on the driver’s door B-pillar
( Y page 418).
The handling characteristics of a fully loaded
vehicle depends greatly on the load
Loading and storing379Controls in detail221_AKB; 6; 20, en-USd2ugruen,Version: 2.11.8.12009-09-24T13:28:17+02:00 - Seite 379Z
Page 382 of 548
distribution. It is therefore recommended to
load the vehicle accordingly with the heaviest
items being placed towards the front of the
vehicle.
Please pay attention to and comply with the
following instructions when loading the
vehicle and transporting cargo:
RAlways place items being carried against
front or rear seat backrests, and fasten
them as securely as possible.
RThe heaviest portion of the cargo should
always be kept as low as possible against
front or rear seat backrests.
Roof rack
For information about further roof rack
equipment, contact an authorized Mercedes-
Benz Center.
GWarning!
Only use roof racks approved by Mercedes-
Benz for your vehicle model to avoid damage
to the vehicle.
Follow the manufacturer’s installation
instructions. Otherwise, an improperly
attached roof rack system or its load could
become detached from the vehicle.
Do not exceed the maximum roof load of
220 lb (100 kg).
Take into consideration that when the roof
rack is loaded, the handling characteristics
are different from those when operating the
vehicle without the roof rack loaded.
Make sure
Ryou can raise the power tilt/sliding sunroof
or the panorama roof with tilt/sliding panel
completely
Ryou can open the trunk completely
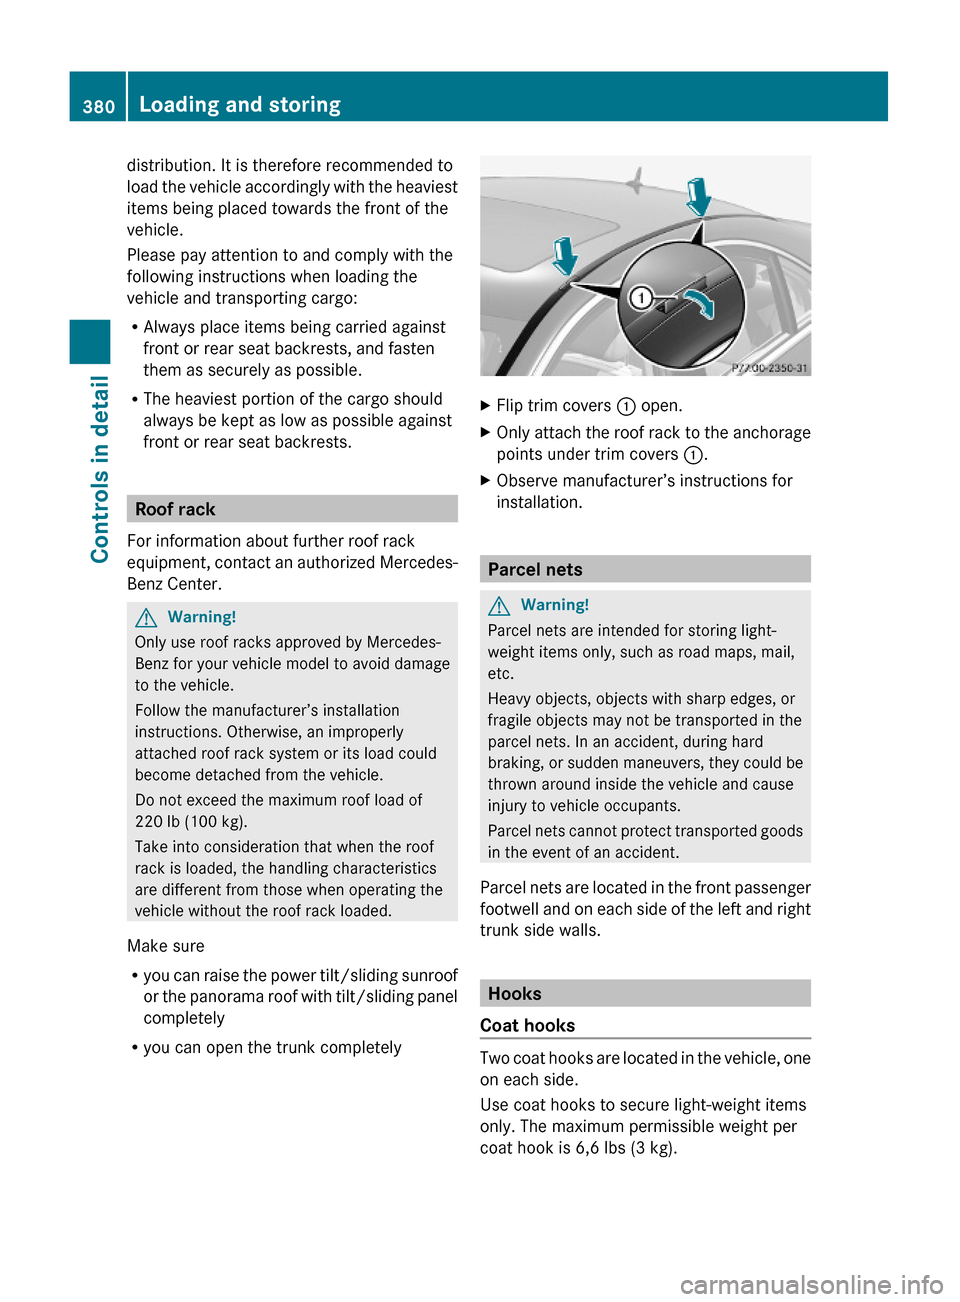
XFlip trim covers : open.XOnly attach the roof rack to the anchorage
points under trim covers :.
XObserve manufacturer’s instructions for
installation.
Parcel nets
GWarning!
Parcel nets are intended for storing light-
weight items only, such as road maps, mail,
etc.
Heavy objects, objects with sharp edges, or
fragile objects may not be transported in the
parcel nets. In an accident, during hard
braking, or sudden maneuvers, they could be
thrown around inside the vehicle and cause
injury to vehicle occupants.
Parcel nets cannot protect transported goods
in the event of an accident.
Parcel nets are located in the front passenger
footwell and on each side of the left and right
trunk side walls.
Hooks
Coat hooks
Two coat hooks are located in the vehicle, one
on each side.
Use coat hooks to secure light-weight items
only. The maximum permissible weight per
coat hook is 6,6 lbs (3 kg).
380Loading and storingControls in detail
221_AKB; 6; 20, en-USd2ugruen,Version: 2.11.8.12009-09-24T13:28:17+02:00 - Seite 380
Page 433 of 548
GAWR (Gross Axle Weight Rating)
The GAWR is the maximum permissible axle
weight. The gross vehicle weight on each axle
must never exceed the GAWR for the front
and rear axle indicated on the certification
label located on the driver’s door B-pillar.
GVW (Gross Vehicle Weight)
The GVW comprises the weight of the vehicle
including fuel, tools, spare wheel, installed
accessories, passengers and cargo and, if
applicable, trailer tongue load. The GVW must
never exceed the GVWR indicated on the
certification label located on the driver’s door
B-pillar.
GVWR (Gross Vehicle Weight Rating)
This is the maximum permissible vehicle
weight of the fully loaded vehicle (weight of
the vehicle including all options, passengers,
fuel, and cargo and, if applicable, trailer
tongue load). It is indicated on the
certification label located on the driver’s door
B-pillar.
Kilopascal (kPa)
Metric unit for air pressure. There are 6.9 kPa
to 1 psi; another metric unit for air pressure
is bar. There are 100 kilopascals (kPa) to
1 bar.
Load index
Numerical code associated with the
maximum load a tire can support.
Maximum load rating
The maximum load in kilograms and pounds
that can be carried by the tire.
Maximum loaded vehicle weight
The sum of curb weight, accessory weight,
total load limit, and production options
weight.
Maximum permissible tire inflation
pressure
This number is the greatest amount of air
pressure that should ever be put in the tire.
Normal occupant weight
The number of occupants the vehicle is
designed to seat, multiplied by 68 kilograms
(150 lb).
Occupant distribution
The distribution of occupants in a vehicle at
their designated seating positions.
Production options weight
The combined weight of those installed
regular production options weighing over
5 lbs (2.3 kilograms) in excess of those
standard items which they replace, not
previously considered in curb weight or
accessory weight, including heavy duty
brakes, ride levelers, roof rack, heavy duty
battery, and special trim.
PSI (Pounds per square inch)
A standard unit of measure for air pressure.
Recommended tire inflation pressure
The recommended tire inflation pressure for
normal driving conditions is listed on the Tire
and Loading Information placard located on
the driver’s door B-pillar. It provides best
handling, tread life and riding comfort.
Supplemental information pertaining to
special driving situations can be found on the
tire inflation pressure label on the inside of
the fuel filler flap.
Rim
A metal support for a tire or a tire and tube
assembly upon which the tire beads are
seated.
Tires and wheels431Operation221_AKB; 6; 20, en-USd2ugruen,Version: 2.11.8.12009-09-24T13:28:17+02:00 - Seite 431Z
Page 436 of 548
GWarning!
The outside temperature indicator is not
designed to serve as an ice-warning device
and is therefore unsuitable for that purpose.
Indicated temperatures just above the
freezing point do not guarantee that the road
surface is free of ice. The road may still be icy,
especially in wooded areas or on bridges.
GWarning!
On slippery road surfaces, never downshift in
order to obtain braking action. This could
result in drive wheel slip and reduced vehicle
control. Your vehicle’s ABS will not prevent
this type of loss of control.
The most important rule for slippery or icy
roads is to drive sensibly and to avoid abrupt
acceleration, braking and steering
maneuvers. Do not use the cruise control or
DISTRONIC PLUS system under such
conditions.
When the vehicle is in danger of skidding, shift
the automatic transmission to neutral
position N. Try to keep the vehicle under
control by corrective steering action.
i For information on driving with snow
chains, see “Snow chains” ( Y page 433).
Road salts and chemicals can adversely
affect braking efficiency. Increased pedal
force may become necessary to produce the
normal brake effect.
Depressing the brake pedal periodically when
traveling at length on salt-strewn roads can
bring road-salt-impaired braking efficiency
back to normal.
If the vehicle is parked after being driven on
salt-treated roads, the braking efficiency
should be tested as soon as possible after
driving is resumed.
GWarning!
Make sure not to endanger any other road
users when carrying out these braking
maneuvers.
Driving instructions
Drive sensibly – save fuel
To save fuel you should:
R Keep tires at the recommended inflation
pressures.
R Remove unnecessary loads.
R Remove roof rack when not in use.
R Allow engine to warm up under low load
use.
R Avoid frequent acceleration and
deceleration.
R Have all maintenance work performed at
the intervals specified in the Maintenance
Booklet and as required by the
Maintenance system. Contact an
authorized Mercedes-Benz Center.
Fuel consumption is also increased by driving
in cold weather, in stop-and-go traffic, on
short trips and in mountainous areas.
Drinking and driving
GWarning!
Drinking and driving and/or taking drugs and
driving are very dangerous combinations.
Even a small amount of alcohol or drugs can
affect your reflexes, perceptions and
judgment.
The possibility of a serious or even fatal
accident are greatly increased when you drink
or take drugs and drive.
Do not drink or take drugs and drive or allow
anyone to drive who has been drinking or
taking drugs.
Pedals
GWarning!
Make sure absolutely no objects are
obstructing the pedals’ range of movement.
Keep the driver’s footwell clear of all
434Driving instructionsOperation
221_AKB; 6; 20, en-USd2ugruen,Version: 2.11.8.12009-09-24T13:28:17+02:00 - Seite 434
Page 443 of 548
To avoid paint damage, you should
immediately remove:
R Grease and oil
R Fuel
R Coolant
R Brake fluid
R Bird droppings
R Insects
R Tree resins etc.
Frequent washing reduces and/or eliminates
the aggressiveness and potency of the above
adverse influences.
More frequent washings are necessary to
deal with unfavorable conditions:
R near the ocean
R in industrial areas (smoke, exhaust
emissions)
R during winter operation
You should check your vehicle from time to
time for stone chipping or other damage. Any
damage should be repaired as soon as
possible to prevent corrosion.
In doing so, do not neglect the underbody of
the vehicle. A prerequisite for a thorough
check is a washing of the underbody followed
by a thorough inspection. Damaged areas
need to be re-undercoated.
Your vehicle has been treated at the factory
with a wax-base rustproofing in the body
cavities which will last for the lifetime of the
vehicle. Post-production treatment is neither
necessary nor recommended by Mercedes-
Benz because of the possibility of
incompatibility between materials used in the
production process and others applied later.
We have selected vehicle-care products and
compiled recommendations which are
specially matched to our vehicles and which
always reflect the latest technology. You can
obtain Mercedes-Benz approved vehicle-care
products at an authorized Mercedes-Benz
Center.Scratches, corrosive deposits, corrosion or
damage due to negligent or incorrect care
cannot always be removed or repaired with
the vehicle-care products recommended
here. In such cases it is best to seek aid at an
authorized Mercedes-Benz Center.
The following topics deal with the cleaning
and care of your vehicle and give important
“how-to” information as well as references to
Mercedes-Benz approved vehicle-care
products.
Power washer
! Follow the instructions provided by the
power washer manufacturer on
maintaining a distance between the vehicle
and the nozzle of the power washer.
Never use a round nozzle to power-wash
tires. The intense jet of water can result in
damage to the tire.
Always replace a damaged tire.
Always keep the jet of water moving across
the surface. Do not aim directly at electrical
parts, electrical connectors, seals, or other
rubber parts.
i Vehicles with KEYLESS-GO:
If a door handle is hit by a strong jet of
water, and a SmartKey is within
approximately 3 ft (1 m) of the vehicle, it
could be inadvertently locked or unlocked.
Tar stains
Quickly remove tar stains before they dry and
become more difficult to remove. A tar
remover is recommended.
Paintwork, painted body components
! Affixing stickers, magnets, adhesive tape
or similar materials to painted body
components may damage the paintwork.
Mercedes-Benz approved Paint Care should
be applied when water drops on the paint
surface do not “bead up”. This should
Vehicle care441Operation221_AKB; 6; 20, en-USd2ugruen,Version: 2.11.8.12009-09-24T13:28:17+02:00 - Seite 441Z