2010 MERCEDES-BENZ S600 roof
[x] Cancel search: roofPage 40 of 548
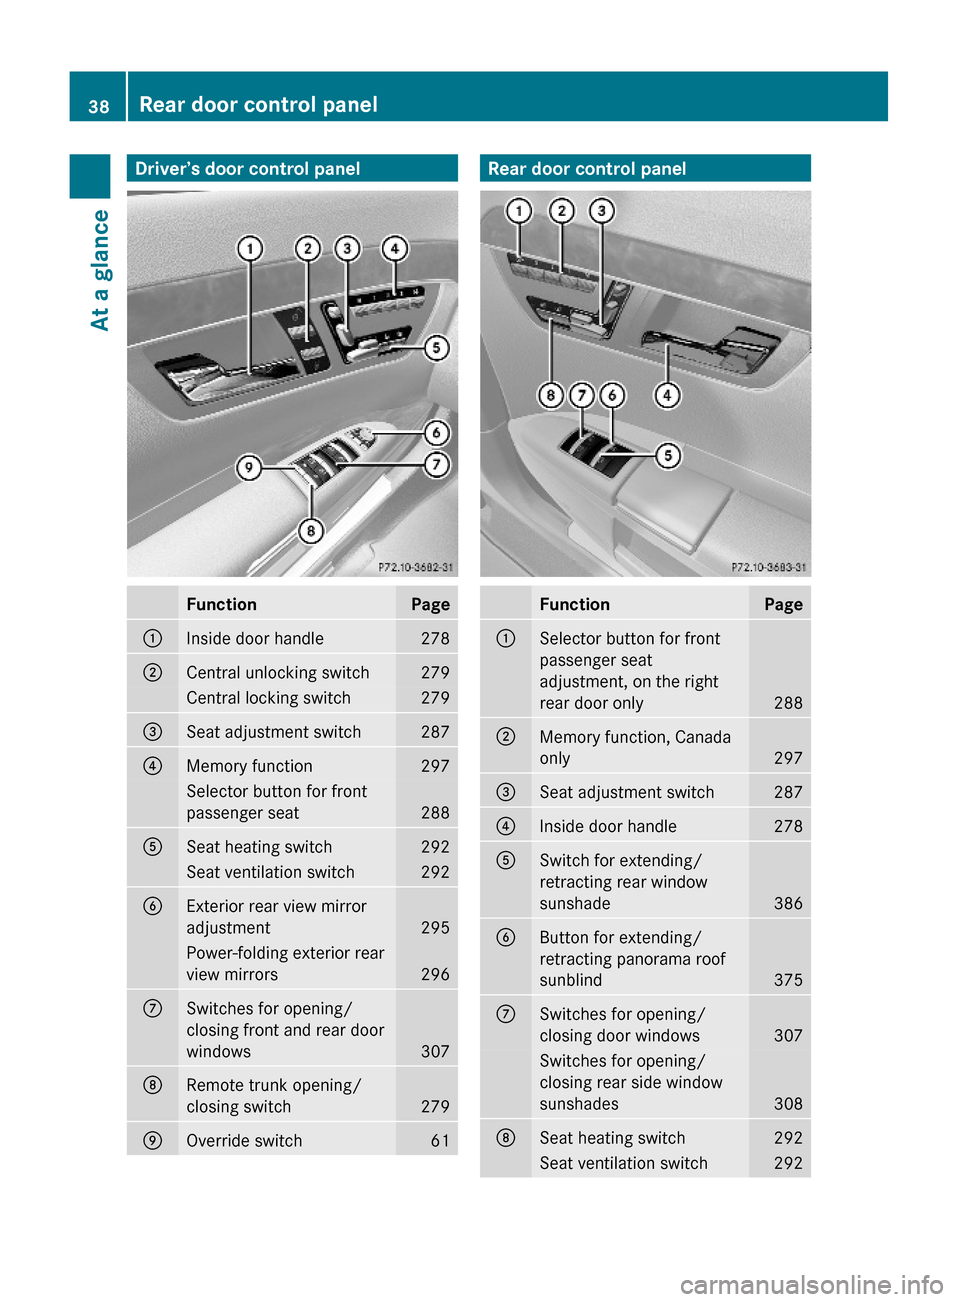
Driver’s door control panelFunctionPage:Inside door handle 278;Central unlocking switch279Central locking switch279=Seat adjustment switch287?Memory function297Selector button for front
passenger seat288
ASeat heating switch292Seat ventilation switch292BExterior rear view mirror
adjustment295
Power-folding exterior rear
view mirrors296
CSwitches for opening/
closing front and rear door
windows307
DRemote trunk opening/
closing switch279
EOverride switch61Rear door control panelFunctionPage:Selector button for front
passenger seat
adjustment, on the right
rear door only288
;Memory function, Canada
only297
=Seat adjustment switch287?Inside door handle278ASwitch for extending/
retracting rear window
sunshade386
BButton for extending/
retracting panorama roof
sunblind375
CSwitches for opening/
closing door windows307
Switches for opening/
closing rear side window
sunshades308
DSeat heating switch292Seat ventilation switch29238Rear door control panelAt a glance
221_AKB; 6; 20, en-USd2ugruen,Version: 2.11.8.12009-09-24T13:28:17+02:00 - Seite 38
Page 56 of 548

Automatic comfort-fit feature seat belt
The automatic comfort-fit feature reduces the
retracting force of the seat belts when they
are in normal use. It is available for the front
seats and for the rear outer seats (only for
vehicles with rear power seats).
Preventive occupant safety (PRE-
SAFE ®
)
GWarning!
The PRE-SAFE ®
system is intended to reduce
the effects of an accident on vehicle
occupants who are wearing their seat belt
properly. Despite your vehicle being equipped
with the PRE-SAFE ®
system, the possibility of
personal injuries occurring as a result of an
accident cannot be eliminated. Therefore,
always drive carefully and adjust your driving
to the prevailing road, weather, and traffic
conditions.
The PRE-SAFE ®
system takes preventive
measures to better protect the occupants
from the possibility of personal injuries in the
following hazardous situations:
R emergency braking situations, e.g. if the
Brake Assist System (BAS) ( Y page 64) is
activated
or when
vehicles with DISTRONIC PLUS:
the BAS PLUS ( Y page 64) or the PRE-
SAFE ®
Brake ( Y page 69) is strongly
engaging
R when the radar sensors recognize the
immediate risk of collision in certain
situations (vehicles with DISTRONIC PLUS)
R critical dynamic driving situations, e.g.
when the vehicle has been caused to
understeer or oversteer because it has
exceeded its physical limitations or in case
of evasive steering maneuvers at speeds
above approximately 85 mph (140 km/h)
The PRE-SAFE ®
system takes the following
measures when it is activated:
R The front seat belts are pre-tensioned
automatically.
R If the front passenger seat is in an
unfavorable position, the seat will be
adjusted to a position that seeks to better
protect the occupant.
R If a rear outer power seat (if so equipped)
is in an unfavorable position, the seat will
be adjusted to a position that seeks to
better protect the occupant.
R The system increases the air pressure in
the air pockets (on the sides of the seat
cushion and backrest) of the multicontour
and/or drive-dynamic multicontour front
seats.
R If the vehicle is equipped with multicontour
rear seats, the system increases the air
pressure in the air pockets (on the sides of
the seat backrest) of the multicontour rear
outer seats.
R If the vehicle is in a critical dynamic driving
situation, the door windows and the tilt/
sliding sunroof or panorama roof with tilt/
sliding panel also closes, except for a
minimal gap that remains open.
If the closing procedure of any of these
elements is blocked, it will stop and open
slightly.
Once the hazardous situation no longer exists
and an accident has been avoided, the PRE-
SAFE ®
system loosens the seat belt pre-
tension and decreases the air pressure in the
air pockets of the multicontour and/or drive-
dynamic multicontour seats. All of the PRE-
SAFE ®
system settings can be re-adjusted
following the critical driving event.
If the seat belts do not release:XAdjust the seat backrest to the rear until
the seat belt tension is reduced.
The locking mechanism releases.54Occupant safetySafety and security
221_AKB; 6; 20, en-USd2ugruen,Version: 2.11.8.12009-09-24T13:28:17+02:00 - Seite 54
Page 63 of 548
XVehicles with rear center seat: Make sure
that the seat belt for the rear center seat
can operate freely with a child seat
installed.
GWarning!
Vehicles with rear power seats:
Never change the rear seat position after
installing the child restraint. This could
Rdamage the child restraint
Rintroduce undesirable slack or tension into
the seat belt
Rloosen the child restraint
Rmisposition the child restraint
All of the above will lessen the
effectiveness of the child restraint and thus
increase the chance or severity of injury in
an accident.
Child safety
Child safety locks
GObserve Safety notes, see page 56.GWarning!
Children could open a rear door from the
inside. This may cause serious personal injury
or an accident. Therefore, secure the rear
doors with the child safety locks whenever
children are riding in the back seats of the
vehicle.
The child safety locks on the rear doors
enable you to secure each rear door
individually. You cannot open a secured rear
door from the inside. You can open the rear
door from the outside when the vehicle is
unlocked.
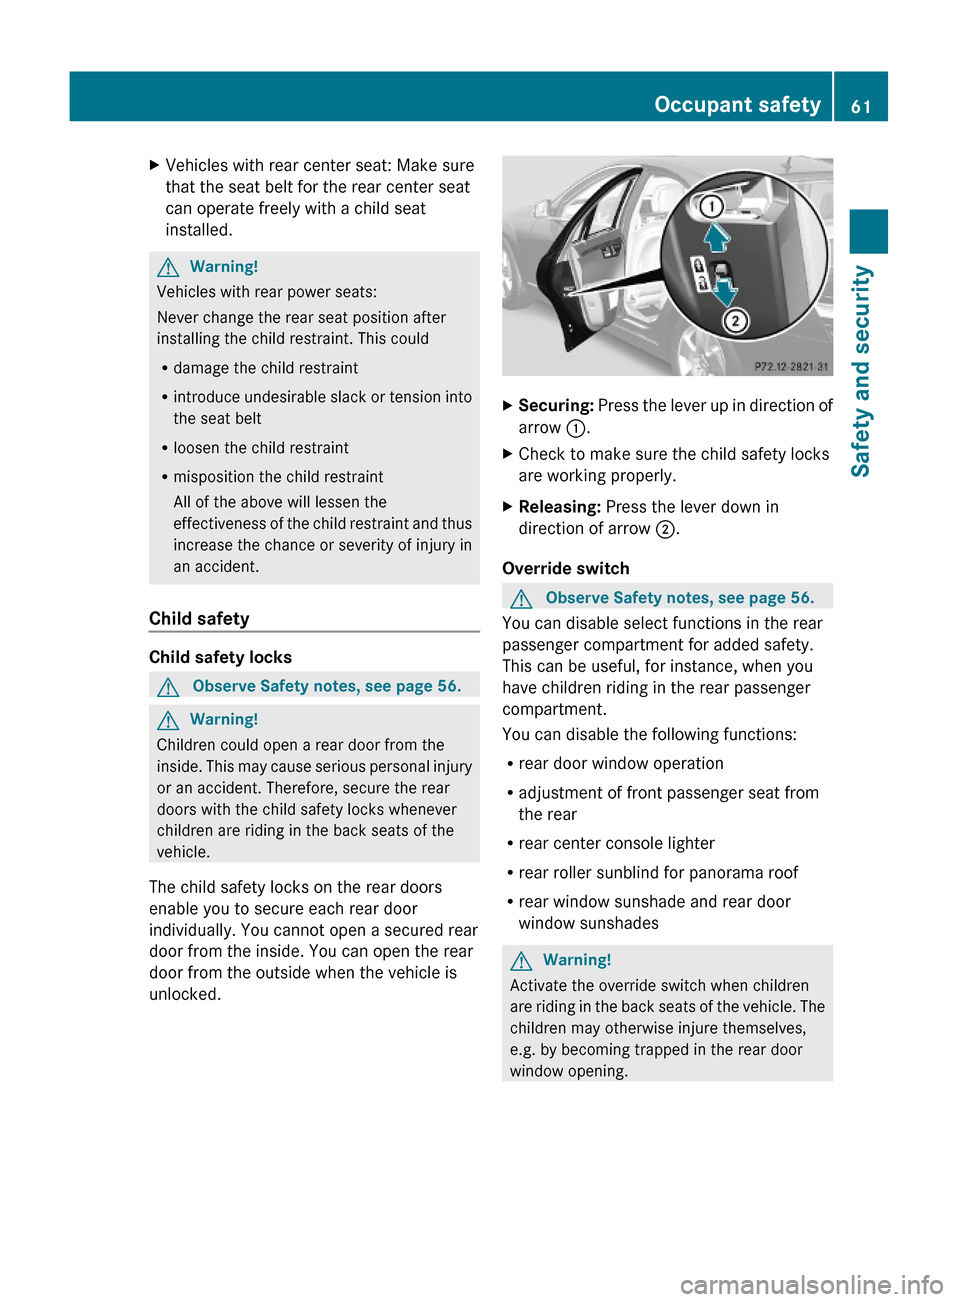
XSecuring: Press the lever up in direction of
arrow :.
XCheck to make sure the child safety locks
are working properly.
XReleasing: Press the lever down in
direction of arrow ;.
Override switch
GObserve Safety notes, see page 56.
You can disable select functions in the rear
passenger compartment for added safety.
This can be useful, for instance, when you
have children riding in the rear passenger
compartment.
You can disable the following functions:
Rrear door window operation
Radjustment of front passenger seat from
the rear
Rrear center console lighter
Rrear roller sunblind for panorama roof
Rrear window sunshade and rear door
window sunshades
GWarning!
Activate the override switch when children
are riding in the back seats of the vehicle. The
children may otherwise injure themselves,
e.g. by becoming trapped in the rear door
window opening.
Occupant safety61Safety and security221_AKB; 6; 20, en-USd2ugruen,Version: 2.11.8.12009-09-24T13:28:17+02:00 - Seite 61Z
Page 101 of 548
compatible. If this is the case, the navigation
system will not be operational.
You will know if this is the case, when the
following message will appear when you
switch to navigation mode: The system
software has been updated. The map
software must be updated now. Please
insert the DVD with the map software.XUpdating map software: Proceed as
described in the “Updating the map
software” section ( Y page 96). Use map
software which is compatible with the
system software.
i Please note that the update must be
allowed to run to the end in this case. If you
interrupt it, the navigation system will
continue to be non-operational.
Initial use or use following a system
software update
In both these cases, the navigation system
must determine the position of the vehicle.
You may have to drive for a while before
precise route guidance is possible.
GPS reception
The Navigation system relies on a number of
factors to function correctly. GPS reception
is very important.
In certain situations GPS may be impaired, for
example:
R in tunnels
R in parking garages
R due to snow on the GPS antenna
If there is snow on the GPS antenna, you
should remove it. The GPS antenna is at the
back of the vehicle roof.
A roof cargo container may also impair GPS
coverage.
Route guidance after transporting the
vehicle or exiting a parking garage
COMAND has to redetermine the position of
the vehicle if the vehicle has been transported
(e.g. by ferry, by train or after towing).
COMAND may also have to redetermine the
vehicle position when leaving a parking
garage.
The proper position of the vehicle will even be
found if you are driving with COMAND
switched off. The duration of the positioning
recalculation will vary case by case.
During positioning, route guidance may be
inaccurate and may show the following:
R Navigation announcements, route
guidance displays and displayed street
names are not consistent with the actual
location of the vehicle.
R COMAND does not generate navigation
announcements.
R Instead of the route guidance displays, you
see the Off Road display and a direction
arrow. The direction arrow shows the
compass heading to the destination.
After the vehicle position has been
redetermined, route guidance with navigation
announcements and route guidance display
is available again.
Interrupting the journey during route
guidance
The following applies if you interrupt the
journey during route guidance and continue
the journey later:
R COMAND resumes route guidance
automatically if you continue the journey
within 2 hours.
R Route guidance is canceled if you continue
the journey after more than 2 hours. It will
be necessary to resume the canceled route
guidance manually ( Y page 135).
i The journey is interrupted if you park the
vehicle and switch off COMAND. The
COMAND navigation (introduction)99Control systems221_AKB; 6; 20, en-USd2ugruen,Version: 2.11.8.12009-09-24T13:28:17+02:00 - Seite 99Z
Page 179 of 548
File structure on a disc
When you create an audio disc, the tracks can
be organized in folders. A disc may contain a
maximum of 4000 tracks.
The directory depth may not exceed a
maximum of 8 levels. The system will ignore
files in lower levels.
Notes on USB storage media
Do not store data other than audio data on a
USB storage medium. Doing so will increase
the time required to initialize the USB storage
medium.
A maximum of 8 directory levels with up to
4000 tracks each are supported.
For information on connecting USB storage
media to the built-in USB socket in the glove
box see ( Y page 80).
Track and folder names
When you create an audio medium, you can
assign names to the tracks and folders.
COMAND uses these names for the
corresponding display. Empty folders or
folders which contain data other than MP3/
WMA tracks are not displayed by COMAND.
If MP3/WMA files are saved in the root
directory itself (uppermost directory on
storage medium), the root directory will also
be treated as a folder. COMAND will then
show the name of the root directory as the
folder name.
You must observe the following when
assigning track names:
R Track names must have at least one
character.
R Track names must have the extension
“mp3” or “wma”.
R There must be a period between the track
name and the extension.
Example of a correct track name:
Track1.mp3
Compatible file systems and
compression methods
COMAND supports the following formats:
R MPEG1 Audio Layer 3 (MP3) 25
R Microsoft Windows Media Audio (WMA) V2,
V7, V8 or V9 that are not copy-proof
Bit and sampling rates
MP3
COMAND supports MP3 files of the following
types:
R Fixed and variable bit rates from
32 kbit/s up to 320 kbit/s
R Sampling rates of 24 kHz to 48 kHz
WMA (Windows Media ®
Audio)
Windows Media ®
Audio (WMA) is an audio
data compression technology developed by
Microsoft ®
.
COMAND supports WMA files of the following
types:
R Fixed and variable bit rates from 5 kbit/s
up to 384 kbit/s
R Sampling rates of 8 kHz to 48 kHz
COMAND does not support WMA files of the
following types:
R DRM (Digital Rights Management) coded
files
R variable bit rates
R Losless Settings
R WMA Pro
R 5.1-Surround
i Only use tracks with a bit rate of above
128 kbit/s and a sampling rate of above
44.1 kHz. Lower rates will cause an audible
25 MPEG Layer 3 audio-coding technology under license of Fraunhofer-Institut for Integrated Circuits (IIS) and
ThomsonCOMAND audio CD/audio DVD/MP3177Control systems221_AKB; 6; 20, en-USd2ugruen,Version: 2.11.8.12009-09-24T13:28:17+02:00 - Seite 177Z
Page 213 of 548
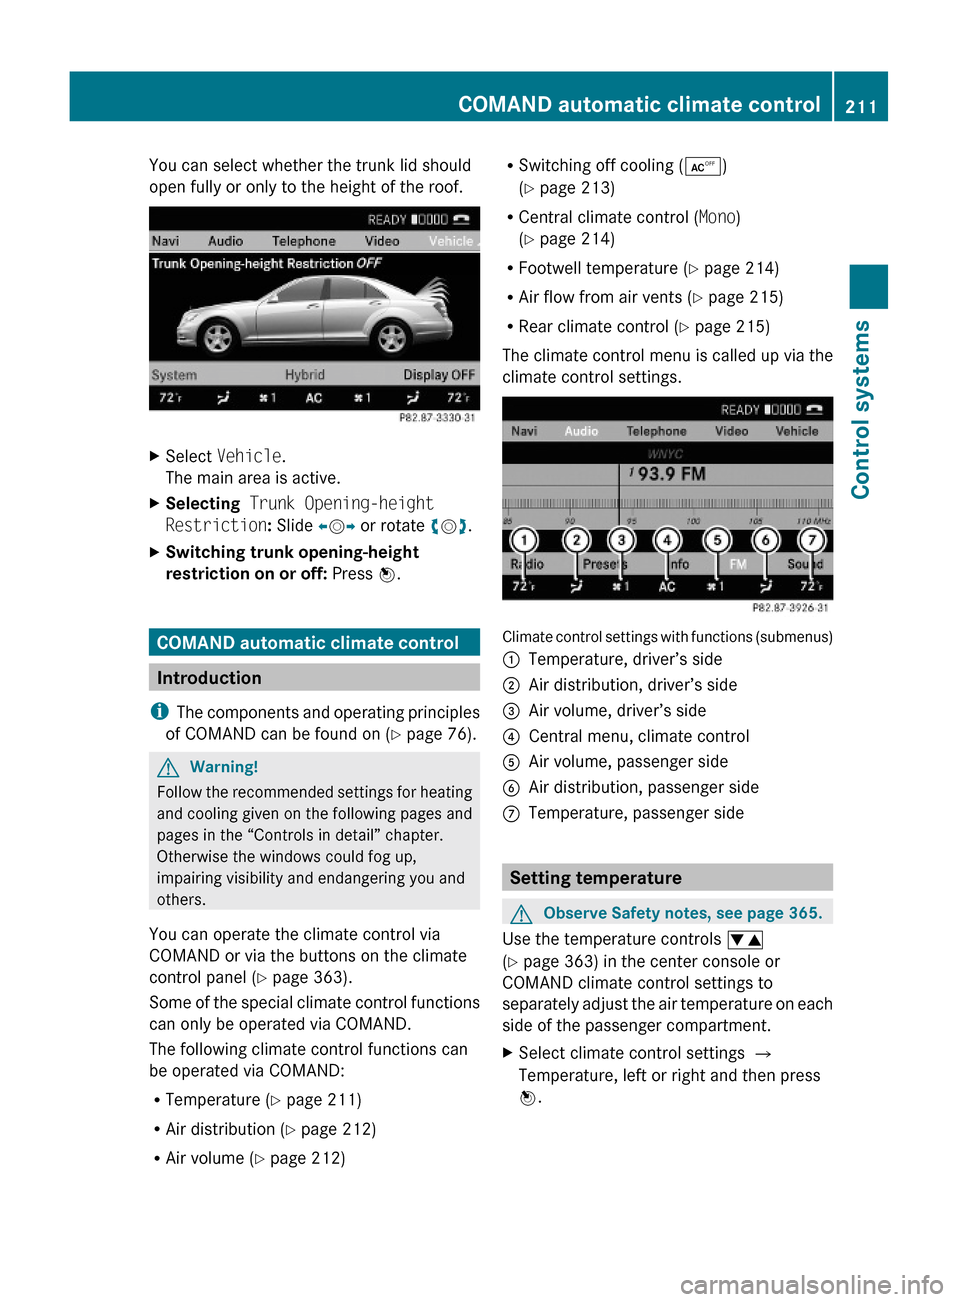
You can select whether the trunk lid should
open fully or only to the height of the roof.
XSelect Vehicle.
The main area is active.
XSelecting Trunk Opening-height
Restriction: Slide XVY or rotate cVd.
XSwitching trunk opening-height
restriction on or off: Press W.
COMAND automatic climate control
Introduction
iThe components and operating principles
of COMAND can be found on (Y page 76).
GWarning!
Follow the recommended settings for heating
and cooling given on the following pages and
pages in the “Controls in detail” chapter.
Otherwise the windows could fog up,
impairing visibility and endangering you and
others.
You can operate the climate control via
COMAND or via the buttons on the climate
control panel (Y page 363).
Some of the special climate control functions
can only be operated via COMAND.
The following climate control functions can
be operated via COMAND:
RTemperature (Y page 211)
RAir distribution (Y page 212)
RAir volume (Y page 212)
RSwitching off cooling (Æ)
(Y page 213)
RCentral climate control (Mono)
(Y page 214)
RFootwell temperature (Y page 214)
RAir flow from air vents (Y page 215)
RRear climate control (Y page 215)
The climate control menu is called up via the
climate control settings.
Climate control settings with functions (submenus)
:Temperature, driver’s side;Air distribution, driver’s side=Air volume, driver’s side?Central menu, climate controlAAir volume, passenger sideBAir distribution, passenger sideCTemperature, passenger side
Setting temperature
GObserve Safety notes, see page 365.
Use the temperature controls w
(Y page 363) in the center console or
COMAND climate control settings to
separately adjust the air temperature on each
side of the passenger compartment.
XSelect climate control settings Q
Temperature, left or right and then press
W.
COMAND automatic climate control211Control systems221_AKB; 6; 20, en-USd2ugruen,Version: 2.11.8.12009-09-24T13:28:17+02:00 - Seite 211Z
Page 275 of 548
Vehicle equipment ............................274
Locking and unlocking .....................274
Starter switch positions ...................284
Seats ..................................................286
Multifunction steering wheel ..........293
Mirrors ...............................................294
Memory function ..............................297
Lighting ..............................................298
Wipers ................................................305
Power windows .................................307
Driving and parking ..........................311
Automatic transmission ...................317
Transfer case ....................................325
Instrument cluster ............................326
Driving systems ................................327
Climate control system ....................363
Rear window defroster .....................372
Power tilt/sliding sunroof ...............373
Panorama roof with power tilt/
sliding panel ......................................375
Loading and storing ..........................379
Useful features .................................384
273Controls in detail221_AKB; 6; 20, en-USd2ugruen,Version: 2.11.8.12009-09-24T13:28:17+02:00 - Seite 273
Page 280 of 548
XHave the SmartKey deactivated by an
authorized Mercedes-Benz Center.
XReport the loss of the SmartKey or the
mechanical key to your car insurance
company immediately.
XHave the mechanical lock replaced if
necessary.
Any authorized Mercedes-Benz Center will be
glad to supply you with a replacement. For
information on replacing the SmartKey, see
“Replacing the SmartKey” (Y page 278).
Replacing the SmartKey
Only you, or someone authorized by you can
order a replacement key from any Mercedes-
Benz Center. In order to do so, the Mercedes-
Benz Center will require proof of identity and
vehicle ownership with original documents,
including the following:
If you are the current owner of the vehicle:
Rthe vehicle’s current state registration
Ra current identity card, passport, or drivers
license
If you are an authorized person:
Rthe vehicle’s current state registration
Ra current identity card, passport, or drivers
license for the authorized individual
Rsigned and dated authorization from the
owner of the vehicle for which the key is
being requested
iDuplicated or photocopied
documentation will not be accepted.
Activating the key
Once you, or an authorized person, has
provided the appropriate documents, the
Mercedes-Benz Center will need to
synchronize the key to your vehicle before it
can be used. In order to do so, the Mercedes-
Benz Center need access to your vehicle.
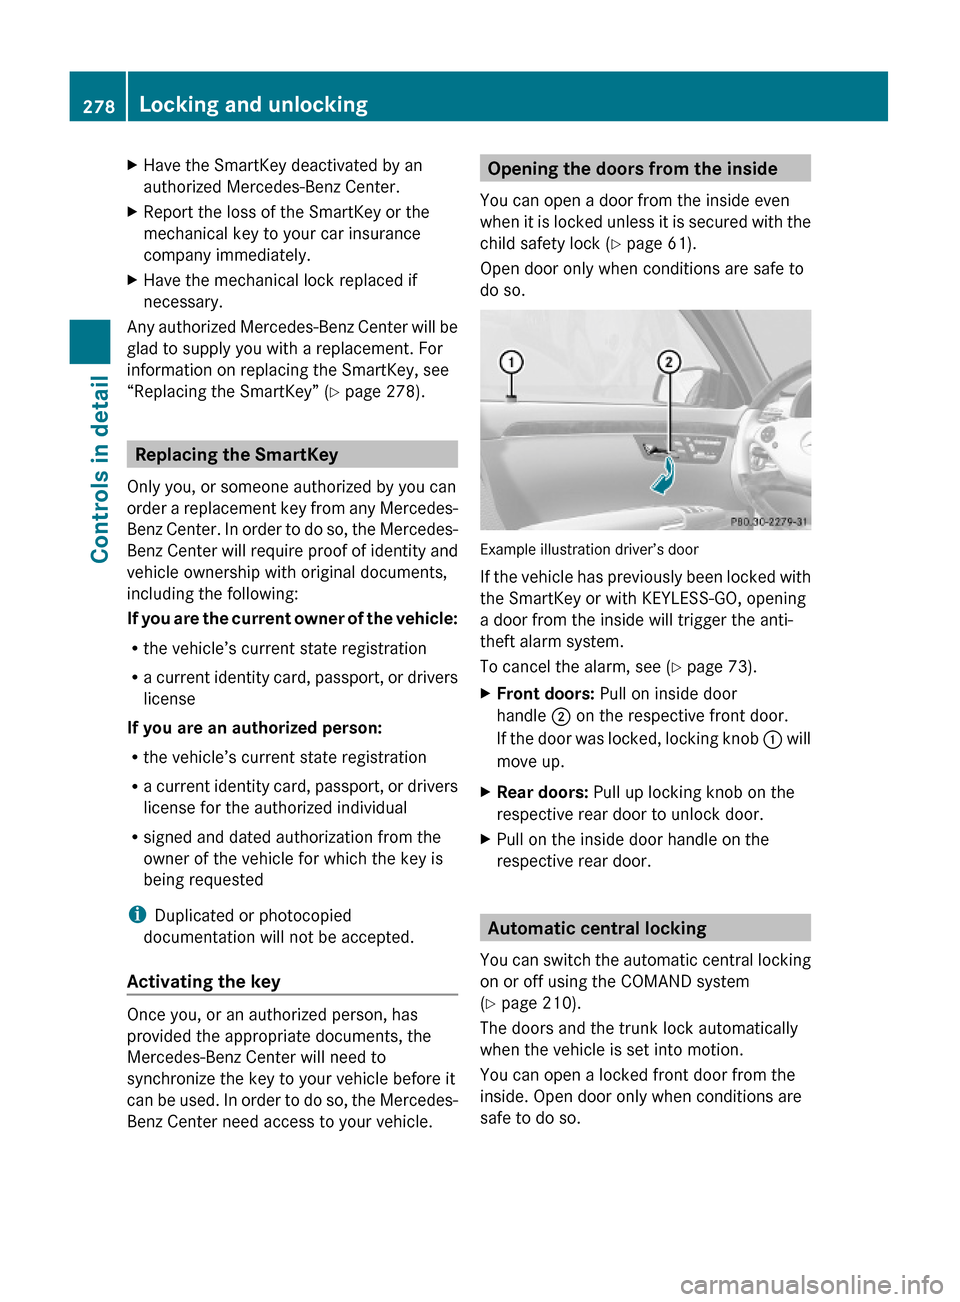
Opening the doors from the inside
You can open a door from the inside even
when it is locked unless it is secured with the
child safety lock (Y page 61).
Open door only when conditions are safe to
do so.
Example illustration driver’s door
If the vehicle has previously been locked with
the SmartKey or with KEYLESS-GO, opening
a door from the inside will trigger the anti-
theft alarm system.
To cancel the alarm, see (Y page 73).
XFront doors: Pull on inside door
handle ; on the respective front door.
If the door was locked, locking knob : will
move up.
XRear doors: Pull up locking knob on the
respective rear door to unlock door.
XPull on the inside door handle on the
respective rear door.
Automatic central locking
You can switch the automatic central locking
on or off using the COMAND system
(Y page 210).
The doors and the trunk lock automatically
when the vehicle is set into motion.
You can open a locked front door from the
inside. Open door only when conditions are
safe to do so.
278Locking and unlockingControls in detail
221_AKB; 6; 20, en-USd2ugruen,Version: 2.11.8.12009-09-24T13:28:17+02:00 - Seite 278