2010 MERCEDES-BENZ S600 remote control
[x] Cancel search: remote controlPage 397 of 548
The vehicle can be remotely locked within
four days after the ignition has been switched
off.XContact the Customer Assistance Center
at 1-800-FOR-MERCedes
(1-800-367-6372) (USA only) or
1-888-923-8367 (Canada only).
You will be asked to provide your password.
When you are inside your vehicle the next
time and switch on the ignition, the message
Tele Aid Doors Locked Remotely will
appear on the multifunction display.
i The remote door lock feature is available
if the relevant cellular phone network is
available and data connection is possible.
Automatic Maintenance Call
Your vehicle is equipped with a feature that
considerably enhances vehicle care. Just
prior to reaching a vehicle maintenance
milestone, Tele Aid transmits important
vehicle maintenance information that alerts
your authorized Mercedes-Benz Center of
required service. This is automatic and does
not require driver intervention. This feature
allows your preferred Mercedes-Benz Center
to significantly improve the process of
arranging your service appointment and
ensures that your vehicle receives the best
possible care.
i The Automatic Maintenance Call feature
is available if the relevant telephone
network is available and data connection is
possible.
Stolen Vehicle Recovery Services
In the event your vehicle was stolen:
XReport the incident to the police.
The police will issue a numbered incident
report.XPass this number on to the Customer
Assistance Center along with your
password.
The Customer Assistance Center will then
attempt to covertly contact the vehicle’s
Tele Aid system. Once the vehicle is
located, the Customer Assistance Center
will contact the local law enforcement and
you. The vehicle’s location will only be
provided to law enforcement.
i If the anti-theft alarm stays on for more
than 30 seconds, the Tele Aid system will
notify the Customer Assistance Center
automatically.
Garage door opener
The integrated remote control can operate up
to three separately controlled devices
compatible with HomeLink ®
or some other
systems.
GWarning!
Before programming the integrated remote
control to a garage door opener or gate
operator, make sure people and objects are
out of the way of the device to prevent
potential harm or damage. When
programming a garage door opener, the door
moves up or down. When programming a gate
operator, the gate opens or closes.
Do not use the integrated remote control with
any garage door opener that lacks safety stop
and reverse features as required by U.S.
federal safety standards (this includes any
garage door opener model manufactured
before April 1, 1982). A garage door that
cannot detect an object - signaling the door
to stop and reverse - does not meet current
U.S. federal safety standards.
Useful features395Controls in detail221_AKB; 6; 20, en-USd2ugruen,Version: 2.11.8.12009-09-24T13:28:17+02:00 - Seite 395Z
Page 398 of 548
When programming a garage door opener,
park vehicle outside the garage.
Do not run the engine while programming the
integrated remote control. Inhalation of
exhaust gas is hazardous to your health. All
exhaust gas contains carbon monoxide (CO),
and inhaling it can cause unconsciousness
and possible death.
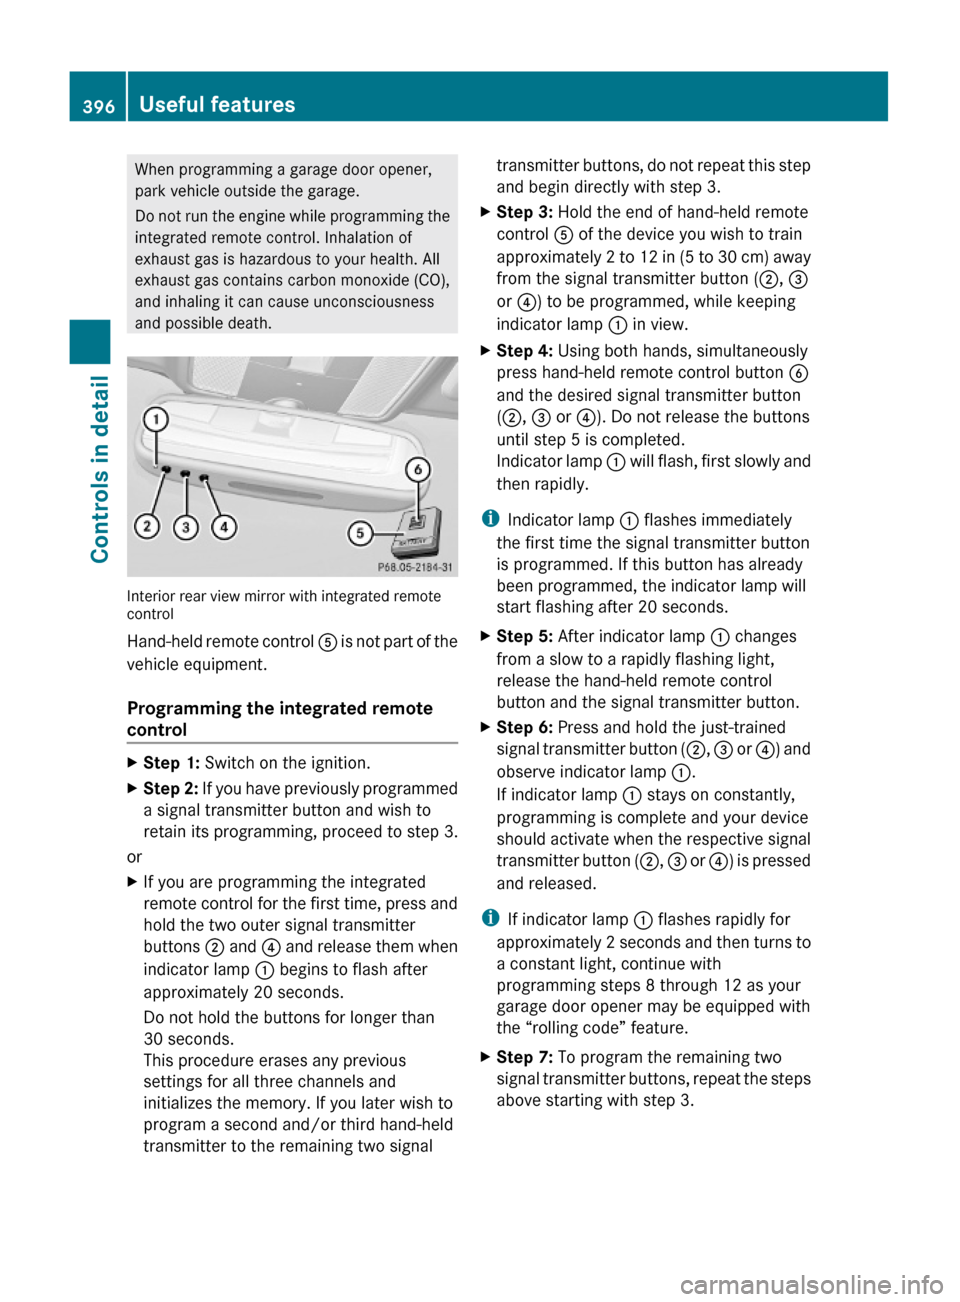
Interior rear view mirror with integrated remotecontrol
Hand-held remote control A is not part of the
vehicle equipment.
Programming the integrated remote
control
XStep 1: Switch on the ignition.XStep 2: If you have previously programmed
a signal transmitter button and wish to
retain its programming, proceed to step 3.
or
XIf you are programming the integrated
remote control for the first time, press and
hold the two outer signal transmitter
buttons ; and ? and release them when
indicator lamp : begins to flash after
approximately 20 seconds.
Do not hold the buttons for longer than
30 seconds.
This procedure erases any previous
settings for all three channels and
initializes the memory. If you later wish to
program a second and/or third hand-held
transmitter to the remaining two signal
transmitter buttons, do not repeat this step
and begin directly with step 3.
XStep 3: Hold the end of hand-held remote
control A of the device you wish to train
approximately 2 to 12 in (5 to 30 cm) away
from the signal transmitter button (;, =
or ?) to be programmed, while keeping
indicator lamp : in view.
XStep 4: Using both hands, simultaneously
press hand-held remote control button B
and the desired signal transmitter button
(;, = or ?). Do not release the buttons
until step 5 is completed.
Indicator lamp : will flash, first slowly and
then rapidly.
iIndicator lamp : flashes immediately
the first time the signal transmitter button
is programmed. If this button has already
been programmed, the indicator lamp will
start flashing after 20 seconds.
XStep 5: After indicator lamp : changes
from a slow to a rapidly flashing light,
release the hand-held remote control
button and the signal transmitter button.
XStep 6: Press and hold the just-trained
signal transmitter button (;, = or ?) and
observe indicator lamp :.
If indicator lamp : stays on constantly,
programming is complete and your device
should activate when the respective signal
transmitter button (;, = or ?) is pressed
and released.
iIf indicator lamp : flashes rapidly for
approximately 2 seconds and then turns to
a constant light, continue with
programming steps 8 through 12 as your
garage door opener may be equipped with
the “rolling code” feature.
XStep 7: To program the remaining two
signal transmitter buttons, repeat the steps
above starting with step 3.
396Useful featuresControls in detail
221_AKB; 6; 20, en-USd2ugruen,Version: 2.11.8.12009-09-24T13:28:17+02:00 - Seite 396
Page 399 of 548

Rolling code programming
To train a garage door opener (or other rolling
code devices) with the rolling code feature,
follow these instructions after completing the
“Programming” portion (steps 1 through 6) of
this text. For your convenience and to
complete the procedure faster, you might
want to have someone assist you.XStep 8: Locate the “training” button on the
garage door opener motor head unit.
i Exact location and color of the button may
vary by garage door opener brand.
Depending on manufacturer, the “training”
button may also be referred to as “learn” or
“smart” button. If there is difficulty locating
the transmitting button, refer to the garage
door opener Operator’s Manual.
XStep 9: Press the “training” button on the
garage door opener motor head unit.
The “training light” is activated.
You have 30 seconds to initiate the
following two steps.XStep 10: Return to the vehicle and firmly
press, hold for 2 seconds and release the
programmed signal transmitter button ( ;,
= or ?).XStep 11: Press, hold for 2 seconds and
release same signal transmitter button a
second time to complete the training
process.
i Some garage door openers (or other
rolling code equipped devices) may require
you to press, hold for 2 seconds and
release the same signal transmitter button
a third time to complete the training
process.
XStep 12: Confirm the garage door
operation by pressing the programmed
signal transmitter button ( ;, = or ?).XStep 13: To program the remaining two
signal transmitter buttons, repeat the steps
above starting with step 3.Gate operator/Canadian programming
Canadian radio-frequency laws require
transmitter signals to “time-out” (or quit)
after several seconds of transmission which
may not be long enough for the integrated
signal transmitter to pick up the signal during
programming. Similar to this Canadian law,
some U.S. gate operators are designed to
“time-out” in the same manner.
If you live in Canada or if you are having
difficulties programming a gate operator
(regardless of where you live) by using the
programming procedures, replace step 4 with
the following:XStep 4: Press and hold the signal
transmitter button ( ;, = or ?). Do not
release this button until it has been
successfully trained.XWhile still holding down the signal
transmitter button ( ;, = or ?), “cycle”
your hand-held remote control button B
as follows: Press and hold button B for
2 seconds, then release it for 2 seconds,
and again press and hold it for 2 seconds.
Repeat this sequence on the hand-held
remote control until the frequency signal
has been learned.
Upon successful training, indicator
lamp : will flash slowly and then rapidly
after several seconds.XProceed with programming step 5 and
step 6 to complete.
i Upon completion of programming the
integrated remote control, make sure you
retain the hand-held remote control that
came with the garage door opener, gate
operator or other device. You may need it
for use in other vehicles, for future
programming of an integrated remote
control, or simply for continued use as a
hand-held remote control to operate the
respective device in other situations.
Useful features397Controls in detail221_AKB; 6; 20, en-USd2ugruen,Version: 2.11.8.12009-09-24T13:28:17+02:00 - Seite 397Z
Page 400 of 548
Reprogramming a single signal
transmitter button
To program a device using a signal
transmitter button previously trained, follow
these steps:
XSwitch on the ignition.XPress and hold the desired signal
transmitter button ( ;, = or ?). Do not
release the button.
Indicator lamp : will begin to flash after
20 seconds.XWithout releasing the signal transmitter
button, proceed with programming starting
with step 3.
Operation of integrated remote control
XSwitch on the ignition.XSelect and press the appropriate
integrated signal transmitter button ( ;,
= or ?) to activate the remote controlled
device.
The integrated remote control transmitter
continues to send the signal as long as the
button is pressed – up to 20 seconds.
Erasing the integrated remote control
memory
i If you sell your vehicle, erase the codes of
all three channels.
XSwitch on the ignition.XSimultaneously press and hold outer signal
transmitter buttons ; and ?, for
approximately 20 seconds, until indicator
lamp : flashes rapidly. Do not hold for
longer than 30 seconds.
The codes of all three channels are erased.Programming tips
If you are having difficulty programming the
integrated remote control, here are some
helpful tips:
R Check the frequency of hand-held remote
control A (typically located on the reverse
side of the remote). The integrated remote
control is compatible with radio-frequency
devices operating between 280-390 MHz.
R Put a new battery in hand-held remote
control A. This will increase the likelihood
of the hand-held remote control sending a
stronger and more accurate signal to the
integrated remote control.
R While performing step 3, hold hand-held
remote control A at different lengths and
angles from the signal transmitter button
( ; , = or ?) you are programming.
Attempt varying angles at the distance of 2
to 12 inches (5 to 30 cm) away or the same
angle at varying distances.
R If another hand-held remote control is
available for the same device, try the
programming steps again using that other
hand-held remote control. Make sure new
batteries are in the hand-held remote
control before beginning the procedure.
R Straighten the antenna wire from the
garage door opener assembly. This may
help improve transmitting and/or receiving
signals.
i Certain types of garage door openers are
incompatible with the integrated remote
control. If you should experience further
difficulties with programming the
integrated remote control, contact an
authorized Mercedes-Benz Center, or call
the Mercedes-Benz Customer Assistance
Center (USA only) at
1-800-FOR-MERCedes (1-800-367-6372),
or the HomeLink ®
Hotline (USA only) at
1-800-355-3515, or the Customer Service
(Canada only) at 1-800-387-0100.
398Useful featuresControls in detail
221_AKB; 6; 20, en-USd2ugruen,Version: 2.11.8.12009-09-24T13:28:17+02:00 - Seite 398
Page 451 of 548
Vehicle equipment ............................450
Where will I find ...? ..........................450
Vehicle status messages in the
multifunction display .......................452
What to do if … ..................................489
Unlocking/locking manually ...........499
Resetting activated NECK-PRO
active front head restraints .............501
Replacing batteries (SmartKey,
remote control, headphone) ............502
Replacing bulbs .................................504
Replacing wiper blades ....................507
Flat tire ..............................................508
Battery ...............................................512
Jump starting ....................................514
Towing the vehicle ............................516
Fuses ..................................................519
449Practical hints221_AKB; 6; 20, en-USd2ugruen,Version: 2.11.8.12009-09-24T13:28:17+02:00 - Seite 449
Page 504 of 548
XFirmly press the head restraint cushion
backward towards the head restraint cover
in direction of arrow = until it engages.
XRepeat this procedure for the second front
seat.
XAfter resetting the NECK-PRO active front
head restraints store reset tool : in the
Mercedes-Benz literature pouch.
For information on NECK-PRO active front
head restraints, see “NECK-PRO active front
head restraints” (Y page 55).
For information on head restraint adjustment,
see “Seats” (Y page 286).
Replacing batteries (SmartKey,
remote control, headphone)
Notes
If the batteries in the SmartKey are
discharged, the vehicle can no longer be
locked or unlocked. It is recommended to
have the batteries replaced at an authorized
Mercedes-Benz Center.
GWarning!
Batteries contain poisonous and corrosive
substances. Therefore, keep the batteries out
of reach of children.
If a battery is swallowed, seek medical help
immediately.
GWarning!
SmartKey batteries contain perchlorate
material, which may require special handling
and regard for the environment. Check with
your local government’s disposal guidelines.
California residents, see www.dtsc.ca.gov/
HazardousWaste/Perchlorate/
index.cfm.
Batteries contain materials that can harm the
environment if disposed of improperly.
Recycling of batteries is the preferred method
of disposal. Many states (USA only) or
provinces (Canada only) require sellers of
batteries to accept old batteries for recycling.
SmartKey
When inserting the batteries, make sure they
are clean and free of lint.
When replacing batteries, always replace
both batteries.
iThe required replacement batteries are
available at any authorized Mercedes-Benz
Center.
Replacement batteries: Lithium, type
CR 2025 or equivalent.
XRemove the mechanical key from the
SmartKey (Y page 499).
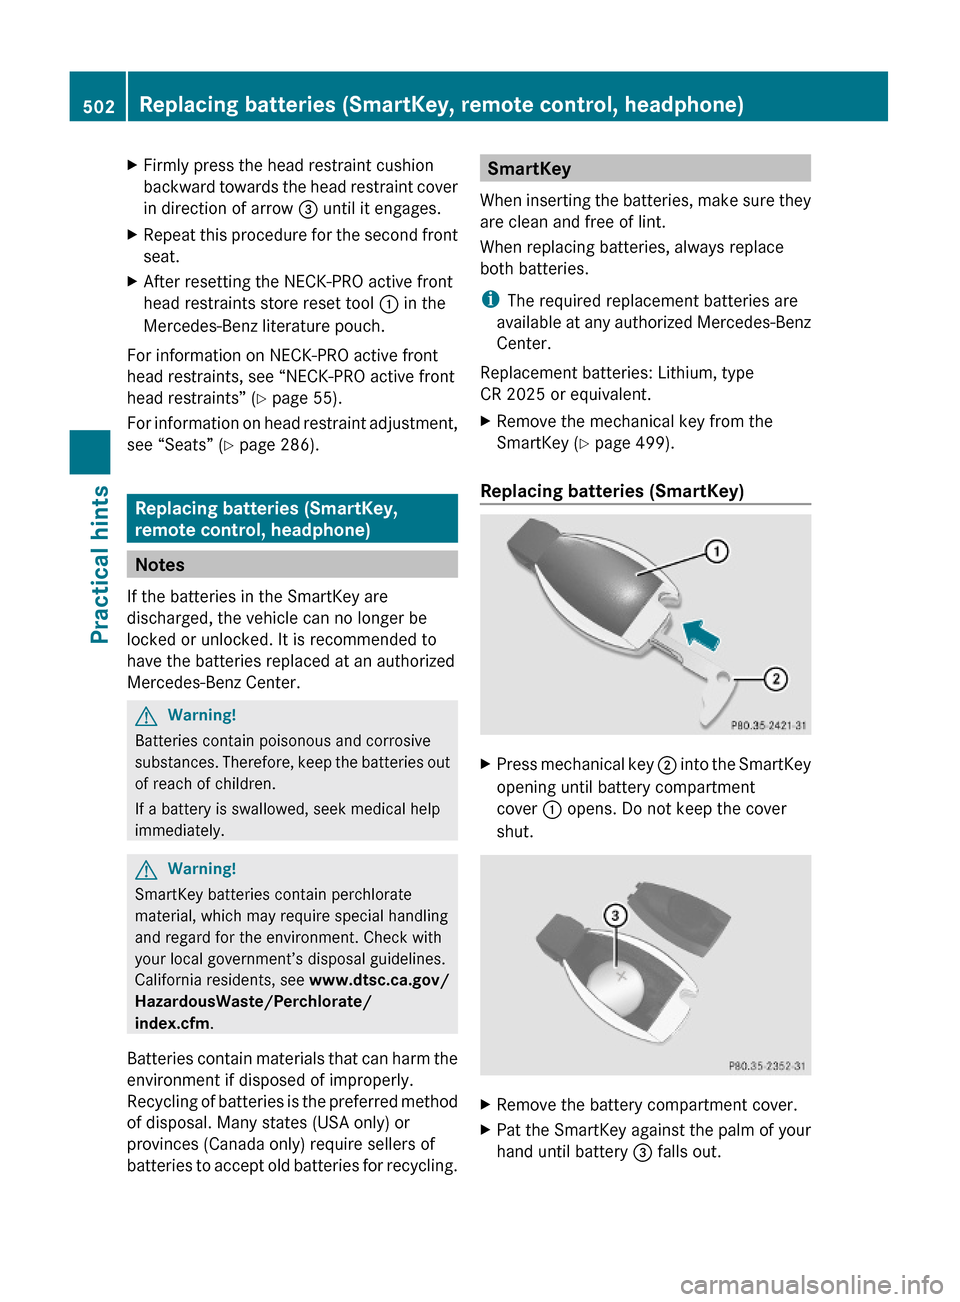
Replacing batteries (SmartKey)
XPress mechanical key ; into the SmartKey
opening until battery compartment
cover : opens. Do not keep the cover
shut.
XRemove the battery compartment cover.XPat the SmartKey against the palm of your
hand until battery = falls out.
502Replacing batteries (SmartKey, remote control, headphone)Practical hints
221_AKB; 6; 20, en-USd2ugruen,Version: 2.11.8.12009-09-24T13:28:17+02:00 - Seite 502
Page 505 of 548
XInsert the new battery with the positive
terminal (+) facing up. Use a lint-free cloth.
XInsert the tabs of the battery compartment
cover into the housing and press the cover
closed.
XSlide mechanical key : back into the
SmartKey.
XCheck the operation of the SmartKey.
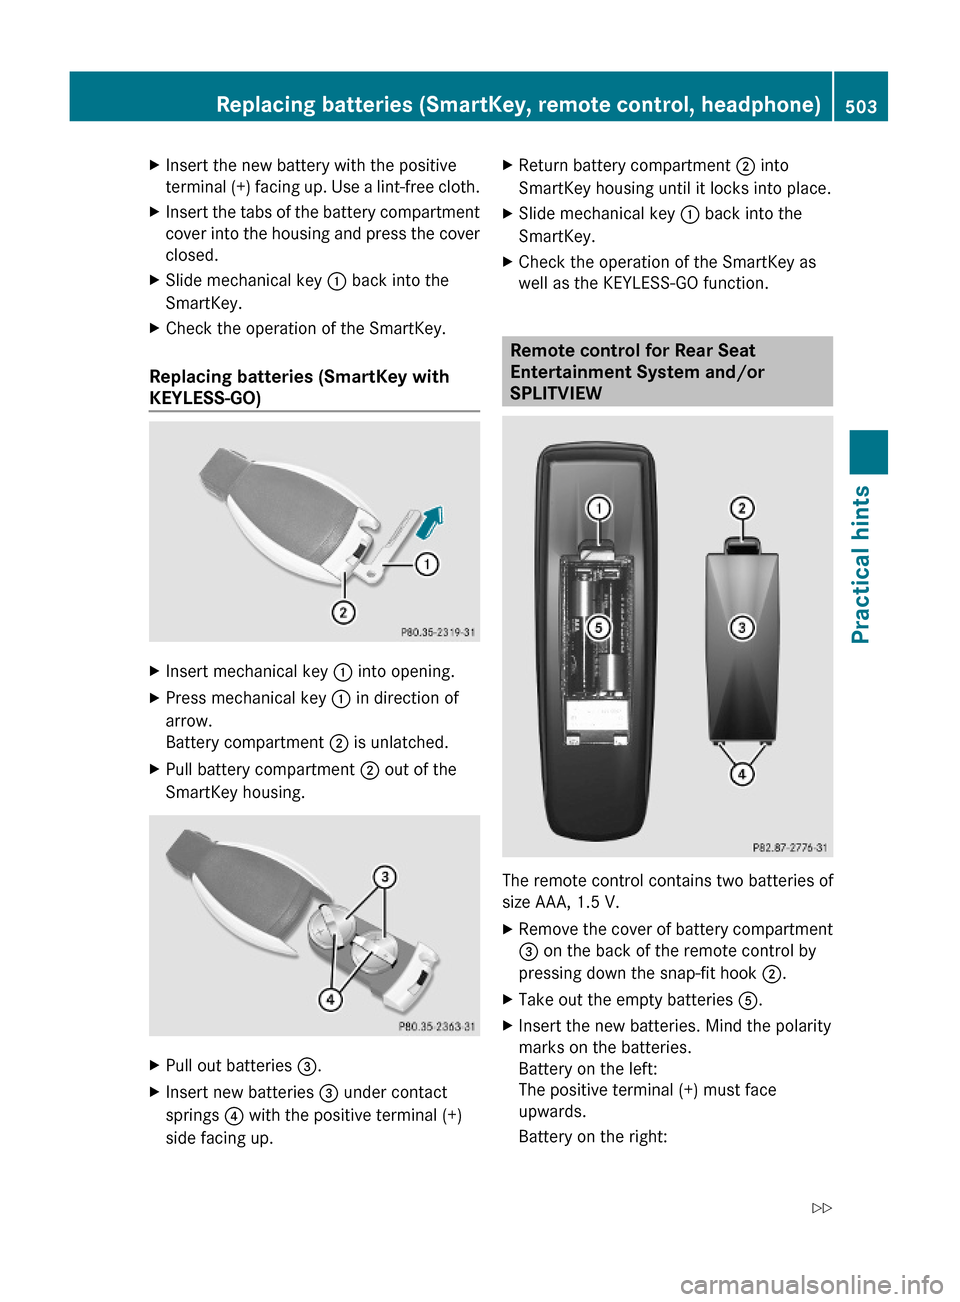
Replacing batteries (SmartKey with
KEYLESS-GO)
XInsert mechanical key : into opening.XPress mechanical key : in direction of
arrow.
Battery compartment ; is unlatched.
XPull battery compartment ; out of the
SmartKey housing.
XPull out batteries =.XInsert new batteries = under contact
springs ? with the positive terminal (+)
side facing up.
XReturn battery compartment ; into
SmartKey housing until it locks into place.
XSlide mechanical key : back into the
SmartKey.
XCheck the operation of the SmartKey as
well as the KEYLESS-GO function.
Remote control for Rear Seat
Entertainment System and/or
SPLITVIEW
The remote control contains two batteries of
size AAA, 1.5 V.
XRemove the cover of battery compartment
3 on the back of the remote control by
pressing down the snap-fit hook 2.
XTake out the empty batteries 5.XInsert the new batteries. Mind the polarity
marks on the batteries.
Battery on the left:
The positive terminal (+) must face
upwards.
Battery on the right:
Replacing batteries (SmartKey, remote control, headphone)503Practical hints221_AKB; 6; 20, en-USd2ugruen,Version: 2.11.8.12009-09-24T13:28:17+02:00 - Seite 503Z