2010 MERCEDES-BENZ S600 ESP
[x] Cancel search: ESPPage 71 of 548

! Avoid spinning of a drive wheel for an
extended period with the ESC switched off.
This may cause serious damage to the
drivetrain which is not covered by the
Mercedes-Benz Limited Warranty.
Switching on the ESCXSwitch on the ESC via the control system
( Y page 231).
PRE-SAFE ®
Brake
The PRE-SAFE ®
Brake is available in vehicles
equipped with DISTRONIC PLUS. The PRE-
SAFE ®
Brake can assist you in minimizing the
risk of a rear-end collision with a vehicle in
front of you. The PRE-SAFE ®
Brake may also
reduce the severity of an accident. At speeds
above approximately 20 mph (30 km/h) it will
issue a warning when your vehicle is
approaching the preceding vehicle very
quickly. An intermittent acoustic warning
sounds and the distance warning lamp ·
in the instrument cluster comes on.
When the driver and front passenger have
fastened their seat belts, the PRE-SAFE ®
Brake can also
R brake the vehicle within a speed range of
up to 112 mph (180 km/h) automatically
R activate preventative occupant safety
measures (PRE-SAFE ®
) ( Y page 54)
GWarning!
An intermittent warning sounds and the
distance warning lamp · in the instrument
cluster is illuminated if the PRE-SAFE ®
Brake
calculates that the distance to the vehicle
ahead and your vehicle’s current speed
indicate that the PRE-SAFE ®
Brake will not be
capable of slowing the vehicle sufficiently to
maintain the preset following distance, which
creates a danger of a collision.
Immediately brake your vehicle to increase
the distance between your vehicle and the
vehicle driving in front of you. The warning
sound is intended as a final caution that you
have not interceded with your own braking
inputs to avoid a potentially dangerous
situation. Do not wait for the operation of the
warning signal to intercede with your own
braking, as that will result in potentially
dangerous emergency braking which will not
always result in an impact being avoided.
Tailgating increases the risk of an accident.GWarning!
The PRE-SAFE ®
Brake is a convenience
system designed to assist the driver during
vehicle operation. The responsibility for the
vehicle speed and the distance to the vehicle
ahead, including most importantly brake
operation to assure safe stopping distance,
always remains with the driver.
Always pay attention to traffic conditions
even while the PRE-SAFE ®
Brake is switched
on. Otherwise, you may not be able to
recognize dangerous situations until it is too
late and could cause an accident resulting in
personal or fatal injury to you or others.
i USA only:
This device has been approved by the FCC
as a “Vehicular Radar System”. The radar
sensor is intended for use in an automotive
radar system only. Removal, tampering, or
altering of the device will void any
warranties, and is not permitted by the
FCC. Do not tamper with, alter, or use in
any non-approved way.
Any unauthorized modification to this
device could void the user’s authority to
operate the equipment.
Driving safety systems69Safety and security221_AKB; 6; 20, en-USd2ugruen,Version: 2.11.8.12009-09-24T13:28:17+02:00 - Seite 69Z
Page 72 of 548
iCanada only:
This device complies with RSS-210 of
Industry Canada. Operation is subject to
the following two conditions:
1. This device may not cause interference,
and
2. this device must accept any interference received, including
interference that may cause undesired
operation of the device.
Removal, tampering, or altering of the
device will void any warranties, and is not
permitted. Do not tamper with, alter, or use
in any non-approved way.
Any unauthorized modification to this
device could void the user’s authority to
operate the equipment.
Using the radar sensors, the PRE-SAFE ®
Brake detects obstacles that are in your
driving path for a sufficient period of time for
the system to recognize it. If you approach a
vehicle and the PRE-SAFE ®
Brake has
established that the distance to the vehicle
ahead at your current speed is so close that
the PRE-SAFE ®
Brake will not be capable of
slowing the vehicle sufficiently, the system
will initially warn you visually and acoustically.
If you do not apply the brakes yourself or
maneuver around a sensed obstacle, the
vehicle will brake lightly automatically. The
PRE-SAFE ®
system ( Y page 54) is activated
when the distance to the vehicle ahead at
your current speed is so close that the PRE-
SAFE ®
Brake will not be capable of slowing
the vehicle sufficiently.
When the danger of a collision still persists
and you do not brake or accelerate
significantly, the PRE-SAFE ®
Brake may
initiate full application of the brakes
automatically.GWarning!
The PRE-SAFE ®
Brake will only respond with
brake assistance if it has clearly detected an
object. Detection can be impeded by
R dirty or covered sensors
R snowfall or heavy rain
R disturbance from other radar sources
R strong radar reflection such as in parking
garages
The PRE-SAFE ®
Brake uses radar signals that
are not reflected well by narrow objects and
absorptive materials. For this reason the PRE-
SAFE ®
Brake will not react to persons,
animals, and approaching traffic or cross-
traffic.
The PRE-SAFE ®
Brake may not detect narrow
vehicles driving in front of you, such as
motorcycles and vehicles driving offset from
your vehicle center.
GWarning!
Depending on the vehicle speed, the
PRE-SAFE ®
Brake brakes your vehicle with a
maximum of 13 ft/s 2
(4 m/s 2
) before a
possible hard stop. This corresponds to about
40% of the maximum deceleration ability of
your vehicle. The driver must apply the brakes
additionally in order to prevent a collision. The
self-acting hard stop will be initiated when the
imminent danger of a collision exists, e.g.
when an evasive driving maneuver cannot
avoid an accident.
The PRE-SAFE ®
Brake applies the brake pedal
automatically which results in the brake pedal
moving. Therefore keep driver’s foot area
clear at all times, including the area under the
brake pedal. Objects stored in this area may
impair pedal movement which could interfere
with the braking ability of the PRE-SAFE ®
Brake.
Do not place your foot under the brake pedal
– your foot could become caught.
70Driving safety systemsSafety and security
221_AKB; 6; 20, en-USd2ugruen,Version: 2.11.8.12009-09-24T13:28:17+02:00 - Seite 70
Page 74 of 548
ActivatingXWith SmartKey: Remove the SmartKey
from the starter switch.
XWith KEYLESS-GO: Turn off the engine and
open the driver’s door.
Deactivating
XSwitch on the ignition.
iStarting the engine will also deactivate
the immobilizer.
In the event that the engine cannot be
started (yet the vehicle’s battery is
charged), the system is not operational.
Contact an authorized Mercedes-Benz
Center or call 1-800-FOR-MERCedes (in the
USA) or 1-800-387-0100 (in Canada).
Anti-theft alarm system
Once the alarm system has been armed, a
visual and audible alarm is triggered when
someone opens
Ra door
Rthe trunk
Rthe hood
The alarm will stay on even if the activating
element, a door, for example, is closed
immediately.
The alarm system will also be triggered when
Rthe vehicle is opened with the mechanical
key
Ra door is opened from the inside
To cancel the alarm after it has been
triggered, see “Canceling the alarm”
(Y page 73).
iIf the alarm stays on for more than
30 seconds, the Tele Aid system initiates a
call to the Customer Assistance Center
automatically. The Tele Aid system will
initiate the call provided that
Ryou have subscribed to the Tele Aid
service
Rthe Tele Aid service has been activated
properly
Rthe necessary mobile phone, power
supply and GPS coverage are available
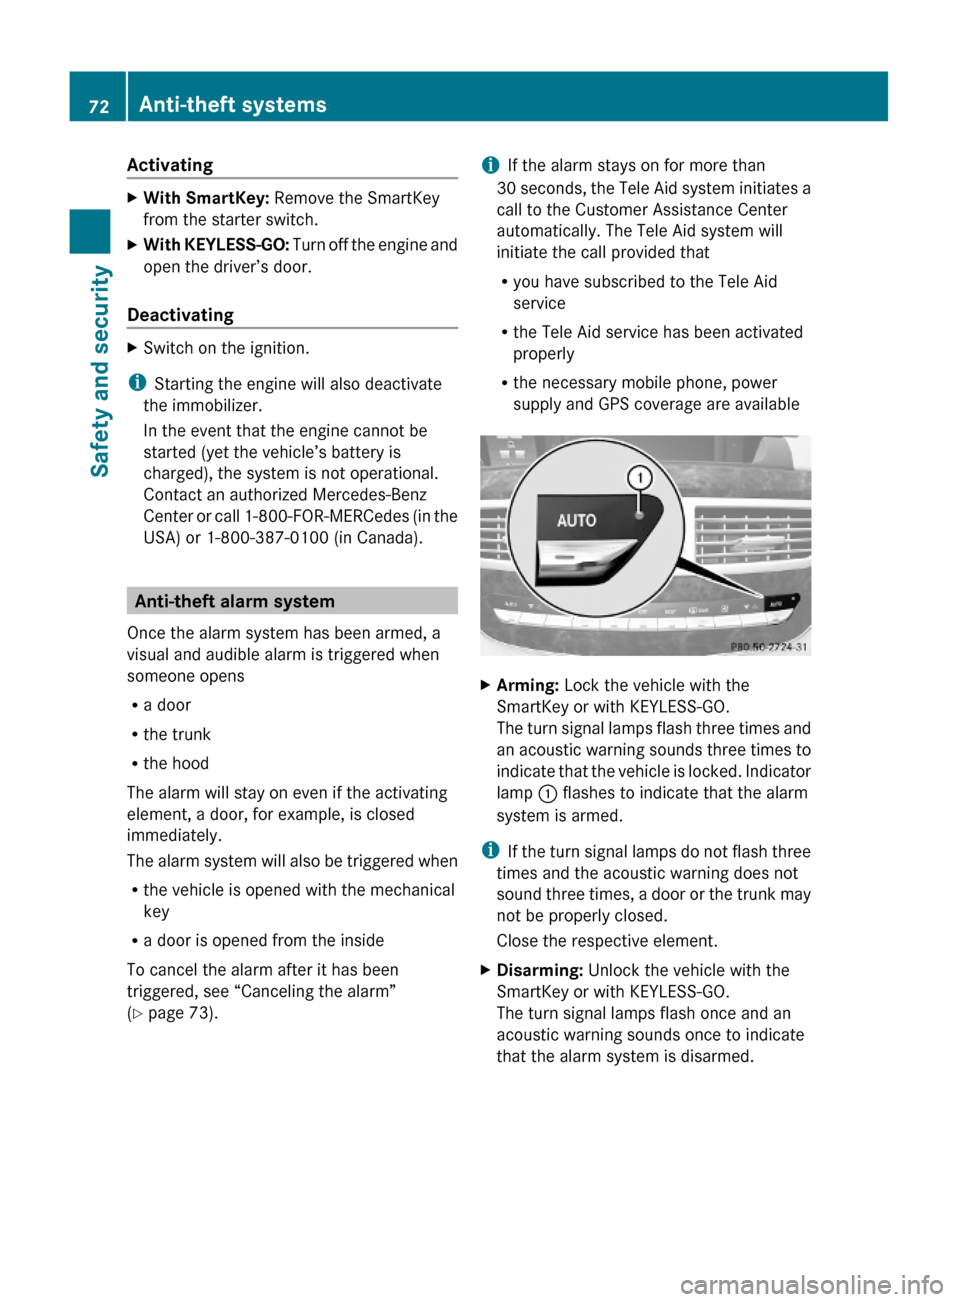
XArming: Lock the vehicle with the
SmartKey or with KEYLESS-GO.
The turn signal lamps flash three times and
an acoustic warning sounds three times to
indicate that the vehicle is locked. Indicator
lamp : flashes to indicate that the alarm
system is armed.
iIf the turn signal lamps do not flash three
times and the acoustic warning does not
sound three times, a door or the trunk may
not be properly closed.
Close the respective element.
XDisarming: Unlock the vehicle with the
SmartKey or with KEYLESS-GO.
The turn signal lamps flash once and an
acoustic warning sounds once to indicate
that the alarm system is disarmed.
72Anti-theft systemsSafety and security
221_AKB; 6; 20, en-USd2ugruen,Version: 2.11.8.12009-09-24T13:28:17+02:00 - Seite 72
Page 78 of 548

Vehicle equipment
i This Operator’s Manual describes all
features, standard or optional, potentially
available for your vehicle at the time of
purchase. Please be aware that your
vehicle might not be equipped with all
features described in this manual.
COMAND introduction
COMAND operating safety
COMAND (
Cockpit Management and Data
System) is an information and operating
center for vehicle sound and communications
systems. It includes the radio and navigation
system, as well as other optional equipment
(satellite radio, telephone, etc.).
GWarning!
Any alteration of electronic components or
software can cause malfunctions.
Radio, satellite radio, amplifier, CD/DVD
changer, navigation module, telephone and
Voice Control Systems are interconnected.
Therefore, if one of the components is not
operational, or has not been removed/
replaced properly, the function of other
components could be impaired.
Such conditions might seriously impair the
operating safety of your vehicle.
We recommend to have any service work on
electronic components carried out by an
authorized Mercedes-Benz Center.
GWarning!
In order to avoid distraction which could lead
to an accident, the driver should enter system
settings while the vehicle is at a standstill, and
operate the system only when permitted by
road, weather and traffic conditions.
Bear in mind that at a speed of just 30 mph
(approximately 50 km/h), your vehicle is
covering a distance of 44 feet (approximately
14 m) every second.
COMAND supplies you with information to
help you select your route more easily and
guide you conveniently and safely to your
destination. For safety reasons, we
encourage the driver to stop the vehicle in a
safe place before answering or placing a call,
or consulting the COMAND screen to read
navigational maps, instructions, or
downloaded information.GWarning!
While the navigation system provides
directional assistance, the driver must remain
focused on safe driving behavior, especially
attention to traffic and street signs, and
should utilize the system’s audio cues while
driving.
The navigation system does not supply any
information on stop signs, yield signs, traffic
regulations or traffic safety rules. Their
observance always remains in the driver’s
personal responsibility. Maps do not cover all
areas nor all routes within an area.
GWarning!
HYBRID vehicles: It is imperative that you read
the HYBRID Supplemental Operating
Instructions included in your vehicle literature
portfolio. You may otherwise not receive all
necessary safety information and warning for
the operation of your vehicle.
Availability of functions while the
vehicle is in motion
For safety reasons, certain COMAND
functions are not available while the vehicle
is in motion or they are only available to a
limited extent. You will notice this, for
example, by the fact that certain menu items
cannot be selected or that the COMAND
display shows a corresponding message.
76COMAND introductionControl systems
221_AKB; 6; 20, en-USd2ugruen,Version: 2.11.8.12009-09-24T13:28:17+02:00 - Seite 76
Page 80 of 548

Function?T Seat menu button
(Y page 216)
AS Shortcut button for:
RTelephone (Y page 148)
RNavigation (Y page 95)
Bu COMAND on/off button
(Y page 77)
CH Volume control (Y page 88)Dh Favorite button (Y page 94)
COMAND display
In the COMAND display, you will find the
function currently selected and the
corresponding menus. The COMAND display
is divided into several areas.
:Status line;Main functions=Main area?SubmenusAClimate control settings
The currently selected main function is
highlighted.
Once you have selected a main function, main
area = is active.
iThe layout of the menus may vary
depending on your vehicle’s equipment.
This manual shows the menus for a fully
equipped vehicle.
Adjusting COMAND display illuminationXIncreasing the illumination: Turn
knob : clockwise.
XDimming the illumination: Turn knob :
counterclockwise.
Swiveling COMAND display
iThis function is not available in vehicles
with SPLITVIEW.
With button : or ; you can swivel the
COMAND display to the left or right.
Instrument cluster multifunction
display
This section describes features and controls
via the COMAND controller, display and
shortcut buttons only.
Related COMAND features are described in
the “Instrument cluster control system”
section (Y page 220). It contains function
descriptions and operation of the instrument
cluster multifunction display and the
multifunction steering wheel buttons.
78COMAND introductionControl systems
221_AKB; 6; 20, en-USd2ugruen,Version: 2.11.8.12009-09-24T13:28:17+02:00 - Seite 78
Page 82 of 548
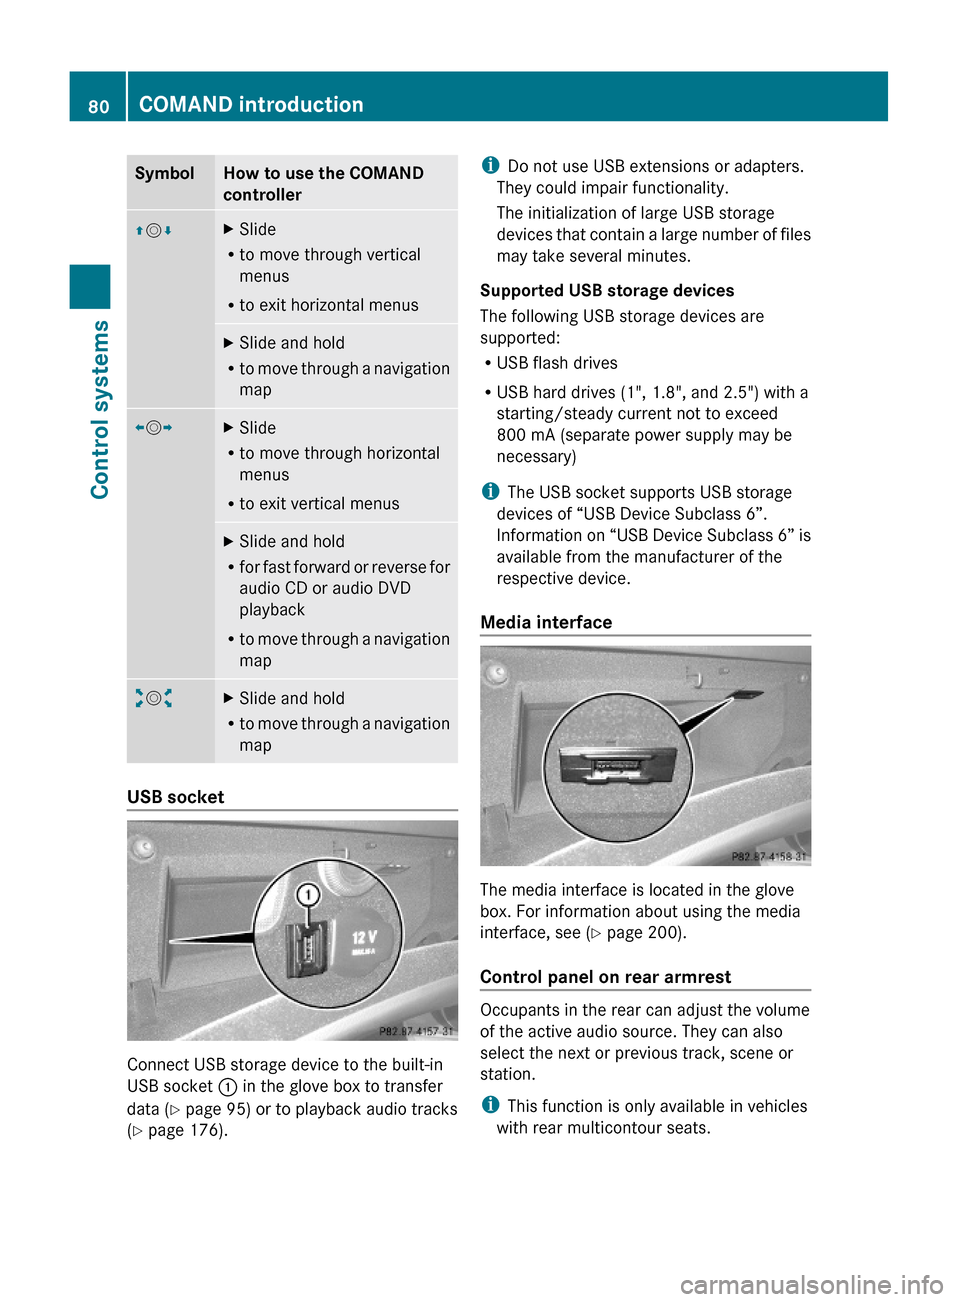
SymbolHow to use the COMAND
controller
ZVÆXSlide
Rto move through vertical
menus
Rto exit horizontal menus
XSlide and hold
Rto move through a navigation
map
XVYXSlide
Rto move through horizontal
menus
Rto exit vertical menus
XSlide and hold
Rfor fast forward or reverse for
audio CD or audio DVD
playback
Rto move through a navigation
map
aVbXSlide and hold
Rto move through a navigation
map
USB socket
Connect USB storage device to the built-in
USB socket : in the glove box to transfer
data (Y page 95) or to playback audio tracks
(Y page 176).
iDo not use USB extensions or adapters.
They could impair functionality.
The initialization of large USB storage
devices that contain a large number of files
may take several minutes.
Supported USB storage devices
The following USB storage devices are
supported:
RUSB flash drives
RUSB hard drives (1", 1.8", and 2.5") with a
starting/steady current not to exceed
800 mA (separate power supply may be
necessary)
iThe USB socket supports USB storage
devices of “USB Device Subclass 6”.
Information on “USB Device Subclass 6” is
available from the manufacturer of the
respective device.
Media interface
The media interface is located in the glove
box. For information about using the media
interface, see (Y page 200).
Control panel on rear armrest
Occupants in the rear can adjust the volume
of the active audio source. They can also
select the next or previous track, scene or
station.
iThis function is only available in vehicles
with rear multicontour seats.
80COMAND introductionControl systems
221_AKB; 6; 20, en-USd2ugruen,Version: 2.11.8.12009-09-24T13:28:17+02:00 - Seite 80
Page 83 of 548
Rear armrest
:Adjusting volume;Selecting next/previous track, scene or
station
Remote control for Rear Seat
Entertainment System and/or
SPLITVIEW
GObserve Safety notes, see page 76.
SPLITVIEW includes one remote control for
the front passenger.
The Rear Seat Entertainment System
includes two remote controls for the rear
passenger compartment.
If your vehicle is equipped with Rear Seat
Entertainment System and SPLITVIEW, the
remote controls are interchangeable.
For information on using SPLITVIEW, see
(Y page 90).
For information on using the Rear Seat
Entertainment System, see (Y page 189).
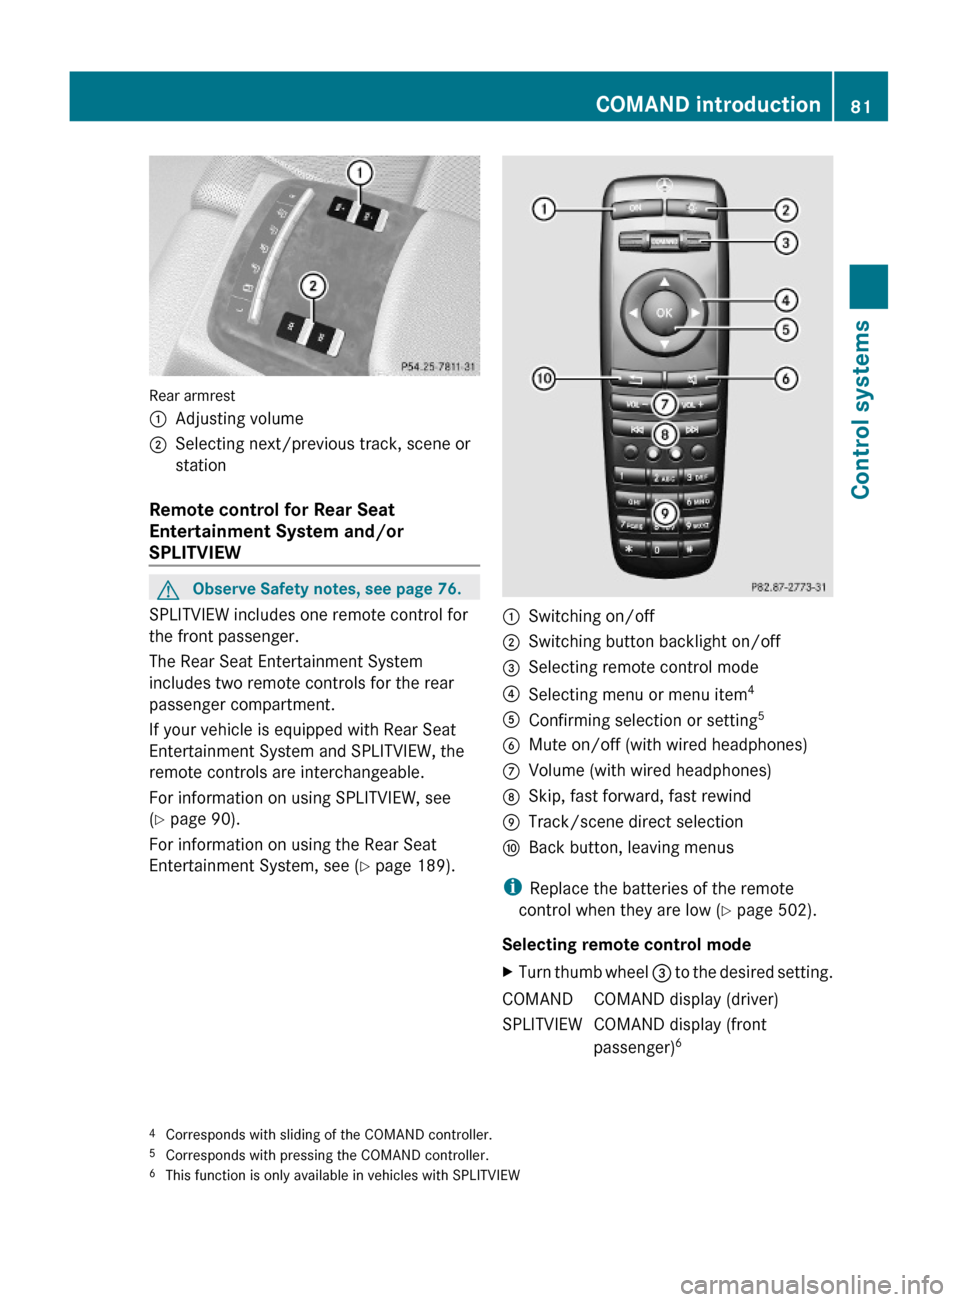
:Switching on/off;Switching button backlight on/off=Selecting remote control mode?Selecting menu or menu item4AConfirming selection or setting5BMute on/off (with wired headphones)CVolume (with wired headphones)DSkip, fast forward, fast rewindETrack/scene direct selectionFBack button, leaving menus
iReplace the batteries of the remote
control when they are low (Y page 502).
Selecting remote control mode
XTurn thumb wheel = to the desired setting.COMANDCOMAND display (driver)SPLITVIEWCOMAND display (front
passenger)64Corresponds with sliding of the COMAND controller.5Corresponds with pressing the COMAND controller.6This function is only available in vehicles with SPLITVIEW
COMAND introduction81Control systems221_AKB; 6; 20, en-USd2ugruen,Version: 2.11.8.12009-09-24T13:28:17+02:00 - Seite 81Z
Page 84 of 548
REAR LLeft screen7REAR RRight screen 7
i
In position COMAND, you can operate
various COMAND functions via remote
control buttons ? and A.
Switching SPLITVIEW or rear screens on/
off
i When the SmartKey is in starter switch
position 0 or 1 or removed from the starter
switch, the rear screens switch off after 30
minutes automatically. A corresponding
message appears on the screens prior to
switching off.
You can switch the screens back on. Keep
in mind however that this will drain the
vehicle battery.
XSwitching on with the COMAND system
already on: Aim the remote control on the
screen.XPress button :.XSwitching off: Aim the remote control on
the screen.XPress button :.
Switching button backlight on/off
XPress button ;.
i
When you do not use the remote control
for approximately 15 seconds, the button
backlight switches off automatically.
Mute on/off (for wired headphones or
COMAND)
XPress button B.Selecting menu or menu item and
confirming selectionXSelecting menu or menu item: Press
arrow buttons ?.XConfirming selection: Press button A.
Headphone
GWarning!
The driver should not wear a headphone while
operating the vehicle under any
circumstances. The use of a headphone while
driving the vehicle could drastically impair the
ability to react to audible traffic conditions
(e.g. emergency sirens from police/fire/
ambulance, another car’s horn, etc.).
GWarning!
When not in use, headphones or external
video sources should be stored in a safe
location (e.g. one of the vehicle’s storage
compartments) so that they are not loose
within the passenger compartment during
braking, vehicle maneuvers or a traffic
accident. Objects moving within the
passenger compartment could cause serious
personal injury to vehicle occupants.
GWarning!
Due to a potential choking hazard, wired
headphone usage by children should only
occur with adult supervision.
For information on using SPLITVIEW, see
( Y page 90).
For information on using the Rear Seat
Entertainment System, see ( Y page 189).
7
This function is only available in vehicles with Rear Seat Entertainment System82COMAND introductionControl systems
221_AKB; 6; 20, en-USd2ugruen,Version: 2.11.8.12009-09-24T13:28:17+02:00 - Seite 82