2010 MERCEDES-BENZ S600 Battery
[x] Cancel search: BatteryPage 154 of 548
1-800-FOR-MERCedes
(1-800-367-6372) (in the USA)
R call Customer Service at
1-800-387-0100 (in Canada)
The battery of the mobile phone should
always be charged sufficiently to avoid
malfunctions.
You should check the following on your
mobile phone (see your mobile phone
operating instructions) to prepare for
telephony via the Bluetooth ®
interface:
R Hands-Free Profile (HFP)
The mobile phone must support Hands-
Free Profile 1.0 or higher.
i Some displays, such as the signal
strength, appear depending on the
supported Hands-Free Profile version.
R Bluetooth ®
visibility
With certain mobile phones, the
Bluetooth ®
function must be activated but
also made "visible" to other devices.
R Bluetooth ®
device name
Each Bluetooth ®
device has a Bluetooth ®
device name. The device name is arbitrary,
but it may be identical for all devices of a
single mobile phone manufacturer. You
should therefore assign an individual and
unique device name to your mobile phone.
Connecting the mobile phoneXSwitch on the mobile phone and enter the
PIN. Refer to the mobile phone operating
instructions for details.XActivate the Bluetooth ®
functionality on
the mobile phone. Refer to mobile phone
operating instructions for detail.
Bluetooth ®
is activated in the COMAND by
default. If the Bluetooth function in the
COMAND is not activated, the message
Bluetooth not activated in system
settings. appears. Activate Bluetooth ®
in
the COMAND manually ( Y page 151).
Authorizing the mobile phone
The mobile phone must be registered, e.g.
authorized, before you can use it in
connection with COMAND for the first time.
You can authorize several mobile phones.
COMAND will always connect to the last
connected mobile phone within range.
i If the connection to the last connected
mobile phone fails, COMAND searches for
the mobile phone that was connected
before that.
When authorizing a new mobile phone, it will
be connected automatically 11
.XSelect Data/Connections Q
Bluetooth Telephones Q Update .
The COMAND searches for Bluetooth ®
devices within range and lists them in the
Bluetooth ®
phone list.
The duration of the search depends on the
number of Bluetooth ®
devices within range
and the characteristics of the mobile
phone, such as Hands-Free Profile version
and possibly required visibility.11 Function available if supported by the mobile phone.152COMAND telephoneControl systems
221_AKB; 6; 20, en-USd2ugruen,Version: 2.11.8.12009-09-24T13:28:17+02:00 - Seite 152
Page 276 of 548
Vehicle equipment
iThis Operator’s Manual describes all
features, standard or optional, potentially
available for your vehicle at the time of
purchase. Please be aware that your
vehicle might not be equipped with all
features described in this manual.
Locking and unlocking
Notes
GObserve Safety notes, see page 56.
When unlocking or locking the vehicle with
the SmartKey an acoustic signal sounds. The
acoustic signal is activated at the factory. If
you wish to deactivate the feature, or adjust
its signal volume, contact an authorized
Mercedes-Benz Center.
When unlocking the vehicle, all turn signal
lamps flash once. An acoustic signal sounds
once, and the locking knobs in the doors
move up. The anti-theft alarm system is
disarmed.
When locking the vehicle, all turn signal lamps
flash three times. An acoustic signal sounds
three times, and the locking knobs in the
doors move down. The anti-theft alarm
system is armed.
All doors and the trunk must be closed.
If you cannot lock or unlock the vehicle with
the SmartKey, the batteries in the SmartKey
are discharged, the SmartKey is
malfunctioning, or the vehicle battery is
drained.
XCheck the batteries in the SmartKey
(Y page 277) and replace them if
necessary.
XUse the mechanical key to unlock the
driver’s door and the trunk (Y page 499).
XUse the mechanical key to lock the vehicle
(Y page 500).
XHave the vehicle battery and the vehicle
battery connections checked at an
authorized Mercedes-Benz Center.
If the SmartKey is malfunctioning, contact
Roadside Assistance or an authorized
Mercedes-Benz Center.
SmartKey
Your vehicle comes supplied with two
SmartKeys, each with remote control and a
removable mechanical key.
The SmartKey centrally locks and unlocks
Rthe doors
Rthe trunk lid
Rthe fuel filler flap
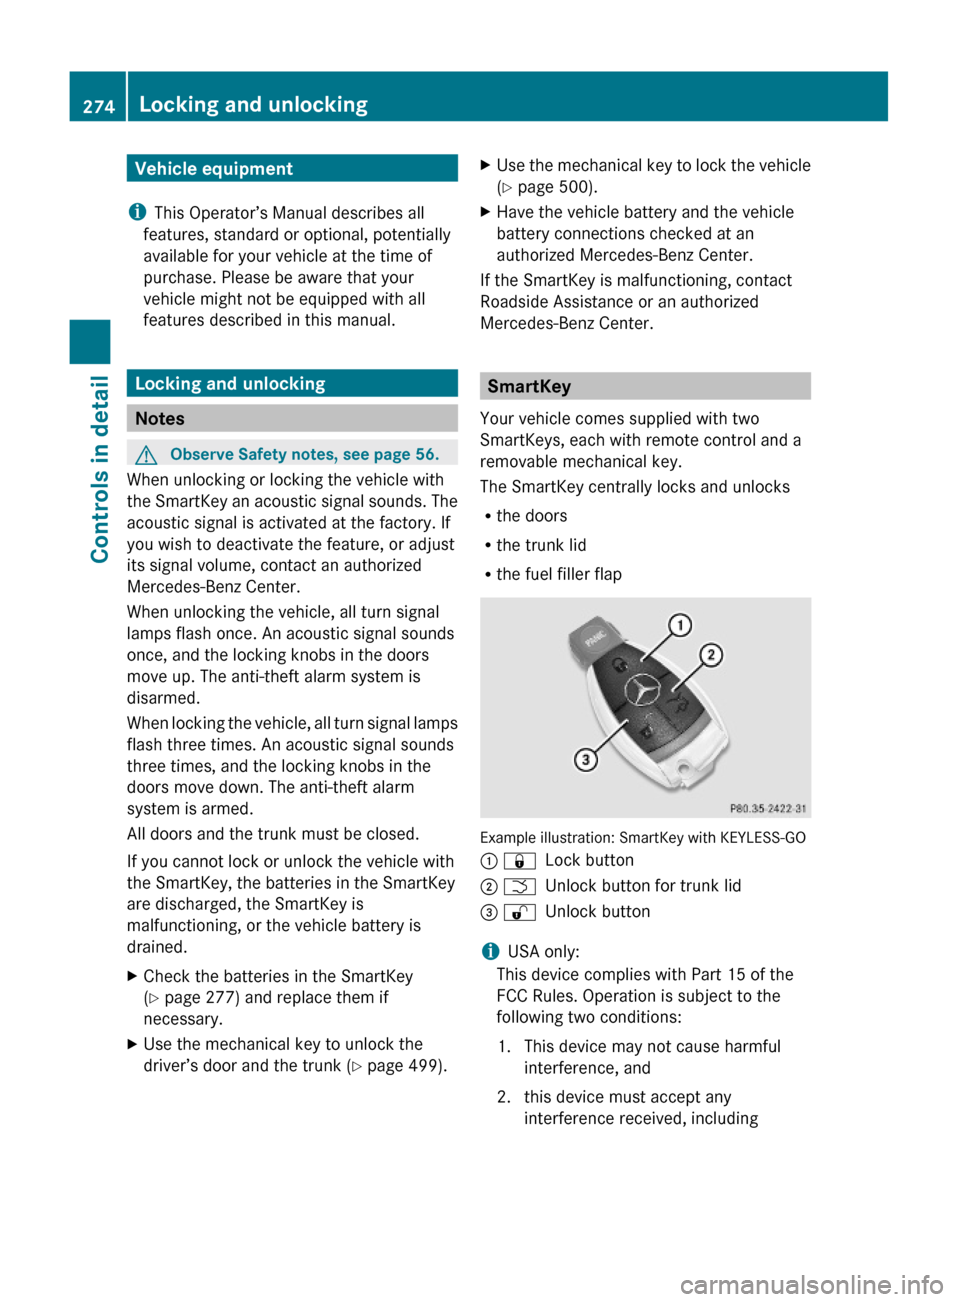
Example illustration: SmartKey with KEYLESS-GO
: &Lock button; FUnlock button for trunk lid= %Unlock button
iUSA only:
This device complies with Part 15 of the
FCC Rules. Operation is subject to the
following two conditions:
1. This device may not cause harmful
interference, and
2. this device must accept any
interference received, including
274Locking and unlockingControls in detail
221_AKB; 6; 20, en-USd2ugruen,Version: 2.11.8.12009-09-24T13:28:17+02:00 - Seite 274
Page 277 of 548
interference that may cause undesired
operation.
Any unauthorized modification to this
device could void the user’s authority to
operate the equipment.
i Canada only:
This device complies with RSS-210 of
Industry Canada. Operation is subject to
the following two conditions:
1. This device may not cause interference,
and
2. this device must accept any interference received, including
interference that may cause undesired
operation of the device.
Any unauthorized modification to this
device could void the user’s authority to
operate the equipment.
Factory setting XGlobal unlocking: Press button %.
Unless you open a door or the trunk within
approximately 40 seconds after unlocking
the vehicle:
R The vehicle will be locked again.
R The anti-theft alarm system will be
rearmed.
XGlobal locking: Press button &.
Selective setting
If you frequently travel alone, you may wish
to reprogramm the SmartKey. Pressing
button % will then only unlock the driver’s
door and the fuel filler flap.
XSwitching on/off: Press and hold buttons
% and & simultaneously for
approximately 6 seconds until the battery
check lamp ( Y page 277) flashes twice.
The SmartKey will then function as follows:
XUnlocking driver’s door and fuel filler
flap: Press button % once.XGlobal unlocking: Press button %
twice.XGlobal locking: Press button &.
KEYLESS-GO
Vehicles equipped with KEYLESS-GO come
with two SmartKeys with KEYLESS-GO, each
with remote control and a removable
mechanical key.
The KEYLESS-GO function is integrated into
the SmartKey. The validity of the SmartKey is
checked every time you grasp an outside door
handle.
When the SmartKey is valid, your vehicle
unlocks
R the doors
R the trunk lid
R the fuel filler flap
i USA only:
This device complies with Part 15 of the
FCC Rules. Operation is subject to the
following two conditions:
1. This device may not cause harmful interference, and
2. this device must accept any interference received, including
interference that may cause undesired
operation.
Any unauthorized modification to this
device could void the user’s authority to
operate the equipment.
Locking and unlocking275Controls in detail221_AKB; 6; 20, en-USd2ugruen,Version: 2.11.8.12009-09-24T13:28:17+02:00 - Seite 275Z
Page 279 of 548
Possibility 2 (One SmartKey in the vehicle,
no SmartKey outside the vehicle):
When exiting and trying to lock the vehicle,
the message Key Detected In Vehicle
appears in the multifunction display. The
vehicle will not be locked.
Factory setting
XGlobal unlocking: Pull an outside door
handle.
Unless you open a door or the trunk within
approximately 40 seconds after unlocking
the vehicle:
RThe vehicle will be locked again.
RThe anti-theft alarm system will be
rearmed.
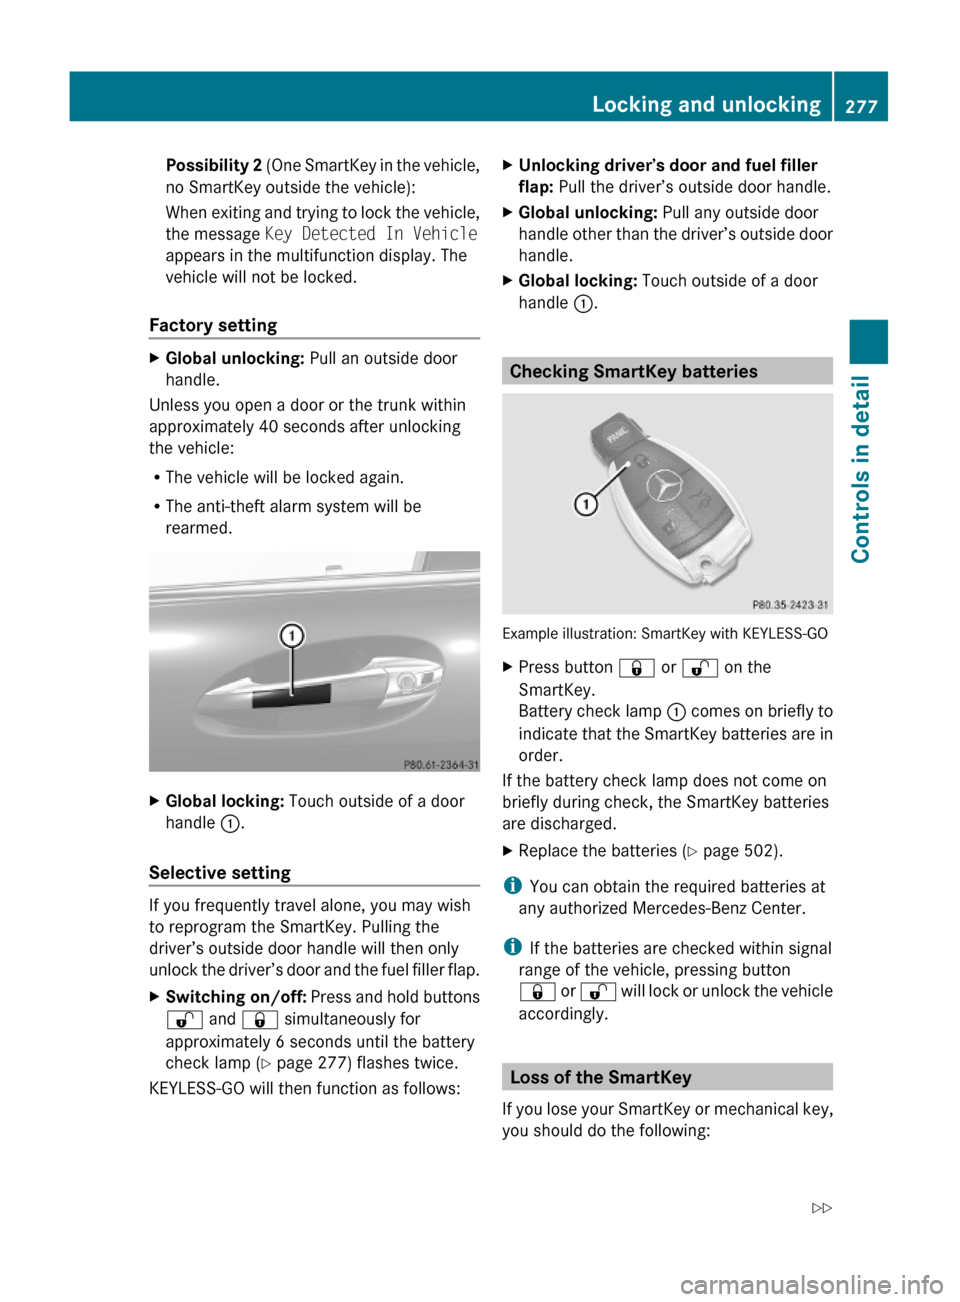
XGlobal locking: Touch outside of a door
handle :.
Selective setting
If you frequently travel alone, you may wish
to reprogram the SmartKey. Pulling the
driver’s outside door handle will then only
unlock the driver’s door and the fuel filler flap.
XSwitching on/off: Press and hold buttons
% and & simultaneously for
approximately 6 seconds until the battery
check lamp (Y page 277) flashes twice.
KEYLESS-GO will then function as follows:
XUnlocking driver’s door and fuel filler
flap: Pull the driver’s outside door handle.
XGlobal unlocking: Pull any outside door
handle other than the driver’s outside door
handle.
XGlobal locking: Touch outside of a door
handle :.
Checking SmartKey batteries
Example illustration: SmartKey with KEYLESS-GO
XPress button & or % on the
SmartKey.
Battery check lamp : comes on briefly to
indicate that the SmartKey batteries are in
order.
If the battery check lamp does not come on
briefly during check, the SmartKey batteries
are discharged.
XReplace the batteries (Y page 502).
iYou can obtain the required batteries at
any authorized Mercedes-Benz Center.
iIf the batteries are checked within signal
range of the vehicle, pressing button
& or % will lock or unlock the vehicle
accordingly.
Loss of the SmartKey
If you lose your SmartKey or mechanical key,
you should do the following:
Locking and unlocking277Controls in detail221_AKB; 6; 20, en-USd2ugruen,Version: 2.11.8.12009-09-24T13:28:17+02:00 - Seite 277Z
Page 285 of 548
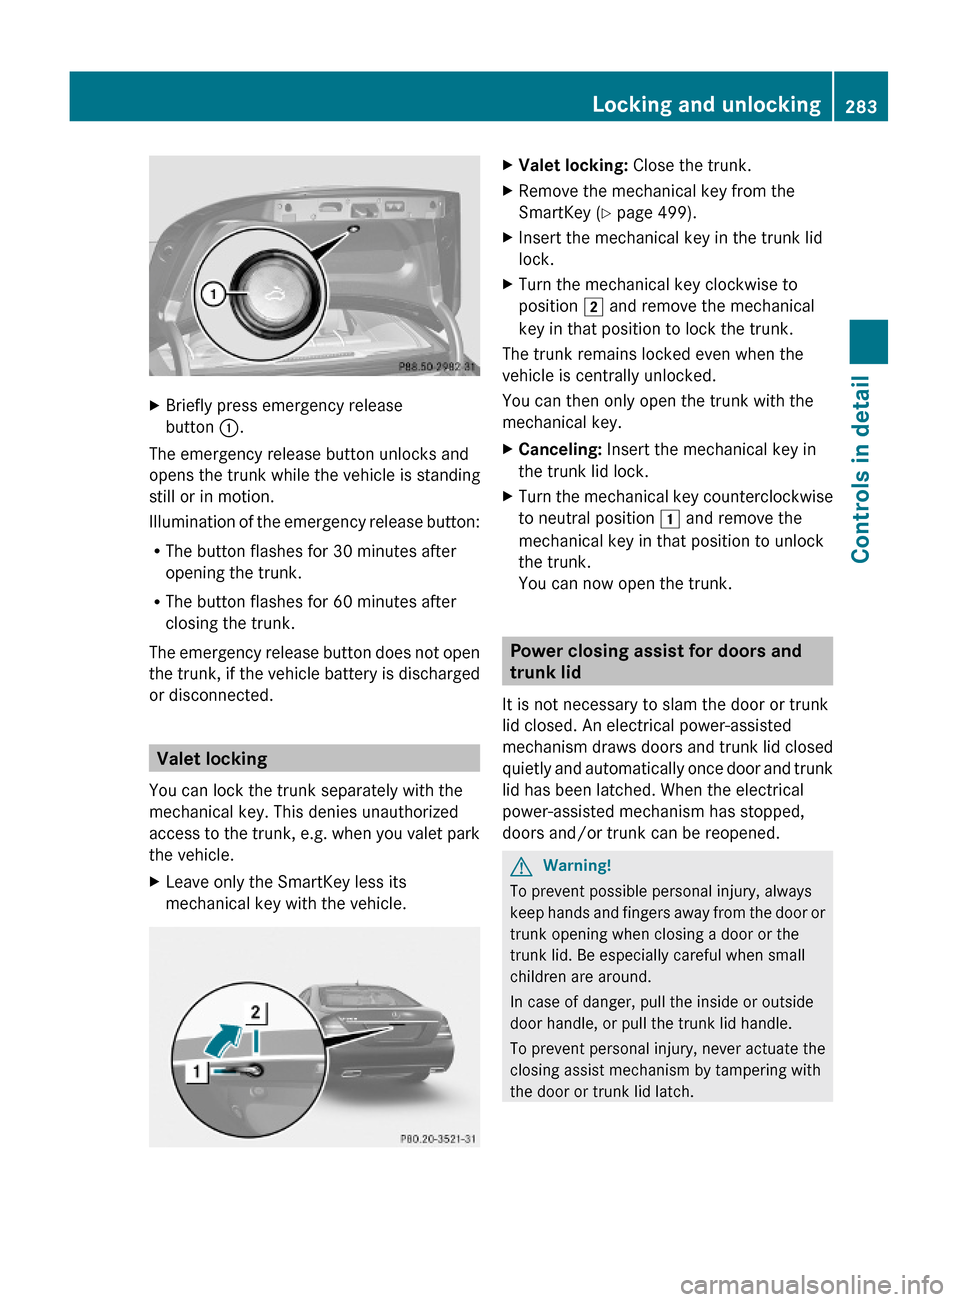
XBriefly press emergency release
button :.
The emergency release button unlocks and
opens the trunk while the vehicle is standing
still or in motion.
Illumination of the emergency release button:
RThe button flashes for 30 minutes after
opening the trunk.
RThe button flashes for 60 minutes after
closing the trunk.
The emergency release button does not open
the trunk, if the vehicle battery is discharged
or disconnected.
Valet locking
You can lock the trunk separately with the
mechanical key. This denies unauthorized
access to the trunk, e.g. when you valet park
the vehicle.
XLeave only the SmartKey less its
mechanical key with the vehicle.
XValet locking: Close the trunk.XRemove the mechanical key from the
SmartKey (Y page 499).
XInsert the mechanical key in the trunk lid
lock.
XTurn the mechanical key clockwise to
position 2 and remove the mechanical
key in that position to lock the trunk.
The trunk remains locked even when the
vehicle is centrally unlocked.
You can then only open the trunk with the
mechanical key.
XCanceling: Insert the mechanical key in
the trunk lid lock.
XTurn the mechanical key counterclockwise
to neutral position 1 and remove the
mechanical key in that position to unlock
the trunk.
You can now open the trunk.
Power closing assist for doors and
trunk lid
It is not necessary to slam the door or trunk
lid closed. An electrical power-assisted
mechanism draws doors and trunk lid closed
quietly and automatically once door and trunk
lid has been latched. When the electrical
power-assisted mechanism has stopped,
doors and/or trunk can be reopened.
GWarning!
To prevent possible personal injury, always
keep hands and fingers away from the door or
trunk opening when closing a door or the
trunk lid. Be especially careful when small
children are around.
In case of danger, pull the inside or outside
door handle, or pull the trunk lid handle.
To prevent personal injury, never actuate the
closing assist mechanism by tampering with
the door or trunk lid latch.
Locking and unlocking283Controls in detail221_AKB; 6; 20, en-USd2ugruen,Version: 2.11.8.12009-09-24T13:28:17+02:00 - Seite 283Z
Page 286 of 548

GWarning!
Only drive with the doors closed. Otherwise,
one or more of the doors could open while the
vehicle is in motion, putting you and/or
others at risk.
GWarning!
Make sure the trunk is closed when the engine
is running and while driving. Among other
dangers, deadly carbon monoxide (CO) gases
may enter vehicle interior resulting in
unconsciousness and death.
XPower closing assist for doors: Press the
doors gently past the initial engage position
into the lock.
XPower closing assist for trunk lid: Press
the trunk lid gently into its lock.
Starter switch positions
SmartKey
GObserve Safety notes, see page 56.
Starter switch
gFor removing SmartKey1Power supply for some electrical
consumers, e.g. wipers
2Ignition (power supply for all electrical
consumers) and driving position
3Starting position
When you switch on the ignition, all lamps in
the instrument cluster come on. The high-
beam headlamp indicator lamp and turn
signal indicator lamps will only come on if
activated. If a lamp in the instrument cluster
fails to come on when the ignition is switched
on, have it checked and replaced if necessary.
If a lamp in the instrument cluster remains on
after starting the engine or comes on while
driving, refer to “Lamps in instrument cluster”
(Y page 489).
XAlways remove the SmartKey from the
starter switch when the engine is not in
operation.
This will help to prevent accelerated vehicle
battery discharge or a completely
discharged vehicle battery.
If the SmartKey cannot be turned in the
starter switch, the vehicle battery may not be
sufficiently charged.
XCheck the vehicle battery and charge it if
necessary (Y page 514).
or
XGet a jump start (Y page 514).
iIf the SmartKey does not belong to the
vehicle, the SmartKey can be turned in the
starter switch. However, the ignition does
not switch on and the engine does not start.
KEYLESS-GO
GObserve Safety notes, see page 56.
Vehicles equipped with the KEYLESS-GO
feature are supplied with a SmartKey with
integrated KEYLESS-GO function and a
removable KEYLESS-GO start/stop button.
The KEYLESS-GO start/stop button must be
inserted in the starter switch and the
SmartKey present in the vehicle.
Pressing the KEYLESS-GO start/stop button
without depressing the brake pedal
corresponds to the various starter switch
positions (Y page 284).
Pressing the KEYLESS-GO start/stop button
with the brake pedal firmly depressed will
start the engine (Y page 311).
The KEYLESS-GO start/stop button can be
pulled out of the starter switch easily. You can
284Starter switch positionsControls in detail
221_AKB; 6; 20, en-USd2ugruen,Version: 2.11.8.12009-09-24T13:28:17+02:00 - Seite 284
Page 301 of 548
Switch off the parking lamps or the rear fog
lamp manually.
! Failure to switch off the parking lamps
when leaving the vehicle may result in a
discharged battery.
i Vehicles without front fog lamps: For
better detection of the vehicle, the LED
daytime running lamps are dimmed to
parking lamp level when the low-beam
headlamps are switched on.
Low-beam headlamps
The low-beam headlamps can be switched on
and off with the exterior lamp switch.
XSwitch on the ignition.XSwitching on: Turn the exterior lamp
switch to position L.
The following lamps come on:
R Low-beam headlamps
R Parking lamps 38
R Green indicator lamp T in the exterior
lamp switchXSwitching off: Turn the exterior lamp
switch to position $.
Automatic headlamp mode
GWarning!
If the exterior lamp switch is set to c, the
headlamps will not automatically come on
under foggy conditions.
To minimize risk to you and to others, activate
headlamps by turning exterior lamp switch to
L when driving or when traffic and/or
ambient lighting conditions require you to do
so.
In low ambient lighting conditions, only switch
from position c to L with the vehicle
at a standstill in a safe location. Switching
from c to L will briefly switch off the
headlamps. Doing so while driving in low
ambient lighting conditions may result in an
accident.
The automatic headlamp feature is only an aid
to the driver. The driver is responsible for the
operation of the vehicle’s lights at all times.XSwitching on: Turn the exterior lamp
switch to position c.
When ambient light is low: When the
SmartKey is in starter switch position 1 or
when the KEYLESS-GO start/stop button has
been pressed once, the parking lamps 38
come on automatically.
When the engine is running, the low-beam
headlamps come on additionally.
When ambient light is bright: When the
SmartKey is in starter switch position 1 or
when the KEYLESS-GO start/stop button has
been pressed once, all lamps are off.
When the engine is running, the daytime
running lamps 39
come on automatically.
When the low-beam headlamps are switched
on, the green indicator lamp T in the
exterior lamp switch comes on.
Once the low-beam headlamps are on, the
high-beam headlamps are also available.
Daytime running lamp mode
In Canada, the daytime running lamp mode is
mandatory and therefore in a constant mode.
In the USA, the daytime running lamp mode
is deactivated by default.
XActivate the daytime running lamp mode
using the control system, see “Switching38 When the parking lamps are on, the tail lamps, the license plate lamps, the side marker lamps, and the
instrument cluster illumination are also on.
39 USA only: The daytime running lamp mode must be activated via the control system.Lighting299Controls in detail221_AKB; 6; 20, en-USd2ugruen,Version: 2.11.8.12009-09-24T13:28:17+02:00 - Seite 299Z
Page 307 of 548
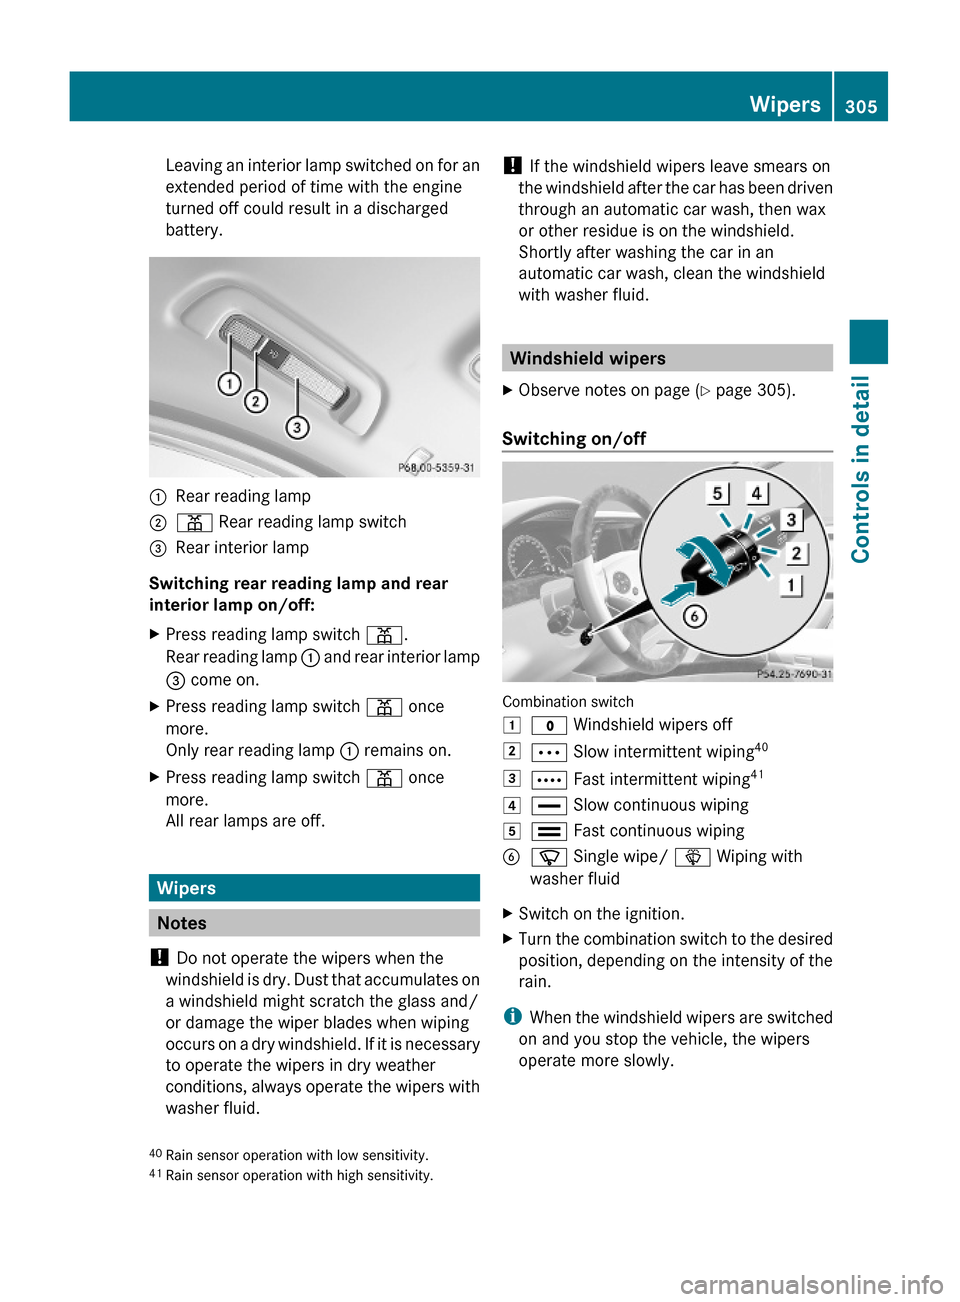
Leaving an interior lamp switched on for an
extended period of time with the engine
turned off could result in a discharged
battery.
:Rear reading lamp;p Rear reading lamp switch=Rear interior lamp
Switching rear reading lamp and rear
interior lamp on/off:
XPress reading lamp switch p.
Rear reading lamp : and rear interior lamp
= come on.
XPress reading lamp switch p once
more.
Only rear reading lamp : remains on.
XPress reading lamp switch p once
more.
All rear lamps are off.
Wipers
Notes
! Do not operate the wipers when the
windshield is dry. Dust that accumulates on
a windshield might scratch the glass and/
or damage the wiper blades when wiping
occurs on a dry windshield. If it is necessary
to operate the wipers in dry weather
conditions, always operate the wipers with
washer fluid.
! If the windshield wipers leave smears on
the windshield after the car has been driven
through an automatic car wash, then wax
or other residue is on the windshield.
Shortly after washing the car in an
automatic car wash, clean the windshield
with washer fluid.
Windshield wipers
XObserve notes on page (Y page 305).
Switching on/off
Combination switch
1$ Windshield wipers off2Ä Slow intermittent wiping403Å Fast intermittent wiping414° Slow continuous wiping5¯ Fast continuous wipingBí Single wipe/ î Wiping with
washer fluid
XSwitch on the ignition.XTurn the combination switch to the desired
position, depending on the intensity of the
rain.
iWhen the windshield wipers are switched
on and you stop the vehicle, the wipers
operate more slowly.
40Rain sensor operation with low sensitivity.41Rain sensor operation with high sensitivity.
Wipers305Controls in detail221_AKB; 6; 20, en-USd2ugruen,Version: 2.11.8.12009-09-24T13:28:17+02:00 - Seite 305Z