2010 MERCEDES-BENZ S550 4MATIC engine
[x] Cancel search: enginePage 74 of 548
ActivatingXWith SmartKey: Remove the SmartKey
from the starter switch.
XWith KEYLESS-GO: Turn off the engine and
open the driver’s door.
Deactivating
XSwitch on the ignition.
iStarting the engine will also deactivate
the immobilizer.
In the event that the engine cannot be
started (yet the vehicle’s battery is
charged), the system is not operational.
Contact an authorized Mercedes-Benz
Center or call 1-800-FOR-MERCedes (in the
USA) or 1-800-387-0100 (in Canada).
Anti-theft alarm system
Once the alarm system has been armed, a
visual and audible alarm is triggered when
someone opens
Ra door
Rthe trunk
Rthe hood
The alarm will stay on even if the activating
element, a door, for example, is closed
immediately.
The alarm system will also be triggered when
Rthe vehicle is opened with the mechanical
key
Ra door is opened from the inside
To cancel the alarm after it has been
triggered, see “Canceling the alarm”
(Y page 73).
iIf the alarm stays on for more than
30 seconds, the Tele Aid system initiates a
call to the Customer Assistance Center
automatically. The Tele Aid system will
initiate the call provided that
Ryou have subscribed to the Tele Aid
service
Rthe Tele Aid service has been activated
properly
Rthe necessary mobile phone, power
supply and GPS coverage are available
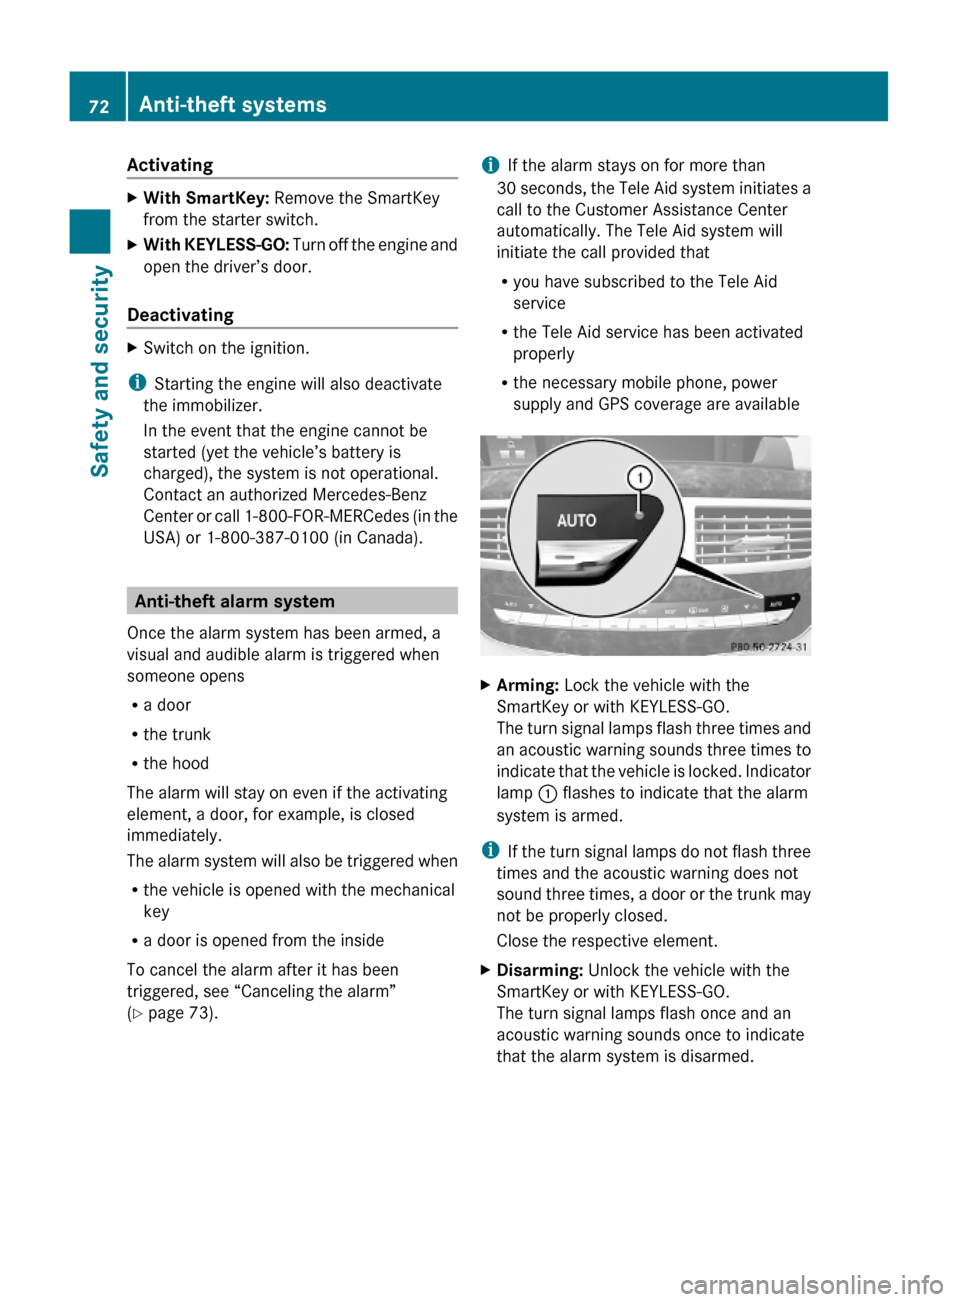
XArming: Lock the vehicle with the
SmartKey or with KEYLESS-GO.
The turn signal lamps flash three times and
an acoustic warning sounds three times to
indicate that the vehicle is locked. Indicator
lamp : flashes to indicate that the alarm
system is armed.
iIf the turn signal lamps do not flash three
times and the acoustic warning does not
sound three times, a door or the trunk may
not be properly closed.
Close the respective element.
XDisarming: Unlock the vehicle with the
SmartKey or with KEYLESS-GO.
The turn signal lamps flash once and an
acoustic warning sounds once to indicate
that the alarm system is disarmed.
72Anti-theft systemsSafety and security
221_AKB; 6; 20, en-USd2ugruen,Version: 2.11.8.12009-09-24T13:28:17+02:00 - Seite 72
Page 99 of 548
to protect the battery. This may happen
when the engine is switched off and the
vehicle battery has insufficient power. If
this occurs, restart the installation with the
engine running. Similarly, if the SmartKey
position is unintentionally switched to 0,
restart the installation.GWarning!
Inhalation of exhaust gas is hazardous to your
health. All exhaust gas contains carbon
monoxide (CO), and inhaling it can cause
unconsciousness and lead to death. Do not
run the engine in confined areas (such as a
garage) which are not properly ventilated.
Installing
Notes about handling DVDs ( Y page 179).
XLoad the map software DVD into the DVD
changer ( Y page 179).
The COMAND system verifies the DVD and
a respective message appears in the
COMAND display.
Map software incompatible with
navigation system
A message indicates that installation of the
map software is not possible.
XConfirming message: Press W.
The DVD is ejected.XRemove the DVD from the slot.XInsert a DVD that is compatible with the
navigation system of the vehicle.
Map software incompatible with the
current system software
A message indicates that the system
software and the map software are
incompatible.
XConfirming message: Press W.
The DVD is ejected.XRemove the DVD from the slot.XHave the system software updated at an
authorized Mercedes-Benz Center.
The system software must be updated before
you can install the map software.
Map software compatible with
navigation software and current
system software
The COMAND system verifies whether the
map data on the DVD have been installed
already.
Map data installed already
A message that indicates that the map data
have been installed already appears. Also,
you are being asked if you would like to install
the map software anyhow.
XSelect Yes or No.
When you select Yes, the current map data
will be overwritten.
When you select No, the DVD will be ejected
automatically and the installation process
is cancelled.XRemove the DVD from the slot.
Map data not installed yet
The versions of the map software on the DVD
and of the installed map software appear in
the COMAND display. You are then asked if
you want to install the map software.
XSelect Yes or No.
When you select Yes, the map data will be
installed.
When you select No, the DVD will be ejected
automatically and the installation process
is cancelled.XRemove the DVD from the slot.
When an activation code is required, you will
be prompted to enter it.
COMAND navigation (introduction)97Control systems221_AKB; 6; 20, en-USd2ugruen,Version: 2.11.8.12009-09-24T13:28:17+02:00 - Seite 97Z
Page 211 of 548
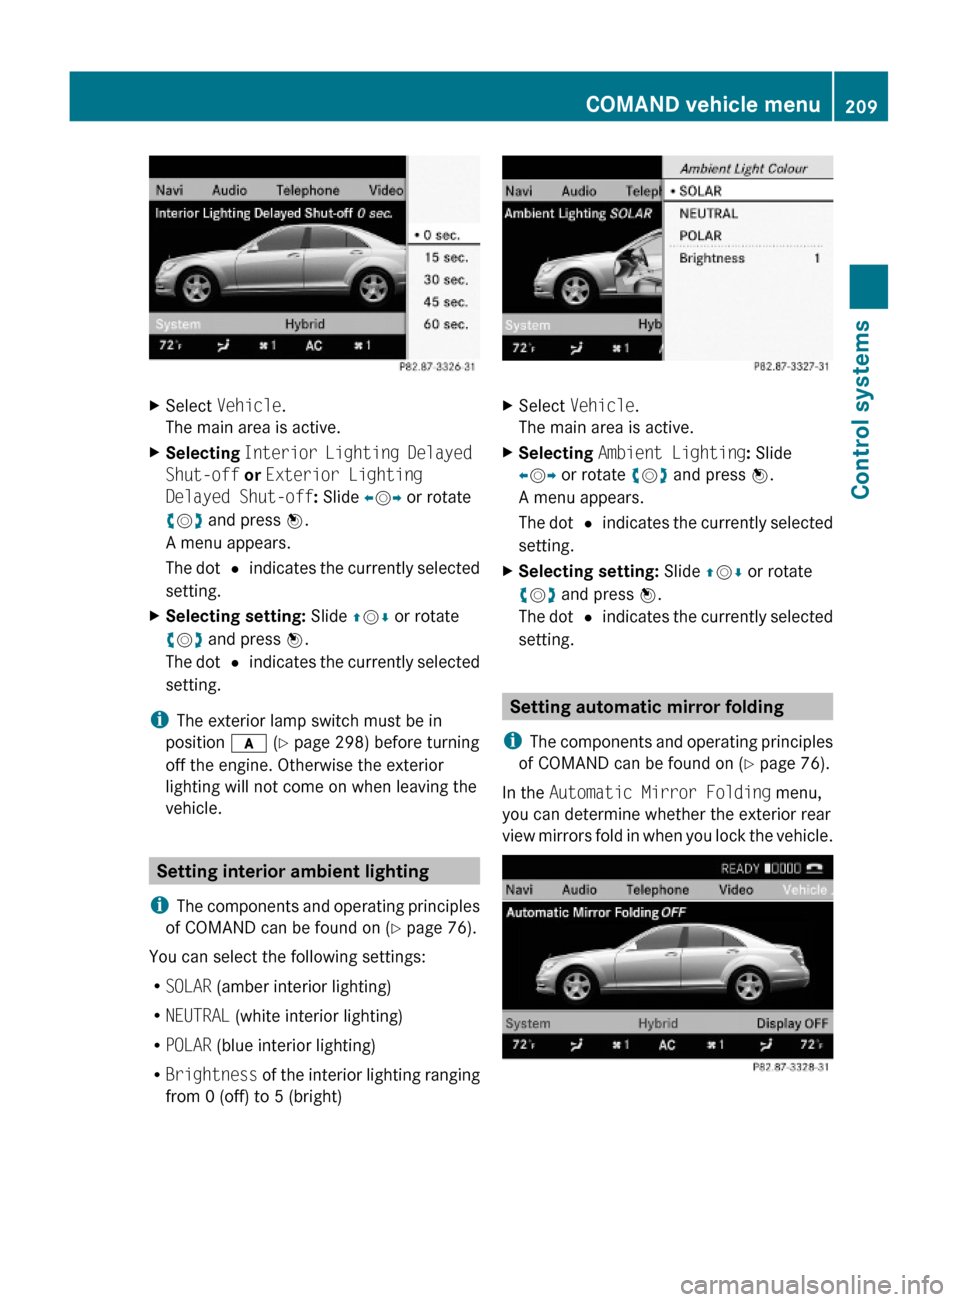
XSelect Vehicle.
The main area is active.
XSelecting Interior Lighting Delayed
Shut-off or Exterior Lighting
Delayed Shut-off: Slide XVY or rotate
cVd and press W.
A menu appears.
The dot # indicates the currently selected
setting.
XSelecting setting: Slide ZVÆ or rotate
cVd and press W.
The dot # indicates the currently selected
setting.
iThe exterior lamp switch must be in
position c (Y page 298) before turning
off the engine. Otherwise the exterior
lighting will not come on when leaving the
vehicle.
Setting interior ambient lighting
iThe components and operating principles
of COMAND can be found on (Y page 76).
You can select the following settings:
RSOLAR (amber interior lighting)
RNEUTRAL (white interior lighting)
RPOLAR (blue interior lighting)
RBrightness of the interior lighting ranging
from 0 (off) to 5 (bright)
XSelect Vehicle.
The main area is active.
XSelecting Ambient Lighting: Slide
XVY or rotate cVd and press W.
A menu appears.
The dot # indicates the currently selected
setting.
XSelecting setting: Slide ZVÆ or rotate
cVd and press W.
The dot # indicates the currently selected
setting.
Setting automatic mirror folding
iThe components and operating principles
of COMAND can be found on (Y page 76).
In the Automatic Mirror Folding menu,
you can determine whether the exterior rear
view mirrors fold in when you lock the vehicle.
COMAND vehicle menu209Control systems221_AKB; 6; 20, en-USd2ugruen,Version: 2.11.8.12009-09-24T13:28:17+02:00 - Seite 209Z
Page 215 of 548

XChanging air volume: Slide ZVÆ or rotate
cVd.
or
XSwitching back to automatic mode:
Rotate cVd and select AUTO.
XExiting menu: Press W, back button
% in the center console (Y page 77) or
slide XVY.
The setting is saved.
Central climate control menu via
COMAND
The central climate control menu is in the
center of the climate control settings. When
the climate control is activated, you will see
AC in the central menu. The following
functions can only be operated in the central
climate control menu via COMAND:
RDeactivating cooling (Æ) (Y page 213)
RCentral climate control (Mono)
(Y page 214)
RFootwell temperature (Y page 214)
RAir flow from air vents (Y page 215)
XSelect climate control settings Q Central
menu.
Activating/deactivating air
conditioning
The air conditioning is operational while the
engine is running and cools the interior air to
the temperature set by the operator. In
addition, the air conditioning dehumidifies
the interior air and helps prevent window
fogging.
iCondensation may drip out from
underneath the vehicle. This is normal and
not an indication of a malfunction.
GWarning!
If you deactivate the air conditioning, the
vehicle will not be cooled when weather
conditions are warm. The windows can fog up
more quickly. Window fogging may impair
visibility and endanger you and others.
XSelect climate control settings Q Central
climate control menu.
XSelecting Æ: Slide ZVÆ or rotate
cVd.
XConfirming selection: Press W.
A checkmark appears when the cooling is
deactivated.
Æ appears in the central menu of the
climate control settings.
COMAND automatic climate control213Control systems221_AKB; 6; 20, en-USd2ugruen,Version: 2.11.8.12009-09-24T13:28:17+02:00 - Seite 213Z
Page 225 of 548

Function:Trip menu (Y page 223);Navi menu (Y page 225)=Audio menu (Y page 226)?AMG34 menu (Y page 227)ATelephone menu (Y page 230)BAssistance menu (Y page 231)CService menu (Y page 233)DSettings menu (Y page 234)
Trip menu
In the Trip menu, you can show an additional
display for the speedometer and call up or
reset your vehicle’s statistical data.
The following information is available:
RStandard display (Y page 223)
RFuel consumption statistics since start
(Y page 223)
RFuel consumption statistics since last reset
(Y page 224)
RResetting values (Y page 224)
RRemaining driving range and current fuel
consumption (Y page 224)
RDigital Speedometer (Y page 224)
Standard display
XPress button = or ; to select the
Trip menu.
In the standard display, the main
odometer : and the trip odometer ;
appear in the multifunction display.
Fuel consumption statistics since start
XPress button = or ; to select the
Trip menu.
XPress button : or 9 to select From
Start.
:Distance driven since start;Time elapsed since start=Average speed since start?Average fuel consumption since start
All statistics stored since the last engine start
will be reset approximately 4 hours after the
SmartKey in the starter switch is turned to
position 0 or removed from the starter switch.
Resetting will not occur if you turn the
SmartKey back to position 1 or 2 within this
time period.
34AMG vehicles only.Instrument cluster control system223Control systems221_AKB; 6; 20, en-USd2ugruen,Version: 2.11.8.12009-09-24T13:28:17+02:00 - Seite 223Z
Page 229 of 548
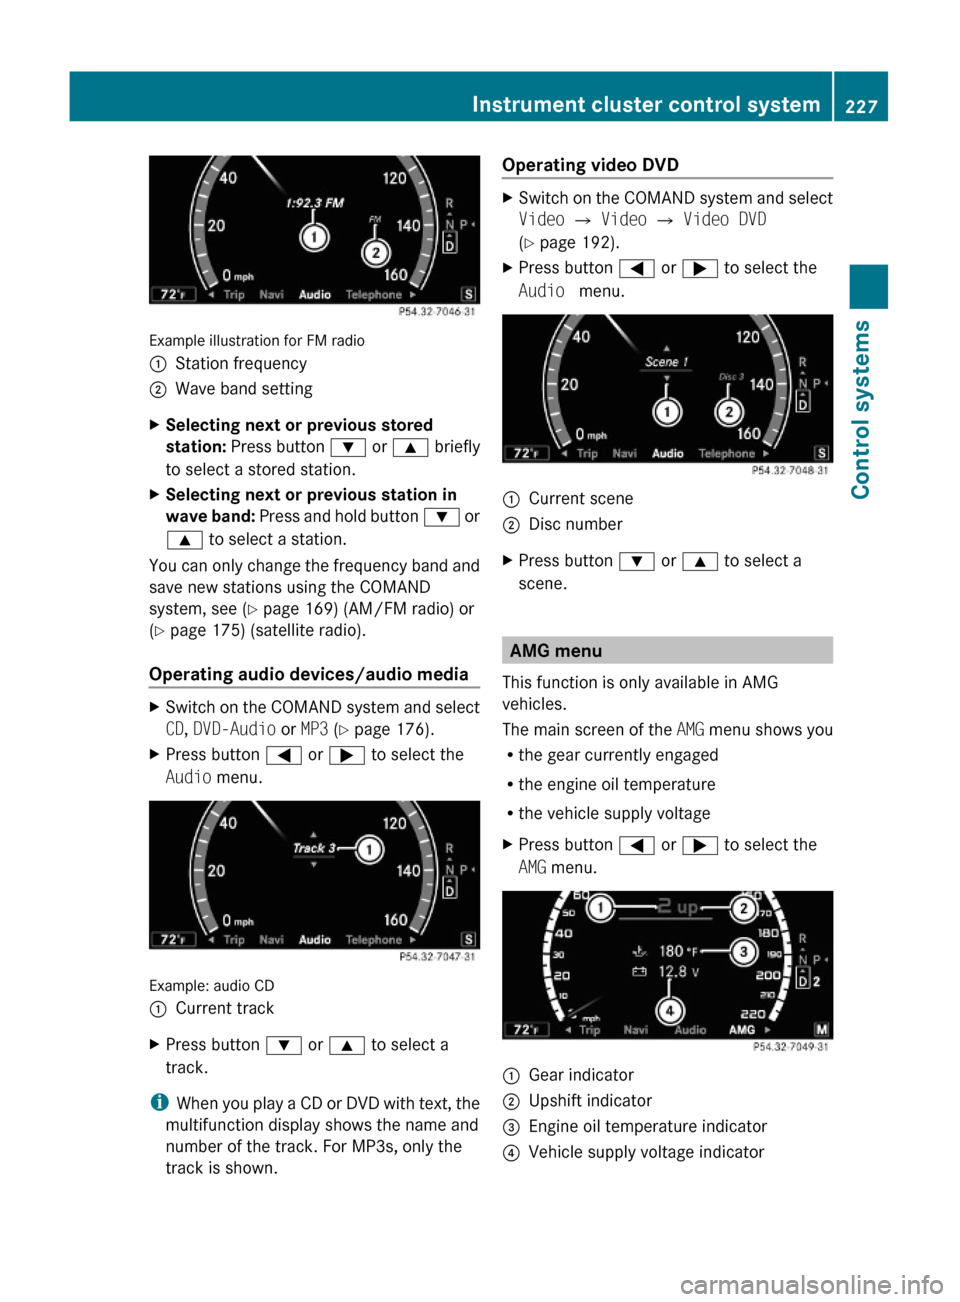
Example illustration for FM radio
:Station frequency;Wave band settingXSelecting next or previous stored
station: Press button : or 9 briefly
to select a stored station.
XSelecting next or previous station in
wave band: Press and hold button : or
9 to select a station.
You can only change the frequency band and
save new stations using the COMAND
system, see (Y page 169) (AM/FM radio) or
(Y page 175) (satellite radio).
Operating audio devices/audio media
XSwitch on the COMAND system and select
CD, DVD-Audio or MP3 (Y page 176).
XPress button = or ; to select the
Audio menu.
Example: audio CD
:Current trackXPress button : or 9 to select a
track.
iWhen you play a CD or DVD with text, the
multifunction display shows the name and
number of the track. For MP3s, only the
track is shown.
Operating video DVDXSwitch on the COMAND system and select
Video Q Video Q Video DVD
(Y page 192).
XPress button = or ; to select the
Audio menu.
:Current scene;Disc numberXPress button : or 9 to select a
scene.
AMG menu
This function is only available in AMG
vehicles.
The main screen of the AMG menu shows you
Rthe gear currently engaged
Rthe engine oil temperature
Rthe vehicle supply voltage
XPress button = or ; to select the
AMG menu.
:Gear indicator;Upshift indicator=Engine oil temperature indicator?Vehicle supply voltage indicatorInstrument cluster control system227Control systems221_AKB; 6; 20, en-USd2ugruen,Version: 2.11.8.12009-09-24T13:28:17+02:00 - Seite 227Z
Page 230 of 548
The engine oil temperature will be shown in
blue if the engine oil temperature has not yet
reached 176‡ (80†). During this time, avoid
driving at full engine speed.
If the engine reaches the overspeed range in
the manual shift program, you will see up next
to gear indicator : as a reminder to upshift.
Use buttons : or 9 to select the
following functions in the AMG menu:
RRACETIMER (Y page 228)
ROverall analysis (Y page 229)
RLap analysis (Y page 229)
RACETIMER
GWarning!
The RACETIMER feature is only for use on
roads and in conditions where high speed
driving is permitted. Racing on public roads is
prohibited under all circumstances. The driver
is and must always remain responsible for
following posted speed limits.
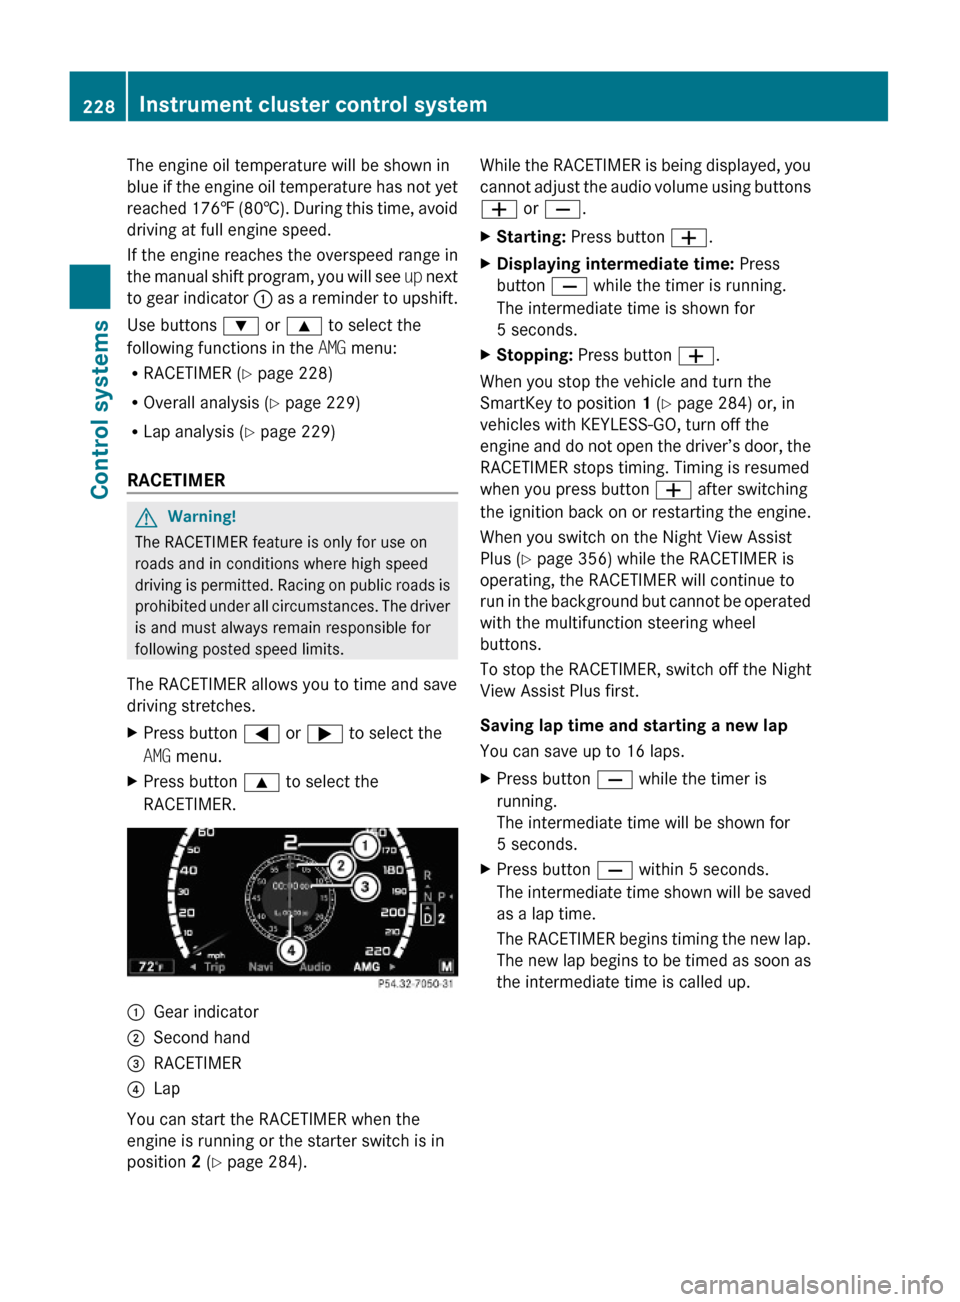
The RACETIMER allows you to time and save
driving stretches.
XPress button = or ; to select the
AMG menu.
XPress button 9 to select the
RACETIMER.
:Gear indicator;Second hand=RACETIMER?Lap
You can start the RACETIMER when the
engine is running or the starter switch is in
position 2 (Y page 284).
While the RACETIMER is being displayed, you
cannot adjust the audio volume using buttons
W or X.
XStarting: Press button W.XDisplaying intermediate time: Press
button X while the timer is running.
The intermediate time is shown for
5 seconds.
XStopping: Press button W.
When you stop the vehicle and turn the
SmartKey to position 1 (Y page 284) or, in
vehicles with KEYLESS-GO, turn off the
engine and do not open the driver’s door, the
RACETIMER stops timing. Timing is resumed
when you press button W after switching
the ignition back on or restarting the engine.
When you switch on the Night View Assist
Plus (Y page 356) while the RACETIMER is
operating, the RACETIMER will continue to
run in the background but cannot be operated
with the multifunction steering wheel
buttons.
To stop the RACETIMER, switch off the Night
View Assist Plus first.
Saving lap time and starting a new lap
You can save up to 16 laps.
XPress button X while the timer is
running.
The intermediate time will be shown for
5 seconds.
XPress button X within 5 seconds.
The intermediate time shown will be saved
as a lap time.
The RACETIMER begins timing the new lap.
The new lap begins to be timed as soon as
the intermediate time is called up.
228Instrument cluster control systemControl systems
221_AKB; 6; 20, en-USd2ugruen,Version: 2.11.8.12009-09-24T13:28:17+02:00 - Seite 228
Page 234 of 548
Switching ESC on or offGWarning!
Never switch off the ESC when you see the
ESC warning lamp ÷ flashing in the
instrument cluster. In this case proceed as
follows:
RWhen driving off, apply as little throttle as
possible.
RWhile driving, ease up on the accelerator
pedal.
RAdapt your speed and driving style to the
prevailing road conditions.
Failure to observe these guidelines could
cause the vehicle to skid. The ESC cannot
prevent accidents resulting from excessive
speed.
For more Information, see (Y page 66)
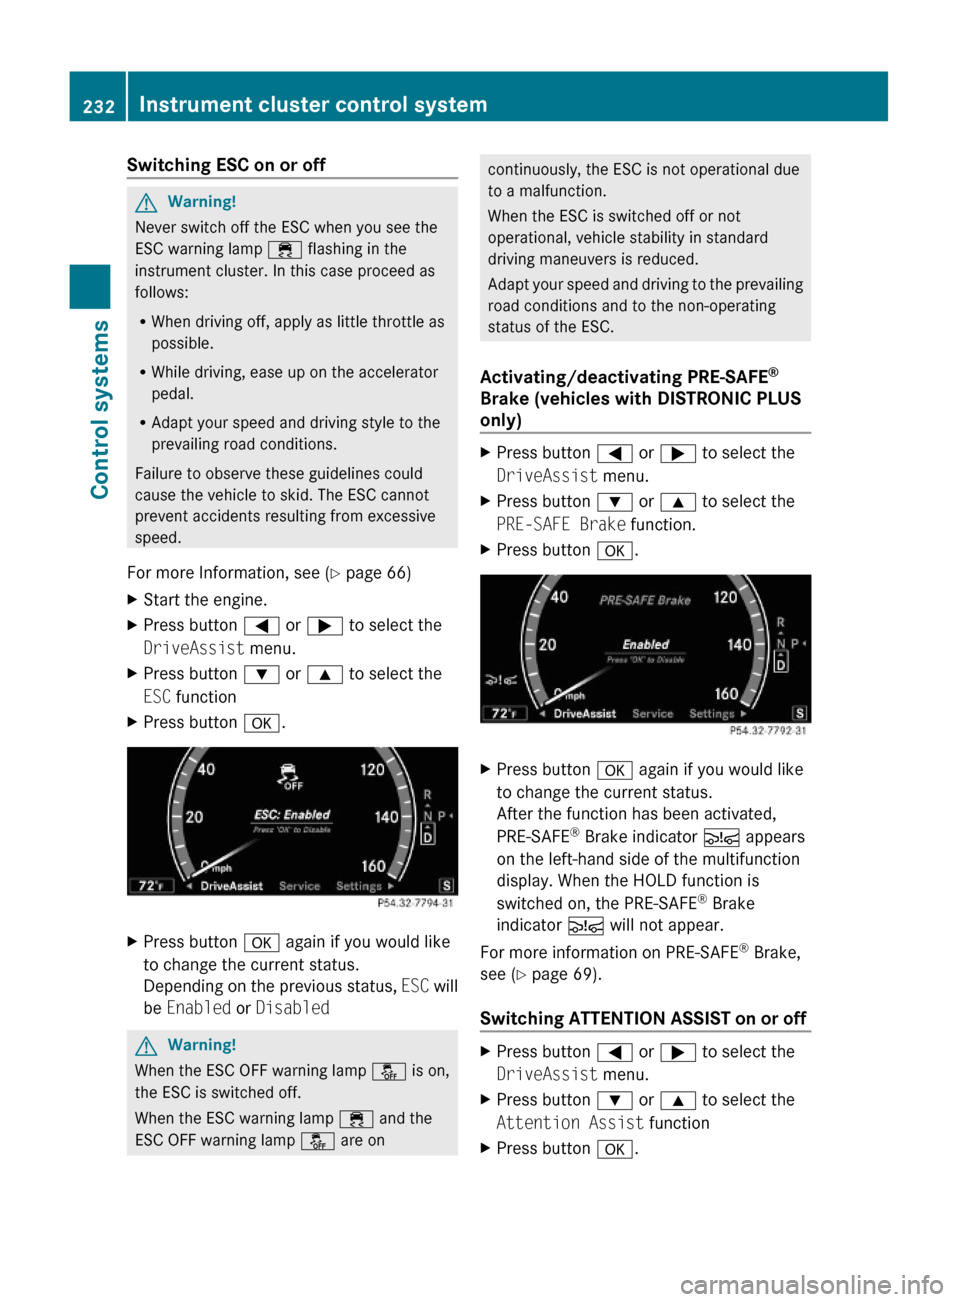
XStart the engine.XPress button = or ; to select the
DriveAssist menu.
XPress button : or 9 to select the
ESC function
XPress button a.XPress button a again if you would like
to change the current status.
Depending on the previous status, ESC will
be Enabled or Disabled
GWarning!
When the ESC OFF warning lamp å is on,
the ESC is switched off.
When the ESC warning lamp ÷ and the
ESC OFF warning lamp å are on
continuously, the ESC is not operational due
to a malfunction.
When the ESC is switched off or not
operational, vehicle stability in standard
driving maneuvers is reduced.
Adapt your speed and driving to the prevailing
road conditions and to the non-operating
status of the ESC.
Activating/deactivating PRE-SAFE®
Brake (vehicles with DISTRONIC PLUS
only)
XPress button = or ; to select the
DriveAssist menu.
XPress button : or 9 to select the
PRE-SAFE Brake function.
XPress button a.XPress button a again if you would like
to change the current status.
After the function has been activated,
PRE-SAFE® Brake indicator Ä appears
on the left-hand side of the multifunction
display. When the HOLD function is
switched on, the PRE-SAFE® Brake
indicator Ä will not appear.
For more information on PRE-SAFE® Brake,
see (Y page 69).
Switching ATTENTION ASSIST on or off
XPress button = or ; to select the
DriveAssist menu.
XPress button : or 9 to select the
Attention Assist function
XPress button a.232Instrument cluster control systemControl systems
221_AKB; 6; 20, en-USd2ugruen,Version: 2.11.8.12009-09-24T13:28:17+02:00 - Seite 232