2010 MERCEDES-BENZ S CLASS display
[x] Cancel search: displayPage 143 of 548
SymbolDescriptionTraffic notifications in map displayTraffic
report
lists
Traffic
report
message
Traffic jam
(red car)
Traffic congestion, average speed
5 – 20 mph (8 – 32 km/h).
Could appear repeatedly to indicate
length of traffic congestion.
(Not
possible)
(Not
possible)
XXXXBlocked
section
Road impassable.
Could appear repeatedly to indicate
length of blocked area
(Not
possible)
(Not
possible)
Displaying real-time traffic reportsXIf necessary, switch to navigation mode
and show the menu system (Y page 102).
XSelect Traffic.
COMAND searches for satellite radio
channels sending traffic messages.
The message No traffic reports are
currently available for this area.
may appear for the following reasons:RMessages were not yet received.
RThere are no messages available.
XCancelling the search: Select Cancel.XClosing the message: Select OK
If there are traffic reports, you will see a list
or a submenu, depending on whether route
guidance is active or not.
iA traffic message may also concern an
area or region rather than a road, e.g.
impaired visibility due to fog.
List when route guidance is not active
The list shows all the roads, areas or regions
for which messages are available.
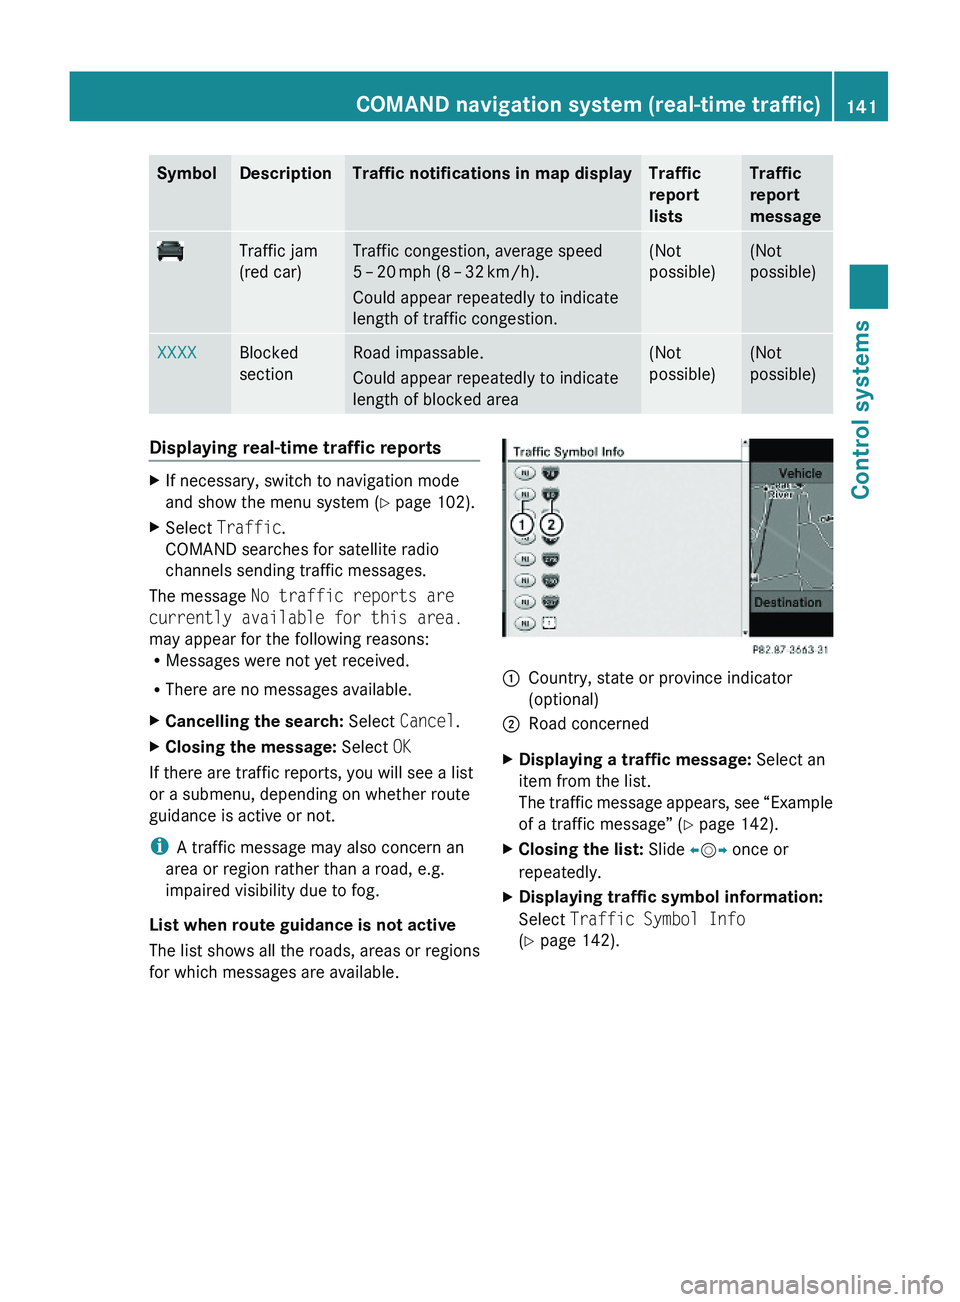
1Country, state or province indicator
(optional)
2Road concernedXDisplaying a traffic message: Select an
item from the list.
The traffic message appears, see “Example
of a traffic message” (Y page 142).
XClosing the list: Slide \000
Page 144 of 548
List when route guidance is active
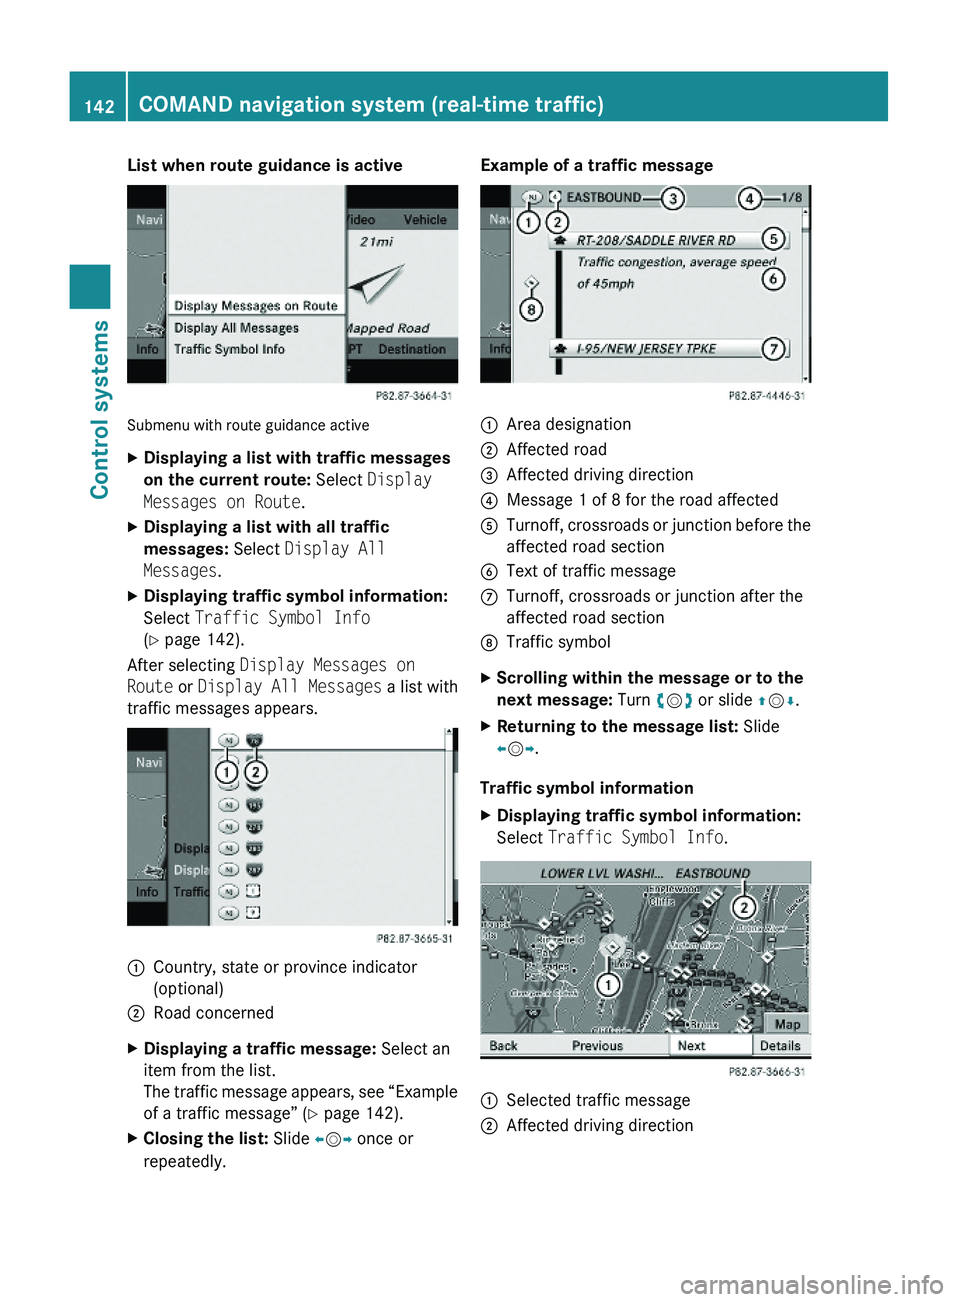
Submenu with route guidance active
XDisplaying a list with traffic messages
on the current route: Select Display
Messages on Route.
XDisplaying a list with all traffic
messages: Select Display All
Messages.
XDisplaying traffic symbol information:
Select Traffic Symbol Info
(Y page 142).
After selecting Display Messages on
Route or Display All Messages a list with
traffic messages appears.
1Country, state or province indicator
(optional)
2Road concernedXDisplaying a traffic message: Select an
item from the list.
The traffic message appears, see “Example
of a traffic message” (Y page 142).
XClosing the list: Slide \000
Page 145 of 548
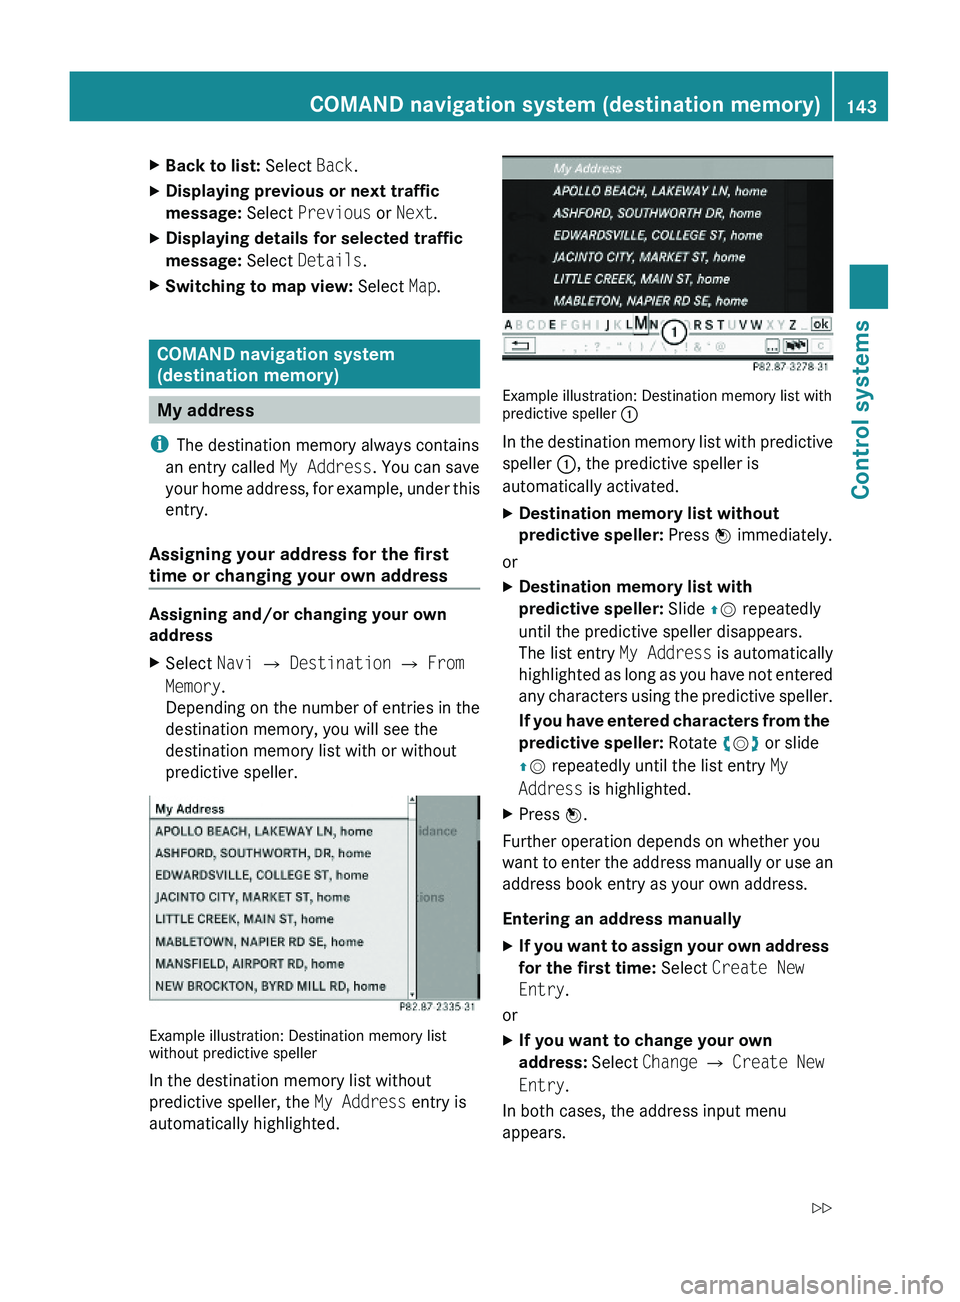
XBack to list: Select Back.XDisplaying previous or next traffic
message: Select Previous or Next.
XDisplaying details for selected traffic
message: Select Details.
XSwitching to map view: Select Map.
COMAND navigation system
(destination memory)
My address
iThe destination memory always contains
an entry called My Address. You can save
your home address, for example, under this
entry.
Assigning your address for the first
time or changing your own address
Assigning and/or changing your own
address
XSelect Navi \000T Destination \000T From
Memory.
Depending on the number of entries in the
destination memory, you will see the
destination memory list with or without
predictive speller.
Example illustration: Destination memory listwithout predictive speller
In the destination memory list without
predictive speller, the My Address entry is
automatically highlighted.
Example illustration: Destination memory list withpredictive speller \000F
In the destination memory list with predictive
speller \000F, the predictive speller is
automatically activated.
XDestination memory list without
predictive speller: Press \000
Page 148 of 548
Saving a destination from the list of last
destinations
XSelect Navi \000T Destination \000T From
Last Destinations.
The list of last destinations appears.
XSelect desired destination.
The address of the destination is displayed.
XSelect Save.
You can now select save options.
Selecting save options
Saving a destination without a name
XSelect Save without Name.
COMAND saves the destination in the
destination memory and uses the address
as the destination name.
or
XSelect Save as "My Address".
COMAND saves the destination in the
destination memory as your own address.
Saving a destination with a name
XSelect Save with Name.XSelect desired category, e.g. Home or
Work.
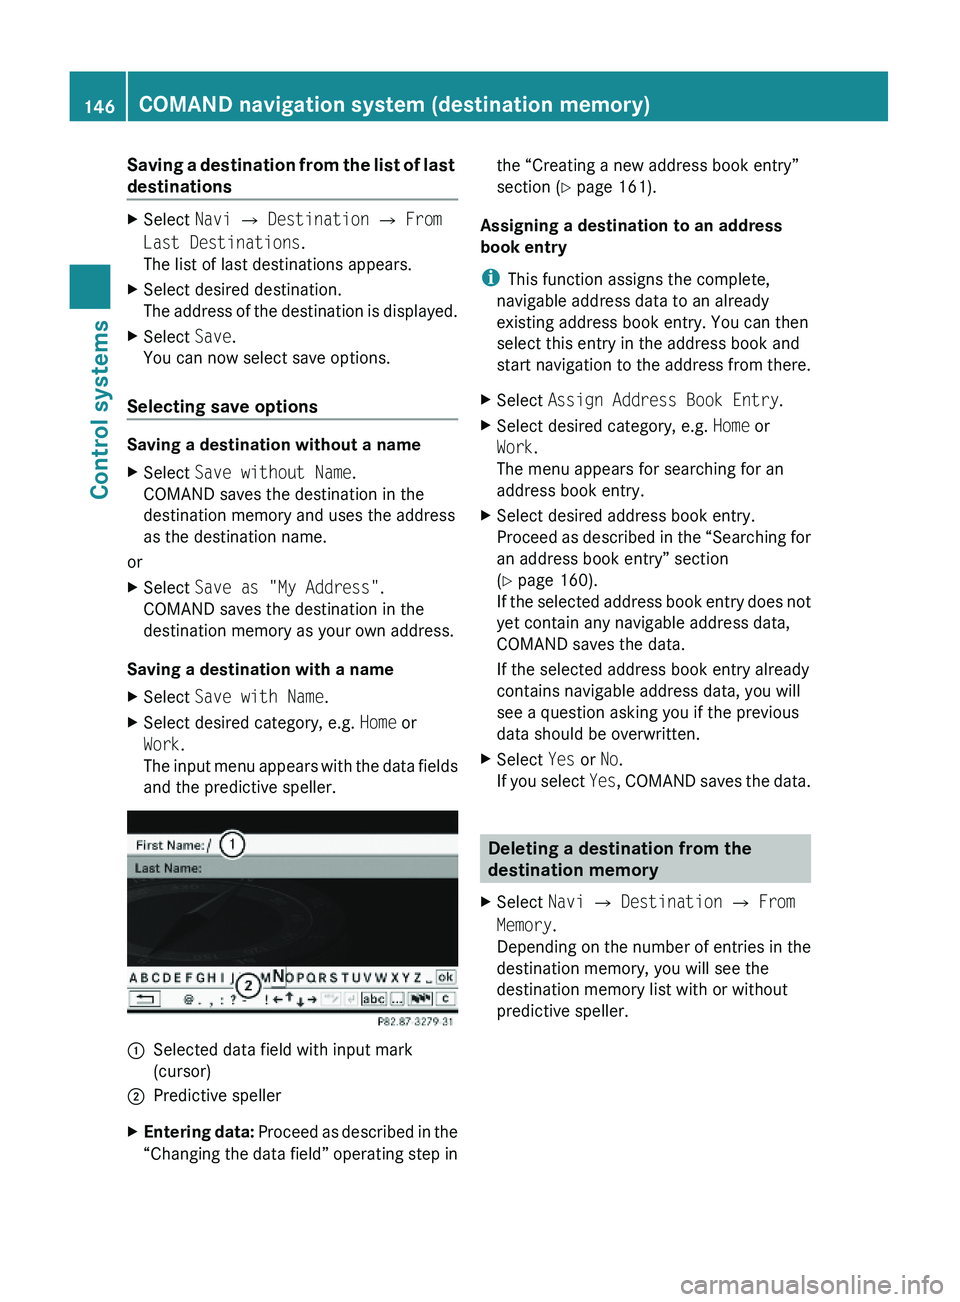
The input menu appears with the data fields
and the predictive speller.
\000FSelected data field with input mark
(cursor)
\000GPredictive spellerXEntering data: Proceed as described in the
“Changing the data field” operating step in
the “Creating a new address book entry”
section (Y page 161).
Assigning a destination to an address
book entry
iThis function assigns the complete,
navigable address data to an already
existing address book entry. You can then
select this entry in the address book and
start navigation to the address from there.
XSelect Assign Address Book Entry.XSelect desired category, e.g. Home or
Work.
The menu appears for searching for an
address book entry.
XSelect desired address book entry.
Proceed as described in the “Searching for
an address book entry” section
(Y page 160).
If the selected address book entry does not
yet contain any navigable address data,
COMAND saves the data.
If the selected address book entry already
contains navigable address data, you will
see a question asking you if the previous
data should be overwritten.
XSelect Yes or No.
If you select Yes, COMAND saves the data.
Deleting a destination from the
destination memory
XSelect Navi \000T Destination \000T From
Memory.
Depending on the number of entries in the
destination memory, you will see the
destination memory list with or without
predictive speller.
146COMAND navigation system (destination memory)Control systems
221_AKB; 6; 20, en-USd2ugruen,Version: 2.11.8.12009-09-24T13:28:17+02:00 - Seite 146
Page 151 of 548
Using the Bluetooth®
interface
COMAND provides telephony via the
Bluetooth ®
interface by connecting a
Bluetooth ®
-compatible mobile phone. The
following functions can be used when a
suitable mobile phone is connected to the
Bluetooth ®
interface:
R Hands-free phone operation
R Phone book
R Reception of electronic business cards
(vCards 10
)
i For further information on suitable mobile
phones and connecting Bluetooth ®
-
enabled mobile phones to COMAND
R visit www.mbusa-mobile.com
R call the Mercedes-Benz Customer
Assistance Center at
1-800-FOR-MERCedes
(1-800-367-6372) (in the USA)
R call Customer Service at
1-800-387-0100 (in Canada)
Calls disconnected while the vehicle is
in motion
A call may be disconnected if
R there is insufficient network coverage
R you move from one transmitter/receiver
area (cell) into another and no channels are
free or the cell is full
Operating options
i The components and operating principles
of COMAND can be found on ( Y page 76).
You can operate the mobile phone using the
following:
R the keys on the mobile phone
R the COMAND telephone keypad in the
center console
R the COMAND controller
R the multifunction steering wheel
R the Voice Control System ( Y page 237)
Unless otherwise specified, the descriptions
and illustrations in this section apply to
COMAND or the telephone keypad in the
center console. Thus, in order to use the
described functions you always have to call
up the Telephone menu. The fastest way to
get to the Telephone menu is pressing
shortcut button 0058.
You can control other functions of the mobile
phone via the COMAND, instrument cluster
control system (Y page 230) or Voice Control
System ( Y page 237).
Caller ID
COMAND can display the telephone number
and the name of the caller, e.g. for an
incoming call and also in other menus or
displays.
For the telephone number to be displayed,
the caller must transmit his telephone
number.
This is also the case for name displays. For
this, the telephone number and the name of
the caller must also be saved in the mobile
phone book.
Functional restrictions
You will not be able to use the telephone, or
you may have to wait a while, in the following
situations:
R If the Bluetooth function in COMAND or
on the mobile phone is switched off.
R If the telephone has not yet logged into the
network.
The telephone tries to log into a network
automatically. If no network is available,
you will also not be able to make a “911”
emergency call. If you attempt to make an
10 vCards are electronic business cards used by e-mail applications, mobile phones, PDAs, etc. to exchange
contact information.COMAND telephone149Control systems221_AKB; 6; 20, en-USd2ugruen,Version: 2.11.8.12009-09-24T13:28:17+02:00 - Seite 149Z
Page 153 of 548
The following conditions must be met for a
“911” emergency call via COMAND:
RMobile phone must be switched on.
RThe corresponding mobile
communications network must be
available.
iEmergency calls may not be possible with
all telephone networks or if certain network
services and/or telephone functions are
active. Check with your local service
providers.
If you cannot make an emergency call, you
will have to initiate rescue measures yourself.
Placing a “911” emergency call using
COMAND with the mobile phone
unlocked
XPress button \000X to switch to telephone
mode.
XEnter 911 using the telephone keypad in
the center console.
XPress button \000j on the telephone
keypad in the center console.
or
XSelect \000j in the COMAND display and
press \000
Page 154 of 548
1-800-FOR-MERCedes
(1-800-367-6372) (in the USA)
R call Customer Service at
1-800-387-0100 (in Canada)
The battery of the mobile phone should
always be charged sufficiently to avoid
malfunctions.
You should check the following on your
mobile phone (see your mobile phone
operating instructions) to prepare for
telephony via the Bluetooth ®
interface:
R Hands-Free Profile (HFP)
The mobile phone must support Hands-
Free Profile 1.0 or higher.
i Some displays, such as the signal
strength, appear depending on the
supported Hands-Free Profile version.
R Bluetooth ®
visibility
With certain mobile phones, the
Bluetooth ®
function must be activated but
also made "visible" to other devices.
R Bluetooth ®
device name
Each Bluetooth ®
device has a Bluetooth ®
device name. The device name is arbitrary,
but it may be identical for all devices of a
single mobile phone manufacturer. You
should therefore assign an individual and
unique device name to your mobile phone.
Connecting the mobile phoneXSwitch on the mobile phone and enter the
PIN. Refer to the mobile phone operating
instructions for details.XActivate the Bluetooth ®
functionality on
the mobile phone. Refer to mobile phone
operating instructions for detail.
Bluetooth ®
is activated in the COMAND by
default. If the Bluetooth function in the
COMAND is not activated, the message
Bluetooth not activated in system
settings. appears. Activate Bluetooth ®
in
the COMAND manually ( Y page 151).
Authorizing the mobile phone
The mobile phone must be registered, e.g.
authorized, before you can use it in
connection with COMAND for the first time.
You can authorize several mobile phones.
COMAND will always connect to the last
connected mobile phone within range.
i If the connection to the last connected
mobile phone fails, COMAND searches for
the mobile phone that was connected
before that.
When authorizing a new mobile phone, it will
be connected automatically 11
.XSelect Data/Connections 0054
Bluetooth Telephones 0054 Update .
The COMAND searches for Bluetooth ®
devices within range and lists them in the
Bluetooth ®
phone list.
The duration of the search depends on the
number of Bluetooth ®
devices within range
and the characteristics of the mobile
phone, such as Hands-Free Profile version
and possibly required visibility.11 Function available if supported by the mobile phone.152COMAND telephoneControl systems
221_AKB; 6; 20, en-USd2ugruen,Version: 2.11.8.12009-09-24T13:28:17+02:00 - Seite 152
Page 156 of 548
External authorization
Certain security settings in your mobile
phone may prevent COMAND from finding
your mobile phone. In this case, you might
want to check if your mobile phone can
recognize the COMAND. The Bluetooth ®
device name of COMAND is MB Bluetooth.XSelect Data/Connections 0054
Bluetooth Telephones .XGo to Update and select Options 0054
External Authorization .XActivate the Bluetooth®
search on the
mobile phone. Refer to mobile phone
operating instructions for detail.XSelect MB Bluetooth on the mobile phone.XWhen prompted, enter the passkey into
COMAND and the mobile phone
( Y page 153).
Show details
Details can be displayed for each mobile
phone in the Bluetooth ®
phone list.
XSelect Data/Connections 0054
Bluetooth Telephones .XChoose the mobile phone from the list and
select Options 0054 Details .
The following mobile phone details appear:
R Bluetooth ®
name
R Bluetooth ®
address
R Availability status
R Authorization
R Bluetooth ®
Class (mobile phone,
notebook, etc.)XClosing detail display: Slide 009E005B 009F.Deauthorizing the mobile phone XSelect Data/Connections 0054
Bluetooth Telephones .XChoose the mobile phone from the list and
select Options 0054 De-authorize .
You will be asked whether you want to
deauthorize the device.XSelect Yes.
i
You should delete the device name MB
Bluetooth from the Bluetooth ®
list of the
mobile phone before authorizing that
mobile phone again.
Connecting another mobile phone
You can switch between several mobile
phones that you have authorized.
i Switching to another authorized mobile
phone is only possible while no phone calls
are being made.
XSelect Data/Connections 0054
Bluetooth Telephones .XSelect the mobile phone from the
Bluetooth ®
phone list.XConfirm the selection.
The selected mobile phone is connected
provided it is within Bluetooth ®
range and
Bluetooth ®
is activated on the respective
device.
You can only connect one mobile phone at
a time. The currently connected mobile
phone is indicated by a dot 003F in the
Bluetooth ®
phone list ( Y page 153).
Main telephone menu
When the connected mobile phone is ready,
the following display appears:
154COMAND telephoneControl systems
221_AKB; 6; 20, en-USd2ugruen,Version: 2.11.8.12009-09-24T13:28:17+02:00 - Seite 154