Page 95 of 548

XSelect Daylight Savings Time
(Summer) or Standard Time .
The dot 003F in front of a list entry indicates
the current setting.XSaving setting and exit the menu: Slide
009E 005B 009F.
Adjusting time lags
i
In some exceptional cases, e.g. where
time zones border, the displayed time and
the local time may show a time lag.
This time lag can be adjusted in steps of 30
minutes.
XSelect Vehicle 0054 System 0054 Time 0054
Time .XSelecting hour or minutes: Slide 009E005B 009F.XSetting value: Rotate 0082005B 0083 or slide 00A0005B 0050.XSaving setting: Press 00A1.
Setting the date
XSelect Vehicle 0054 System 0054 Time 0054
Date .XSelecting month, day, or year: Slide
009E 005B 009F.XSetting value: Rotate 0082005B 0083 or slide 00A0005B 0050.XSaving setting: Press 00A1.
i
Setting the date is only necessary or even
possible if the COMAND system does not
receive a GPS signal.
Setting the time/date format
XSelect Vehicle 0054 System 0054 Time 0054
Format .
The format list appears. The dots 003F in
front of the list entries indicate the current
setting.XChanging format setting: Select desired
format.XSaving setting and exit the menu: Slide
009E 005B 009F.Voice Control System settings
Switching help window on or offXSelect Vehicle 0054 System 0054 Voice
Control .XSelect Help Window .
A checkmark appears when the help
window is switched on.
Individualization
Using individualization, you can fine-tune the
Voice Control System to your own voice and
thus improve voice recognition. The ability of
the system to recognize the commands of
other users does not deteriorate as a result.
Individualization consists of two parts. You
train the system to recognize digits in the first
part and specific commands in the second
part.
Starting new individualization
i The vehicle must be stationary to start
individualization. After starting the session,
acoustic instructions will guide you through
the individualization.
XSelect Vehicle 0054 System 0054 Voice
Control 0054 Start New
Individualization .
A prompt appears asking whether you
would like further information.XSelect Yes or No.
If you select No, the first part of
individualization begins.
If you select Yes, an information display will
be shown with audio instruction.XClosing display: Select OK.
The first part of individualization begins.
At the end of the first part, you will see a
prompt asking whether you want to begin
the second part.XSelect Yes or No.
If you select No, individualization will be
canceled. The data from the first part is
saved automatically.COMAND system settings 93Control systems221_AKB; 6; 20, en-USd2ugruen,Version: 2.11.8.12009-09-24T13:28:17+02:00 - Seite 93Z
Page 97 of 548

Upload/Download of Data
This function lets you transfer COMAND data
to a memory card or a USB storage device and
vice versa.
The following COMAND data can be
transferred:
R Navigation destination memory and last
destination
R Address book entries
R Audio/Video presets memory
R System settings
i You can use this function, for example, to
save your COMAND data and transfer them
to another vehicle.XInsert an SD card into the SD card slot
( Y page 180) or connect a USB storage
device to the built-in USB socket in the
glove box (Y page 80). The USB jack of the
optional media interface is not intended for
this purpose.XSelect Vehicle 0054 System 0054 Upload/
Download Data .XDownload: Select Copy Data to
Storage Medium 0054 On the Memory
Card or On USB .XSelect Start Copying .XUpload: Select Import Data from
Storage Medium 0054 From Memory Card
or From USB .XSelect Start Data Import .XExiting menu without data transfer:
Select Back.
Reset
i You can reset COMAND back to its
factory settings.
Among other things, all personal data are
deleted, for example
R the address book entries
R the entries in the destination memory
R the list of last destinations of the
navigation systemXSelect Vehicle 0054 System 0054 Reset .
A prompt appears asking whether you
really want to reset.XSelect Yes or No.
If you select Yes another prompt will
appear asking whether you really want to
reset.XSelect Yes or No.
If you select Yes, COMAND will be reset
and restarted.
COMAND navigation (introduction)
Safety notes
GWarning!
For safety reasons, only enter a destination
when the vehicle is stationary. When the
vehicle is in motion, a passenger should enter
the destination. Study manual and select
route before driving.
Bear in mind that at a speed of just 30 mph
(approximately 50 km/h), your vehicle is
covering a distance of 44 feet (approximately
14 m) every second.
COMAND calculates the route to the
destination without taking account of the
following, for example:
R Traffic lights
R Stop and right-of-way signs
R Parking or stopping in prohibited areas
R Lane merging
R Other road and traffic rules and regulations
R Narrow bridges
COMAND navigation (introduction)95Control systems221_AKB; 6; 20, en-USd2ugruen,Version: 2.11.8.12009-09-24T13:28:17+02:00 - Seite 95Z
Page 125 of 548

RRestaurant
R Other
With the option Other you can enter stopover
destinations from the destination memory,
last selected destinations, POIs, or via the
address ( Y page 123).
You can enter stopover destinations on the
route or in the vicinity of the route.
You can use the stopover function to
influence the route guidance calculation to
the main destination. When you have reached
your stopover, COMAND automatically
calculates the route to the main destination.
Entering predefined destinationsXSelect Navi 0054 Destination 0054
Stopover .
If a stopover has already been entered, you
can change it.
Changing: Select Change Stopover .
You can now select a category.XSelecting a category: Select category,
e.g. Gas station .
COMAND first looks for destinations along
the vehicle’s route and within the immediate
vicinity of the vehicle. If there are no
destinations available there, COMAND
searches for destinations in an area around
the vehicle position.
If COMAND does not find any destinations,
you will see a message to this effect.
XSelect OK.
You can now select a different category.
If COMAND finds destinations, you will see a
list of the destinations and details of how far
away they are in the right-hand side of the
display. The information about how far away
the destinations are can take a few seconds
to be displayed.
The left-hand part of the display shows the
destinations on the map. The destination
marked in the list is highlighted in the map.
XSelecting a destination: Select the
desired destination from list.
The address of the destination appears.XStarting route calculation: Select Start,
see also ( Y page 120).
Entering another destination as a
stopover
XSelect Navi 0054 Destination 0054
Stopover .XEntering: Select Other.
You can select between the following menu
items:
R Address Entry
R From Memory
R From Last Destinations
R From POIsXSelect a menu item.
Subsequent destination entries may differ,
depending on your selection:
R Address Entry selection:
XEnter a destination by address
( Y page 107).
R
From Memory selection:
XEnter a destination from the
destination memory ( Y page 120).
R
From Last Destinations selection:
XEnter a destination from the list of last
destinations ( Y page 122).
R
From POIs selection:
XEnter a point of interest (POI)
( Y page 124).XStarting route calculation: After entering
a destination, select Start (Y page 120).
Changing a stopover
If a stopover has already been entered, you
can change it.
COMAND navigation system (entering a destination)123Control systems221_AKB; 6; 20, en-USd2ugruen,Version: 2.11.8.12009-09-24T13:28:17+02:00 - Seite 123Z
Page 132 of 548
Examples of displays and
announcements for a driving
maneuver
Driving maneuvers have three phases:
RPreparation phase
RAnnouncement phase
RManeuver phase
Preparation phase
COMAND prepares you for the upcoming
driving maneuver. Based on the example
display below, the driving maneuver is
announced with the Prepare to turn
left message. The display is not split and
shows the map over the full screen.
\000FPoint at which the driving maneuver takes
place (light blue dot)
\000GRoute (highlighted blue)\000
Page 134 of 548
Day modeNight modeRecommended
lane \000p = deep blue
Recommended
lane \000p = light blue
Possible lane \000o =
light blue
Possible lane \000o =
deep blue
Lane not
recommended \000n: =
grey
Lane not
recommended \000n: =
grey
Example of a display without driving
maneuvers
\000FMain destination \000T\000GStopover \000U (only visible if a stopover has
been entered)
\000
Page 145 of 548

XBack to list: Select Back.XDisplaying previous or next traffic
message: Select Previous or Next.
XDisplaying details for selected traffic
message: Select Details.
XSwitching to map view: Select Map.
COMAND navigation system
(destination memory)
My address
iThe destination memory always contains
an entry called My Address. You can save
your home address, for example, under this
entry.
Assigning your address for the first
time or changing your own address
Assigning and/or changing your own
address
XSelect Navi \000T Destination \000T From
Memory.
Depending on the number of entries in the
destination memory, you will see the
destination memory list with or without
predictive speller.
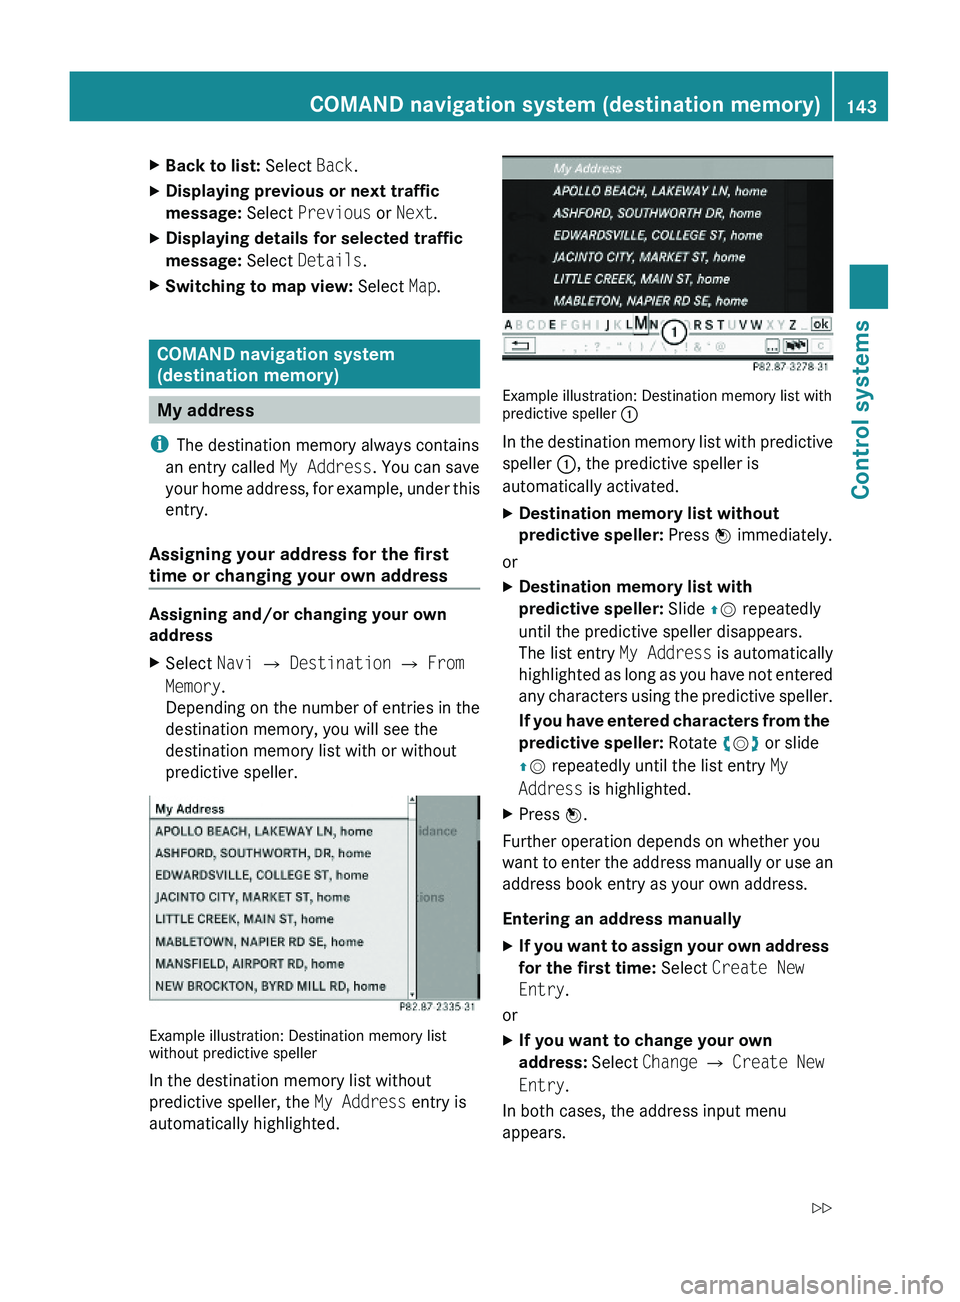
Example illustration: Destination memory listwithout predictive speller
In the destination memory list without
predictive speller, the My Address entry is
automatically highlighted.
Example illustration: Destination memory list withpredictive speller \000F
In the destination memory list with predictive
speller \000F, the predictive speller is
automatically activated.
XDestination memory list without
predictive speller: Press \000
Page 147 of 548
Destination memory list without
predictive speller
In the destination memory list without
predictive speller, the My Address entry is
automatically highlighted.
XPress \000
Page 181 of 548
Such damages are not covered by the
Mercedes-Benz Limited Warranty.
Only use round discs with a diameter of
12 cm.
Notes about handling CDs/DVDs
ROnly hold discs by the edge.
RHandle discs carefully to prevent playback
problems.
RAvoid getting scratches, fingerprints and
dust on discs.
RClean discs from time to time with a
commercially-available cleaning cloth. Do
not wipe them with a circular motion, but
only in straight lines from the center
outwards.
ROnly use a pen designed for such a purpose
to label discs.
RPlace discs back in their boxes after use.
RProtect discs from heat and direct sunlight.
Inserting/ejecting CDs and DVDs
GObserve Safety notes, see page 176.
iIf the CD/DVD has a printed side, this
must face upwards when the CD/DVD is
inserted. If neither side is printed, the side
to be played should face downwards.
DVD changer
The DVD changer contains a built-in magazine
with six trays.
Magazine tray status:RIndicator lamp on magazine tray button
\000