2010 MERCEDES-BENZ S CLASS key battery
[x] Cancel search: key batteryPage 451 of 548
Vehicle equipment ............................450
Where will I find ...? ..........................450
Vehicle status messages in the
multifunction display .......................452
What to do if … ..................................489
Unlocking/locking manually ...........499
Resetting activated NECK-PRO
active front head restraints .............501
Replacing batteries (SmartKey,
remote control, headphone) ............502
Replacing bulbs .................................504
Replacing wiper blades ....................507
Flat tire ..............................................508
Battery ...............................................512
Jump starting ....................................514
Towing the vehicle ............................516
Fuses ..................................................519
449Practical hints221_AKB; 6; 20, en-USd2ugruen,Version: 2.11.8.12009-09-24T13:28:17+02:00 - Seite 449
Page 481 of 548
Display messagesPossible causes/consequences and 0050 Solutions00B1Key Does
Not
Belong to
VehicleThe SmartKey in the starter switch does not belong to the
vehicle.XRemove the SmartKey from the starter switch.00B1Replace
Key
BatteryThe batteries in the SmartKey with KEYLESS-GO are
discharged.XReplace the batteries ( Y page 502).00B1Key Not
Detected
(message
appears in
red)The SmartKey with KEYLESS-GO is not detected while the
engine is running because the SmartKey is not in the vehicle.XStop the vehicle as soon as it is safe to do so.XEngage the electronic parking brake.XSearch for the SmartKey.
The vehicle cannot be locked centrally nor can the engine
be started again after the engine is stopped.00B1Key Not
Detected
(message
appears in
red)The SmartKey with KEYLESS-GO is not detected while the
engine is running because there is strong radio-frequency
interference.XStop the vehicle as soon as it is safe to do so.XEngage the electronic parking brake.XRemove the KEYLESS-GO button from the starter switch
( Y page 285).XOperate the vehicle with the SmartKey in the starter switch.00B1Key Not
Detected
(message
appears in
red)The SmartKey with KEYLESS-GO is momentarily not detected.XChange the position of the SmartKey in the vehicle.XIf necessary, remove the KEYLESS-GO button from the
starter switch ( Y page 285).XOperate the vehicle with the SmartKey in the starter switch.00B1Key Not
Detected
(message
appears in
white)The SmartKey with KEYLESS-GO is momentarily not detected.XChange the position of the SmartKey in the vehicle.XIf necessary, remove the KEYLESS-GO button from the
starter switch ( Y page 285).XOperate the vehicle with the SmartKey in the starter switch.00B1Key Being
Initialize
d… Please
WaitThe SmartKey with KEYLESS-GO is being initialized in the
vehicle.XWait until the message disappears from the multifunction
display.Vehicle status messages in the multifunction display479Practical hints221_AKB; 6; 20, en-USd2ugruen,Version: 2.11.8.12009-09-24T13:28:17+02:00 - Seite 479Z
Page 502 of 548
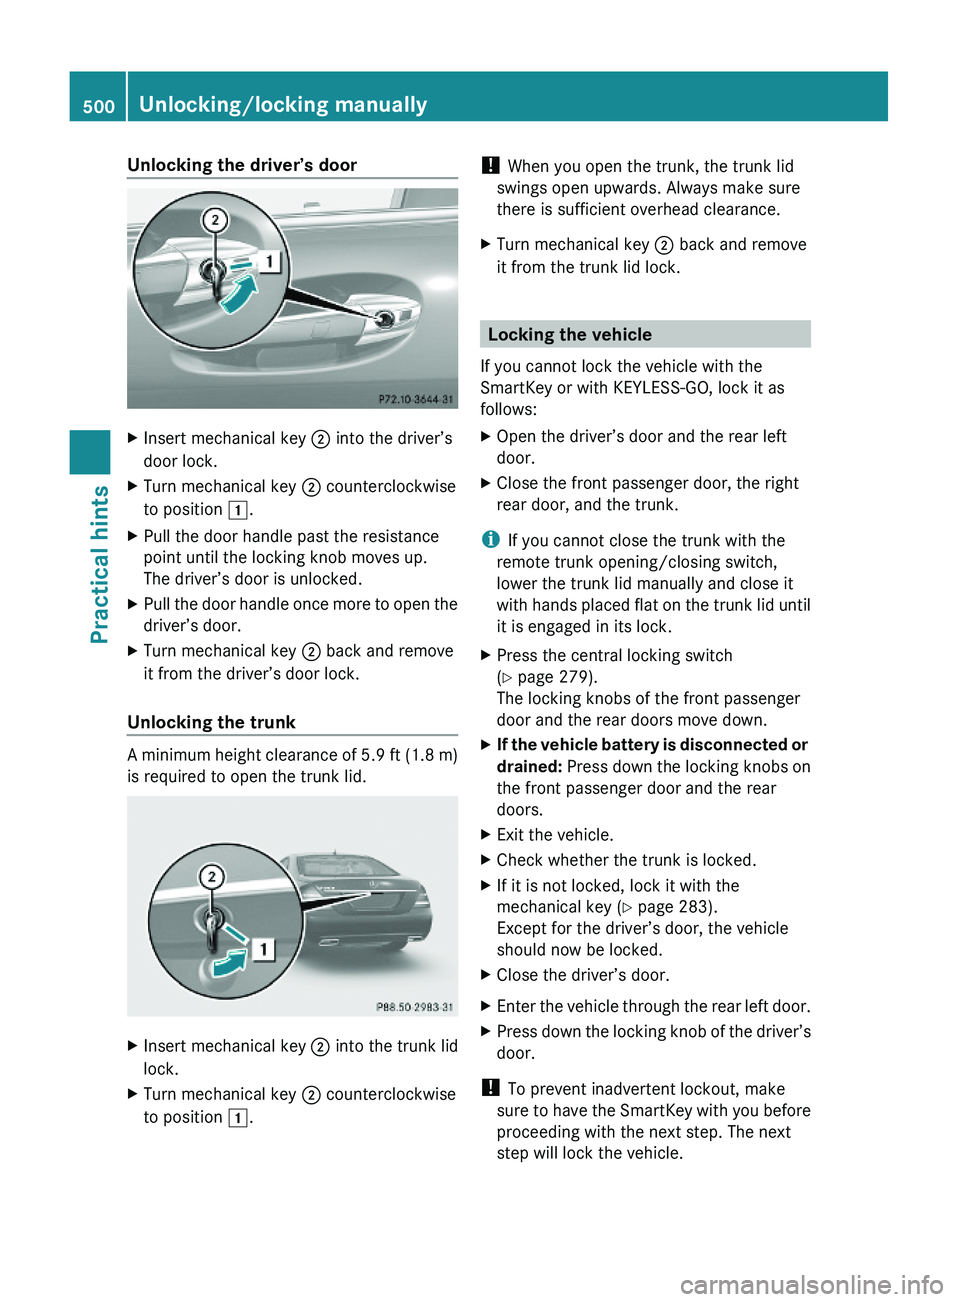
Unlocking the driver’s doorXInsert mechanical key \000G into the driver’s
door lock.
XTurn mechanical key \000G counterclockwise
to position \000J.
XPull the door handle past the resistance
point until the locking knob moves up.
The driver’s door is unlocked.
XPull the door handle once more to open the
driver’s door.
XTurn mechanical key \000G back and remove
it from the driver’s door lock.
Unlocking the trunk
A minimum height clearance of 5.9 ft (1.8 m)
is required to open the trunk lid.
XInsert mechanical key \000G into the trunk lid
lock.
XTurn mechanical key \000G counterclockwise
to position \000J.
! When you open the trunk, the trunk lid
swings open upwards. Always make sure
there is sufficient overhead clearance.
XTurn mechanical key \000G back and remove
it from the trunk lid lock.
Locking the vehicle
If you cannot lock the vehicle with the
SmartKey or with KEYLESS-GO, lock it as
follows:
XOpen the driver’s door and the rear left
door.
XClose the front passenger door, the right
rear door, and the trunk.
iIf you cannot close the trunk with the
remote trunk opening/closing switch,
lower the trunk lid manually and close it
with hands placed flat on the trunk lid until
it is engaged in its lock.
XPress the central locking switch
(Y page 279).
The locking knobs of the front passenger
door and the rear doors move down.
XIf the vehicle battery is disconnected or
drained: Press down the locking knobs on
the front passenger door and the rear
doors.
XExit the vehicle.XCheck whether the trunk is locked.XIf it is not locked, lock it with the
mechanical key (Y page 283).
Except for the driver’s door, the vehicle
should now be locked.
XClose the driver’s door.XEnter the vehicle through the rear left door.XPress down the locking knob of the driver’s
door.
! To prevent inadvertent lockout, make
sure to have the SmartKey with you before
proceeding with the next step. The next
step will lock the vehicle.
500Unlocking/locking manuallyPractical hints
221_AKB; 6; 20, en-USd2ugruen,Version: 2.11.8.12009-09-24T13:28:17+02:00 - Seite 500
Page 505 of 548
XInsert the new battery with the positive
terminal (+) facing up. Use a lint-free cloth.
XInsert the tabs of the battery compartment
cover into the housing and press the cover
closed.
XSlide mechanical key \000F back into the
SmartKey.
XCheck the operation of the SmartKey.
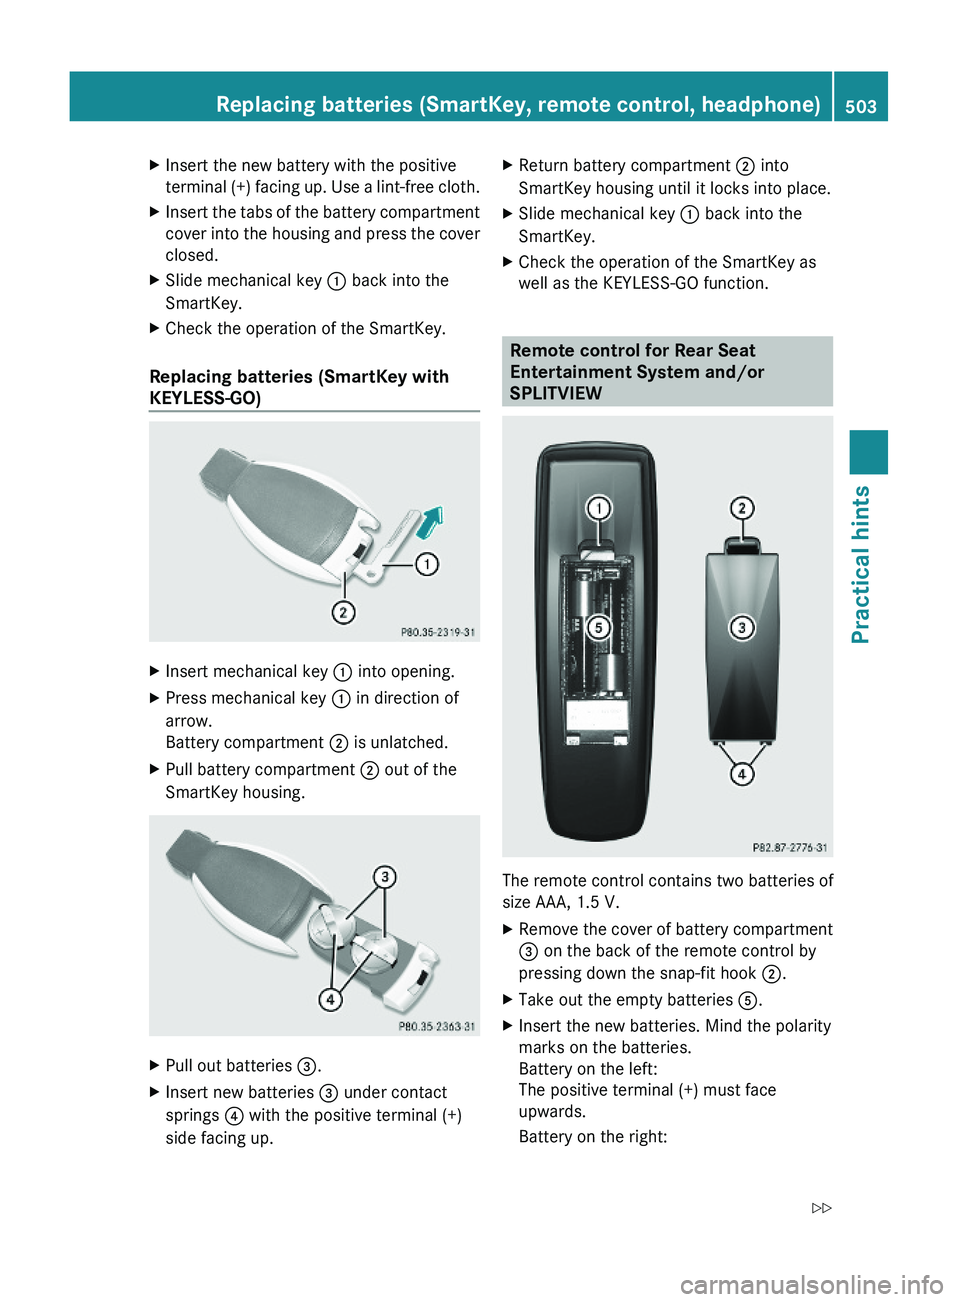
Replacing batteries (SmartKey with
KEYLESS-GO)
XInsert mechanical key \000F into opening.XPress mechanical key \000F in direction of
arrow.
Battery compartment \000G is unlatched.
XPull battery compartment \000G out of the
SmartKey housing.
XPull out batteries \000
Page 516 of 548
The factory-equipped battery may only be
replaced with a battery that
R has the same security features
R is of identical size
R is of identical voltage
R is of identical capacity
! As any other battery, the battery may
discharge if you do not operate the vehicle
for an extended period of time. Have the
battery disconnected at a qualified
workshop or an authorized Mercedes-Benz
Center in such a case. You may also
connect an accessory battery charge unit
expressly approved by Mercedes-Benz for
your vehicle model to maintain the battery
charge. Contact an authorized Mercedes-
Benz Center for further information.
The battery, the battery ventilation hose
and the lateral plug must always be
securely installed when the vehicle is in
operation.
! Switch off the engine and switch off the
vehicle’s internal electrical functions
before you disconnect or remove the
battery’s terminal clamps. You could
otherwise destroy electronic assemblies
such as the generator.
Remove SmartKey from starter switch
(vehicles with KEYLESS-GO: Make sure the
vehicle’s on-board electronics have status 0)
when you turn off the engine and no longer
require any electrical consumers. The vehicle
then uses very little power and the battery is
spared.
If the battery is discharged, you must use the
mechanical key to unlock the vehicle.
Charging the battery
GWarning!
Never charge a battery while still installed in
the vehicle unless the accessory battery
charge unit approved by Mercedes-Benz is
being used. Gases may escape during
charging and could cause an explosion that
may result in personal injury, paint damage or
corrosion.
An accessory battery charge unit specially
adapted for Mercedes-Benz vehicles and
tested and approved by Mercedes-Benz is
available. It permits the charging of the
battery in its installed position. Contact an
authorized Mercedes-Benz Center for
information and availability.
Charge battery in accordance with the
separate instructions for the accessory
battery charger.
Have the battery charged at an authorized
Mercedes-Benz Center. If you charge the
battery yourself, follow the operating
instructions for your charging device.
Only use a battery charge unit with a
maximum charging voltage of 14.8 V.XCharge battery in accordance with the
instructions of the battery charger
manufacturer.
Jump starting
GWarning!
Failure to follow these directions will cause
damage to the electronic components, and
can lead to a battery explosion and severe
injury or death.
Never lean over batteries while connecting or
jump starting. You might get injured.
Battery fluid contains sulfuric acid. Do not
allow this fluid to come in contact with eyes,
skin or clothing. In case it does, immediately
flush affected area with water, and seek
medical help if necessary.
A battery will also produce hydrogen gas,
which is flammable and explosive. Keep
flames or sparks away from battery, avoid
514Jump startingPractical hints
221_AKB; 6; 20, en-USd2ugruen,Version: 2.11.8.12009-09-24T13:28:17+02:00 - Seite 514
Page 519 of 548

necessary safety information and warning for
the operation of your vehicle.
! To prevent damage during transport, do
not tie down vehicle by its chassis or
suspension parts.
If circumstances do not permit the
recommended towing methods, the vehicle
may be towed with all wheels on the ground
or front axle raised (except vehicles with
4MATIC) only so far as necessary to have the
vehicle moved to a safe location where the
recommended towing methods can be
employed.
! Before towing the vehicle observe the
following instructions:
RDo not tow-start the vehicle. You could
otherwise seriously damage the
automatic transmission which is not
covered by the Mercedes-Benz Limited
Warranty.
RDo not tow with sling-type equipment.
Towing with sling-type equipment over
bumpy roads will damage radiator and
supports.
RTowing of the vehicle should only be
done using the properly installed towing
eye bolt. Never attach a tow cable, tow
rope or tow rod to the vehicle chassis,
frame or suspension parts.
GWarning!
With the engine not running, there is no power
assistance for the brake and steering
systems. In this case, it is important to keep
in mind that a considerably higher degree of
effort is necessary to brake and steer the
vehicle. Adapt your driving accordingly.
! Avoid pulling the vehicle abruptly or
diagonally, since it could result in damage
to the chassis alignment.
! Do not use the towing eye bolt for
recovery, as this could damage the vehicle.
If in doubt, recover the vehicle with a crane.
iIf the battery is disconnected or
discharged
Rthe SmartKey will not turn in the starter
switch
Rthe automatic transmission will remain in
park position P
For more information see “Battery”
(Y page 512) or “Jump starting”
(Y page 514).
Installing towing eye bolt
Depending on whether you are towing a
vehicle or you are being towed, the towing eye
bolt can be screwed into threaded holes
which are located behind covers on each
bumper.
The towing eye bolt is supplied with the
vehicle tool kit, located underneath the trunk
floor (Y page 450).
XTake the vehicle tool kit out of the trunk.
Removing cover in front bumper
XPress mark on cover \000F as indicated by the
arrow.
XLift cover \000F off to reveal the threaded hole
for the towing eye bolt.
Towing the vehicle517Practical hints221_AKB; 6; 20, en-USd2ugruen,Version: 2.11.8.12009-09-24T13:28:17+02:00 - Seite 517Z