2010 MERCEDES-BENZ S CLASS buttons
[x] Cancel search: buttonsPage 279 of 548
Possibility 2 (One SmartKey in the vehicle,
no SmartKey outside the vehicle):
When exiting and trying to lock the vehicle,
the message Key Detected In Vehicle
appears in the multifunction display. The
vehicle will not be locked.
Factory setting
XGlobal unlocking: Pull an outside door
handle.
Unless you open a door or the trunk within
approximately 40 seconds after unlocking
the vehicle:
RThe vehicle will be locked again.
RThe anti-theft alarm system will be
rearmed.
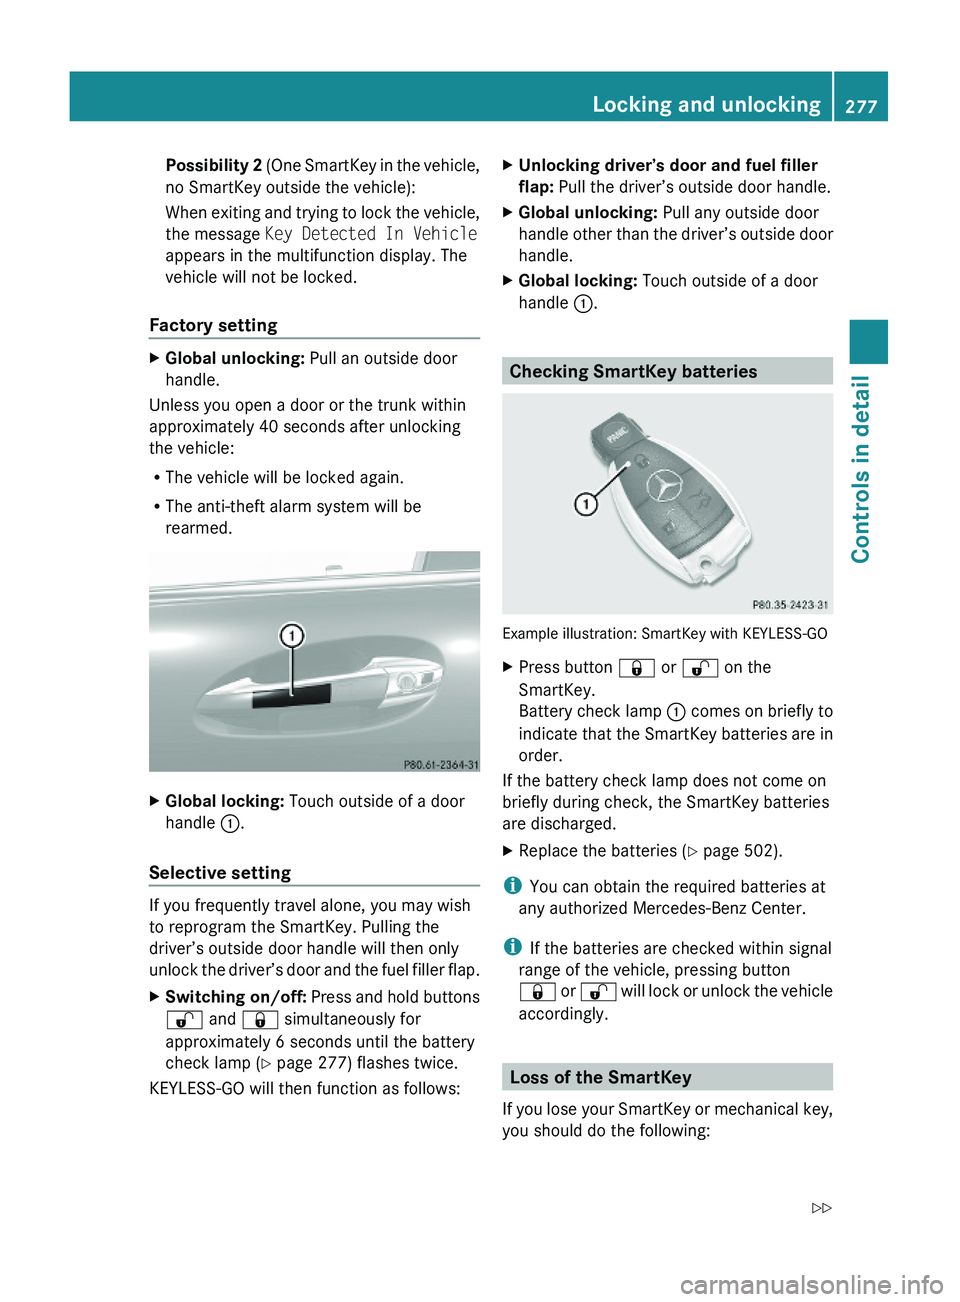
XGlobal locking: Touch outside of a door
handle \000F.
Selective setting
If you frequently travel alone, you may wish
to reprogram the SmartKey. Pulling the
driver’s outside door handle will then only
unlock the driver’s door and the fuel filler flap.
XSwitching on/off: Press and hold buttons
\0006 and \0007 simultaneously for
approximately 6 seconds until the battery
check lamp (Y page 277) flashes twice.
KEYLESS-GO will then function as follows:
XUnlocking driver’s door and fuel filler
flap: Pull the driver’s outside door handle.
XGlobal unlocking: Pull any outside door
handle other than the driver’s outside door
handle.
XGlobal locking: Touch outside of a door
handle \000F.
Checking SmartKey batteries
Example illustration: SmartKey with KEYLESS-GO
XPress button \0007 or \0006 on the
SmartKey.
Battery check lamp \000F comes on briefly to
indicate that the SmartKey batteries are in
order.
If the battery check lamp does not come on
briefly during check, the SmartKey batteries
are discharged.
XReplace the batteries (Y page 502).
iYou can obtain the required batteries at
any authorized Mercedes-Benz Center.
iIf the batteries are checked within signal
range of the vehicle, pressing button
\0007 or \0006 will lock or unlock the vehicle
accordingly.
Loss of the SmartKey
If you lose your SmartKey or mechanical key,
you should do the following:
Locking and unlocking277Controls in detail221_AKB; 6; 20, en-USd2ugruen,Version: 2.11.8.12009-09-24T13:28:17+02:00 - Seite 277Z
Page 291 of 548
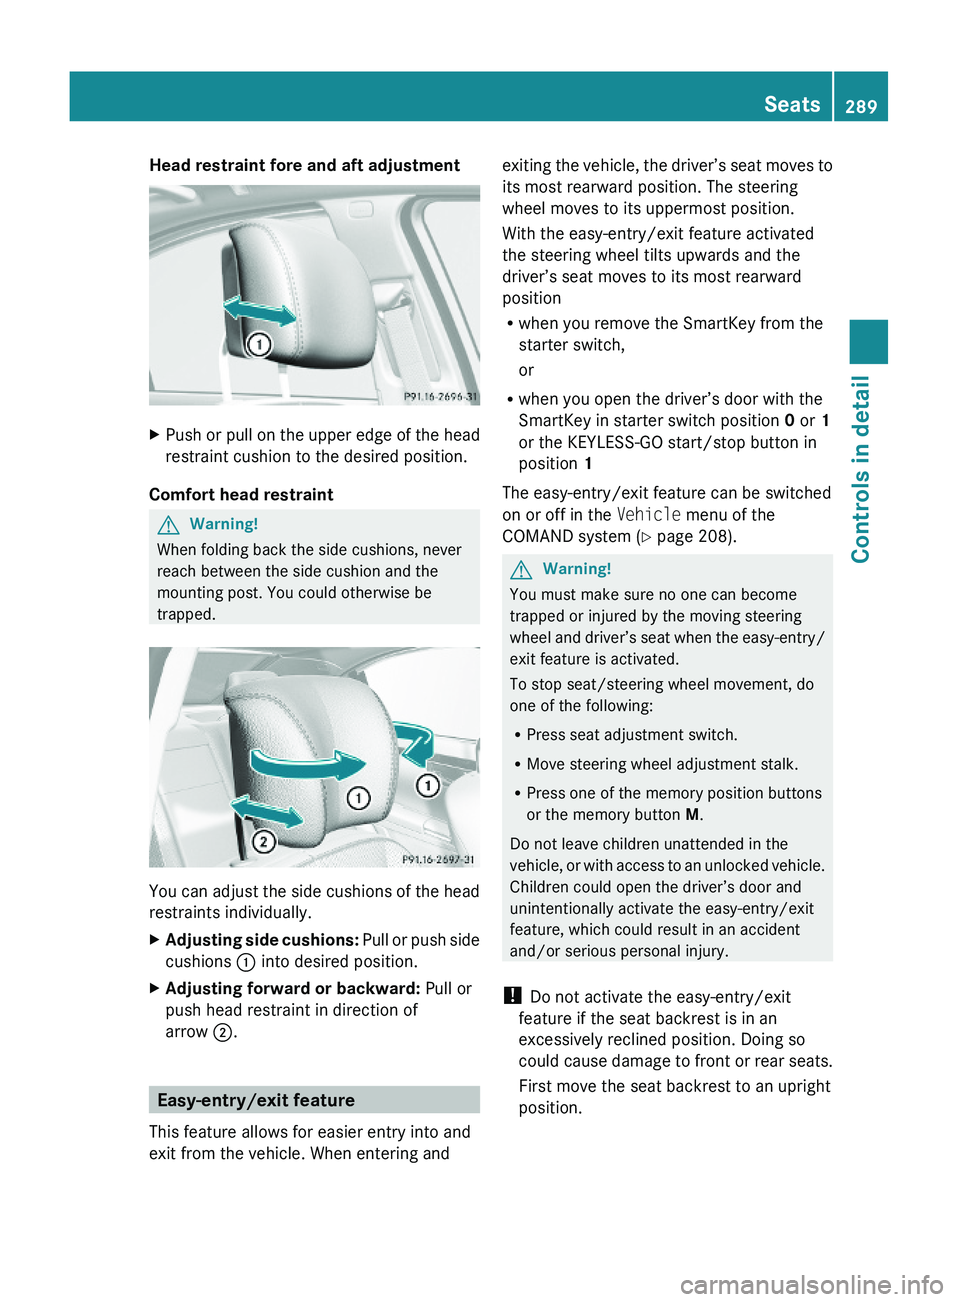
Head restraint fore and aft adjustment XPush or pull on the upper edge of the head
restraint cushion to the desired position.
Comfort head restraint
GWarning!
When folding back the side cushions, never
reach between the side cushion and the
mounting post. You could otherwise be
trapped.
You can adjust the side cushions of the head
restraints individually.
XAdjusting side cushions: Pull or push side
cushions \000F into desired position.
XAdjusting forward or backward: Pull or
push head restraint in direction of
arrow \000G.
Easy-entry/exit feature
This feature allows for easier entry into and
exit from the vehicle. When entering and
exiting the vehicle, the driver’s seat moves to
its most rearward position. The steering
wheel moves to its uppermost position.
With the easy-entry/exit feature activated
the steering wheel tilts upwards and the
driver’s seat moves to its most rearward
position
Rwhen you remove the SmartKey from the
starter switch,
or
Rwhen you open the driver’s door with the
SmartKey in starter switch position 0 or 1
or the KEYLESS-GO start/stop button in
position 1
The easy-entry/exit feature can be switched
on or off in the Vehicle menu of the
COMAND system (Y page 208).
GWarning!
You must make sure no one can become
trapped or injured by the moving steering
wheel and driver’s seat when the easy-entry/
exit feature is activated.
To stop seat/steering wheel movement, do
one of the following:
RPress seat adjustment switch.
RMove steering wheel adjustment stalk.
RPress one of the memory position buttons
or the memory button M.
Do not leave children unattended in the
vehicle, or with access to an unlocked vehicle.
Children could open the driver’s door and
unintentionally activate the easy-entry/exit
feature, which could result in an accident
and/or serious personal injury.
! Do not activate the easy-entry/exit
feature if the seat backrest is in an
excessively reclined position. Doing so
could cause damage to front or rear seats.
First move the seat backrest to an upright
position.
Seats289Controls in detail221_AKB; 6; 20, en-USd2ugruen,Version: 2.11.8.12009-09-24T13:28:17+02:00 - Seite 289Z
Page 295 of 548
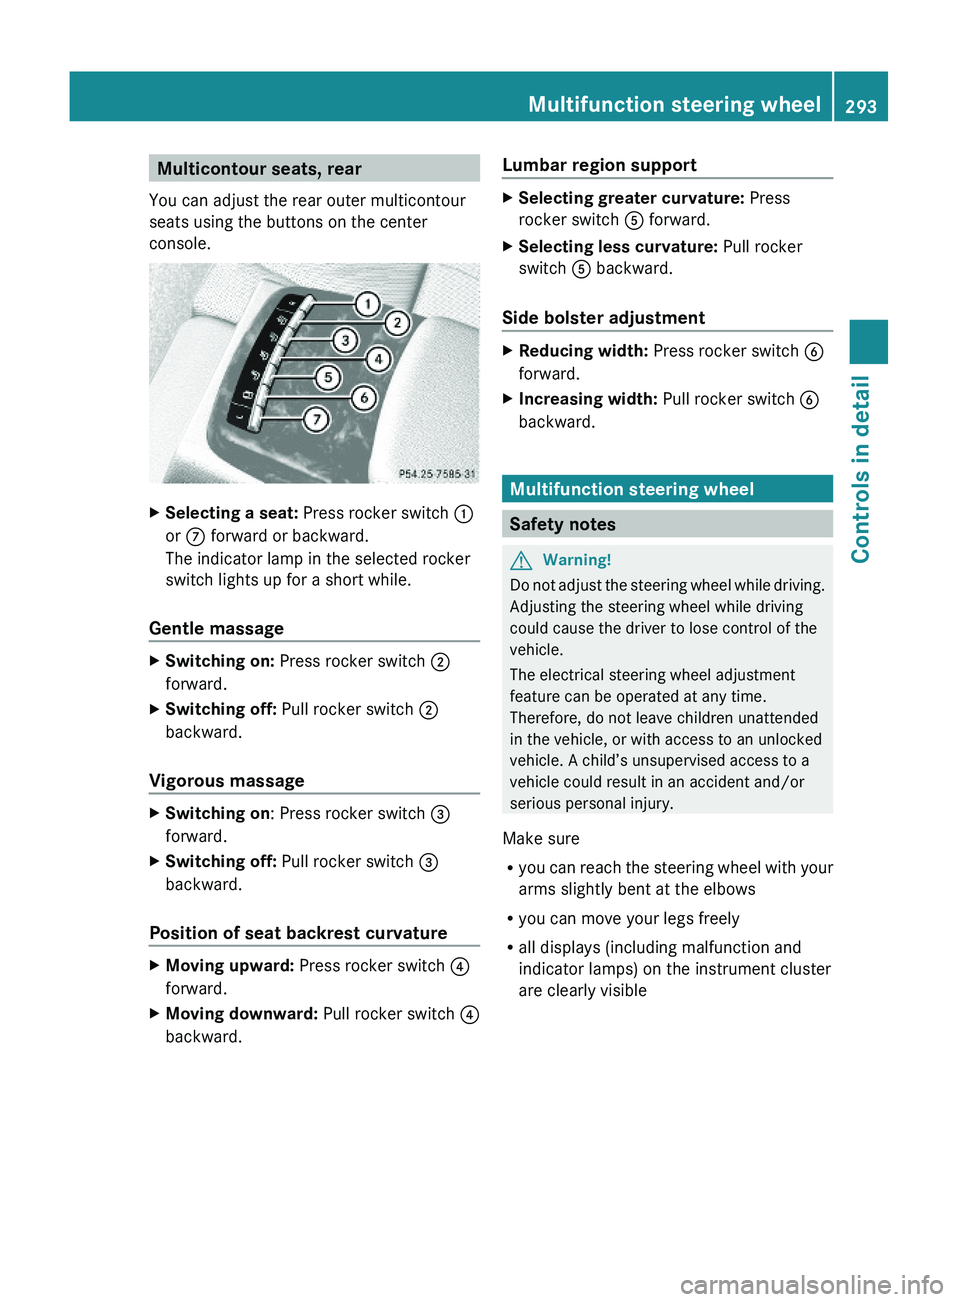
Multicontour seats, rear
You can adjust the rear outer multicontour
seats using the buttons on the center
console.
XSelecting a seat: Press rocker switch \000F
or \000n forward or backward.
The indicator lamp in the selected rocker
switch lights up for a short while.
Gentle massage
XSwitching on: Press rocker switch \000G
forward.
XSwitching off: Pull rocker switch \000G
backward.
Vigorous massage
XSwitching on: Press rocker switch \000
Page 306 of 548
Switching offXSwitch off the left or right turn signal.
or
XSteer straight ahead.
The corner-illuminating lamp goes out.
iThere may be a brief delay before the
corner-illuminating lamps go out.
Interior lighting in the front
iEven with the SmartKey being removed
from the starter switch you can still use the
lighting for the storage compartment, glove
box and vanity mirrors, when you open a
door or press one of the interior lighting
buttons. If a lamp is switched on and you
do not lock the vehicle, it will be switched
off automatically after 30 minutes.
When you lock the vehicle from the outside,
the interior lighting is switched off.
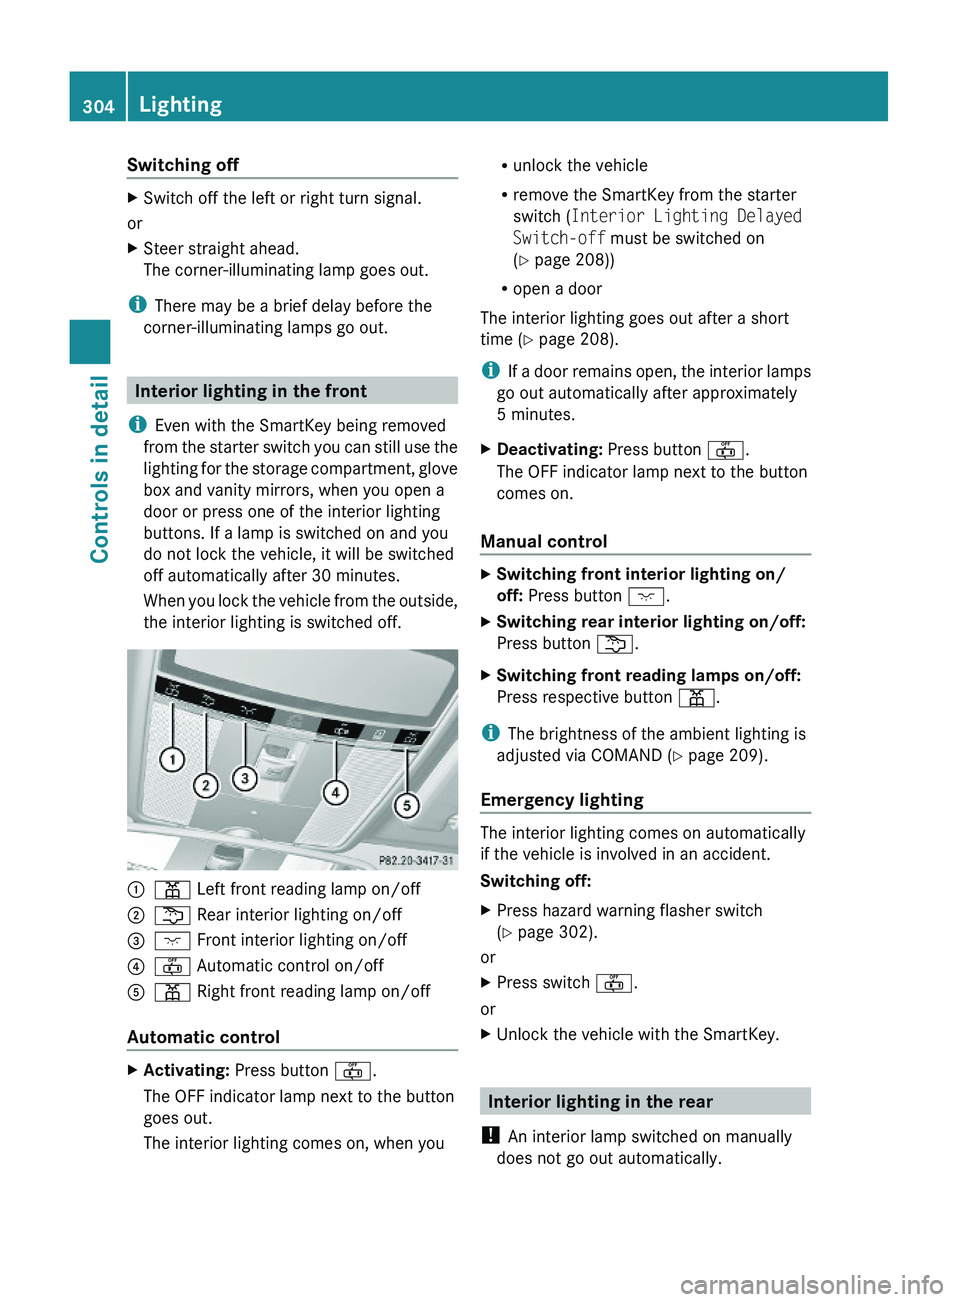
\000F\000I Left front reading lamp on/off \000G\000L Rear interior lighting on/off\000
Page 360 of 548
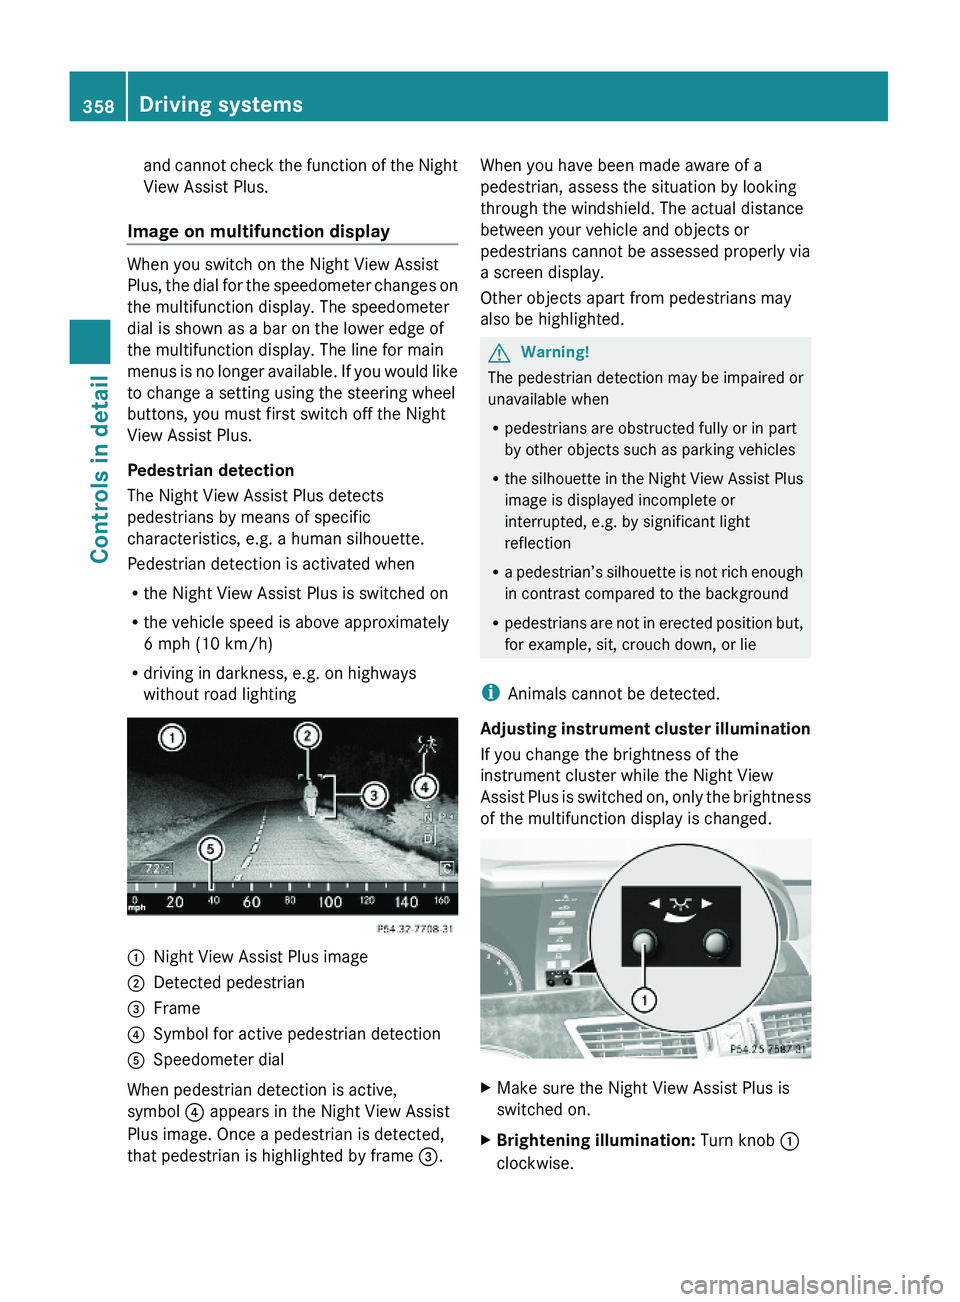
and cannot check the function of the Night
View Assist Plus.
Image on multifunction display
When you switch on the Night View Assist
Plus, the dial for the speedometer changes on
the multifunction display. The speedometer
dial is shown as a bar on the lower edge of
the multifunction display. The line for main
menus is no longer available. If you would like
to change a setting using the steering wheel
buttons, you must first switch off the Night
View Assist Plus.
Pedestrian detection
The Night View Assist Plus detects
pedestrians by means of specific
characteristics, e.g. a human silhouette.
Pedestrian detection is activated when
Rthe Night View Assist Plus is switched on
Rthe vehicle speed is above approximately
6 mph (10 km/h)
Rdriving in darkness, e.g. on highways
without road lighting
\000FNight View Assist Plus image\000GDetected pedestrian\000
Page 399 of 548
Rolling code programming
To train a garage door opener (or other rolling
code devices) with the rolling code feature,
follow these instructions after completing the
“Programming” portion (steps 1 through 6) of
this text. For your convenience and to
complete the procedure faster, you might
want to have someone assist you.XStep 8: Locate the “training” button on the
garage door opener motor head unit.
i Exact location and color of the button may
vary by garage door opener brand.
Depending on manufacturer, the “training”
button may also be referred to as “learn” or
“smart” button. If there is difficulty locating
the transmitting button, refer to the garage
door opener Operator’s Manual.
XStep 9: Press the “training” button on the
garage door opener motor head unit.
The “training light” is activated.
You have 30 seconds to initiate the
following two steps.XStep 10: Return to the vehicle and firmly
press, hold for 2 seconds and release the
programmed signal transmitter button ( 0047,
008A or 0088).XStep 11: Press, hold for 2 seconds and
release same signal transmitter button a
second time to complete the training
process.
i Some garage door openers (or other
rolling code equipped devices) may require
you to press, hold for 2 seconds and
release the same signal transmitter button
a third time to complete the training
process.
XStep 12: Confirm the garage door
operation by pressing the programmed
signal transmitter button ( 0047, 008A or 0088).XStep 13: To program the remaining two
signal transmitter buttons, repeat the steps
above starting with step 3.Gate operator/Canadian programming
Canadian radio-frequency laws require
transmitter signals to “time-out” (or quit)
after several seconds of transmission which
may not be long enough for the integrated
signal transmitter to pick up the signal during
programming. Similar to this Canadian law,
some U.S. gate operators are designed to
“time-out” in the same manner.
If you live in Canada or if you are having
difficulties programming a gate operator
(regardless of where you live) by using the
programming procedures, replace step 4 with
the following:XStep 4: Press and hold the signal
transmitter button ( 0047, 008A or 0088). Do not
release this button until it has been
successfully trained.XWhile still holding down the signal
transmitter button ( 0047, 008A or 0088), “cycle”
your hand-held remote control button 0087
as follows: Press and hold button 0087 for
2 seconds, then release it for 2 seconds,
and again press and hold it for 2 seconds.
Repeat this sequence on the hand-held
remote control until the frequency signal
has been learned.
Upon successful training, indicator
lamp 0046 will flash slowly and then rapidly
after several seconds.XProceed with programming step 5 and
step 6 to complete.
i Upon completion of programming the
integrated remote control, make sure you
retain the hand-held remote control that
came with the garage door opener, gate
operator or other device. You may need it
for use in other vehicles, for future
programming of an integrated remote
control, or simply for continued use as a
hand-held remote control to operate the
respective device in other situations.
Useful features397Controls in detail221_AKB; 6; 20, en-USd2ugruen,Version: 2.11.8.12009-09-24T13:28:17+02:00 - Seite 397Z
Page 400 of 548
Reprogramming a single signal
transmitter button
To program a device using a signal
transmitter button previously trained, follow
these steps:
XSwitch on the ignition.XPress and hold the desired signal
transmitter button ( 0047, 008A or 0088). Do not
release the button.
Indicator lamp 0046 will begin to flash after
20 seconds.XWithout releasing the signal transmitter
button, proceed with programming starting
with step 3.
Operation of integrated remote control
XSwitch on the ignition.XSelect and press the appropriate
integrated signal transmitter button ( 0047,
008A or 0088) to activate the remote controlled
device.
The integrated remote control transmitter
continues to send the signal as long as the
button is pressed – up to 20 seconds.
Erasing the integrated remote control
memory
i If you sell your vehicle, erase the codes of
all three channels.
XSwitch on the ignition.XSimultaneously press and hold outer signal
transmitter buttons 0047 and 0088, for
approximately 20 seconds, until indicator
lamp 0046 flashes rapidly. Do not hold for
longer than 30 seconds.
The codes of all three channels are erased.Programming tips
If you are having difficulty programming the
integrated remote control, here are some
helpful tips:
R Check the frequency of hand-held remote
control 0086 (typically located on the reverse
side of the remote). The integrated remote
control is compatible with radio-frequency
devices operating between 280-390 MHz.
R Put a new battery in hand-held remote
control 0086. This will increase the likelihood
of the hand-held remote control sending a
stronger and more accurate signal to the
integrated remote control.
R While performing step 3, hold hand-held
remote control 0086 at different lengths and
angles from the signal transmitter button
( 0047 , 008A or 0088) you are programming.
Attempt varying angles at the distance of 2
to 12 inches (5 to 30 cm) away or the same
angle at varying distances.
R If another hand-held remote control is
available for the same device, try the
programming steps again using that other
hand-held remote control. Make sure new
batteries are in the hand-held remote
control before beginning the procedure.
R Straighten the antenna wire from the
garage door opener assembly. This may
help improve transmitting and/or receiving
signals.
i Certain types of garage door openers are
incompatible with the integrated remote
control. If you should experience further
difficulties with programming the
integrated remote control, contact an
authorized Mercedes-Benz Center, or call
the Mercedes-Benz Customer Assistance
Center (USA only) at
1-800-FOR-MERCedes (1-800-367-6372),
or the HomeLink ®
Hotline (USA only) at
1-800-355-3515, or the Customer Service
(Canada only) at 1-800-387-0100.
398Useful featuresControls in detail
221_AKB; 6; 20, en-USd2ugruen,Version: 2.11.8.12009-09-24T13:28:17+02:00 - Seite 398