2010 MERCEDES-BENZ S CLASS change wheel
[x] Cancel search: change wheelPage 240 of 548
GWarning!
Please do not use the Voice Control System
in an emergency, as the tone of your voice
may change in a stressful situation. This could
cause a delay in completing your phone call
in a timely manner. This could distract you in
an emergency situation and cause you to be
involved in an accident.
General information
Depending on vehicle equipment, you can
operate the following systems via the Voice
Control System:
RTelephone (Y page 245)
RNavigation (Y page 240)
RAddress book (Y page 249)
RAudio (Y page 252) (AM/FM radio,
Satellite radio, CD/DVD changer, MP3
mode (SD card, USB, Music Register, Media
Interface), AUX)
RVideo
You control these systems using spoken
commands. Moreover, controls such as the
buttons on the multifunction steering wheel
(Y page 238) allow you to keep your hands
on the steering wheel.
The Voice Control System recognizes
commands and number sequences,
irrespective of the speaker. To optimize
speech recognition for your voice follow the
individualization process (Y page 271).
You can use the Voice Control System to call
up all of COMAND’s main menu items.
The commands can be spoken without
pausing between the individual words. If an
unavailable or incorrect command is used,
the Voice Control System will prompt you for
a new command by asking “Please repeat” or
“Please repeat your entry”.
The Voice Control System will confirm
important commands and inform you in case
of incorrect entries.
iTo support the user, the Voice Control
System contains an extensive help function
(Y page 267).
You can use the commands “Continue” or
“Back” to scroll up or down in lists.
The command “Correction” lets you repeat
the entry.
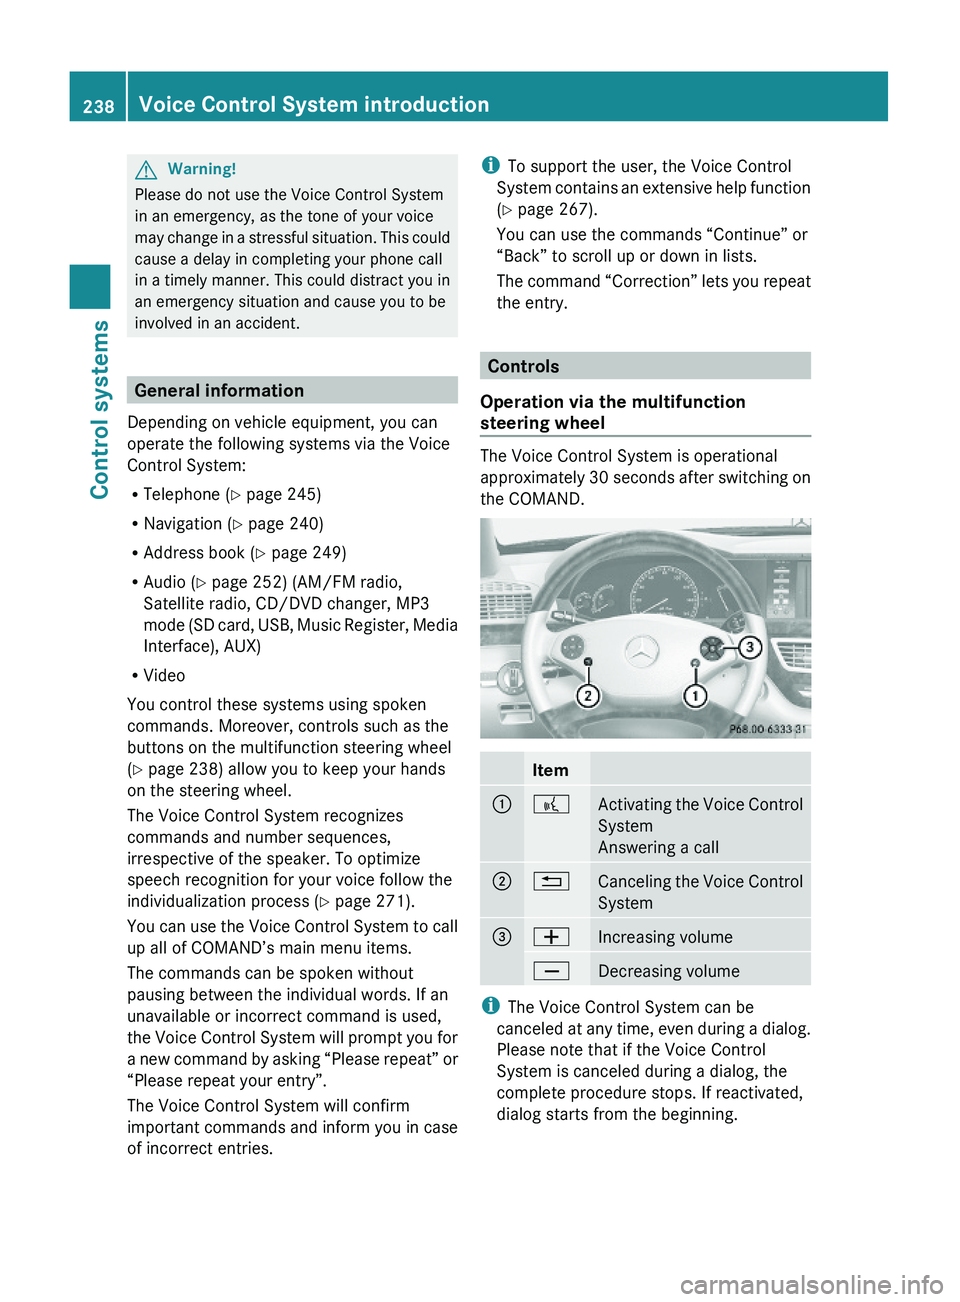
Controls
Operation via the multifunction
steering wheel
The Voice Control System is operational
approximately 30 seconds after switching on
the COMAND.
Item\000F\000bActivating the Voice Control
System
Answering a call
\000G\000ACanceling the Voice Control
System
\000
Page 257 of 548
The system reads out the list of stations.
When the system reads the station to be
deleted:XPress button 0062.
The station to be deleted is selected. The
system reads out the selected station
again.009CDo you want to delete “Favorite
Station 37
”?009DYes.009CStation deleted.
The system deletes the station and reads out
the remaining entries in the Presets.
or
009CNo.
The system continues reading the Presets
entry by entry.
“HD Radio on”, “HD Radio off”
Use “HD Radio on” or “HD Radio off” to switch
the HD Radio™ on or off.
“Sirius”
Use “Sirius” to switch to SIRIUS XM Satellite
Radio.
Voice Control System CD/DVD
changer/MP3
Safety notes
GWarning!
Please devote your attention first and
foremost to the traffic situation you are in.
Before your journey, please familiarize
yourself with the audio functions.
Only use the Voice Control System when road
and traffic conditions permit you to do so.
Otherwise you could be involved in an
accident in which you or others could be
injured.
Operation
You can use the Voice Control System to
R select a CD/DVD or another medium
R select a track
R select a folder in MP3 mode
R change the category when in media
interface mode
R select a group in audio DVD mode
R select a chapter or scene when in video
DVD mode
i Upon the command “Next/Previous CD/
DVD”, the DVD changer switches from one
CD/DVD to the next. It will skip empty
slots. When you select an empty slot using
the commands “CD/DVD 1” through “CD/
DVD 6”, the current slot remains selected.
i The following commands “DVD audio”,
“DVD video”, “Next/Previous CD/DVD”
and “CD/DVD 1” to “CD/DVD 6”, cause
the DVD changer to switch from one slot to
another, regardless of the type of medium
found in the selected slot. In your
command, you can therefore replace the
term “CD/DVD” with “Medium”.
Selecting CD/DVD modeXPress button 0062 on the multifunction
steering wheel.XSpeak one of the following commands:
R “CD player”
R “CD changer”
R “DVD audio”
R “DVD video”
R “Hard disk”
R “Memory card”
R “Media interface”
R “USB”
R “Music Register”37Example for a voice name.Voice Control System CD/DVD changer/MP3255Control systems221_AKB; 6; 20, en-USd2ugruen,Version: 2.11.8.12009-09-24T13:28:17+02:00 - Seite 255Z
Page 258 of 548
XPress button 0062 on the multifunction
steering wheel.XSpeak one of the following commands.
Commands
For a list of commands, see ( Y page 257).
Help commands
Use the following commands and the Voice
Control System will read out a list of available
commands for the audio/video functions:
R “Help CD”
R “Help DVD audio”
R “Help DVD video”
R “Help MP3”
R “Help hard disk”
R “Help memory card”
R “Help media interface”
R “Help USB”
R “Help music register”
“Next CD/DVD/Medium”
Use the command “Next CD”, “Next DVD” or
“Next Medium” to select the next available
medium in the CD/DVD changer.
“Previous CD/DVD/Medium”
Use the command “Previous CD”, “Previous
DVD” or “Previous Medium” to select the
previous medium in the CD/DVD change.
“CD/DVD/Medium 1” to “CD/DVD/
Medium 6”
Use commands “CD/DVD/Medium 1” to
“CD/DVD/Medium 6” to select one of up to
six mediums in your CD/DVD changer.
“Track 1” to “Track 99”
Use the commands “Track 1” to “Track 99”
to select a title number from a loaded
medium.
“Next track”
Use the command “Next track” to select the
next track.
“Previous track”, “Repeat track”
Use the command “Previous track” or
“Repeat track” to play again the track you are
listening to. When you speak the command
during the first seconds of the track, the
previous track is played back.
“Group 1” to “Group 9”
The “Group 1” to “Group 9” commands are
used to select a group on the inserted audio-
DVD.
“Next group”, “Previous group”
Use the command “Next group” or “Previous
group” to select a group on the inserted
audio-DVD.
“DVD audio”
Use the command “DVD audio” to start an
audio DVD in the COMAND.
“DVD video”
Use the command “DVD video” to start a
video DVD in the COMAND.
“Select scene”, “Select chapter”
Use the command “Select scene” or “Select
chapter” to select a scene or chapter on the
current video DVD.
256Voice Control System CD/DVD changer/MP3Control systems
221_AKB; 6; 20, en-USd2ugruen,Version: 2.11.8.12009-09-24T13:28:17+02:00 - Seite 256
Page 326 of 548
Shifting into optimal gear range XPull and hold left gearshift control \000F.
The automatic transmission will select the
gear range suited for optimal acceleration
and deceleration automatically. This will
involve shifting down one or more gears.
Manual shift program
The manual shift program is available on AMG
vehicles only.
Manual program mode M differs with regard
to spontaneity, response time, and shifting
smoothness from automatic program mode
S.
In manual program mode M, system-
controlled automatic gearshifting is switched
off. You need to change the gears by manually
upshifting or downshifting using the steering
wheel gearshift control.
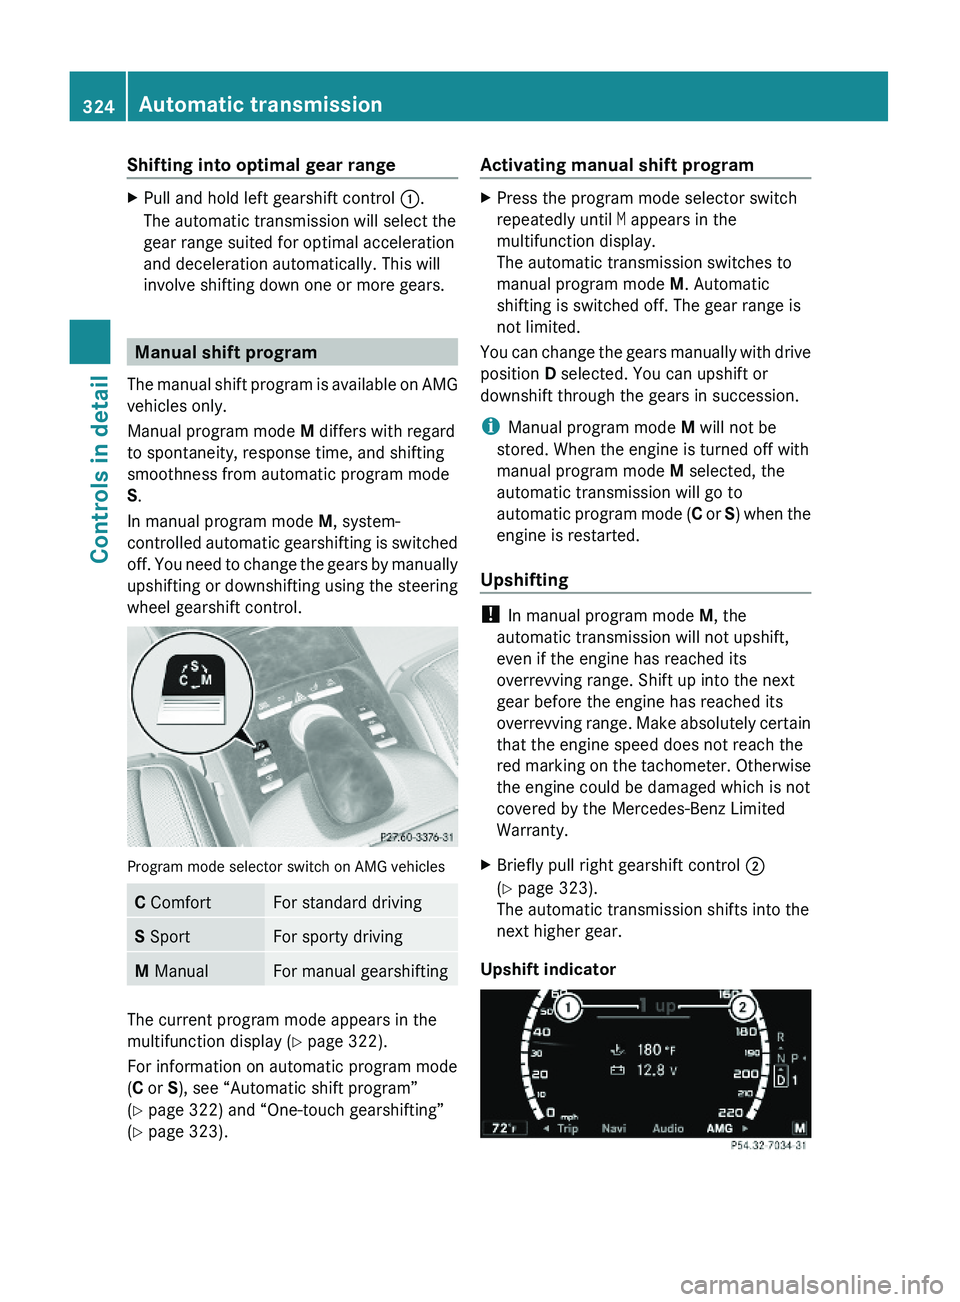
Program mode selector switch on AMG vehicles
C ComfortFor standard drivingS SportFor sporty drivingM ManualFor manual gearshifting
The current program mode appears in the
multifunction display (Y page 322).
For information on automatic program mode
(C or S), see “Automatic shift program”
(Y page 322) and “One-touch gearshifting”
(Y page 323).
Activating manual shift programXPress the program mode selector switch
repeatedly until M appears in the
multifunction display.
The automatic transmission switches to
manual program mode M. Automatic
shifting is switched off. The gear range is
not limited.
You can change the gears manually with drive
position D selected. You can upshift or
downshift through the gears in succession.
iManual program mode M will not be
stored. When the engine is turned off with
manual program mode M selected, the
automatic transmission will go to
automatic program mode (C or S) when the
engine is restarted.
Upshifting
! In manual program mode M, the
automatic transmission will not upshift,
even if the engine has reached its
overrevving range. Shift up into the next
gear before the engine has reached its
overrevving range. Make absolutely certain
that the engine speed does not reach the
red marking on the tachometer. Otherwise
the engine could be damaged which is not
covered by the Mercedes-Benz Limited
Warranty.
XBriefly pull right gearshift control \000G
(Y page 323).
The automatic transmission shifts into the
next higher gear.
Upshift indicator
324Automatic transmissionControls in detail
221_AKB; 6; 20, en-USd2ugruen,Version: 2.11.8.12009-09-24T13:28:17+02:00 - Seite 324
Page 330 of 548
The driving safety systems ABS, Adaptive
Brake, Adaptive Brake Lights, BAS, BAS
PLUS, EBP, ESC and PRE-SAFE® Brake are
described in the “Safety and security” section
(Y page 63).
Cruise control
The cruise control maintains the speed you
set for your vehicle automatically.
The use of the cruise control is recommended
for driving at a constant speed for extended
periods of time.
The currently set speed or last set speed
(“Resume” function) appears in the
multifunction display for approximately
5 seconds. The set speed is shown by a
triangle in the speedometer and the
corresponding speedometer segments from
the selected speed to the vehicle maximum
speed in the multifunction display are
illuminated.
GWarning!
The cruise control is a convenience system
designed to assist the driver during vehicle
operation. The driver is and must always
remain responsible for the vehicle’s speed
and for safe brake operation.
Only use the cruise control if the road, traffic,
and weather conditions make it advisable to
travel at a constant speed.
RThe use of the cruise control can be
dangerous on winding roads or in heavy
traffic because conditions do not allow safe
driving at a constant speed.
RThe use of the cruise control can be
dangerous on slippery roads. Rapid
changes in tire traction can result in wheel
spin and loss of control.
RDeactivate the cruise control when driving
in fog.
The “Resume” function should only be
operated if the driver is fully aware of the
previously set speed and wishes to resume
this particular preset speed.
GWarning!
When the cruise control is braking, the brake
pedal is retracted (i.e. depressed
automatically). The pedals’ range of motion
must not be impeded by any obstacles:
RDo not place any objects in the footwell.
RMake sure that the floormats and carpets
are securely in place.
RDo not rest your foot underneath the brake
pedal, as it could otherwise be trapped.
You could otherwise cause an accident and
injure yourself and/or others.
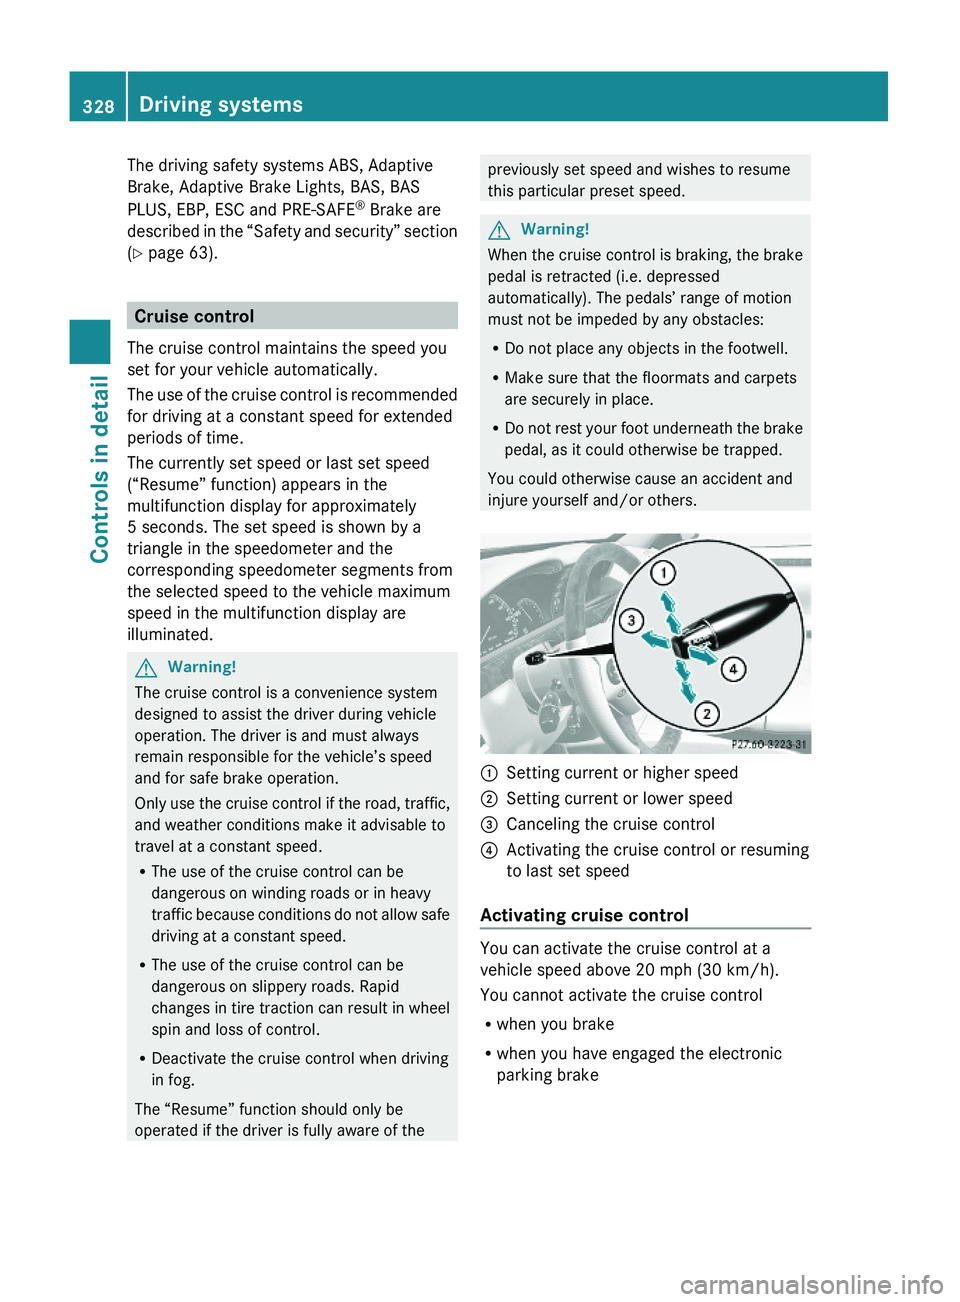
\000FSetting current or higher speed \000GSetting current or lower speed\000
Page 333 of 548

GWarning!
When the DISTRONIC PLUS is braking, the
brake pedal is retracted (i.e. depressed
automatically). The pedals’ range of motion
must not be impeded by any obstacles:
R Do not place any objects in the footwell.
R Make sure that the floormats and carpets
are securely in place.
R Do not rest your foot underneath the brake
pedal, as it could otherwise be trapped.
You could otherwise cause an accident and
injure yourself and/or others.
GWarning!
The DISTRONIC PLUS is a convenience
system. Its speed adjustment reduction
capability is intended to make cruise control
more effective and usable when traffic speeds
vary. It is not however, intended to, nor does
it, replace the need for extreme care.
The responsibility for the vehicle’s speed,
distance to the preceding vehicle and, most
importantly, brake operation to ensure a safe
stopping distance, always remains with the
driver.
The DISTRONIC PLUS cannot take street and
traffic conditions into account.
Complex driving situations are not always
fully recognized by the DISTRONIC PLUS. This
could result in wrong or missing distance
warnings.
GWarning!
The DISTRONIC PLUS adaptive cruise control
is not a substitute for active driving
involvement. It does not react to pedestrians
or on stationary objects, nor does it recognize
or predict the curvature and lane layout or the
movement of preceding vehicles. The
DISTRONIC PLUS can only apply a maximum
of 40% of the vehicle’s braking power.
The DISTRONIC PLUS may not detect narrow
vehicles possibly driving in front of you, such
as motorcycles and vehicles driving in an
offset formation.
It is the driver’s responsibility at all times to
be attentive to the road, weather and traffic
conditions. Additionally, the driver must
provide the steering, braking and other driving
inputs necessary to remain in control of the
vehicle.
High-frequency sources such as toll stations,
speed measuring systems etc. can cause the
DISTRONIC PLUS system to temporarily
cease functioning.GWarning!
The DISTRONIC PLUS cannot take road and
traffic conditions into account. Only use the
DISTRONIC PLUS if the road, weather and
traffic conditions make it advisable to travel
at a constant speed.
GWarning!
Use of the DISTRONIC PLUS can be
dangerous on slippery roads. Rapid changes
in tire traction can result in wheel spin and
loss of control.
The DISTRONIC PLUS does not function in
adverse sight and distance conditions. Do not
use the DISTRONIC PLUS during conditions of
fog, heavy rain, snow or sleet.
GWarning!
The DISTRONIC PLUS cannot take weather
conditions into account. Switch off the
DISTRONIC PLUS or do not switch it on if:
R roads are slippery or covered with snow or
ice. The wheels could lose traction while
braking or accelerating, and the vehicle
could skid.
R the DISTRONIC PLUS system sensor covers
are dirty or visibility is diminished due to
snow, rain or fog, for example. The distance
control system functionality could be
impaired.
Always pay attention to surrounding traffic
conditions even while the DISTRONIC PLUS is
Driving systems331Controls in detail221_AKB; 6; 20, en-USd2ugruen,Version: 2.11.8.12009-09-24T13:28:17+02:00 - Seite 331Z
Page 346 of 548
XStart the engine.
Sporty damping adjustment
The firmer suspension tuning in sport driving
mode provides enhanced road contact.
Select this mode for example, on winding
highways.
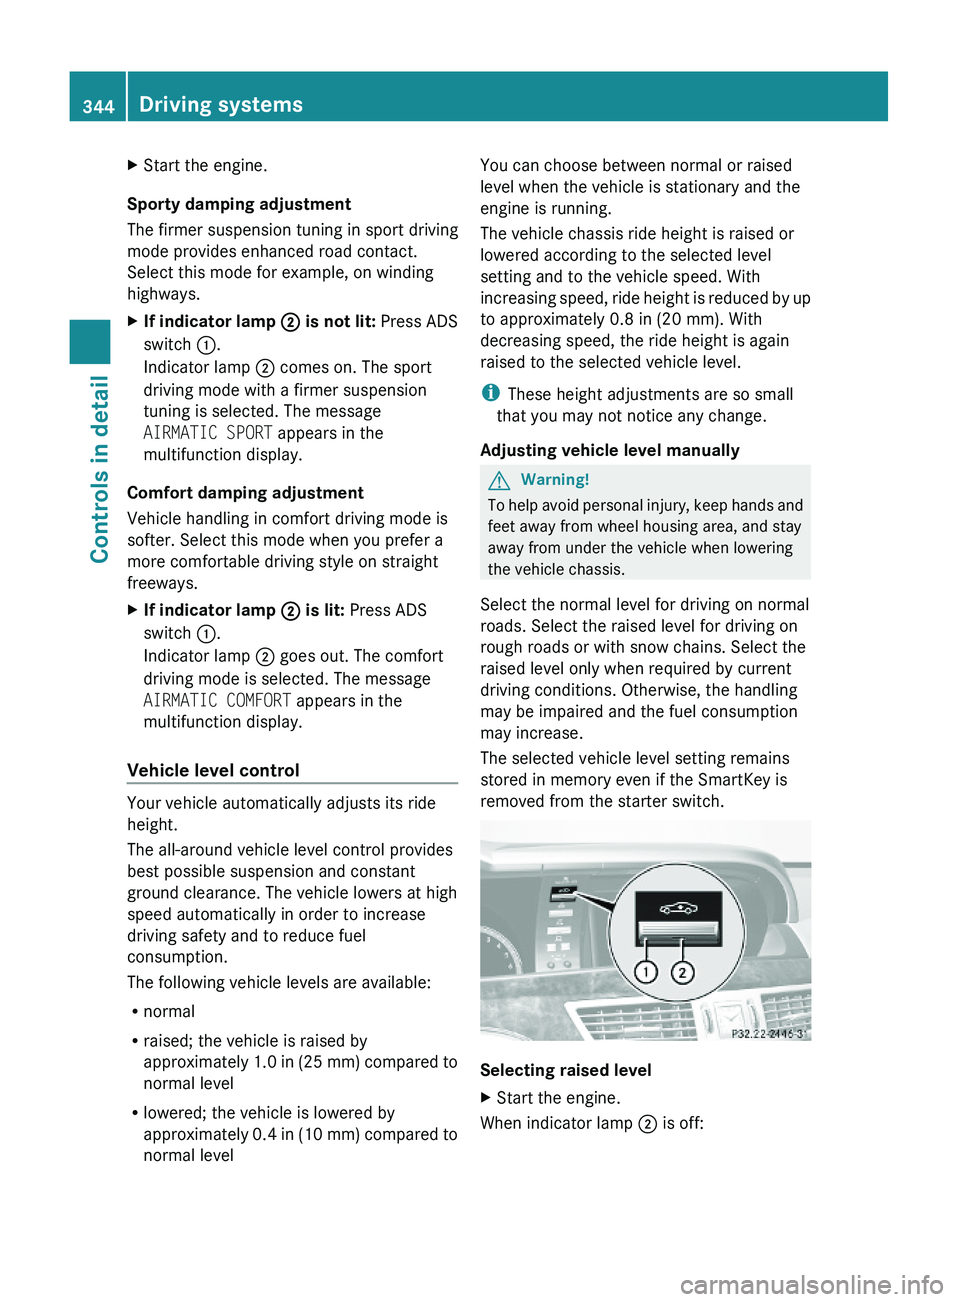
XIf indicator lamp \000G is not lit: Press ADS
switch \000F.
Indicator lamp \000G comes on. The sport
driving mode with a firmer suspension
tuning is selected. The message
AIRMATIC SPORT appears in the
multifunction display.
Comfort damping adjustment
Vehicle handling in comfort driving mode is
softer. Select this mode when you prefer a
more comfortable driving style on straight
freeways.
XIf indicator lamp \000G is lit: Press ADS
switch \000F.
Indicator lamp \000G goes out. The comfort
driving mode is selected. The message
AIRMATIC COMFORT appears in the
multifunction display.
Vehicle level control
Your vehicle automatically adjusts its ride
height.
The all-around vehicle level control provides
best possible suspension and constant
ground clearance. The vehicle lowers at high
speed automatically in order to increase
driving safety and to reduce fuel
consumption.
The following vehicle levels are available:
Rnormal
Rraised; the vehicle is raised by
approximately 1.0 in (25 mm) compared to
normal level
Rlowered; the vehicle is lowered by
approximately 0.4 in (10 mm) compared to
normal level
You can choose between normal or raised
level when the vehicle is stationary and the
engine is running.
The vehicle chassis ride height is raised or
lowered according to the selected level
setting and to the vehicle speed. With
increasing speed, ride height is reduced by up
to approximately 0.8 in (20 mm). With
decreasing speed, the ride height is again
raised to the selected vehicle level.
iThese height adjustments are so small
that you may not notice any change.
Adjusting vehicle level manually
GWarning!
To help avoid personal injury, keep hands and
feet away from wheel housing area, and stay
away from under the vehicle when lowering
the vehicle chassis.
Select the normal level for driving on normal
roads. Select the raised level for driving on
rough roads or with snow chains. Select the
raised level only when required by current
driving conditions. Otherwise, the handling
may be impaired and the fuel consumption
may increase.
The selected vehicle level setting remains
stored in memory even if the SmartKey is
removed from the starter switch.
Selecting raised level
XStart the engine.
When indicator lamp \000G is off:
344Driving systemsControls in detail
221_AKB; 6; 20, en-USd2ugruen,Version: 2.11.8.12009-09-24T13:28:17+02:00 - Seite 344
Page 347 of 548

XBriefly press vehicle level control
switch 0046.
Indicator lamp 0047 comes on. The vehicle
adjusts from normal level to raised level.
The message: Vehicle Rising appears in
the multifunction display when adjusting
from normal level to raised level. The
message disappears when the vehicle is
raised. Indicator lamp 0047 is then lit.
When the vehicle is in raised level, pressing
vehicle level control switch 0046 will return
the vehicle to normal level.
The vehicle is lowered to the normal level
automatically when
R the vehicle speed is above 75 mph
(120 km/h)
R the vehicle speed stays between 50 mph
(80 km/h) and 75 mph (120 km/h) for
approximately 3 minutes.
Indicator lamp 0047 in
vehicle level control switch 0046 goes out.
If you do not drive in this speed range, the
selected vehicle level setting remains stored
in memory even if the SmartKey is removed
from the starter switch.
Selecting normal level
XStart the engine.
When indicator lamp 0047 is on:
XBriefly press vehicle level control
switch 0046.
Indicator lamp 0047 goes out. The vehicle
adjusts from raised level to normal level.
ABC
The ABC system is an active, computer-
controlled system that adjusts the
suspension hydraulically at all four wheels in
response to various driving situations. It
selects the optimum suspension tuning and
ride height for your vehicle automatically.
Vehicle level control
Your vehicle adjusts its ride height
automatically to increase vehicle safety and
to reduce fuel consumption.
The vehicle chassis ride height is raised or
lowered according to the selected level
setting and to the vehicle speed. With
increasing speed, the ride height is reduced
by up to approximately 0.6 in (15 mm). With
decreasing speed, the ride height is again
raised to the selected vehicle level.
These height adjustments are so small that
you may not notice any change.
GWarning!
When you turn off the engine, the entire
vehicle is lowered. You should therefore make
sure that no one is near the wheel housing or
under the vehicle when you turn off the
engine. Otherwise, parts of the individuals
body could be trapped.
! When you turn off the engine, the entire
vehicle is lowered. When parking, position
your vehicle in such a way that it will not
scrape against a curb, for example, when it
is lowered. Your vehicle could otherwise be
damaged.
i S 63 AMG and S 65 AMG only:
When you turn off the engine, the entire
vehicle is lowered by 0.4 in (10 mm).
Setting the vehicle level
GWarning!
To help avoid personal injury, keep hands and
feet away from wheel housing area, and stay
away from under the vehicle when lowering
the vehicle chassis.
Driving systems345Controls in detail221_AKB; 6; 20, en-USd2ugruen,Version: 2.11.8.12009-09-24T13:28:17+02:00 - Seite 345Z