2010 MERCEDES-BENZ S CLASS wheel alignment
[x] Cancel search: wheel alignmentPage 6 of 548

1, 2, 3 ...
4-ETS see ETS/4-ETS
4MATIC
see All-wheel drive (4MATIC)
911 emergency call .......................... 150
A
ABC (Active Body Control) ................ 345
Messages in the multifunction
display ........................................... 457
ABS (Antilock Brake System) ............. 63
Indicator lamp ................................ 490
Messages in the multifunction
display ................................... 467, 468
Accessory weight .............................. 430
Accidents ........................................... 314
Air bags ........................................... 41
Emergency calls (Tele Aid) .............390
Emergency calls (Telephone) .........150
NECK-PRO active front head
restraints ........................................ 55
Active Bi-Xenon headlamps
see Headlamps
Active Body Control
see ABC
Adaptive Brake .................................... 65
Adaptive Brake Lights ......................... 66
Adaptive Damping System see ADS
Adaptive Highbeam Assist ............... 301
Setting ........................................... 235
Additives
Engine oil ....................................... 540
Gasoline ......................................... 541
Address book ..................................... 159
Address change ................................... 22
ADS (Adaptive Damping System) ..... 343
Advanced Parking Guidance
Messages in the multifunction
display ........................................... 461
Advanced Tire Pressure
Monitoring System (Advanced
TPMS) ................................................. 414
Messages in the multifunction
display ........................................... 464
Air bags ................................................ 41
Emergency call upon deployment ..390
Front, driver and passenger .............44
Front passenger front air bag off
indicator lamp .......................... 46, 498
Messages in the multifunction
display ........................................... 455
OCS (Occupant Classification
System) ........................................... 46
Safety guidelines ............................. 43
Side impact ...................................... 45
Window curtain ................................ 45
Air conditioning refrigerant and
lubricant ............................................. 540
Air distribution .................................. 370
AIRMATIC
ADS (Adaptive Damping System) ...343
Introduction ................................... 343
Messages in the multifunction
display ........................................... 476
Vehicle level control ......................344
Air pressure
see Tire inflation pressure
Air pressure (tires) ............................ 430
Air recirculation mode ...................... 371
Air volume .......................................... 370
Alarm system see Anti-theft systems
Alignment bolt (vehicle tool
kit) .............................................. 450, 511
All-wheel drive (4MATIC) .................. 347
Alternator
Messages in the multifunction
display ................................... 463, 482
Alternator (Technical data)
see Vehicle specification
AMG menu ......................................... 227
Anticorrosion/antifreeze .................. 543
Antilock Brake System see ABS
Anti-theft systems ............................... 71
Anti-theft alarm system ...................72
Immobilizer ...................................... 71
Aquaplaning
see Hydroplaning
Armrest, front
Storage compartment ....................3824Index221_AKB; 6; 20, en-USd2ugruen,Version: 2.11.8.12009-09-24T13:28:17+02:00 - Seite 4
Page 452 of 548

Vehicle equipment
iThis Operator’s Manual describes all
features, standard or optional, potentially
available for your vehicle at the time of
purchase. Please be aware that your
vehicle might not be equipped with all
features described in this manual.
Where will I find ...?
First aid kit
iCheck expiration dates and contents for
completeness at least once a year and
replace missing/expired items.
The first aid kit is located in the trunk on the
right side storage pocket, secured by a
tensioning strap.
XLoosen tensioning strap \000F.
First aid kit \000G can be removed.
Vehicle tool kit
The vehicle tool kit is located in the space
underneath the trunk floor.
iVehicles without spare wheel are not
factory-equipped with the tools required for
a wheel change such as a jack or a wheel
wrench. Some tools required for a wheel
change are specific to your vehicle.
Contact an authorized Mercedes-Benz
Center to obtain the tools approved for
your vehicle.
The vehicle tool kit includes:
RAlignment bolt 44
RCollapsible wheel chock44
RFuse chart
RJack44
RPair of gloves44
RTowing eye bolt
RWheel wrench44
XRemoving: Open the trunk (Y page 279).XLift the trunk floor using the floor handle.XEngage the floor handle on the upper trunk
lip.
! To prevent damage, always disengage the
floor handle from the upper trunk lip and
lower the trunk floor before closing the
trunk.
\000FCollapsible wheel chock\000GVehicle tool kit box cover\000
Page 513 of 548

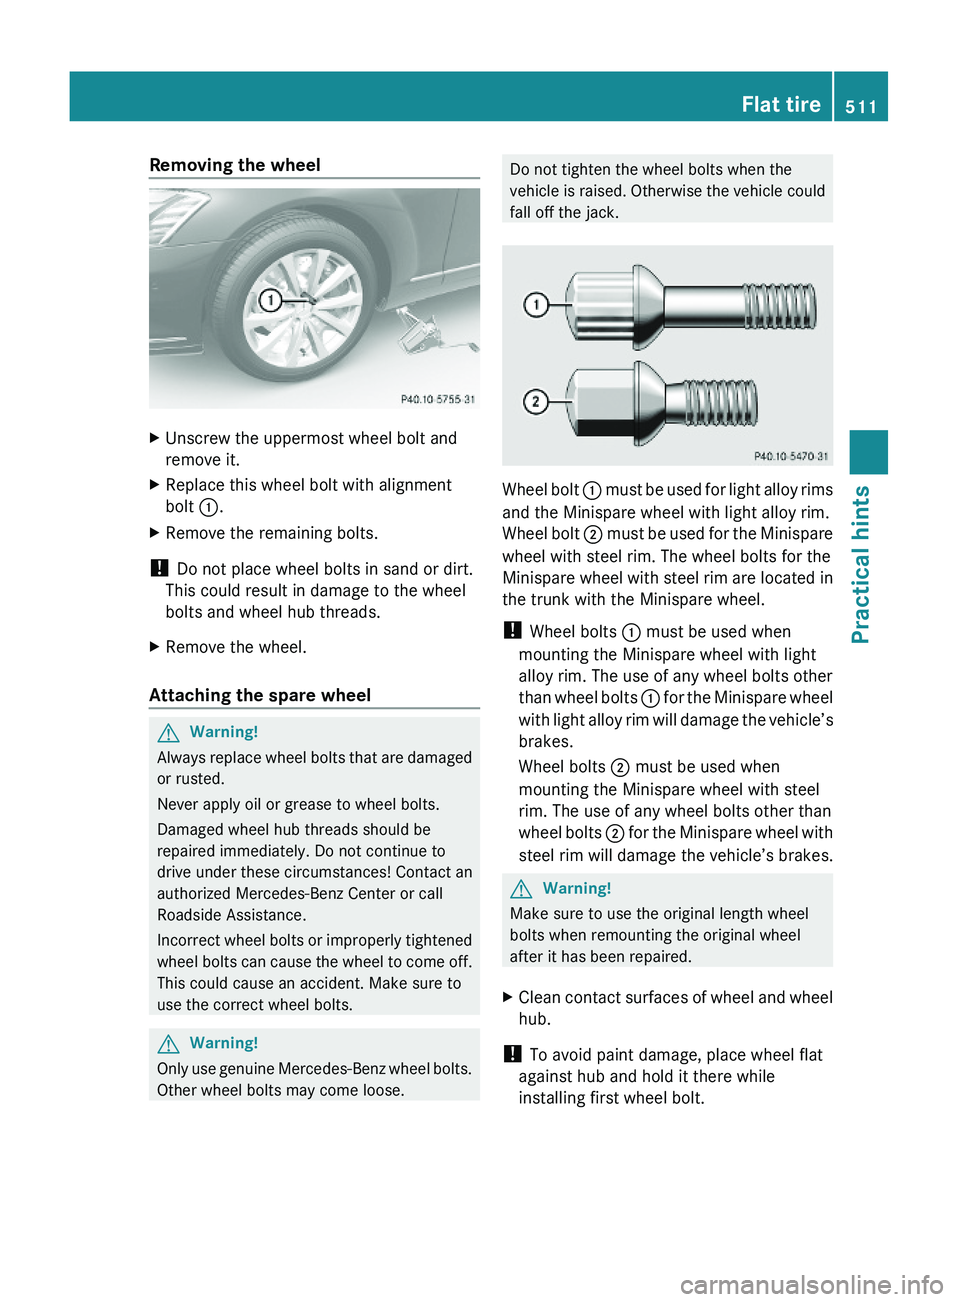
Removing the wheelXUnscrew the uppermost wheel bolt and
remove it.
XReplace this wheel bolt with alignment
bolt \000F.
XRemove the remaining bolts.
! Do not place wheel bolts in sand or dirt.
This could result in damage to the wheel
bolts and wheel hub threads.
XRemove the wheel.
Attaching the spare wheel
GWarning!
Always replace wheel bolts that are damaged
or rusted.
Never apply oil or grease to wheel bolts.
Damaged wheel hub threads should be
repaired immediately. Do not continue to
drive under these circumstances! Contact an
authorized Mercedes-Benz Center or call
Roadside Assistance.
Incorrect wheel bolts or improperly tightened
wheel bolts can cause the wheel to come off.
This could cause an accident. Make sure to
use the correct wheel bolts.
GWarning!
Only use genuine Mercedes-Benz wheel bolts.
Other wheel bolts may come loose.
Do not tighten the wheel bolts when the
vehicle is raised. Otherwise the vehicle could
fall off the jack.
Wheel bolt \000F must be used for light alloy rims
and the Minispare wheel with light alloy rim.
Wheel bolt \000G must be used for the Minispare
wheel with steel rim. The wheel bolts for the
Minispare wheel with steel rim are located in
the trunk with the Minispare wheel.
! Wheel bolts \000F must be used when
mounting the Minispare wheel with light
alloy rim. The use of any wheel bolts other
than wheel bolts \000F for the Minispare wheel
with light alloy rim will damage the vehicle’s
brakes.
Wheel bolts \000G must be used when
mounting the Minispare wheel with steel
rim. The use of any wheel bolts other than
wheel bolts \000G for the Minispare wheel with
steel rim will damage the vehicle’s brakes.
GWarning!
Make sure to use the original length wheel
bolts when remounting the original wheel
after it has been repaired.
XClean contact surfaces of wheel and wheel
hub.
! To avoid paint damage, place wheel flat
against hub and hold it there while
installing first wheel bolt.
Flat tire511Practical hints221_AKB; 6; 20, en-USd2ugruen,Version: 2.11.8.12009-09-24T13:28:17+02:00 - Seite 511Z
Page 514 of 548

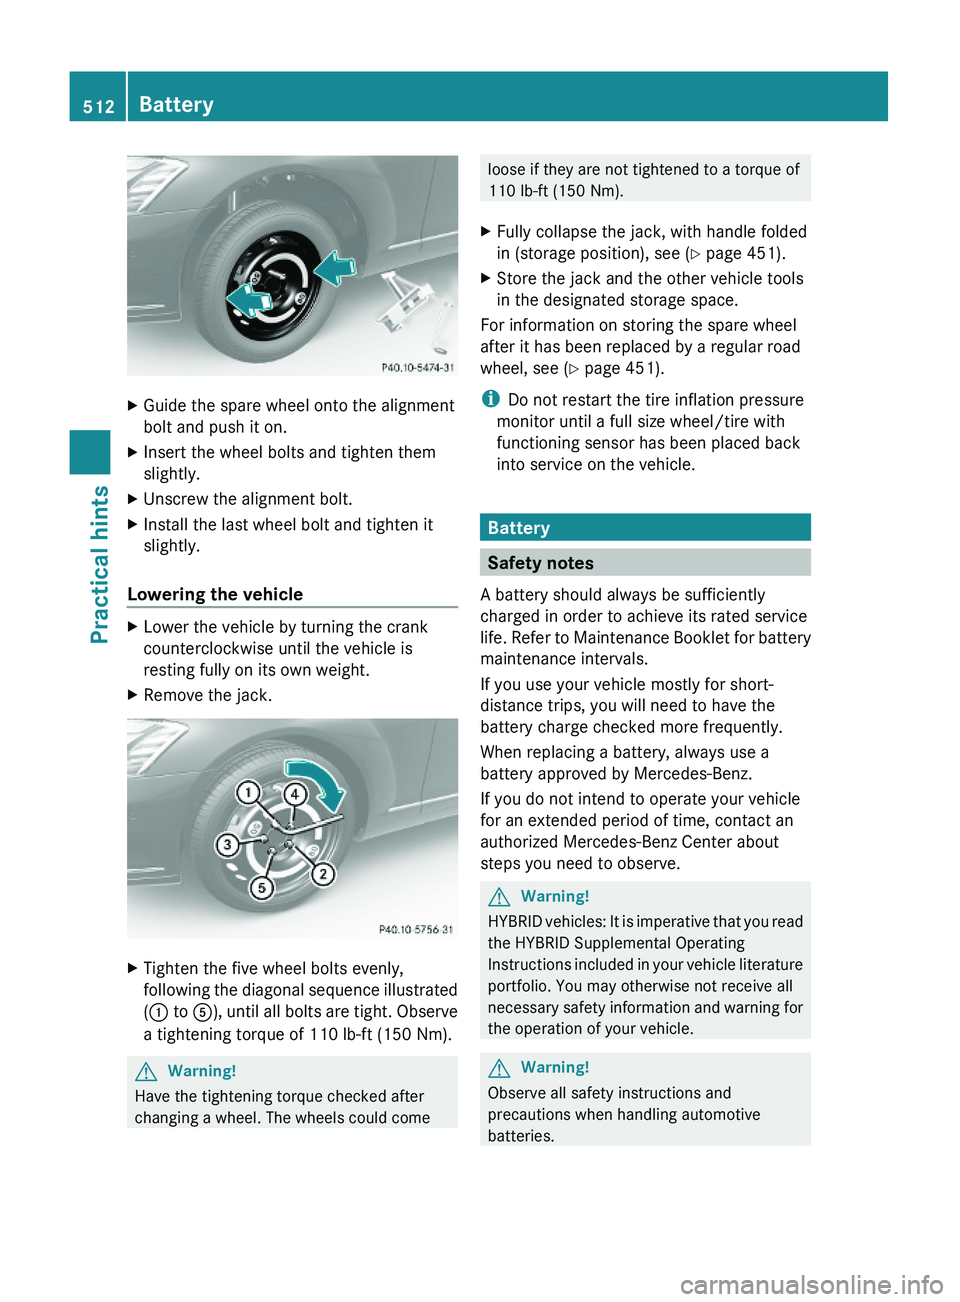
XGuide the spare wheel onto the alignment
bolt and push it on.
XInsert the wheel bolts and tighten them
slightly.
XUnscrew the alignment bolt.XInstall the last wheel bolt and tighten it
slightly.
Lowering the vehicle
XLower the vehicle by turning the crank
counterclockwise until the vehicle is
resting fully on its own weight.
XRemove the jack.XTighten the five wheel bolts evenly,
following the diagonal sequence illustrated
(\000F to \000
Page 519 of 548

necessary safety information and warning for
the operation of your vehicle.
! To prevent damage during transport, do
not tie down vehicle by its chassis or
suspension parts.
If circumstances do not permit the
recommended towing methods, the vehicle
may be towed with all wheels on the ground
or front axle raised (except vehicles with
4MATIC) only so far as necessary to have the
vehicle moved to a safe location where the
recommended towing methods can be
employed.
! Before towing the vehicle observe the
following instructions:
RDo not tow-start the vehicle. You could
otherwise seriously damage the
automatic transmission which is not
covered by the Mercedes-Benz Limited
Warranty.
RDo not tow with sling-type equipment.
Towing with sling-type equipment over
bumpy roads will damage radiator and
supports.
RTowing of the vehicle should only be
done using the properly installed towing
eye bolt. Never attach a tow cable, tow
rope or tow rod to the vehicle chassis,
frame or suspension parts.
GWarning!
With the engine not running, there is no power
assistance for the brake and steering
systems. In this case, it is important to keep
in mind that a considerably higher degree of
effort is necessary to brake and steer the
vehicle. Adapt your driving accordingly.
! Avoid pulling the vehicle abruptly or
diagonally, since it could result in damage
to the chassis alignment.
! Do not use the towing eye bolt for
recovery, as this could damage the vehicle.
If in doubt, recover the vehicle with a crane.
iIf the battery is disconnected or
discharged
Rthe SmartKey will not turn in the starter
switch
Rthe automatic transmission will remain in
park position P
For more information see “Battery”
(Y page 512) or “Jump starting”
(Y page 514).
Installing towing eye bolt
Depending on whether you are towing a
vehicle or you are being towed, the towing eye
bolt can be screwed into threaded holes
which are located behind covers on each
bumper.
The towing eye bolt is supplied with the
vehicle tool kit, located underneath the trunk
floor (Y page 450).
XTake the vehicle tool kit out of the trunk.
Removing cover in front bumper
XPress mark on cover \000F as indicated by the
arrow.
XLift cover \000F off to reveal the threaded hole
for the towing eye bolt.
Towing the vehicle517Practical hints221_AKB; 6; 20, en-USd2ugruen,Version: 2.11.8.12009-09-24T13:28:17+02:00 - Seite 517Z