2010 MERCEDES-BENZ R350 rear view mirror
[x] Cancel search: rear view mirrorPage 260 of 364
X
Make sure the automatic transmission is in
park position P (Y page 116).
X Engage the parking brake for the vehicle
(Y page 114).
X Start the engine (Y page 110).
X Vehicles with AIRMATIC:
Set the vehicle level to highway
(Y page 154) and set the ADS to AUTO or
COMF (Y page 153).
X Turn off the engine ( Y page 114).
X Close all doors and the tailgate.
X Attach the trailer.
X Plug in all electrical connectors.
i Vehicles with AIRMATIC:
When you are towing a trailer, the vehicle
level
always remains in the highway setting.
The following applies additionally when
towing a trailer:
R The vehicle is lowered to the highway
level when it reaches a speed of 5 mph
(8 km/h) if not set to highway level.
R The highspeed level is not available.
The restrictions that apply to towing also
apply when using accessories that are
connected to the trailer power socket, such
as a bicycle rack.
Towing a trailer There are many different laws, including
speed limit restrictions, having to do with
trailer
towing. Make sure your rig will be legal,
not only for where you reside, but also for
where you will be driving. A good source for
this information can be the police or local
authorities.
Note the following, when driving with a trailer:
R In order to gain skill and an understanding
of the vehicle’s behavior, you should practice turning, stopping and backing up
in an area which is free of traffic.
R Before you start driving check the
-trailer hitch
- break-away switch
- safety chains
- electrical connections
- lighting
- tires
R Adjust the mirrors
(Y page 94) to permit
unobstructed view beyond rear of trailer.
R If the trailer has electric brakes, start your
vehicle and trailer moving slowly, and then
apply only the trailer brake controller by
hand to make sure the brakes are working
properly.
R Always secure items in the trailer to
prevent load shifts while driving.
R When towing a trailer, check occasionally
to make sure the load is secure, and that
trailer lighting and brakes (if so equipped)
are functioning properly.
R Take into consideration that when towing a
trailer, the handling characteristics are
different and less stable from those when
operating the vehicle without a trailer.
It is important to avoid sudden maneuvers.
R The vehicle and trailer combination is
heavier, and therefore limited in
acceleration and climbing ability, and has a
larger braking distance.
It is more prone to reacting to cross wind
gusts, and requires more sensitive steering
input.
R If possible, do not brake abruptly, but
rather engage the brake slightly at first to
permit the trailer to activate its brake. Then
increase the braking force.
! If the trailer should begin to sway, reduce
the vehicle’s speed immediately. 258
Driving instructions
Operation
251_AKB; 4; 52, en-US
d2ureepe,
Version: 2.11.8.1 2009-03-23T09:22:52+01:00 - Seite 258
Page 266 of 364
Paintwork, painted body components
!
Affixing stickers, magnets, adhesive tape
or similar materials to painted body
components may damage the paintwork.
Mercedes-Benz approved Paint Care should
be applied when water drops on the paint
surface do not “bead up”. This should
normally be done every 3 to 5 months,
depending on the climate and washing
detergent used.
Mercedes-Benz approved Paint Cleaner
should be applied if the paint surface shows
signs of embedded dirt (i.e. loss of gloss).
Do not apply any of these products or wax if
your
vehicle is parked in the sun or if the hood
is still hot.
X Use the appropriate MB-Touch-Up Stick for
quick
and provisional repairs of minor paint
damage (i.e. chips from stones, vehicle
doors, etc.).
Engine cleaning Prior to cleaning the engine compartment,
make sure to protect electrical components
and connectors from contact with water and
cleaning agents.
Corrosion protection, such as MB
Anticorrosion Wax should be applied to the
engine compartment after every engine
cleaning. Before applying, all control linkage
bushings
and joints should be lubricated. The
poly-V-belt and all pulleys should be
protected from any wax.
Vehicle washing In the winter, thoroughly remove all traces of
road salt as soon as possible.
When
washing the vehicle underbody, do not
forget to clean the inner sides of the wheels.
i Vehicles with KEYLESS-GO:
If a door handle is hit by a strong jet of
water, and a SmartKey is within approximately 3 ft (1 m) of the vehicle, it
could
be inadvertently locked or unlocked.
Hand-wash
X Do not use hot water or wash your vehicle
in direct sunlight.
X Only use a soft, wet cloth or sponge to
clean the vehicle.
X Only use a mild vehicle wash detergent,
such as Mercedes-Benz approved Car
Shampoo.
X Thoroughly spray the vehicle with a
diffused jet of water.
X Do not spray directly towards the
ventilation intake.
X Use plenty of water and rinse the sponge
and chamois frequently.
X Rinse with clean water and dry with a
chamois thoroughly.
Do not allow cleaning agents to dry on the
finish.
Automatic car wash
You can have your vehicle washed in an
automatic
car wash from the start. Brushless
car washes are preferable.
X To protect the filter system, activate the air
recirculation mode using button d on
the climate control panel.
! Do
not clean your vehicle in an automatic
touchless car wash which uses caustic
spray. Caustic spray will damage the paint
or ornamental moldings.
If the vehicle is very dirty, prewash it before
running it through the automatic car wash.
! Make sure the combination switch is set
to wiper setting $. Otherwise, the rain
sensor could activate and cause the wipers
to move unintentionally. This may lead to
vehicle damage.
Due to the width of the vehicle, fold in
exterior rear view mirrors prior to running
the vehicle through an automatic car wash
to prevent damage to the mirrors. 264
Vehicle care
Operation
251_AKB; 4; 52, en-US
d2ureepe,
Version: 2.11.8.1 2009-03-23T09:22:52+01:00 - Seite 264
Page 300 of 364
Display messages
Possible causes/consequences and
X Solutionsb Turn
Signal
Rear Left
or
Turn
Signal
Rear Right The left or right rear turn signal lamp is malfunctioning. A
substitute bulb is being used.
X
Replace the bulb as soon as possible (Y page 312). b Turn
Signal
Front Left
or
Turn
Signal
Front
Right The left or right front turn signal lamp is malfunctioning. A
substitute bulb is being used.
X
Replace the bulb as soon as possible (Y page 312). b Turn
Signal
Left
Mirror
or
Turn
Signal
Right
Mirror The turn signal in the left or right exterior rear view mirror is
malfunctioning.
This message will only appear if all LEDs have
stopped working.
X Contact an authorized Mercedes-Benz Center as soon as
possible. Tires
Display messages
Possible causes/consequences and
X Solutionsh Tire
pressure(s
) Please
Correct The tire inflation pressure is too low in at least one tire.
or
The tire inflation pressure of the individual tires differ from
each other significantly.
X
Check and correct tire inflation pressure as required
(Y page 230). h Tire
Pressure
Caution:
Tire
Defect At least one tire is deflating.
X
Carefully bring the vehicle to a halt, avoiding abrupt
steering and braking maneuvers.
X If necessary, change the wheel (Y page 319). 298
Vehicle status messages in the multifunction display
Practical hints
251_AKB; 4; 52, en-US
d2ureepe,
Version: 2.11.8.1 2009-03-23T09:22:52+01:00 - Seite 298
Page 337 of 364
battery cover is non-removable. Do not
attempt to open the battery as otherwise
the battery will be damaged.
VRLA
batteries do not require topping-up of
the electrolyte level. They cannot be
opened to check the electrolyte level.
However, the battery condition must be
checked periodically by performing a
battery conductance test. Refer to
Maintenance Booklet for battery condition
testing intervals.
The factory-equipped battery may only be
replaced with a battery that
R has the same security features
R is of identical size
R is of identical voltage
R is of identical capacity
! As any other battery, the battery may
discharge if you do not operate the vehicle
for an extended period of time. Have the
battery disconnected at a qualified
workshop or an authorized Mercedes-Benz
Center in such a case. You may also
connect an accessory battery charge unit
expressly approved by Mercedes-Benz for
your vehicle model to maintain the battery
charge. Contact an authorized Mercedes-
Benz Center for further information.
The battery, the battery ventilation hose
and the lateral plug must always be
securely installed when the vehicle is in
operation.
! Never loosen or detach battery terminal
clamps while the engine is running or the
SmartKey is in the starter switch or
KEYLESS-GO button is in position 1.
Otherwise the alternator and other
electronic components could be severely
damaged.
Have the battery checked regularly at an
authorized Mercedes-Benz Center.
Refer to Maintenance Booklet for
maintenance intervals or contact an authorized Mercedes-Benz Center for
further information.
i After battery power was interrupted, do
the following:
R Set the clock
(Y page 133).
Vehicles with COMAND system with
navigation module: Time and date are set
automatically.
R Synchronize the door windows
(Y page 107).
R Synchronize the power tilt/sliding
sunroof (Y page 183).
R Synchronize the power tilt/sliding panel
(Y page 186).
R Synchronize the exterior rear view
mirrors (Y page 96). Charging the battery
G
Warning!
Never charge a battery while still installed in
the vehicle unless the accessory battery
charge unit approved by Mercedes-Benz is
being used. Gases may escape during
charging and could cause an explosion that
may
result in personal injury, paint damage or
corrosion.
An accessory battery charge unit specially
adapted for Mercedes-Benz vehicles and
tested and approved by Mercedes-Benz is
available. It permits the charging of the
battery in its installed position. Contact an
authorized Mercedes-Benz Center for
information and availability.
Charge battery in accordance with the
separate instructions for the accessory
battery charger.
Have the battery charged at an authorized
Mercedes-Benz Center. If you charge the
battery yourself, follow the operating
instructions for your charging device. Battery
335
Practical hints
251_AKB; 4; 52, en-US
d2ureepe, Version: 2.11.8.1 2009-03-23T09:22:52+01:00 - Seite 335 Z
Page 348 of 364
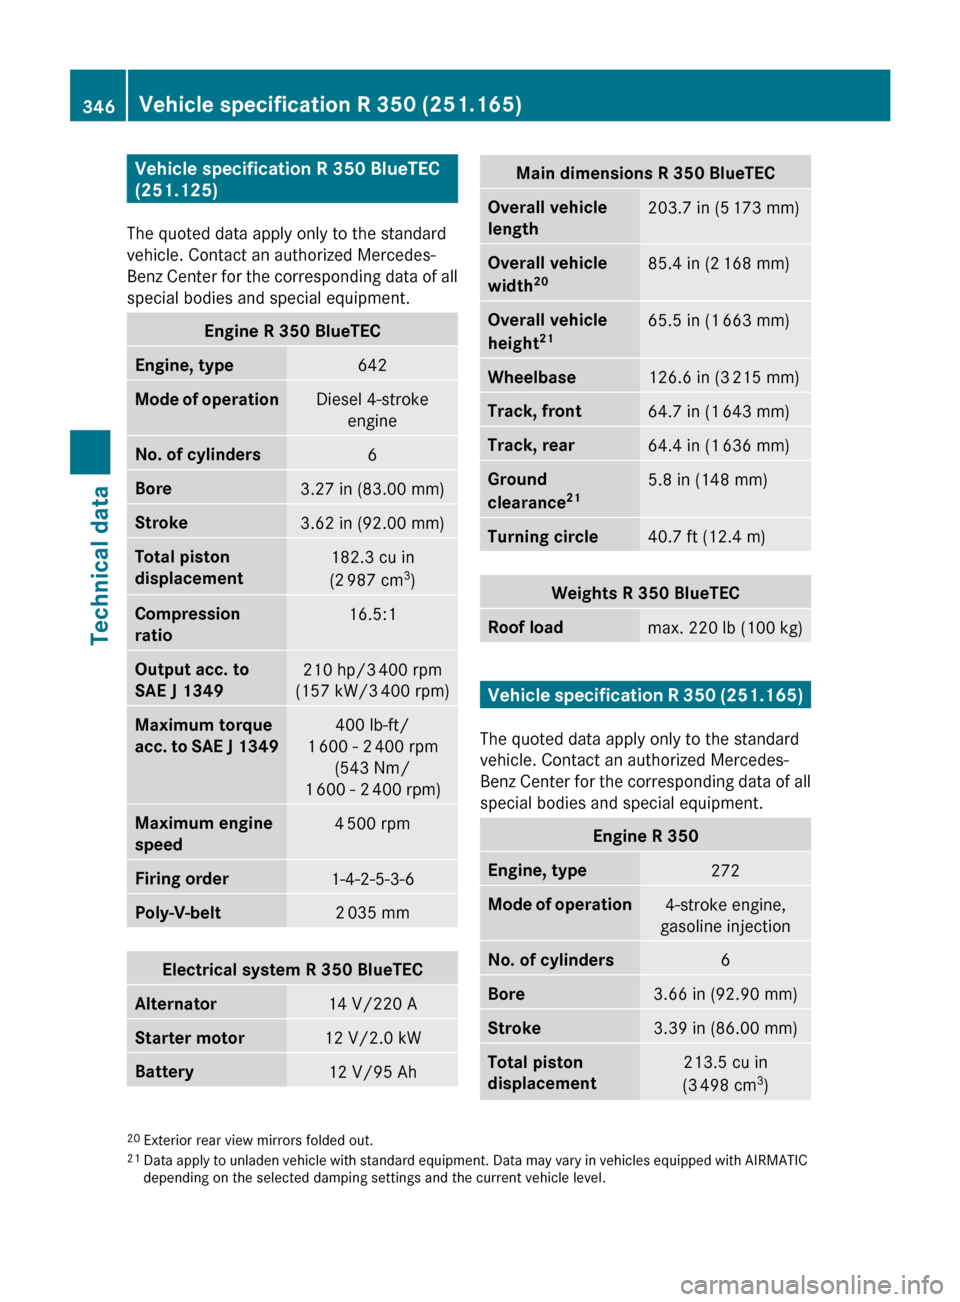
Vehicle specification R 350 BlueTEC
(251.125)
The quoted data apply only to the standard
vehicle. Contact an authorized Mercedes-
Benz
Center for the corresponding data of all
special bodies and special equipment. Engine R 350 BlueTEC
Engine, type
642
Mode of operation
Diesel 4-stroke
engine No. of cylinders
6
Bore
3.27 in (83.00 mm)
Stroke
3.62 in (92.00 mm)
Total piston
displacement
182.3 cu in
(2 987 cm 3
) Compression
ratio
16.5:1
Output acc. to
SAE J 1349
210 hp/3
400 rpm
(157 kW/3 400 rpm) Maximum torque
acc.
to SAE J 1349 400 lb-ft/
1 600 - 2 400 rpm
(543 Nm/
1 600 - 2 400 rpm) Maximum engine
speed
4 500 rpm
Firing order
1-4-2-5-3-6
Poly-V-belt
2 035 mm
Electrical system R 350 BlueTEC
Alternator
14 V/220 A
Starter motor
12 V/2.0 kW
Battery
12 V/95 Ah Main dimensions R 350 BlueTEC
Overall vehicle
length
203.7 in (5
173 mm) Overall vehicle
width
20 85.4 in (2
168 mm) Overall vehicle
height
21 65.5 in (1
663 mm) Wheelbase
126.6 in (3
215 mm) Track, front
64.7 in (1
643 mm) Track, rear
64.4 in (1
636 mm) Ground
clearance
21 5.8 in (148 mm)
Turning circle
40.7 ft (12.4 m)
Weights R 350 BlueTEC
Roof load
max. 220 lb (100 kg)
Vehicle specification R 350 (251.165)
The quoted data apply only to the standard
vehicle. Contact an authorized Mercedes-
Benz
Center for the corresponding data of all
special bodies and special equipment. Engine R 350
Engine, type
272
Mode of operation
4-stroke engine,
gasoline injection No. of cylinders
6
Bore
3.66 in (92.90 mm)
Stroke
3.39 in (86.00 mm)
Total piston
displacement
213.5 cu in
(3 498 cm 3
) 20
Exterior rear view mirrors folded out.
21 Data
apply to unladen vehicle with standard equipment. Data may vary in vehicles equipped with AIRMATIC
depending on the selected damping settings and the current vehicle level. 346
Vehicle specification R 350 (251.165)
Technical data
251_AKB; 4; 52, en-US
d2ureepe,
Version: 2.11.8.1 2009-03-23T09:22:52+01:00 - Seite 346
Page 349 of 364

Engine R 350
Compression
ratio
10.7:1
Output acc. to
SAE J 1349
22 268 hp/6
000 rpm
(200 kW/6 000 rpm) Maximum torque
acc.
to SAE J 1349 258 lb-ft/
2 400 - 5 000 rpm
(350 Nm/
2 400 - 5 000 rpm) Maximum engine
speed
6 500 rpm
Firing order
1-4-3-6-2-5
Poly-V-belt
2 404 mm
Electrical system R 350
Alternator
14 V/180 A
Starter motor
12 V/1.4 kW
Battery
12 V/70 Ah
Spark plugs, type
Bosch Y 7 MPP33
Spark plugs,
electrode gap
0.031 in (0.8 mm)
Spark plugs,
tightening torque
15 - 18 lb-ft
(20 - 25 Nm) Main dimensions R 350
Overall vehicle
length
203.7 in (5
173 mm) Overall vehicle
width
23 85.4 in (2
168 mm) Overall vehicle
height
24 65.5 in (1
663 mm) Wheelbase
126.6 in (3
215 mm) Main dimensions R 350
Track, front
64.7 in (1
643 mm) Track, rear
64.4 in (1
636 mm) Ground
clearance
24 5.8 in (148 mm)
Turning circle
40.7 ft (12.4 m)
Weights R 350
Roof load
max. 220 lb (100 kg)
Rims and tires
Notes
! Only
use tires which have been tested and
approved by Mercedes-Benz. Tires
approved by Mercedes-Benz are developed
to provide best possible performance in
conjunction with the driving safety systems
on your vehicle such as the ABS or the
ESP ®
. Tires specially developed for your
vehicle and tested and approved by
Mercedes-Benz can be identified by finding
the following on the tire’s sidewall:
R MO = Mercedes-Benz Original
equipment tires
R MOE
= Mercedes-Benz Original Extended
(tires with limited run-flat
characteristics) original equipment tires
Using tires other than those approved by
Mercedes-Benz may result in damage that
is not covered by the Mercedes-Benz
Limited Warranty.
For information on driving with MOExtended
tires, see the “Practical hints” section
(Y page 330).
22 Premium fuel required. Performance may vary with fuel octane rating.
23 Exterior rear view mirrors folded out.
24 Data
apply to unladen vehicle with standard equipment. Data may vary in vehicles equipped with AIRMATIC
depending on the selected damping settings and the current vehicle level. Rims and tires
347
Technical data
251_AKB; 4; 52, en-US
d2ureepe, Version: 2.11.8.1 2009-03-23T09:22:52+01:00 - Seite 347 Z