2010 MERCEDES-BENZ R350 Location
[x] Cancel search: LocationPage 216 of 364
X
Step 4: Using both hands, simultaneously
press hand-held remote control button B
and the desired signal transmitter button
(;, = or ?). Do not release the buttons
until step 5 is completed.
Indicator
lamp : will flash, first slowly and
then rapidly.
i Indicator lamp : flashes immediately
the first time the signal transmitter button
is programmed. If this button has already
been programmed, the indicator lamp will
start flashing after 20 seconds.
X Step 5: After indicator lamp : changes
from a slow to a rapidly flashing light,
release the hand-held remote control
button and the signal transmitter button.
X Step 6: Press and hold the just-trained
signal
transmitter button (;, = or ?) and
observe indicator lamp :.
If indicator lamp : stays on constantly,
programming is complete and your device
should activate when the respective signal
transmitter button ( ;, = or ?) is pressed
and released.
i If indicator lamp : flashes rapidly for
approximately
2 seconds and then turns to
a constant light, continue with
programming steps 8 through 12 as your
garage door opener may be equipped with
the “rolling code” feature.
X Step 7: To program the remaining two
signal
transmitter buttons, repeat the steps
above starting with step 3.
Rolling code programming
To
train a garage door opener (or other rolling
code devices) with the rolling code feature,
follow these instructions after completing the
“Programming” portion (steps 1 through 6) of
this text. For your convenience and to
complete the procedure faster, you might
want to have someone assist you. X
Step 8:
Locate the “training” button on the
garage door opener motor head unit.
i Exact
location and color of the button may
vary by garage door opener brand.
Depending on manufacturer, the “training”
button may also be referred to as “learn” or
“smart” button. If there is difficulty locating
the transmitting button, refer to the garage
door opener Operator’s Manual.
X Step 9: Press the “training” button on the
garage door opener motor head unit.
The “training light” is activated.
You have 30 seconds to initiate the
following two steps.
X Step 10: Return to the vehicle and firmly
press, hold for 2 seconds and release the
programmed
signal transmitter button (;,
= or ?).
X Step 11: Press, hold for 2 seconds and
release same signal transmitter button a
second time to complete the training
process.
i Some garage door openers (or other
rolling
code equipped devices) may require
you to press, hold for 2 seconds and
release the same signal transmitter button
a third time to complete the training
process.
X Step 12: Confirm the garage door
operation by pressing the programmed
signal transmitter button ( ;, = or ?).
X Step 13: To program the remaining two
signal
transmitter buttons, repeat the steps
above starting with step 3.
Gate operator/Canadian programming
Canadian radio-frequency laws require
transmitter signals to “time-out” (or quit)
after several seconds of transmission which
may not be long enough for the integrated
signal
transmitter to pick up the signal during
programming. Similar to this Canadian law,
some U.S. gate operators are designed to
“time-out” in the same manner. 214
Useful features
Controls in detail
251_AKB; 4; 52, en-US
d2ureepe,
Version: 2.11.8.1 2009-03-23T09:22:52+01:00 - Seite 214
Page 236 of 364
malfunction using the TPMS telltale
flashing and illumination sequence.
The telltale extinguishes after a few
minutes driving if the malfunction has been
corrected.
Tire pressure inquiries are made using the
multifunction display. The current tire
inflation pressure for each tire appears in the
multifunction display after a few minutes of
driving.
i Possible differences between the
readings of a tire pressure gauge of an air
hose, e.g. gas station equipment, and the
vehicle’s control system can occur. The tire
pressure displayed by the control system
apply to sea level. In high-altitude
locations, the reading on a tire pressure
gauge will be higher than the reading issued
by the vehicle’s control system. Do not
reduce the tire inflation pressure under
such circumstances.
X Switch on the ignition.
X Press button V or U on the
multifunction steering wheel repeatedly
until the standard display appears in the
multifunction display ( Y page 126).
X Press button & or * until the current
inflation pressure for each tire appears in
the multifunction display. Example illustration
When the vehicle has been parked for longer
than 20 minutes, the message Tire
pressure displayed after driving
for a few minutes. appears in the
multifunction display.
The TPMS recognizes new wheels or sensors
automatically after the learn-in phase. As long as the tire inflation pressure values cannot be
allocated to the individual wheels, the
message
Tire Pressure Monitor Active
appears. Despite this message, the tire
inflation pressure values are monitored
already.
i With a spare wheel mounted, the system
may still indicate the tire inflation pressure
of the removed road wheel for some
minutes. If this happens, keep in mind that
the indicated value where the spare wheel
is mounted does not reflect the actual
spare tire inflation pressure.
i Operating radio transmission equipment
(e.g. wireless headsets, two-way radios) in
or near the vehicle could cause the TPMS
to malfunction.
i This device complies with Part 15 of the
FCC Rules. Operation is subject to the
following two conditions:
1. This device may not cause harmful interference, and
2. this device must accept any interference received, including
interference that may cause undesired.
Any unauthorized modification to this
device could void the user’s authority to
operate the equipment.
Tire inflation pressure warnings
If the system detects a significant loss of tire
inflation pressure in one or more than one
tire, a message appears in the multifunction
display. In addition, an acoustic warning
sounds and the low tire pressure telltale in the
instrument cluster comes on. Example illustration234
Tires and wheelsOperation
251_AKB; 4; 52, en-US
d2ureepe,
Version: 2.11.8.1 2009-03-23T09:22:52+01:00 - Seite 234
Page 254 of 364
Snow chains
! Vehicles with Adaptive Damping System
(ADS):
When driving with snow chains, do not
select SPORT mode as this may result in
damage to your vehicle.
! Some tire sizes do not leave adequate
clearance for snow chains. To help avoid
serious damage to your vehicle or tires,
make sure the use of snow chains is
permissible as specified in the “Technical
data” section of this Operator’s Manual.
Snow chains should only be driven on snow-
covered roads at speeds not to exceed
30 mph (50 km/h)
. Remove chains as soon
as possible when driving on roads without
snow.
Observe the following guidelines when using
snow chains:
R Use of snow chains is not permissible with
all wheel/tire combinations ( Y page 347).
R Use snow chains in pairs and on rear
wheels only. Follow the manufacturer’s
mounting instructions.
! If snow chains are mounted to the front
wheels, they may scrape against the body
or axle components. The tires or the vehicle
could be damaged as a result.
R Only use snow chains that are approved by
Mercedes-Benz. Any authorized Mercedes-
Benz Center will be glad to advise you on
this subject.
R Use of snow chains may be prohibited
depending on location. Always check local
and state laws before installing snow
chains.
R Do not use snow chains on the spare wheel.
i When driving with snow chains, you may
wish to switch off the ESP ®
(Y page 65)
before setting the vehicle in motion. This
will improve the vehicle’s traction. Winter driving instructions
G
Warning!
If the vehicle becomes stuck in snow, make
sure snow is kept clear of the exhaust pipe
and from around the vehicle with the engine
running. Otherwise, deadly carbon monoxide
(CO) gases may enter vehicle interior
resulting in unconsciousness and death.
To
assure sufficient fresh air ventilation, open
a window slightly on the side of the vehicle
not facing the wind. G
Warning!
The outside temperature indicator is not
designed to serve as an ice-warning device
and is therefore unsuitable for that purpose.
Indicated temperatures just above the
freezing
point do not guarantee that the road
surface is free of ice. The road may still be icy,
especially in wooded areas or on bridges. G
Warning!
On slippery road surfaces, never downshift in
order to obtain braking action. This could
result
in drive wheel slip and reduced vehicle
control. Your vehicle’s ABS will not prevent
this type of loss of control.
The most important rule for slippery or icy
roads is to drive sensibly and to avoid abrupt
acceleration, braking and steering
maneuvers. Do not use the cruise control
system under such conditions.
When the vehicle is in danger of skidding, shift
the automatic transmission to neutral
position N. Try to keep the vehicle under
control by corrective steering action.
i For information on driving with snow
chains, see “Snow chains” ( Y page 252).
Road salts and chemicals can adversely
affect braking efficiency. Increased pedal
force may become necessary to produce the
normal brake effect.
Depressing the brake pedal periodically when
traveling at length on salt-strewn roads can 252
Winter driving
Operation
251_AKB; 4; 52, en-US
d2ureepe,
Version: 2.11.8.1 2009-03-23T09:22:52+01:00 - Seite 252
Page 262 of 364
Control and operation of radio
transmitter
Safety notes G
Warning!
Please do not forget that your primary
responsibility is to drive the vehicle. A driver’s
attention to the road must always be his/her
primary focus when driving. For your safety
and the safety of others, we recommend that
you pull over to a safe location and stop
before placing or taking a telephone call.
If you choose to use the telephone 15
while
driving, please use the hands-free device and
only use the telephone when road, weather
and traffic conditions permit. Some
jurisdictions prohibit the driver from using a
mobile telephone while driving a vehicle.
Only operate the COMAND 15
(Cockpit
Management and Data System) if road,
weather and traffic conditions permit.
Otherwise, you may not be able to observe
traffic conditions and could endanger yourself
and others.
Bear in mind that at a speed of just 30 mph
(approximately 50 km/h), your vehicle is
covering a distance of 44 feet (approximately
14 m) every second. Emission control
Certain systems of the engine serve to keep
the toxic components of the exhaust gases
within permissible limits required by law.
These systems will function properly only
when
maintained strictly according to factory
specifications. Any adjustments on the
engine should, therefore, be carried out only
by qualified Mercedes-Benz Center
authorized technicians.
Engine adjustments should not be altered in
any way. Moreover, the specified service
procedures must be carried out regularly according to Mercedes-Benz servicing
requirements. For details refer to the
Maintenance Booklet. G
Warning!
Inhalation of exhaust gas is hazardous to your
health. All exhaust gas contains carbon
monoxide (CO), and inhaling it can cause
unconsciousness and possible death.
Do
not run the engine in confined areas (such
as a garage) which are not properly ventilated.
If you think that exhaust gas fumes are
entering the vehicle while driving, have the
cause determined and corrected
immediately. If you must drive under these
conditions, drive only with at least one
window fully open at all times. Maintenance
Notes
The Maintenance System in your vehicle
tracks the distance driven and the time
elapsed since the last maintenance service.
It
calculates other maintenance service work
required, and calls for the next maintenance
service accordingly.
We strongly recommend that you have your
vehicle serviced at an authorized Mercedes-
Benz Center. Have it serviced in accordance
with the Maintenance Booklet at the times
called for by the maintenance service
indicator.
i Failure to have the vehicle maintained in
accordance with the Maintenance Booklet
and maintenance service indicator at the
designated times/mileage will result in
vehicle damage not covered by the
Mercedes-Benz Limited Warranty.
15 Observe all legal requirements. 260
Maintenance
Operation
251_AKB; 4; 52, en-US
d2ureepe,
Version: 2.11.8.1 2009-03-23T09:22:52+01:00 - Seite 260
Page 279 of 364
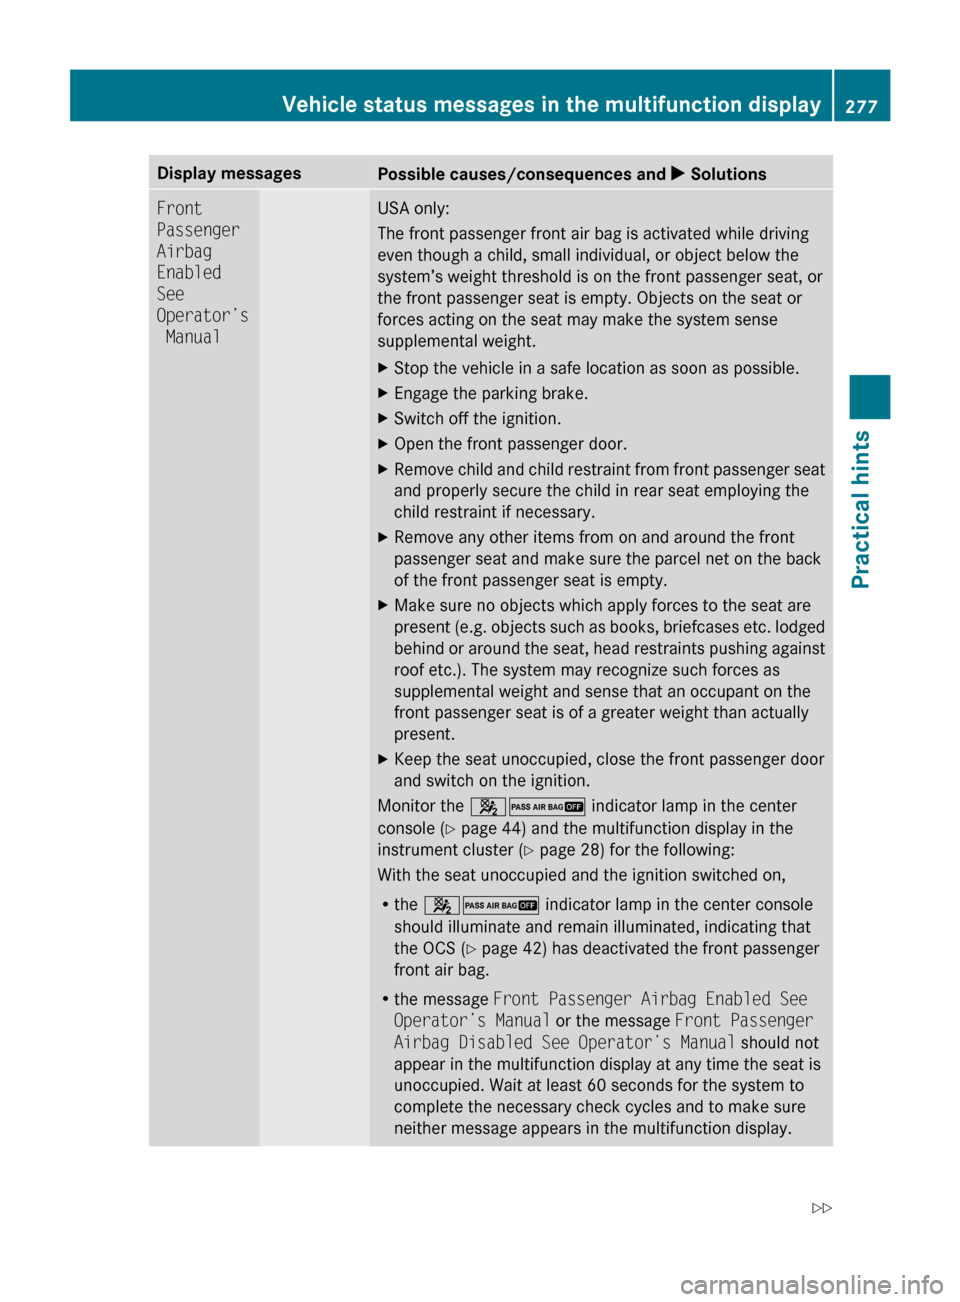
Display messages
Possible causes/consequences and
X SolutionsFront
Passenger
Airbag
Enabled
See
Operator’s
Manual USA only:
The front passenger front air bag is activated while driving
even though a child, small individual, or object below the
system’s weight threshold is on the front passenger seat, or
the front passenger seat is empty. Objects on the seat or
forces acting on the seat may make the system sense
supplemental weight.
X
Stop the vehicle in a safe location as soon as possible.
X Engage the parking brake.
X Switch off the ignition.
X Open the front passenger door.
X Remove child and child restraint from front passenger seat
and properly secure the child in rear seat employing the
child restraint if necessary.
X Remove any other items from on and around the front
passenger seat and make sure the parcel net on the back
of the front passenger seat is empty.
X Make sure no objects which apply forces to the seat are
present
(e.g. objects such as books, briefcases etc. lodged
behind or around the seat, head restraints pushing against
roof etc.). The system may recognize such forces as
supplemental weight and sense that an occupant on the
front passenger seat is of a greater weight than actually
present.
X Keep the seat unoccupied, close the front passenger door
and switch on the ignition.
Monitor the 42 indicator lamp in the center
console (Y page 44) and the multifunction display in the
instrument cluster
(Y page 28) for the following:
With the seat unoccupied and the ignition switched on,
R the 42 indicator lamp in the center console
should illuminate and remain illuminated, indicating that
the OCS (Y page 42) has deactivated the front passenger
front air bag.
R the message Front Passenger Airbag Enabled See
Operator’s Manual or the message Front Passenger
Airbag Disabled See Operator’s Manual should not
appear in the multifunction display at any time the seat is
unoccupied. Wait at least 60 seconds for the system to
complete the necessary check cycles and to make sure
neither message appears in the multifunction display. Vehicle status messages in the multifunction display
277
Practical hints
251_AKB; 4; 52, en-US
d2ureepe,Version: 2.11.8.1 2009-03-23T09:22:52+01:00 - Seite 277 Z
Page 281 of 364
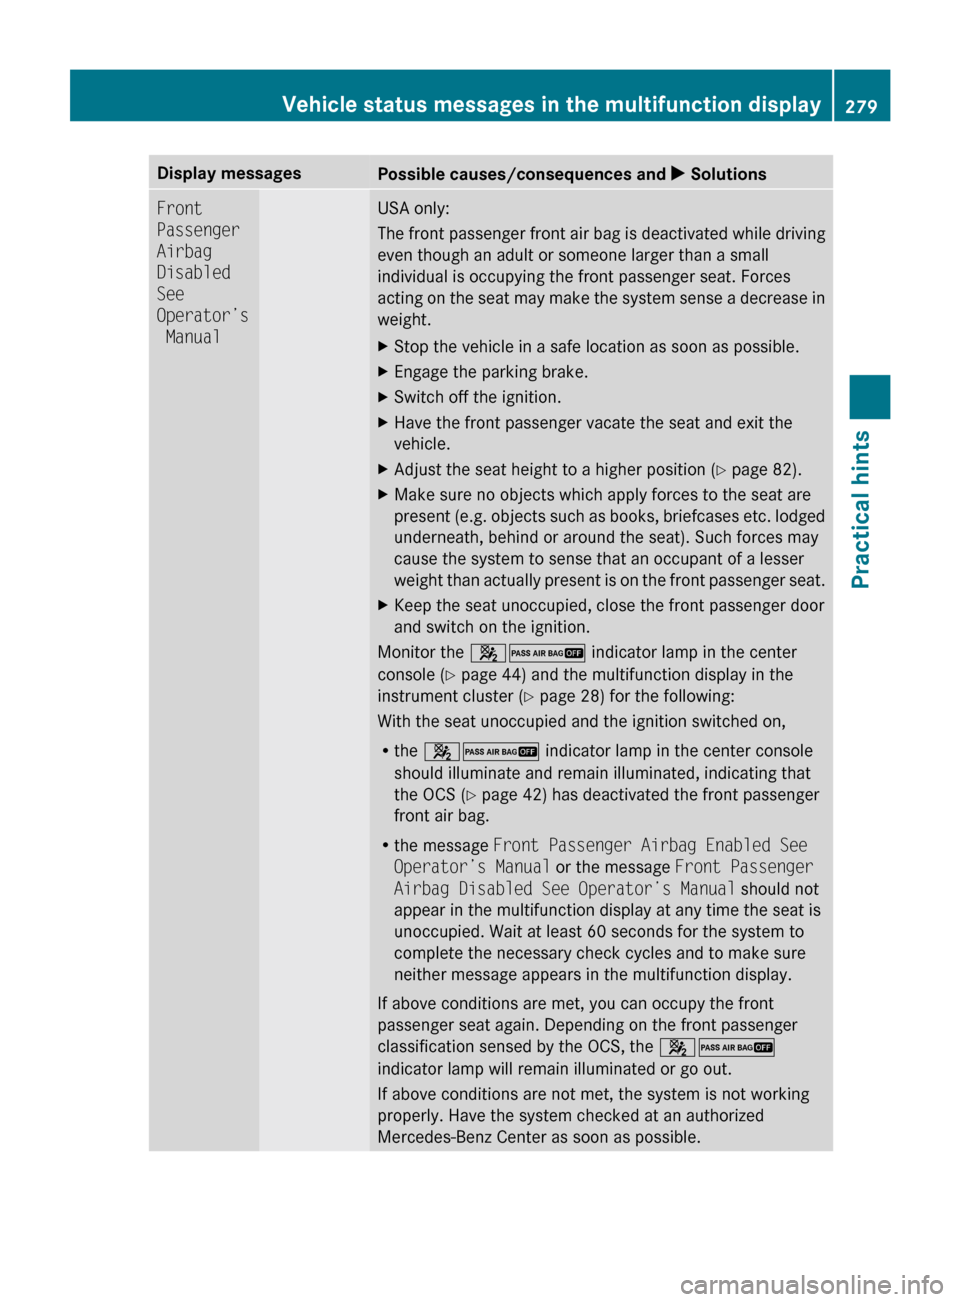
Display messages
Possible causes/consequences and
X SolutionsFront
Passenger
Airbag
Disabled
See
Operator’s
Manual USA only:
The
front passenger front air bag is deactivated while driving
even though an adult or someone larger than a small
individual is occupying the front passenger seat. Forces
acting on the seat may make the system sense a decrease in
weight.
X Stop the vehicle in a safe location as soon as possible.
X Engage the parking brake.
X Switch off the ignition.
X Have the front passenger vacate the seat and exit the
vehicle.
X Adjust the seat height to a higher position (Y page 82).
X Make sure no objects which apply forces to the seat are
present
(e.g. objects such as books, briefcases etc. lodged
underneath, behind or around the seat). Such forces may
cause the system to sense that an occupant of a lesser
weight than actually present is on the front passenger seat.
X Keep the seat unoccupied, close the front passenger door
and switch on the ignition.
Monitor the 42 indicator lamp in the center
console (Y page 44) and the multifunction display in the
instrument cluster
(Y page 28) for the following:
With the seat unoccupied and the ignition switched on,
R the 42 indicator lamp in the center console
should illuminate and remain illuminated, indicating that
the OCS (Y page 42) has deactivated the front passenger
front air bag.
R the message Front Passenger Airbag Enabled See
Operator’s Manual or the message Front Passenger
Airbag Disabled See Operator’s Manual should not
appear in the multifunction display at any time the seat is
unoccupied. Wait at least 60 seconds for the system to
complete the necessary check cycles and to make sure
neither message appears in the multifunction display.
If above conditions are met, you can occupy the front
passenger seat again. Depending on the front passenger
classification sensed by the OCS, the 42
indicator lamp will remain illuminated or go out.
If above conditions are not met, the system is not working
properly. Have the system checked at an authorized
Mercedes-Benz Center as soon as possible. Vehicle status messages in the multifunction display
279
Practical hints
251_AKB; 4; 52, en-US
d2ureepe,Version: 2.11.8.1 2009-03-23T09:22:52+01:00 - Seite 279 Z
Page 288 of 364
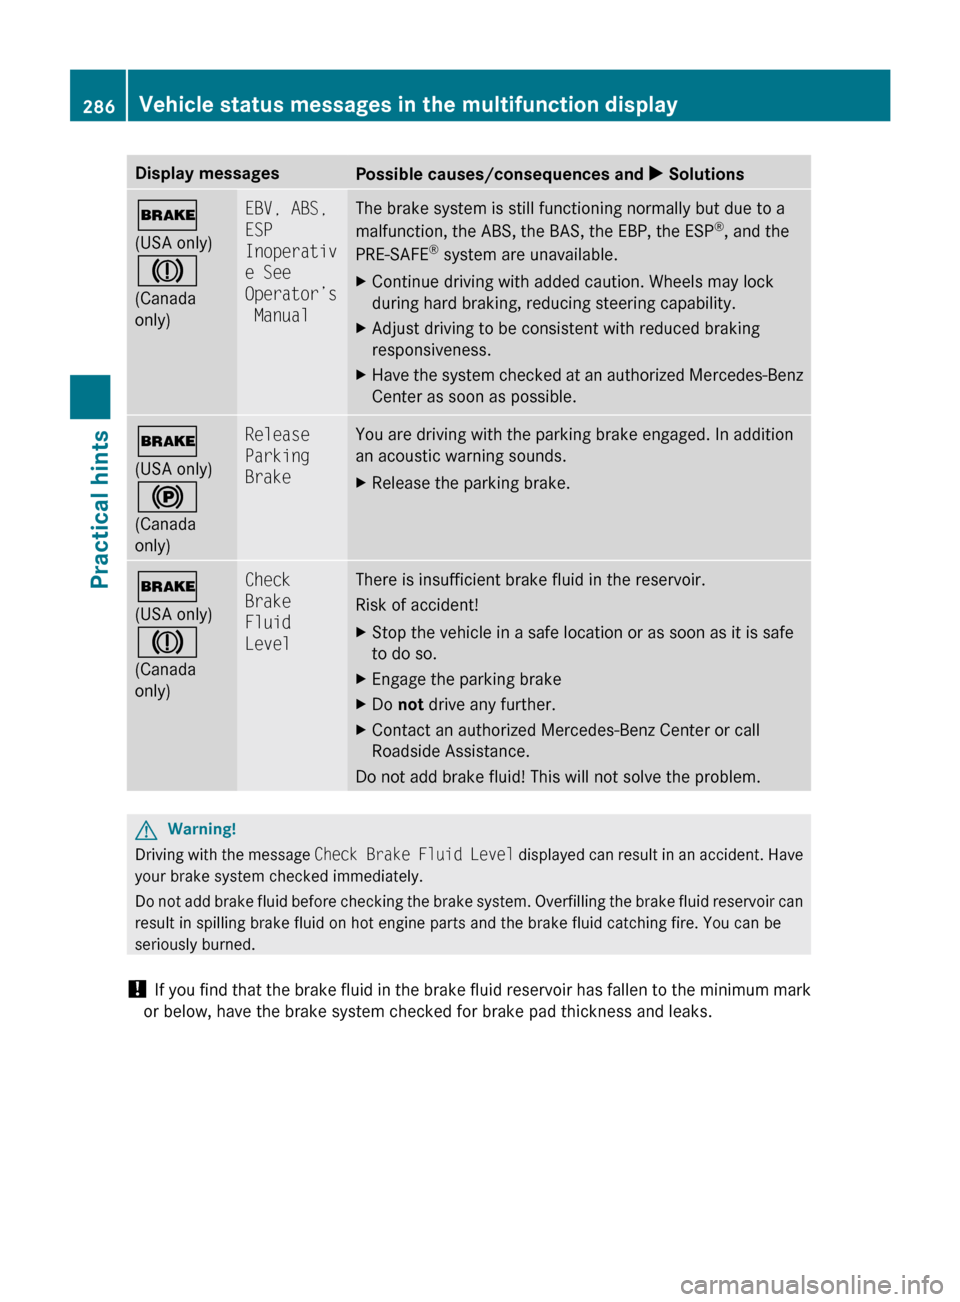
Display messages
Possible causes/consequences and
X Solutions$
(USA only)
J
(Canada
only) EBV, ABS,
ESP
Inoperativ
e See
Operator’s
Manual The brake system is still functioning normally but due to a
malfunction, the ABS, the BAS, the EBP, the ESP
®
, and the
PRE-SAFE ®
system are unavailable.
X Continue driving with added caution. Wheels may lock
during hard braking, reducing steering capability.
X Adjust driving to be consistent with reduced braking
responsiveness.
X Have the system checked at an authorized Mercedes-Benz
Center as soon as possible. $
(USA only)
!
(Canada
only) Release
Parking
Brake You are driving with the parking brake engaged. In addition
an acoustic warning sounds.
X
Release the parking brake. $
(USA only)
J
(Canada
only) Check
Brake
Fluid
Level There is insufficient brake fluid in the reservoir.
Risk of accident!
X
Stop the vehicle in a safe location or as soon as it is safe
to do so.
X Engage the parking brake
X Do not drive any further.
X Contact an authorized Mercedes-Benz Center or call
Roadside Assistance.
Do not add brake fluid! This will not solve the problem. G
Warning!
Driving with the message Check Brake Fluid Level displayed can result in an accident. Have
your brake system checked immediately.
Do not add brake fluid before checking the brake system. Overfilling the brake fluid reservoir can
result in spilling brake fluid on hot engine parts and the brake fluid catching fire. You can be
seriously burned.
! If you find that the brake fluid in the brake fluid reservoir has fallen to the minimum mark
or below, have the brake system checked for brake pad thickness and leaks. 286
Vehicle status messages in the multifunction display
Practical hints
251_AKB; 4; 52, en-US
d2ureepe,
Version: 2.11.8.1 2009-03-23T09:22:52+01:00 - Seite 286
Page 290 of 364
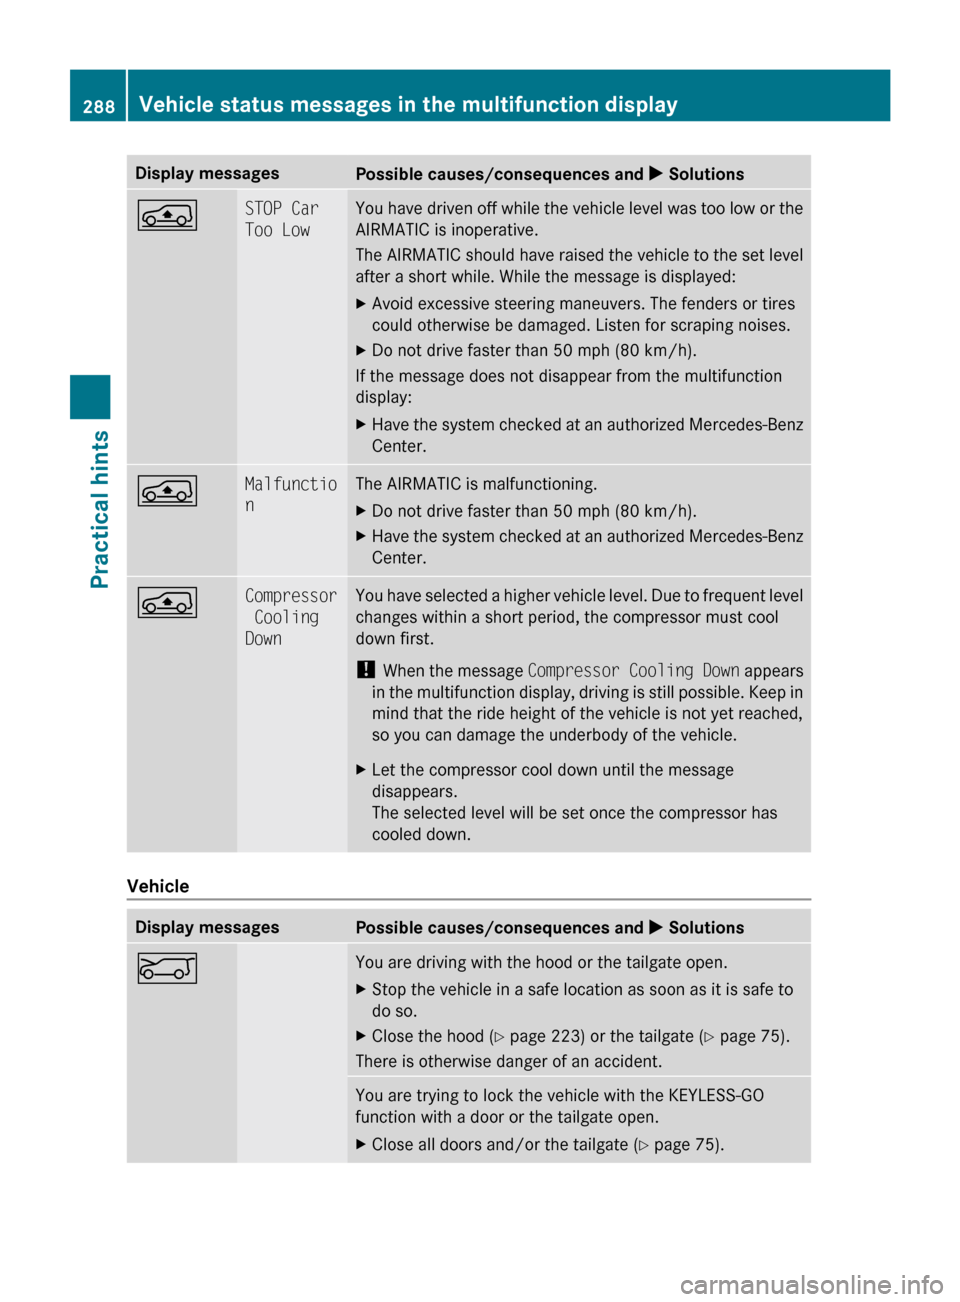
Display messages
Possible causes/consequences and
X SolutionsÁ STOP Car
Too Low You have driven off while the vehicle level was too low or the
AIRMATIC is inoperative.
The
AIRMATIC should have raised the vehicle to the set level
after a short while. While the message is displayed:
X Avoid excessive steering maneuvers. The fenders or tires
could otherwise be damaged. Listen for scraping noises.
X Do not drive faster than 50 mph (80 km/h).
If the message does not disappear from the multifunction
display:
X Have the system checked at an authorized Mercedes-Benz
Center. Á Malfunctio
n The AIRMATIC is malfunctioning.
X
Do not drive faster than 50 mph (80 km/h).
X Have the system checked at an authorized Mercedes-Benz
Center. Á Compressor
Cooling
Down You have selected a higher vehicle level. Due to frequent level
changes within a short period, the compressor must cool
down first.
!
When
the message Compressor Cooling Down appears
in the multifunction display, driving is still possible. Keep in
mind that the ride height of the vehicle is not yet reached,
so you can damage the underbody of the vehicle.
X Let the compressor cool down until the message
disappears.
The selected level will be set once the compressor has
cooled down. Vehicle
Display messages
Possible causes/consequences and
X SolutionsE You are driving with the hood or the tailgate open.
X
Stop the vehicle in a safe location as soon as it is safe to
do so.
X Close the hood ( Y page 223) or the tailgate ( Y page 75).
There is otherwise danger of an accident. You are trying to lock the vehicle with the KEYLESS-GO
function with a door or the tailgate open.
X
Close all doors and/or the tailgate ( Y page 75).288
Vehicle status messages in the multifunction displayPractical hints
251_AKB; 4; 52, en-US
d2ureepe,
Version: 2.11.8.1 2009-03-23T09:22:52+01:00 - Seite 288