2010 MERCEDES-BENZ R350 Key
[x] Cancel search: KeyPage 291 of 364
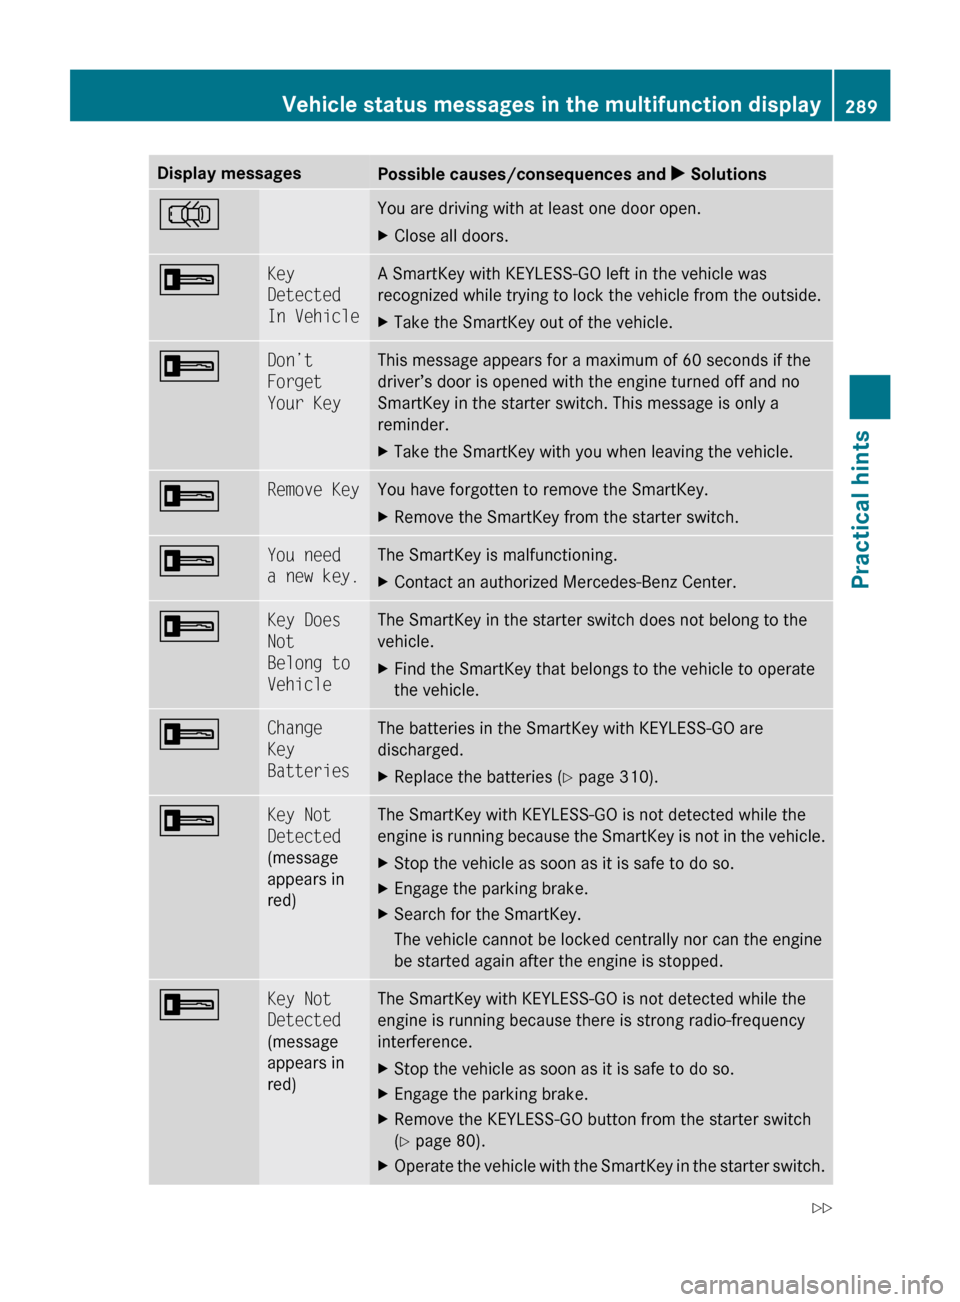
Display messages
Possible causes/consequences and
X Solutions; You are driving with at least one door open.
X
Close all doors. + Key
Detected
In Vehicle A SmartKey with KEYLESS-GO left in the vehicle was
recognized while trying to lock the vehicle from the outside.
X
Take the SmartKey out of the vehicle. + Don’t
Forget
Your Key This message appears for a maximum of 60 seconds if the
driver’s door is opened with the engine turned off and no
SmartKey in the starter switch. This message is only a
reminder.
X
Take the SmartKey with you when leaving the vehicle. + Remove Key You have forgotten to remove the SmartKey.
X
Remove the SmartKey from the starter switch. + You need
a new key. The SmartKey is malfunctioning.
X
Contact an authorized Mercedes-Benz Center. + Key Does
Not
Belong to
Vehicle The SmartKey in the starter switch does not belong to the
vehicle.
X
Find the SmartKey that belongs to the vehicle to operate
the vehicle. + Change
Key
Batteries The batteries in the SmartKey with KEYLESS-GO are
discharged.
X
Replace the batteries ( Y page 310).+ Key Not
Detected
(message
appears in
red) The SmartKey with KEYLESS-GO is not detected while the
engine
is running because the SmartKey is not in the vehicle.
X Stop the vehicle as soon as it is safe to do so.
X Engage the parking brake.
X Search for the SmartKey.
The vehicle cannot be locked centrally nor can the engine
be started again after the engine is stopped. + Key Not
Detected
(message
appears in
red) The SmartKey with KEYLESS-GO is not detected while the
engine is running because there is strong radio-frequency
interference.
X
Stop the vehicle as soon as it is safe to do so.
X Engage the parking brake.
X Remove the KEYLESS-GO button from the starter switch
(Y page 80).
X Operate the vehicle with the SmartKey in the starter switch. Vehicle status messages in the multifunction display
289
Practical hints
251_AKB; 4; 52, en-US
d2ureepe,Version: 2.11.8.1 2009-03-23T09:22:52+01:00 - Seite 289 Z
Page 292 of 364
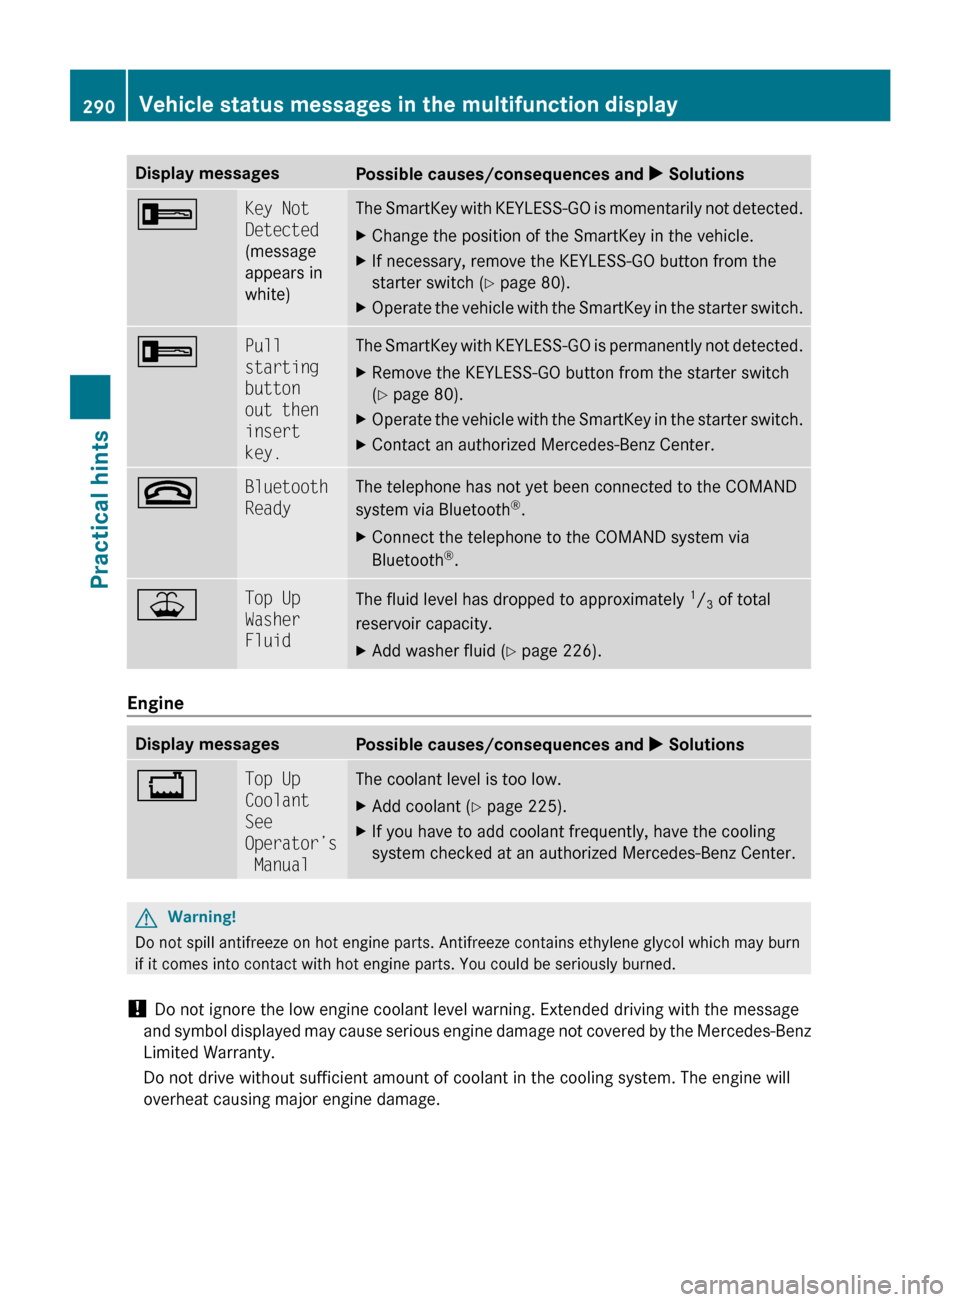
Display messages
Possible causes/consequences and
X Solutions+ Key Not
Detected
(message
appears in
white) The SmartKey with KEYLESS-GO is momentarily not detected.
X
Change the position of the SmartKey in the vehicle.
X If necessary, remove the KEYLESS-GO button from the
starter switch ( Y page 80).
X Operate the vehicle with the SmartKey in the starter switch. + Pull
starting
button
out then
insert
key. The SmartKey with KEYLESS-GO is permanently not detected.
X
Remove the KEYLESS-GO button from the starter switch
(Y page 80).
X Operate the vehicle with the SmartKey in the starter switch.
X Contact an authorized Mercedes-Benz Center. ~ Bluetooth
Ready The telephone has not yet been connected to the COMAND
system via Bluetooth
®
.
X Connect the telephone to the COMAND system via
Bluetooth ®
. ¥ Top Up
Washer
Fluid
The fluid level has dropped to approximately
1
/ 3 of total
reservoir capacity.
X Add washer fluid ( Y page 226).Engine
Display messages
Possible causes/consequences and
X Solutions+ Top Up
Coolant
See
Operator’s
Manual The coolant level is too low.
X
Add coolant (Y page 225).
X If you have to add coolant frequently, have the cooling
system checked at an authorized Mercedes-Benz Center. G
Warning!
Do not spill antifreeze on hot engine parts. Antifreeze contains ethylene glycol which may burn
if it comes into contact with hot engine parts. You could be seriously burned.
! Do not ignore the low engine coolant level warning. Extended driving with the message
and
symbol displayed may cause serious engine damage not covered by the Mercedes-Benz
Limited Warranty.
Do not drive without sufficient amount of coolant in the cooling system. The engine will
overheat causing major engine damage. 290
Vehicle status messages in the multifunction display
Practical hints
251_AKB; 4; 52, en-US
d2ureepe,
Version: 2.11.8.1 2009-03-23T09:22:52+01:00 - Seite 290
Page 299 of 364
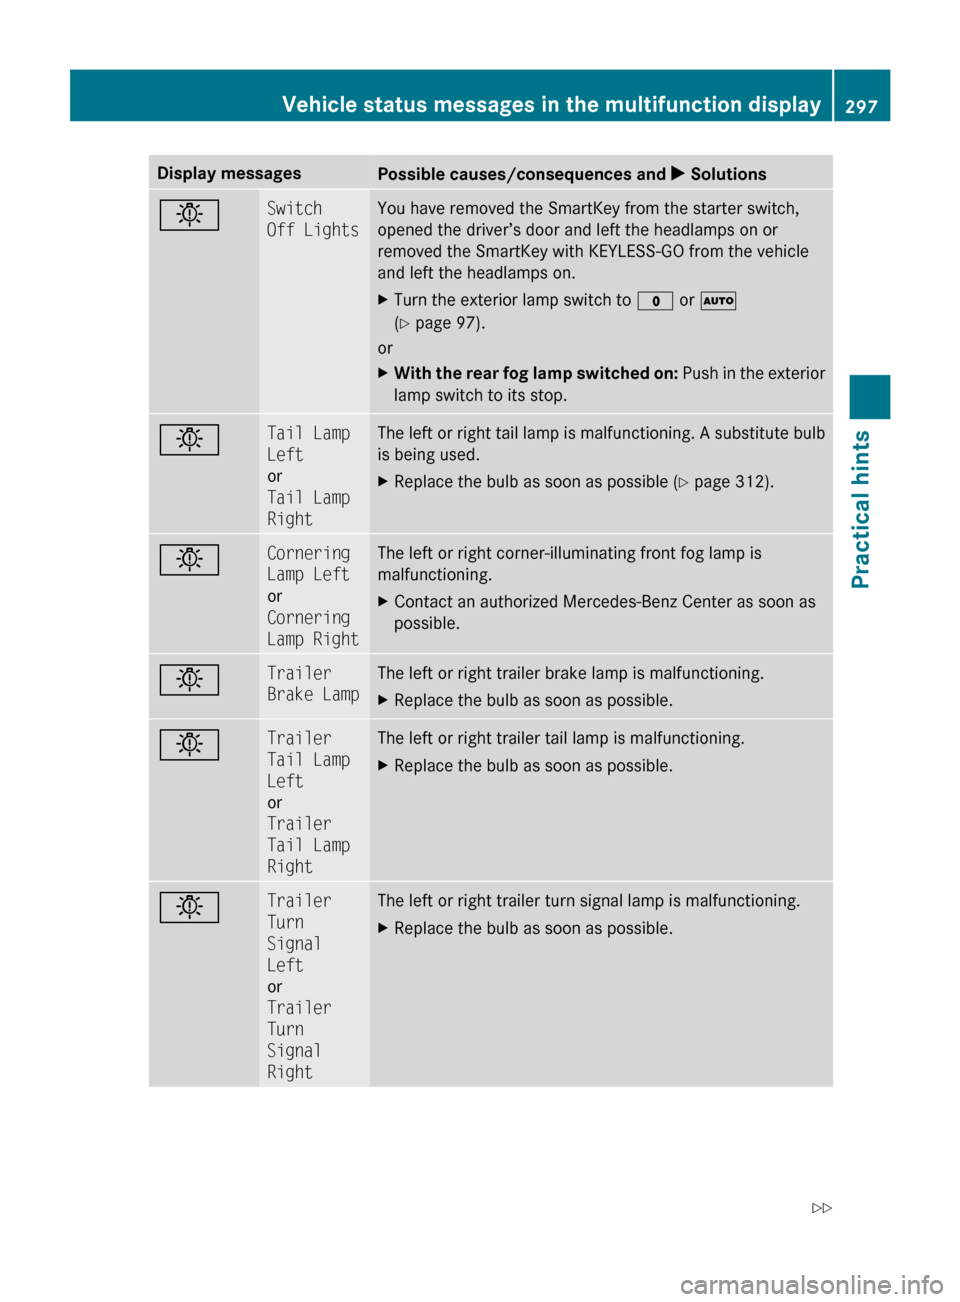
Display messages
Possible causes/consequences and
X Solutionsb Switch
Off Lights You have removed the SmartKey from the starter switch,
opened the driver’s door and left the headlamps on or
removed the SmartKey with KEYLESS-GO from the vehicle
and left the headlamps on.
X
Turn the exterior lamp switch to $ or Ã
(Y page 97).
or
X With the rear fog lamp switched on: Push in the exterior
lamp switch to its stop. b Tail Lamp
Left
or
Tail Lamp
Right The left or right tail lamp is malfunctioning. A substitute bulb
is being used.
X
Replace the bulb as soon as possible (Y page 312). b Cornering
Lamp Left
or
Cornering
Lamp Right The left or right corner-illuminating front fog lamp is
malfunctioning.
X
Contact an authorized Mercedes-Benz Center as soon as
possible. b Trailer
Brake Lamp The left or right trailer brake lamp is malfunctioning.
X
Replace the bulb as soon as possible. b Trailer
Tail Lamp
Left
or
Trailer
Tail Lamp
Right The left or right trailer tail lamp is malfunctioning.
X
Replace the bulb as soon as possible. b Trailer
Turn
Signal
Left
or
Trailer
Turn
Signal
Right The left or right trailer turn signal lamp is malfunctioning.
X
Replace the bulb as soon as possible. Vehicle status messages in the multifunction display
297
Practical hints
251_AKB; 4; 52, en-US
d2ureepe,Version: 2.11.8.1 2009-03-23T09:22:52+01:00 - Seite 297 Z
Page 310 of 364
G
Warning!
If the 42 indicator lamp
illuminates and remains illuminated with the
weight of a typical adult or someone larger than a small individual on the front passenger
seat, do not have any passenger use the front
passenger seat until the system has been
repaired.
Problem
Possible causes/consequences and
X SolutionsUSA only:
42
The front passenger
front air bag off
indicator lamp does not
illuminate and/or does
not remain illuminated
with the weight of a
typical 12-month-old
child in a standard child
restraint or less on the
front passenger seat. The system is malfunctioning.
X
Make sure there is nothing between seat cushion and child seat
and check installation of the child seat.
X Make sure no objects applying supplemental weight onto the
seat are present.
X Make sure no objects which apply forces to the seat are present
(e.g. objects such as books, briefcases etc. lodged behind or
around the seat, head restraints pushing against roof etc.). The
system may recognize such forces as supplemental weight.
X If the front passenger front air bag off indicator lamp remains
out, have the system checked as soon as possible at an
authorized Mercedes-Benz Center. Do not transport a child on
the front passenger seat until the system has been repaired.
X Read and observe messages in the multifunction display and
follow corrective steps (Y page 274). G
Warning!
If the 42 indicator lamp does not
illuminate or remains out with the weight of a
typical 12-month-old child in a standard child
restraint or less on the front passenger seat,
do not transport a child on the front
passenger seat until the system has been
repaired. Unlocking/locking manually
Unlocking the vehicle
If you cannot unlock the vehicle with the
SmartKey or with KEYLESS-GO, unlock the
driver’s door using the mechanical key.
The anti-theft alarm system will trigger when
you
R unlocking the driver’s door with the
mechanical key and
R open the driver’s door
To cancel the alarm, insert the SmartKey into
the starter switch.
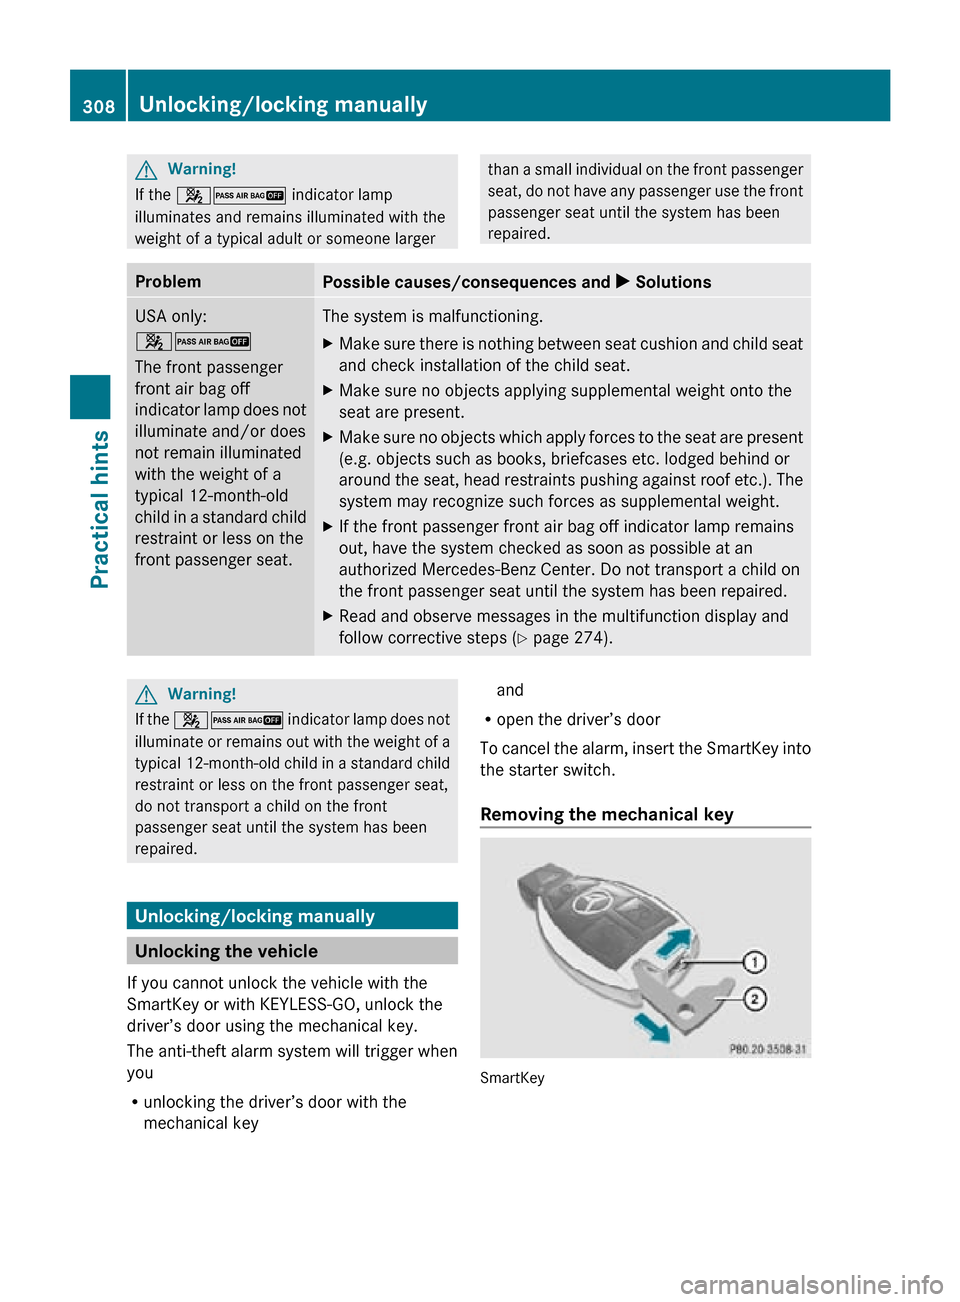
Removing the mechanical key SmartKey308
Unlocking/locking manuallyPractical hints
251_AKB; 4; 52, en-US
d2ureepe,
Version: 2.11.8.1 2009-03-23T09:22:52+01:00 - Seite 308
Page 311 of 364
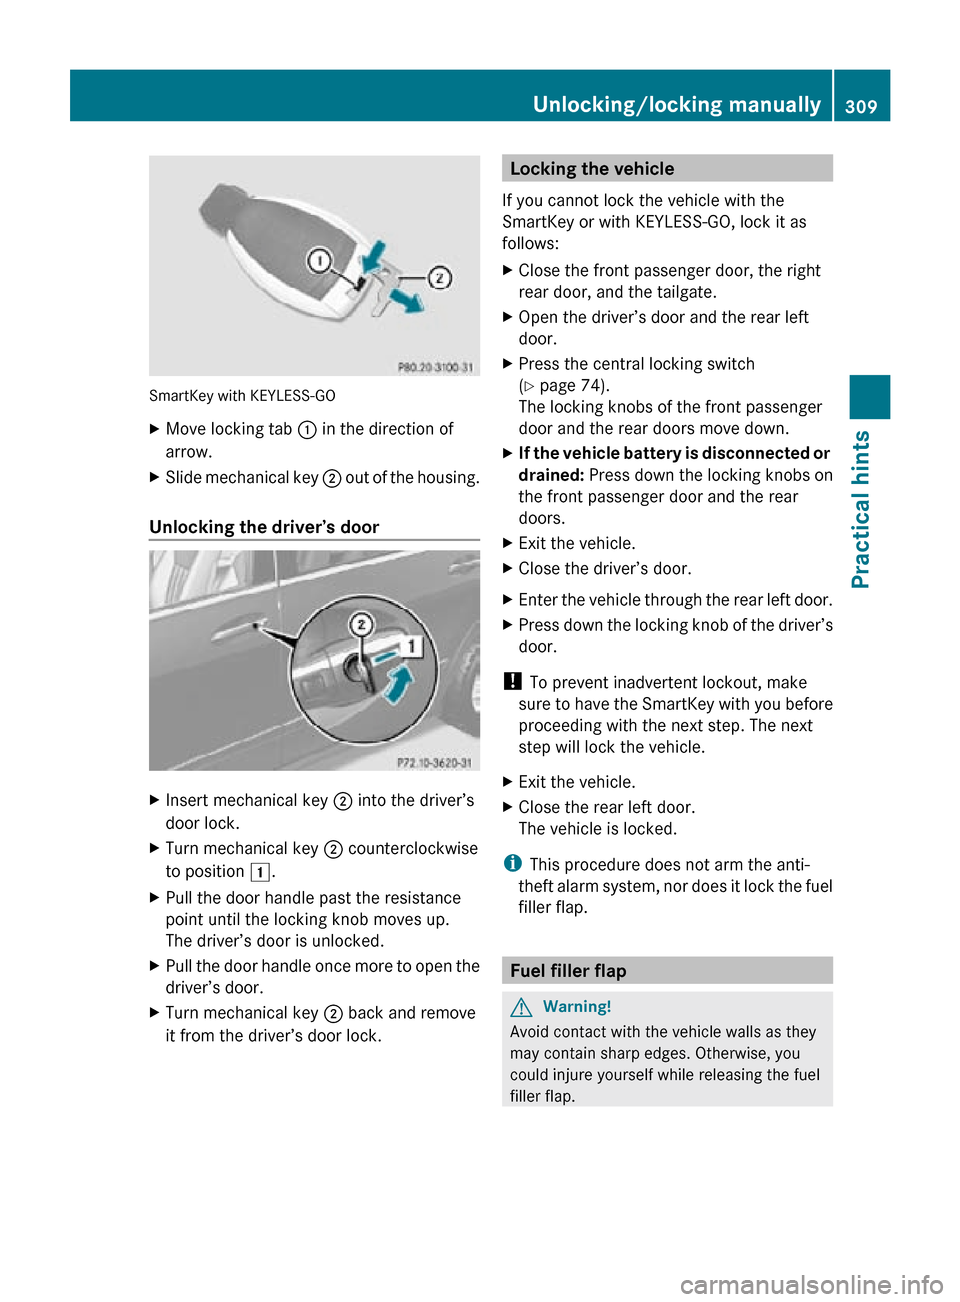
SmartKey with KEYLESS-GO
X
Move locking tab : in the direction of
arrow.
X Slide mechanical key ; out of the housing.
Unlocking the driver’s door X
Insert mechanical key ; into the driver’s
door lock.
X Turn mechanical key ; counterclockwise
to position 1.
X Pull the door handle past the resistance
point until the locking knob moves up.
The driver’s door is unlocked.
X Pull the door handle once more to open the
driver’s door.
X Turn mechanical key ; back and remove
it from the driver’s door lock. Locking the vehicle
If you cannot lock the vehicle with the
SmartKey or with KEYLESS-GO, lock it as
follows:
X Close the front passenger door, the right
rear door, and the tailgate.
X Open the driver’s door and the rear left
door.
X Press the central locking switch
(Y page 74).
The locking knobs of the front passenger
door and the rear doors move down.
X If the vehicle battery is disconnected or
drained: Press down the locking knobs on
the front passenger door and the rear
doors.
X Exit the vehicle.
X Close the driver’s door.
X Enter the vehicle through the rear left door.
X Press down the locking knob of the driver’s
door.
! To prevent inadvertent lockout, make
sure to have the SmartKey with you before
proceeding with the next step. The next
step will lock the vehicle.
X Exit the vehicle.
X Close the rear left door.
The vehicle is locked.
i This procedure does not arm the anti-
theft alarm system, nor does it lock the fuel
filler flap. Fuel filler flap
G
Warning!
Avoid contact with the vehicle walls as they
may contain sharp edges. Otherwise, you
could injure yourself while releasing the fuel
filler flap. Unlocking/locking manually
309Practical hints
251_AKB; 4; 52, en-US
d2ureepe, Version: 2.11.8.1 2009-03-23T09:22:52+01:00 - Seite 309 Z
Page 312 of 364
In case the central locking system does not
release the fuel filler flap, you can open it
manually.
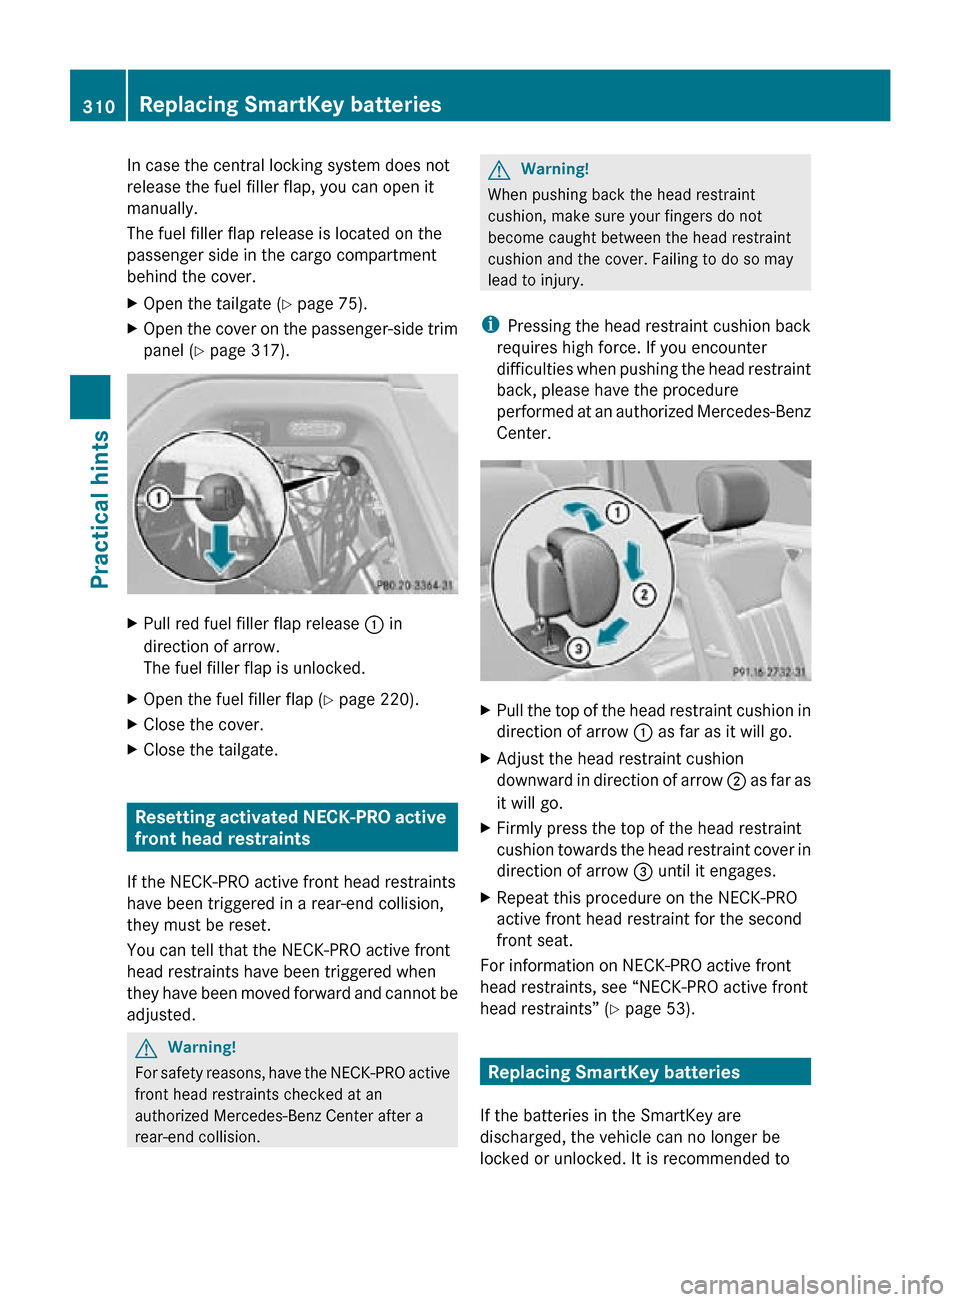
The fuel filler flap release is located on the
passenger side in the cargo compartment
behind the cover.
X
Open the tailgate ( Y page 75).
X Open the cover on the passenger-side trim
panel ( Y page 317). X
Pull red fuel filler flap release : in
direction of arrow.
The fuel filler flap is unlocked.
X Open the fuel filler flap ( Y page 220).
X Close the cover.
X Close the tailgate. Resetting activated NECK-PRO active
front head restraints
If the NECK-PRO active front head restraints
have been triggered in a rear-end collision,
they must be reset.
You can tell that the NECK-PRO active front
head restraints have been triggered when
they have been moved forward and cannot be
adjusted. G
Warning!
For safety reasons, have the NECK-PRO active
front head restraints checked at an
authorized Mercedes-Benz Center after a
rear-end collision. G
Warning!
When pushing back the head restraint
cushion, make sure your fingers do not
become caught between the head restraint
cushion and the cover. Failing to do so may
lead to injury.
i Pressing the head restraint cushion back
requires high force. If you encounter
difficulties when pushing the head restraint
back, please have the procedure
performed at an authorized Mercedes-Benz
Center. X
Pull the top of the head restraint cushion in
direction of arrow : as far as it will go.
X Adjust the head restraint cushion
downward in direction of arrow ; as far as
it will go.
X Firmly press the top of the head restraint
cushion towards the head restraint cover in
direction of arrow = until it engages.
X Repeat this procedure on the NECK-PRO
active front head restraint for the second
front seat.
For information on NECK-PRO active front
head restraints, see “NECK-PRO active front
head restraints” ( Y page 53). Replacing SmartKey batteries
If the batteries in the SmartKey are
discharged, the vehicle can no longer be
locked or unlocked. It is recommended to 310
Replacing SmartKey batteriesPractical hints
251_AKB; 4; 52, en-US
d2ureepe,
Version: 2.11.8.1 2009-03-23T09:22:52+01:00 - Seite 310
Page 313 of 364
have the batteries replaced at an authorized
Mercedes-Benz Center.
G
Warning!
Batteries contain poisonous and corrosive
substances. Therefore, keep the batteries out
of reach of children.
If a battery is swallowed, seek medical help
immediately. G
Warning!
SmartKey batteries contain perchlorate
material, which may require special handling
and regard for the environment. Check with
your local government’s disposal guidelines.
California residents, see www.dtsc.ca.gov/
HazardousWaste/Perchlorate/
index.cfm.
Batteries contain materials that can harm the
environment if disposed of improperly.
Recycling of batteries is the preferred method
of disposal. Many states (USA only) or
provinces (Canada only) require sellers of
batteries to accept old batteries for recycling.
When inserting the batteries, make sure they
are clean and free of lint.
When replacing batteries, always replace
both batteries.
i The required replacement batteries are
available at any authorized Mercedes-Benz
Center.
Replacement batteries: Lithium, type
CR 2025 or equivalent.
X Remove the mechanical key from the
SmartKey (Y page 308). SmartKey
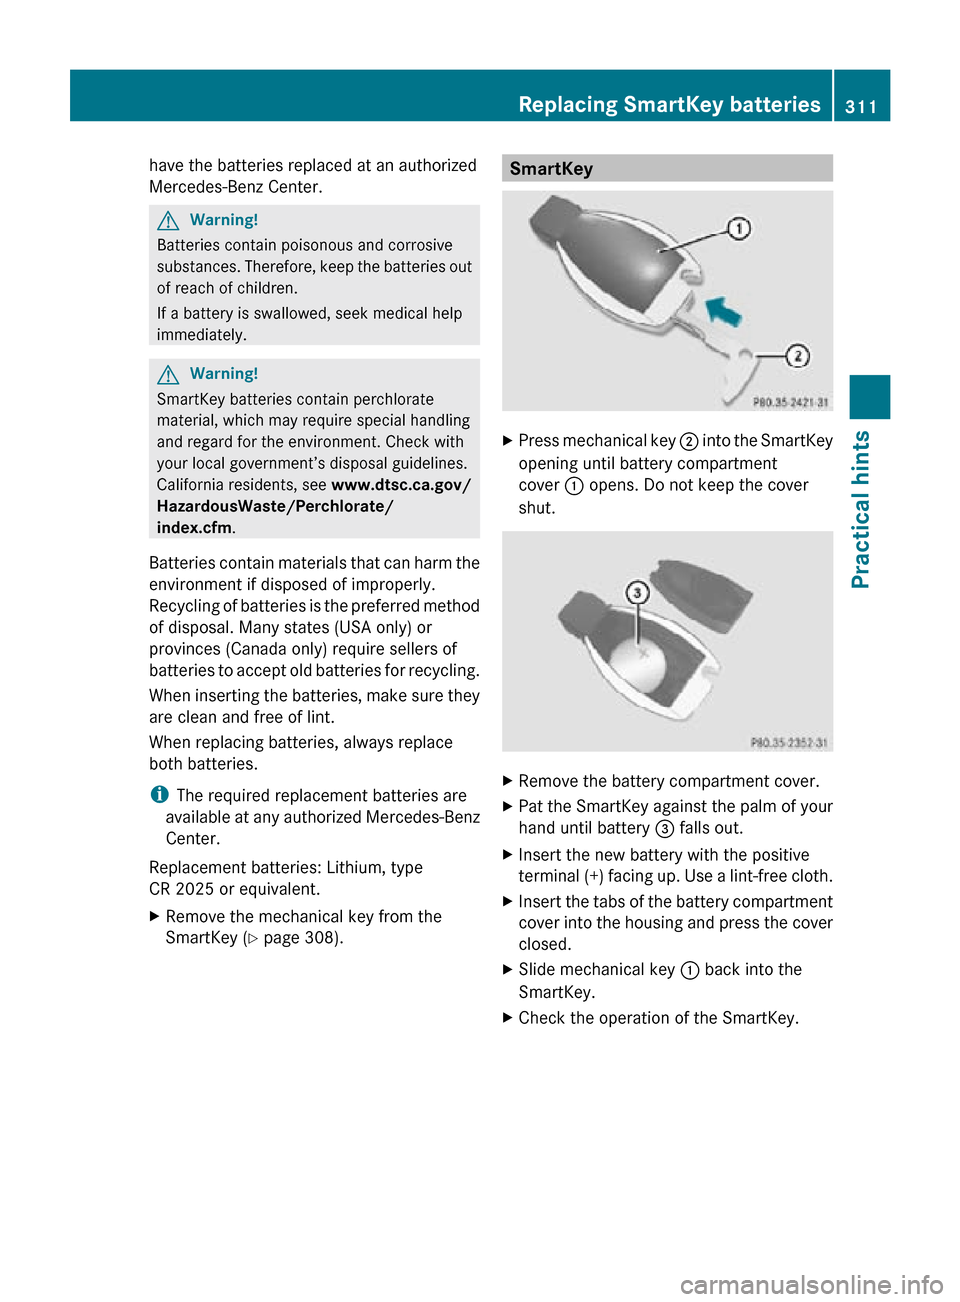
X
Press mechanical key ; into the SmartKey
opening until battery compartment
cover : opens. Do not keep the cover
shut. X
Remove the battery compartment cover.
X Pat the SmartKey against the palm of your
hand until battery = falls out.
X Insert the new battery with the positive
terminal (+) facing up. Use a lint-free cloth.
X Insert the tabs of the battery compartment
cover into the housing and press the cover
closed.
X Slide mechanical key : back into the
SmartKey.
X Check the operation of the SmartKey. Replacing SmartKey batteries
311Practical hints
251_AKB; 4; 52, en-US
d2ureepe, Version: 2.11.8.1 2009-03-23T09:22:52+01:00 - Seite 311 Z
Page 314 of 364
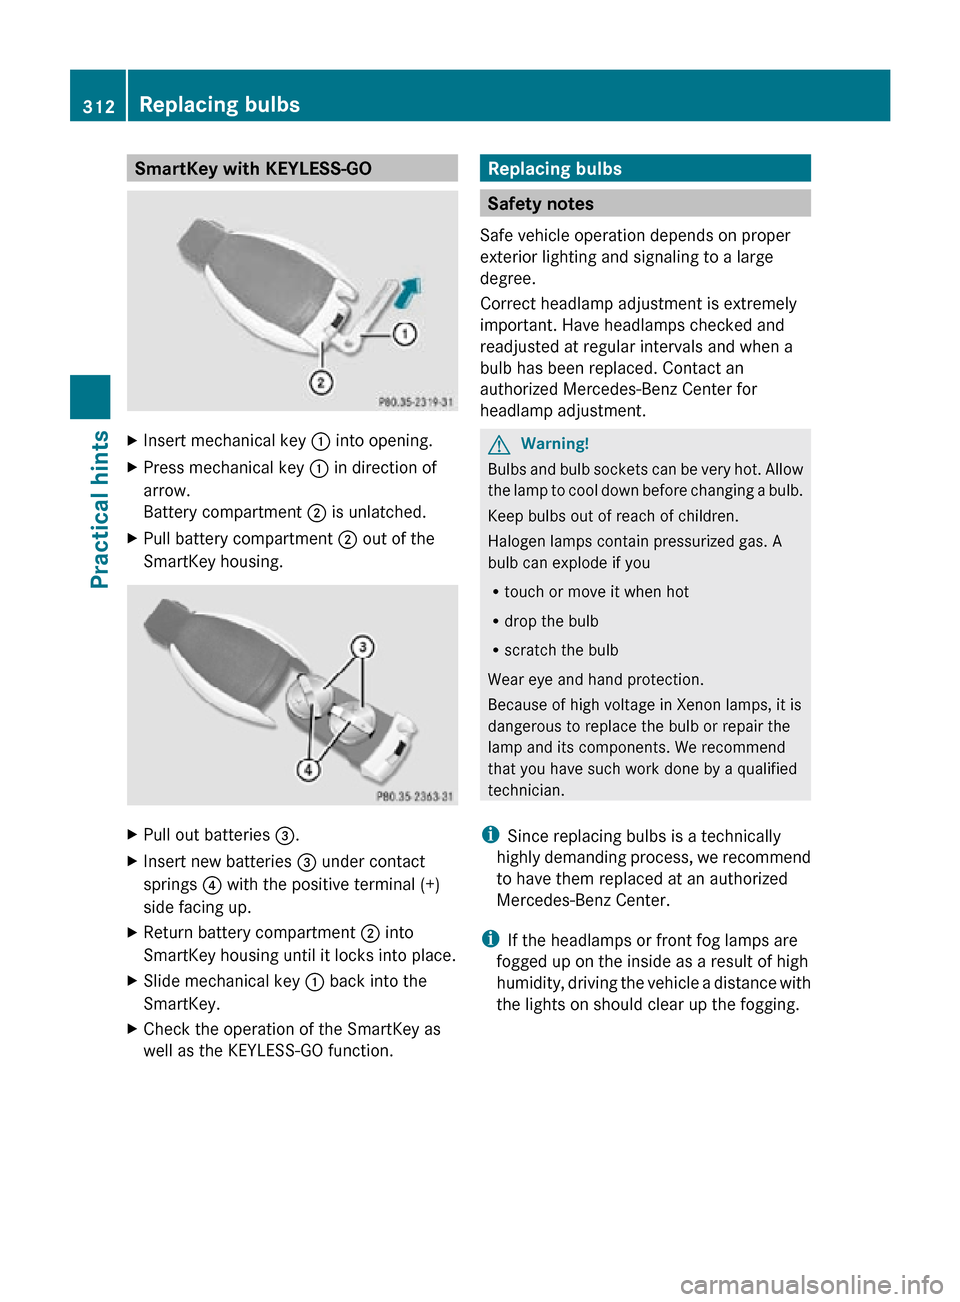
SmartKey with KEYLESS-GO
X
Insert mechanical key : into opening.
X Press mechanical key : in direction of
arrow.
Battery compartment ; is unlatched.
X Pull battery compartment ; out of the
SmartKey housing. X
Pull out batteries =.
X Insert new batteries = under contact
springs ? with the positive terminal (+)
side facing up.
X Return battery compartment ; into
SmartKey housing until it locks into place.
X Slide mechanical key : back into the
SmartKey.
X Check the operation of the SmartKey as
well as the KEYLESS-GO function. Replacing bulbs
Safety notes
Safe vehicle operation depends on proper
exterior lighting and signaling to a large
degree.
Correct headlamp adjustment is extremely
important. Have headlamps checked and
readjusted at regular intervals and when a
bulb has been replaced. Contact an
authorized Mercedes-Benz Center for
headlamp adjustment. G
Warning!
Bulbs and bulb sockets can be very hot. Allow
the lamp to cool down before changing a bulb.
Keep bulbs out of reach of children.
Halogen lamps contain pressurized gas. A
bulb can explode if you
R touch or move it when hot
R drop the bulb
R scratch the bulb
Wear eye and hand protection.
Because of high voltage in Xenon lamps, it is
dangerous to replace the bulb or repair the
lamp and its components. We recommend
that you have such work done by a qualified
technician.
i Since replacing bulbs is a technically
highly demanding process, we recommend
to have them replaced at an authorized
Mercedes-Benz Center.
i If the headlamps or front fog lamps are
fogged up on the inside as a result of high
humidity, driving the vehicle a distance with
the lights on should clear up the fogging. 312
Replacing bulbsPractical hints
251_AKB; 4; 52, en-US
d2ureepe,
Version: 2.11.8.1 2009-03-23T09:22:52+01:00 - Seite 312