2010 MERCEDES-BENZ R320 headlamp
[x] Cancel search: headlampPage 226 of 364
accident, for example. The hood could
otherwise come loose while the vehicle is in
motion and injure you and/or others.
X Let the hood drop from a height of
approximately 8 in (20 cm).
X Check to make sure the hood is fully
closed.
If you can raise the hood at a point above
the headlamps, then it is not properly
closed. Open it again and let it drop with
somewhat greater force. Radiator
i Vehicles with diesel engine:
Do not cover the radiator, for example with
a winter front or bug cover. Otherwise the
readings of the on-board diagnostic system
may be inaccurate. Some of theses
readings are required by law and must be
accurate at all times. Engine oil
The amount of oil your engine consumes will
depend on a number of factors, including
driving style. Increased oil consumption can
occur when the vehicle is new or the vehicle
is driven frequently at higher engine speeds.
Engine oil consumption checks should only
be made after the vehicle break-in period.
! Do not use any special lubricant additives,
as these may damage the drive assemblies.
Using special additives not approved by
Mercedes-Benz may cause damage not
covered by the Mercedes-Benz Limited
Warranty.
For further information contact an
authorized Mercedes-Benz Center.
Notes on checking engine oil level When checking the oil level the vehicle must
be parked on level ground and the vehicle must have been stationary for at least
5 minutes with the engine turned off.
Checking engine oil level X
Open the hood (Y page 222). Example illustration: Gasoline engine
Example illustration: Diesel engine
X
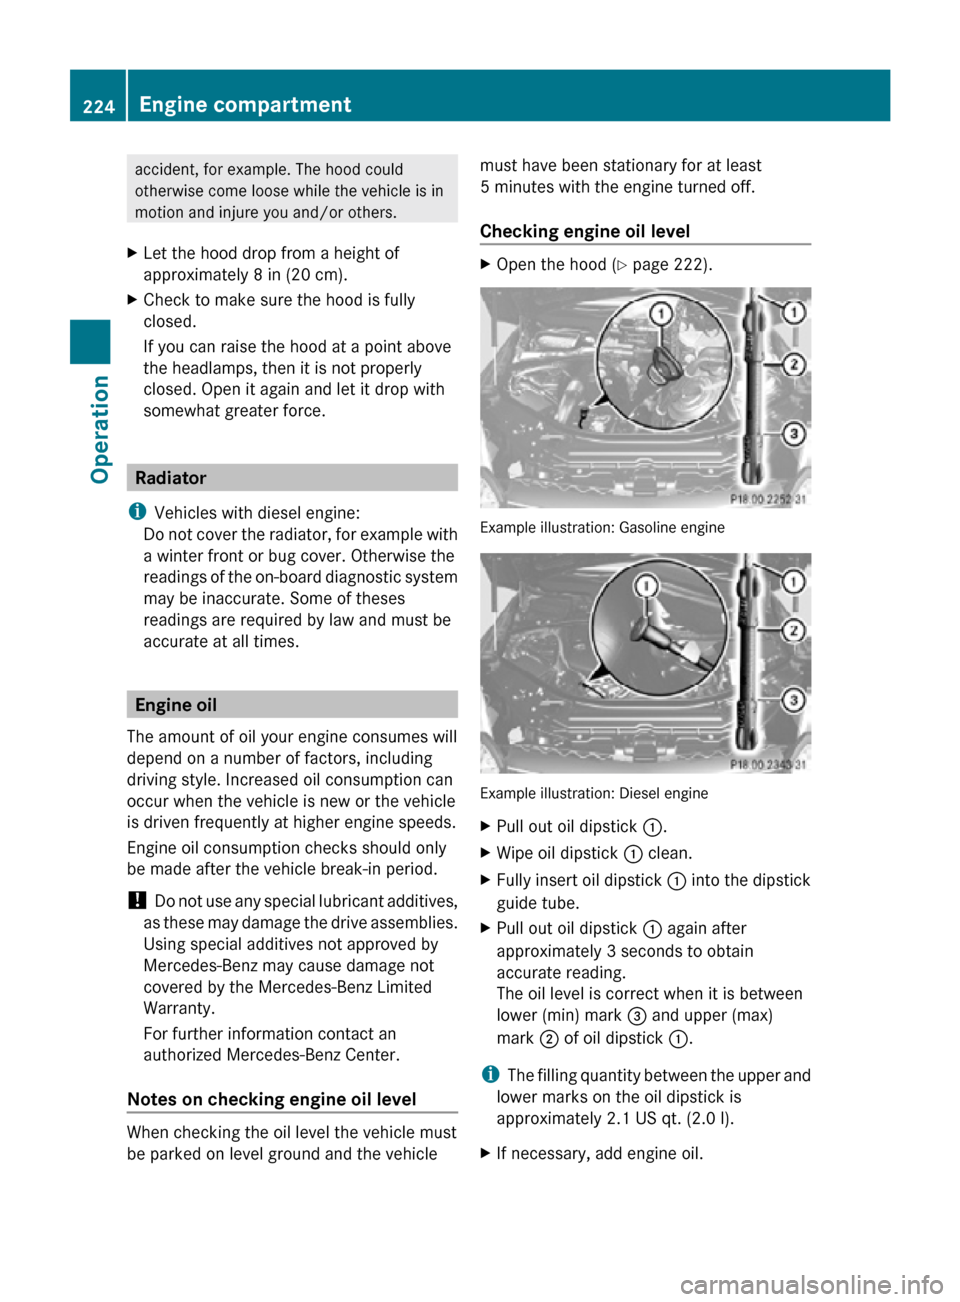
Pull out oil dipstick :.
X Wipe oil dipstick : clean.
X Fully insert oil dipstick : into the dipstick
guide tube.
X Pull out oil dipstick : again after
approximately 3 seconds to obtain
accurate reading.
The oil level is correct when it is between
lower (min) mark = and upper (max)
mark ; of oil dipstick :.
i The filling quantity between the upper and
lower marks on the oil dipstick is
approximately 2.1 US qt. (2.0 l).
X If necessary, add engine oil. 224
Engine compartmentOperation
251_AKB; 4; 52, en-US
d2ureepe,
Version: 2.11.8.1 2009-03-23T09:22:52+01:00 - Seite 224
Page 228 of 364
hot fluid and steam will be blown out under
pressure.
R Do not spill antifreeze on hot engine parts.
Antifreeze contains ethylene glycol which
may burn if it comes into contact with hot
engine parts. X
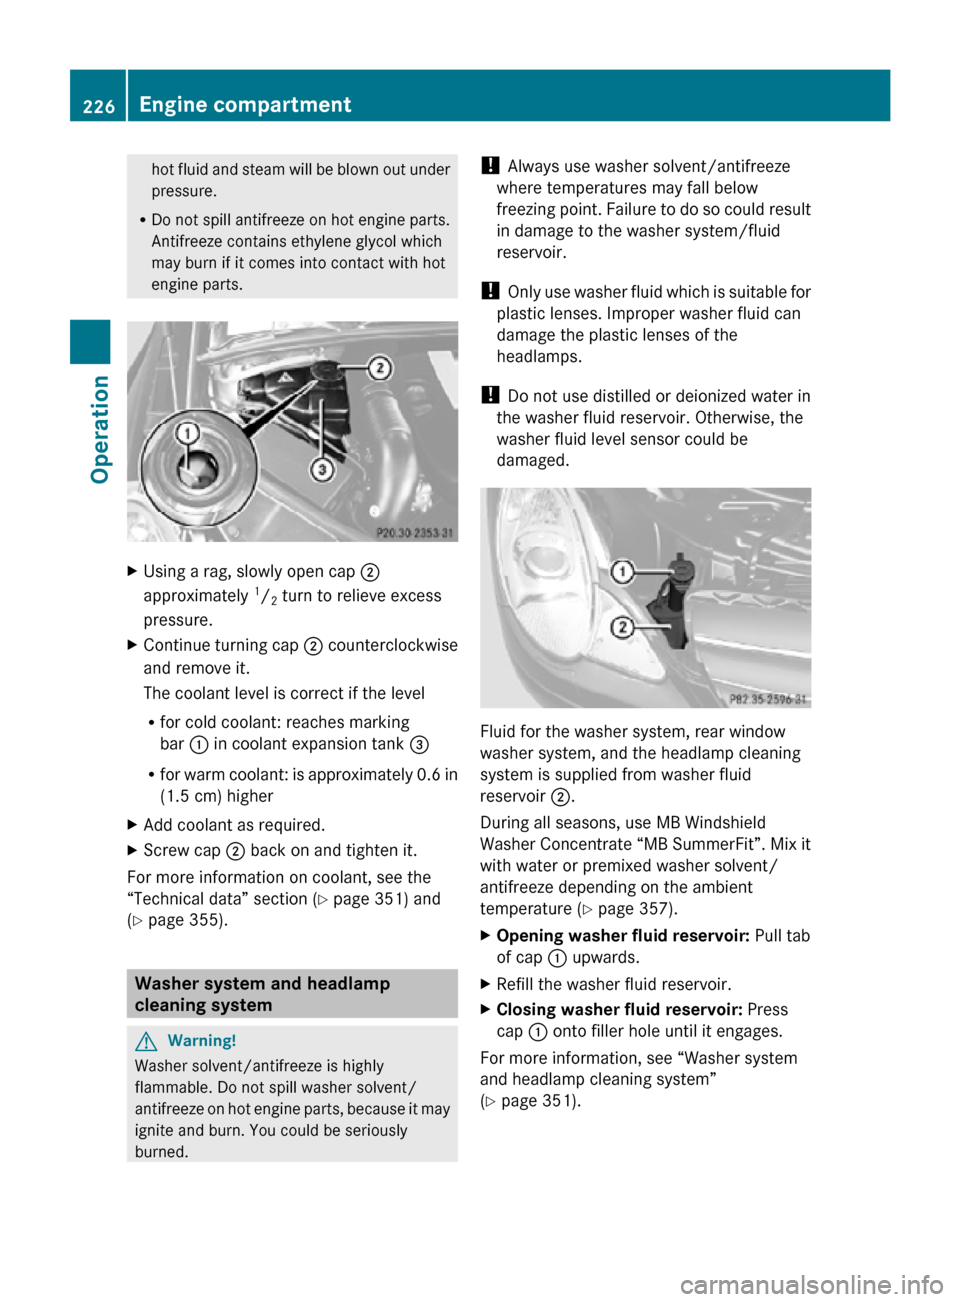
Using a rag, slowly open cap ;
approximately 1
/ 2 turn to relieve excess
pressure.
X Continue turning cap ; counterclockwise
and remove it.
The coolant level is correct if the level
R for cold coolant: reaches marking
bar : in coolant expansion tank =
R for warm coolant: is approximately 0.6 in
(1.5 cm) higher
X Add coolant as required.
X Screw cap ; back on and tighten it.
For more information on coolant, see the
“Technical data” section ( Y page 351) and
(Y page 355). Washer system and headlamp
cleaning system
G
Warning!
Washer solvent/antifreeze is highly
flammable. Do not spill washer solvent/
antifreeze on hot engine parts, because it may
ignite and burn. You could be seriously
burned. !
Always use washer solvent/antifreeze
where temperatures may fall below
freezing point. Failure to do so could result
in damage to the washer system/fluid
reservoir.
! Only use washer fluid which is suitable for
plastic lenses. Improper washer fluid can
damage the plastic lenses of the
headlamps.
! Do not use distilled or deionized water in
the washer fluid reservoir. Otherwise, the
washer fluid level sensor could be
damaged. Fluid for the washer system, rear window
washer system, and the headlamp cleaning
system is supplied from washer fluid
reservoir ;.
During all seasons, use MB Windshield
Washer Concentrate “MB SummerFit”. Mix it
with water or premixed washer solvent/
antifreeze depending on the ambient
temperature (
Y page 357).
X Opening washer fluid reservoir: Pull tab
of cap : upwards.
X Refill the washer fluid reservoir.
X Closing washer fluid reservoir: Press
cap : onto filler hole until it engages.
For more information, see “Washer system
and headlamp cleaning system”
(Y page 351). 226
Engine compartmentOperation
251_AKB; 4; 52, en-US
d2ureepe,
Version: 2.11.8.1 2009-03-23T09:22:52+01:00 - Seite 226
Page 267 of 364
X
When taking the vehicle through an
automatic conveyor-type car wash:
Make sure the automatic transmission
remains in neutral position N. Observe
instructions, see “Remaining in neutral
position N” ( Y page 117).
When leaving the automatic car wash, make
sure the mirrors are folded out.
After running the vehicle through an
automatic car wash, wipe any wax off of the
windshield and the wiper blade inserts. This
will prevent smears and reduce wiping noise
which can be caused by residual wax on the
windshield.
Ornamental moldings X
For regular cleaning and care of ornamental
moldings, use a damp cloth.
! Do not use chrome cleaner on ornamental
moldings. Although ornamental moldings
may have chrome appearance, they could
be made of anodized aluminum that will be
damaged when cleaned with chrome
cleaner. Instead, use a damp cloth to clean
those ornamental moldings.
For very dirty ornamental moldings of
which you are sure are chrome-plated, use
a chrome cleaner. If in doubt whether an
ornamental molding is chrome-plated,
contact an authorized Mercedes-Benz
Center.
Headlamps, brake lamps, tail lamps,
side markers, turn signal lenses X
Use a mild vehicle wash detergent, such as
Mercedes-Benz approved Car Shampoo,
with plenty of water.
! Only use window cleaning solutions that
are suitable for plastic lamp lenses.
Window cleaning solutions which are not
suitable may damage the plastic lamp
lenses of the headlamps. Therefore, do not
use abrasives, solvents or cleaners that
contain solvents. Cleaning the driving systems sensors
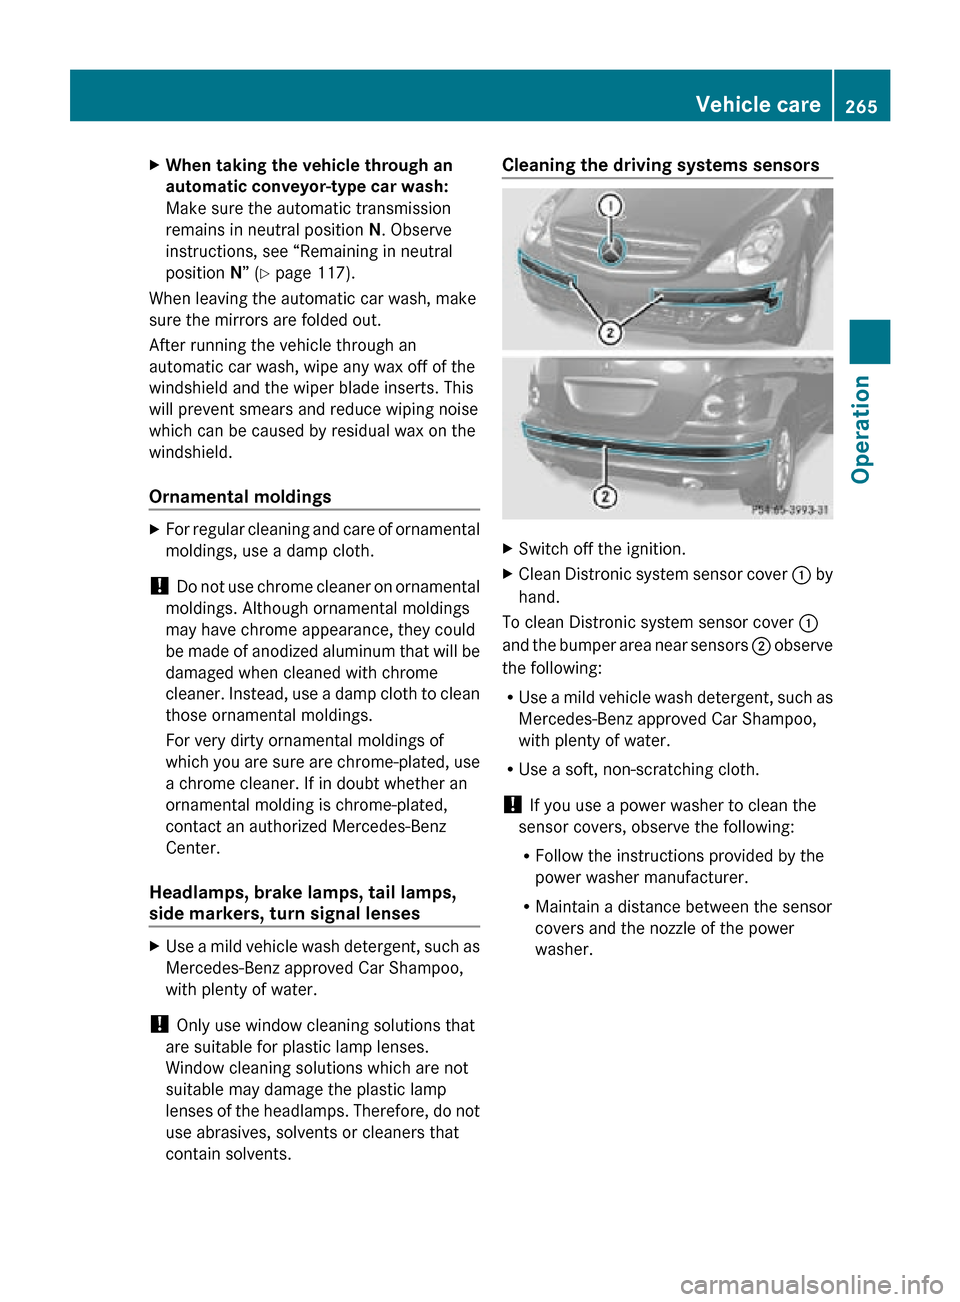
X
Switch off the ignition.
X Clean Distronic system sensor cover : by
hand.
To clean Distronic system sensor cover :
and the bumper area near sensors ; observe
the following:
R Use a mild vehicle wash detergent, such as
Mercedes-Benz approved Car Shampoo,
with plenty of water.
R Use a soft, non-scratching cloth.
! If you use a power washer to clean the
sensor covers, observe the following:
R Follow the instructions provided by the
power washer manufacturer.
R Maintain a distance between the sensor
covers and the nozzle of the power
washer. Vehicle care
265Operation
251_AKB; 4; 52, en-US
d2ureepe, Version: 2.11.8.1 2009-03-23T09:22:52+01:00 - Seite 265 Z
Page 297 of 364
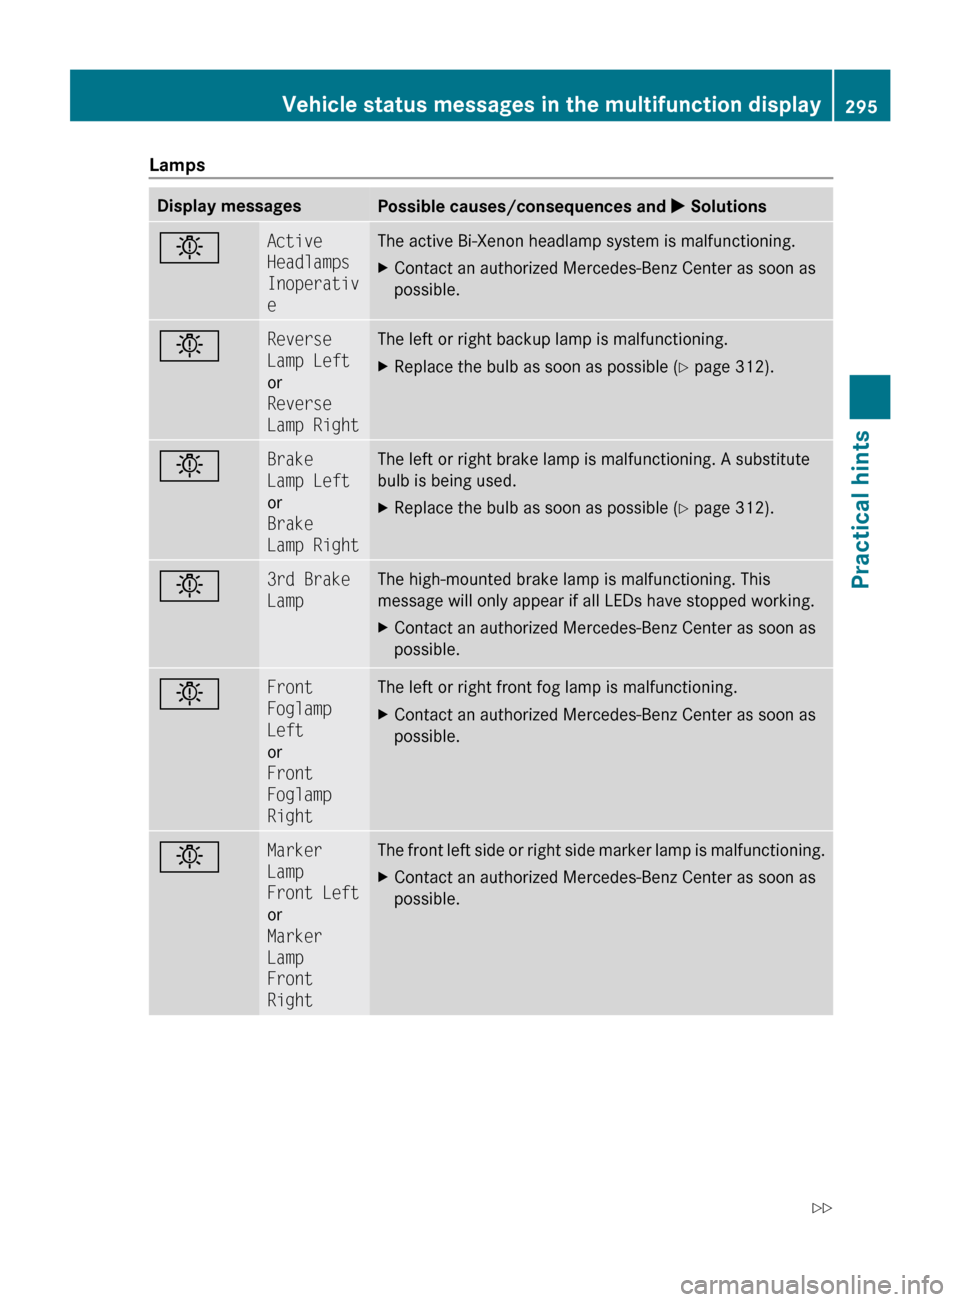
Lamps
Display messages
Possible causes/consequences and
X Solutionsb Active
Headlamps
Inoperativ
e The active Bi-Xenon headlamp system is malfunctioning.
X
Contact an authorized Mercedes-Benz Center as soon as
possible. b Reverse
Lamp Left
or
Reverse
Lamp Right The left or right backup lamp is malfunctioning.
X
Replace the bulb as soon as possible (Y page 312). b Brake
Lamp Left
or
Brake
Lamp Right The left or right brake lamp is malfunctioning. A substitute
bulb is being used.
X
Replace the bulb as soon as possible (Y page 312). b 3rd Brake
Lamp The high-mounted brake lamp is malfunctioning. This
message will only appear if all LEDs have stopped working.
X
Contact an authorized Mercedes-Benz Center as soon as
possible. b Front
Foglamp
Left
or
Front
Foglamp
Right The left or right front fog lamp is malfunctioning.
X
Contact an authorized Mercedes-Benz Center as soon as
possible. b Marker
Lamp
Front Left
or
Marker
Lamp
Front
Right The front left side or right side marker lamp is malfunctioning.
X
Contact an authorized Mercedes-Benz Center as soon as
possible. Vehicle status messages in the multifunction display
295Practical hints
251_AKB; 4; 52, en-US
d2ureepe,Version: 2.11.8.1 2009-03-23T09:22:52+01:00 - Seite 295 Z
Page 298 of 364
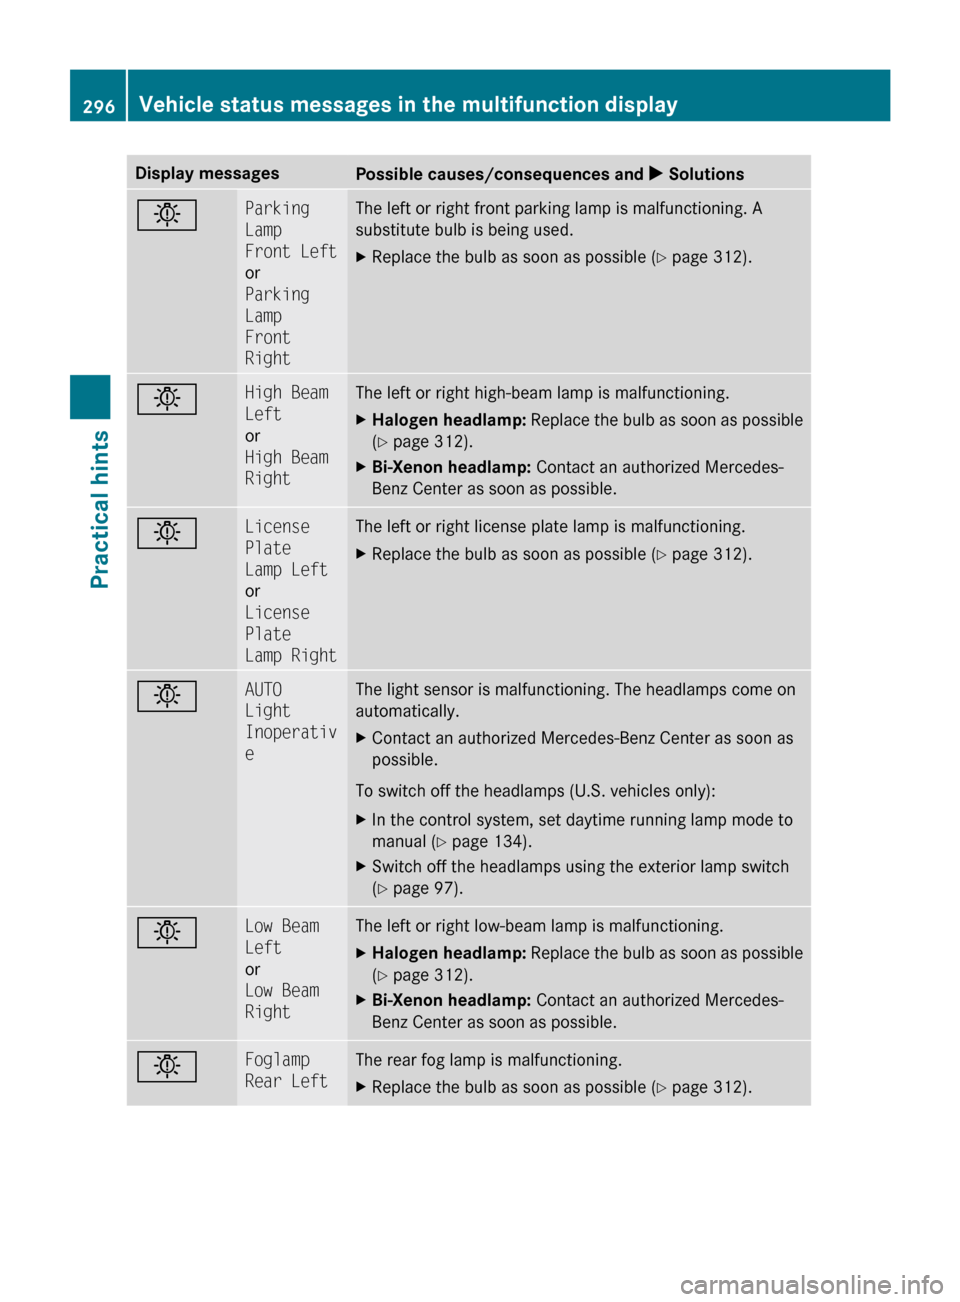
Display messages
Possible causes/consequences and
X Solutionsb Parking
Lamp
Front Left
or
Parking
Lamp
Front
Right The left or right front parking lamp is malfunctioning. A
substitute bulb is being used.
X
Replace the bulb as soon as possible (Y page 312). b High Beam
Left
or
High Beam
Right The left or right high-beam lamp is malfunctioning.
X
Halogen headlamp: Replace the bulb as soon as possible
(Y page 312).
X Bi-Xenon headlamp: Contact an authorized Mercedes-
Benz Center as soon as possible. b License
Plate
Lamp Left
or
License
Plate
Lamp Right The left or right license plate lamp is malfunctioning.
X
Replace the bulb as soon as possible (Y page 312). b AUTO
Light
Inoperativ
e The light sensor is malfunctioning. The headlamps come on
automatically.
X
Contact an authorized Mercedes-Benz Center as soon as
possible.
To switch off the headlamps (U.S. vehicles only):
X In the control system, set daytime running lamp mode to
manual
(Y page 134).
X Switch off the headlamps using the exterior lamp switch
(Y page 97). b Low Beam
Left
or
Low Beam
Right The left or right low-beam lamp is malfunctioning.
X
Halogen headlamp:
Replace the bulb as soon as possible
(Y page 312).
X Bi-Xenon headlamp: Contact an authorized Mercedes-
Benz Center as soon as possible. b Foglamp
Rear Left The rear fog lamp is malfunctioning.
X
Replace the bulb as soon as possible (Y page 312). 296
Vehicle status messages in the multifunction display
Practical hints
251_AKB; 4; 52, en-US
d2ureepe,
Version: 2.11.8.1 2009-03-23T09:22:52+01:00 - Seite 296
Page 299 of 364
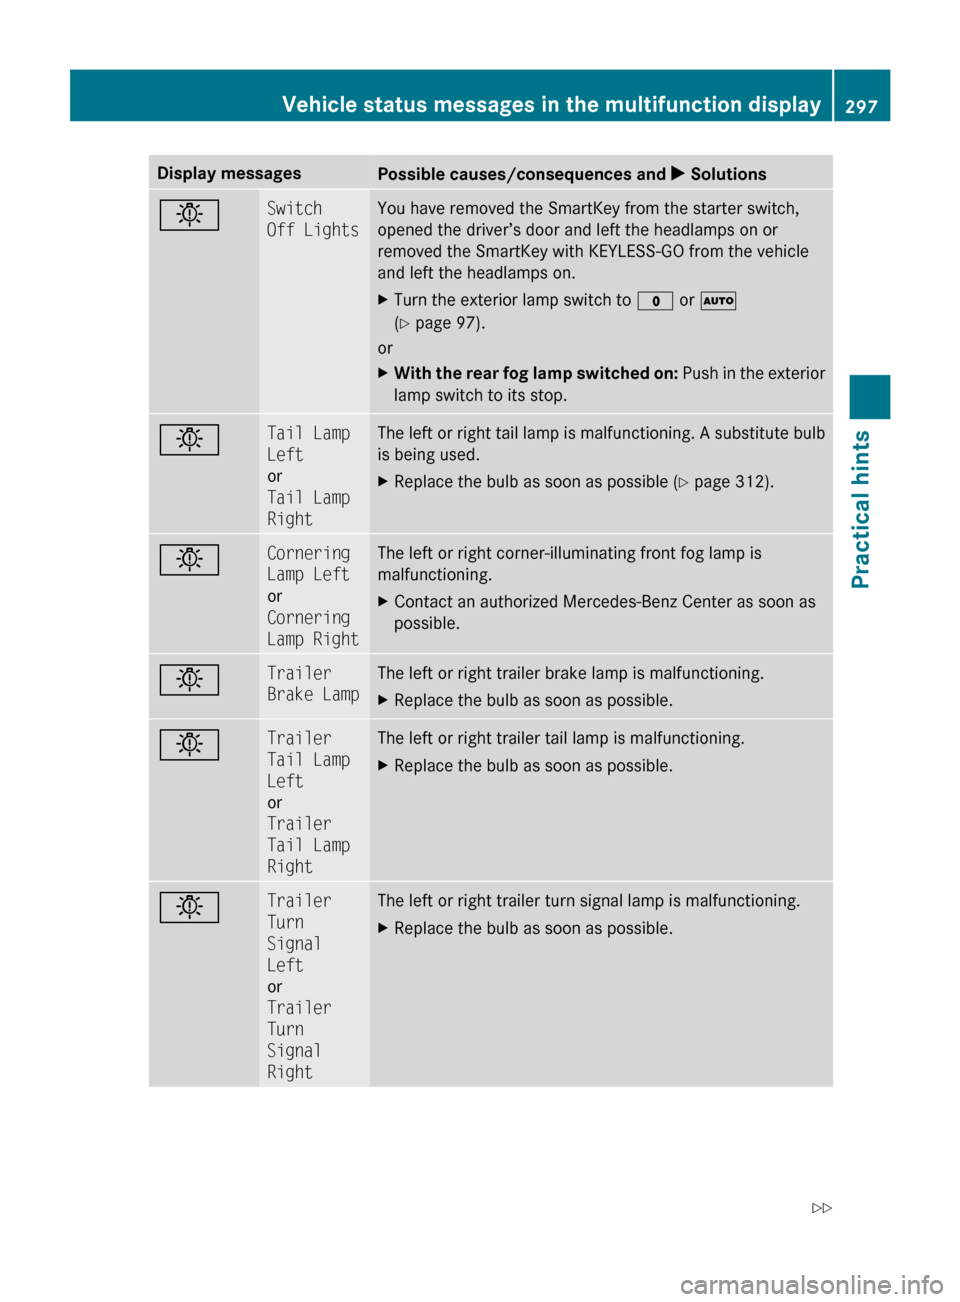
Display messages
Possible causes/consequences and
X Solutionsb Switch
Off Lights You have removed the SmartKey from the starter switch,
opened the driver’s door and left the headlamps on or
removed the SmartKey with KEYLESS-GO from the vehicle
and left the headlamps on.
X
Turn the exterior lamp switch to $ or Ã
(Y page 97).
or
X With the rear fog lamp switched on: Push in the exterior
lamp switch to its stop. b Tail Lamp
Left
or
Tail Lamp
Right The left or right tail lamp is malfunctioning. A substitute bulb
is being used.
X
Replace the bulb as soon as possible (Y page 312). b Cornering
Lamp Left
or
Cornering
Lamp Right The left or right corner-illuminating front fog lamp is
malfunctioning.
X
Contact an authorized Mercedes-Benz Center as soon as
possible. b Trailer
Brake Lamp The left or right trailer brake lamp is malfunctioning.
X
Replace the bulb as soon as possible. b Trailer
Tail Lamp
Left
or
Trailer
Tail Lamp
Right The left or right trailer tail lamp is malfunctioning.
X
Replace the bulb as soon as possible. b Trailer
Turn
Signal
Left
or
Trailer
Turn
Signal
Right The left or right trailer turn signal lamp is malfunctioning.
X
Replace the bulb as soon as possible. Vehicle status messages in the multifunction display
297
Practical hints
251_AKB; 4; 52, en-US
d2ureepe,Version: 2.11.8.1 2009-03-23T09:22:52+01:00 - Seite 297 Z
Page 301 of 364
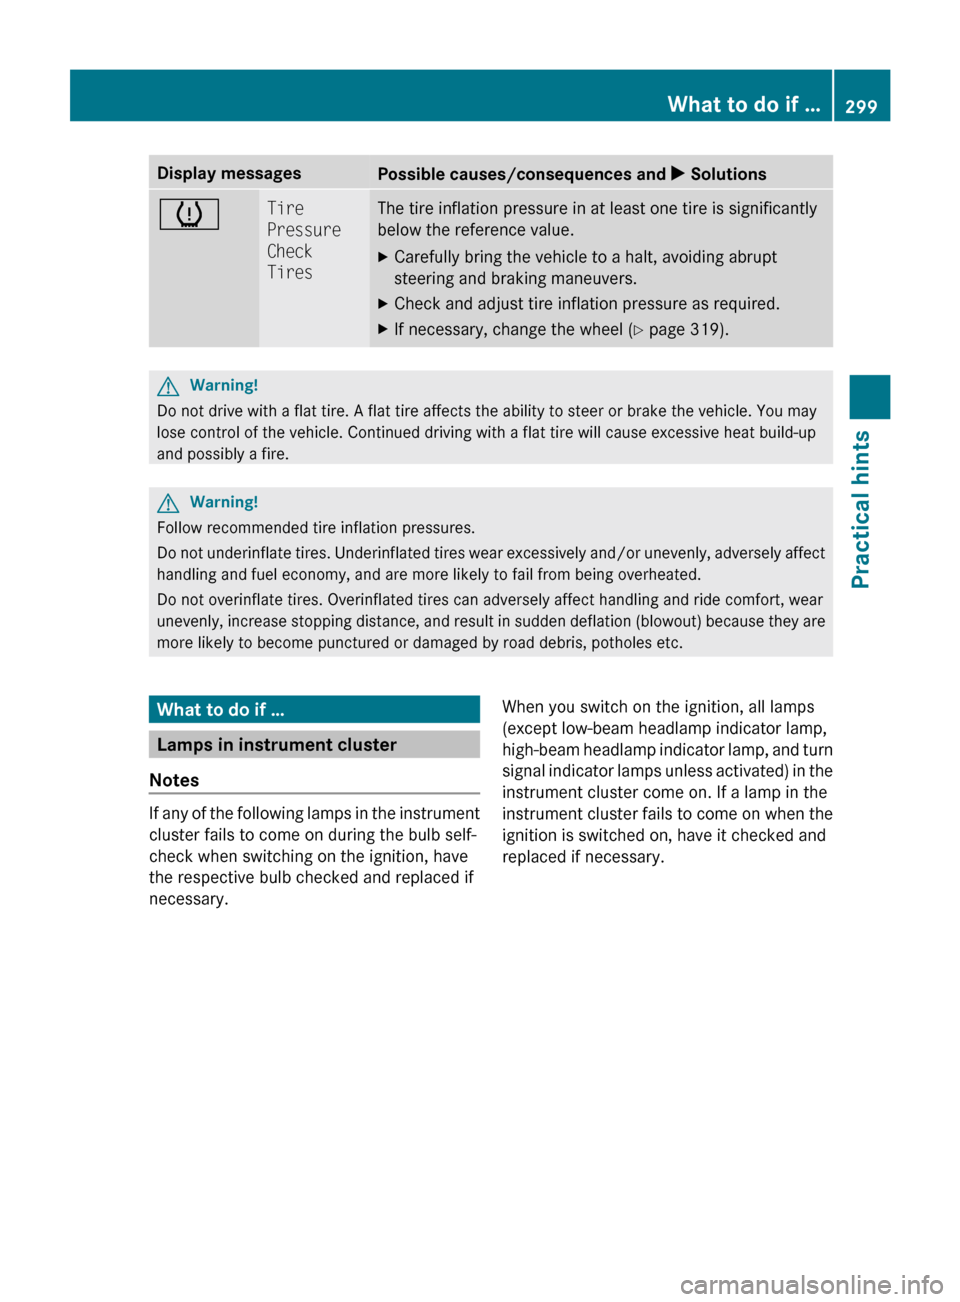
Display messages
Possible causes/consequences and
X Solutionsh Tire
Pressure
Check
Tires The tire inflation pressure in at least one tire is significantly
below the reference value.
X
Carefully bring the vehicle to a halt, avoiding abrupt
steering and braking maneuvers.
X Check and adjust tire inflation pressure as required.
X If necessary, change the wheel (Y page 319). G
Warning!
Do not drive with a flat tire. A flat tire affects the ability to steer or brake the vehicle. You may
lose control of the vehicle. Continued driving with a flat tire will cause excessive heat build-up
and possibly a fire. G
Warning!
Follow recommended tire inflation pressures.
Do not underinflate tires. Underinflated tires wear excessively and/or unevenly, adversely affect
handling and fuel economy, and are more likely to fail from being overheated.
Do not overinflate tires. Overinflated tires can adversely affect handling and ride comfort, wear
unevenly, increase stopping distance, and result in sudden deflation (blowout) because they are
more likely to become punctured or damaged by road debris, potholes etc. What to do if …
Lamps in instrument cluster
Notes If any of the following lamps in the instrument
cluster fails to come on during the bulb self-
check when switching on the ignition, have
the respective bulb checked and replaced if
necessary.
When you switch on the ignition, all lamps
(except low-beam headlamp indicator lamp,
high-beam
headlamp indicator lamp, and turn
signal indicator lamps unless activated) in the
instrument cluster come on. If a lamp in the
instrument cluster fails to come on when the
ignition is switched on, have it checked and
replaced if necessary. What to do if …
299
Practical hints
251_AKB; 4; 52, en-US
d2ureepe, Version: 2.11.8.1 2009-03-23T09:22:52+01:00 - Seite 299 Z
Page 314 of 364
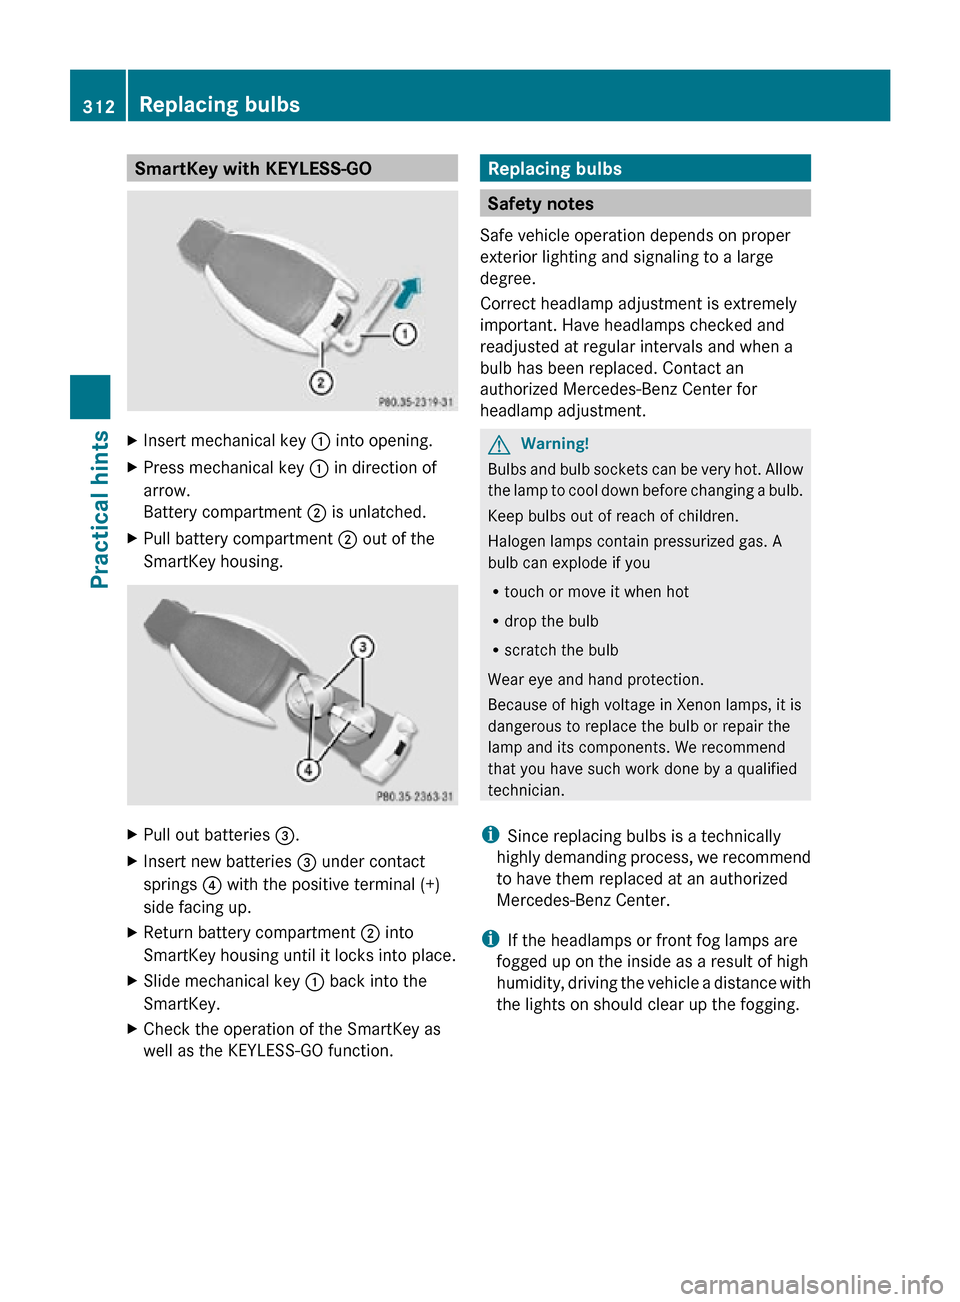
SmartKey with KEYLESS-GO
X
Insert mechanical key : into opening.
X Press mechanical key : in direction of
arrow.
Battery compartment ; is unlatched.
X Pull battery compartment ; out of the
SmartKey housing. X
Pull out batteries =.
X Insert new batteries = under contact
springs ? with the positive terminal (+)
side facing up.
X Return battery compartment ; into
SmartKey housing until it locks into place.
X Slide mechanical key : back into the
SmartKey.
X Check the operation of the SmartKey as
well as the KEYLESS-GO function. Replacing bulbs
Safety notes
Safe vehicle operation depends on proper
exterior lighting and signaling to a large
degree.
Correct headlamp adjustment is extremely
important. Have headlamps checked and
readjusted at regular intervals and when a
bulb has been replaced. Contact an
authorized Mercedes-Benz Center for
headlamp adjustment. G
Warning!
Bulbs and bulb sockets can be very hot. Allow
the lamp to cool down before changing a bulb.
Keep bulbs out of reach of children.
Halogen lamps contain pressurized gas. A
bulb can explode if you
R touch or move it when hot
R drop the bulb
R scratch the bulb
Wear eye and hand protection.
Because of high voltage in Xenon lamps, it is
dangerous to replace the bulb or repair the
lamp and its components. We recommend
that you have such work done by a qualified
technician.
i Since replacing bulbs is a technically
highly demanding process, we recommend
to have them replaced at an authorized
Mercedes-Benz Center.
i If the headlamps or front fog lamps are
fogged up on the inside as a result of high
humidity, driving the vehicle a distance with
the lights on should clear up the fogging. 312
Replacing bulbsPractical hints
251_AKB; 4; 52, en-US
d2ureepe,
Version: 2.11.8.1 2009-03-23T09:22:52+01:00 - Seite 312