2010 MERCEDES-BENZ R320 display
[x] Cancel search: displayPage 21 of 364
Parking brake ................................
286
Parktronic system ..........................159
Seat belt telltale ............................ 302
Warranty coverage ............................
344
Washer and headlamp cleaning
system ................................................ 357
Washer fluid
Messages in the multifunction
display ........................................... 290
Mixing ratio .................................... 357
Refilling .......................................... 226
Washing the vehicle .......................... 262
Wear pattern (tires) ..........................243
Weights (vehicle) see Vehicle specification
Wheel
Changing ....................................... 319
Removing ....................................... 327
Spare ............................................. 319
Tightening torque ........................... 330
Wheels, sizes ..................................... 347
Wheels, Tires and .............................. 227
Window curtain air bags ..................... 41
Windows see Power windows
Windows, cleaning ............................266
Windshield Cleaning wiper blades .................... 266
Infrared reflecting ..........................217
Washer fluid ................................... 357
Wipers ........................................... 104
Windshield wipers
Replacing wiper blades .................. 317
Winter cover .............................. 224, 251
Winter driving Instructions .................................... 252
Radiator cover ............................... 251
Snow chains .................................. 252
Tires ............................................... 251
Winter tires ................................ 251, 347
Wood trims, cleaning ........................ 268 Index
19 251_AKB; 4; 52, en-US
d2ureepe,
Version: 2.11.8.1 2009-03-23T09:22:52+01:00 - Seite 19
Page 31 of 364
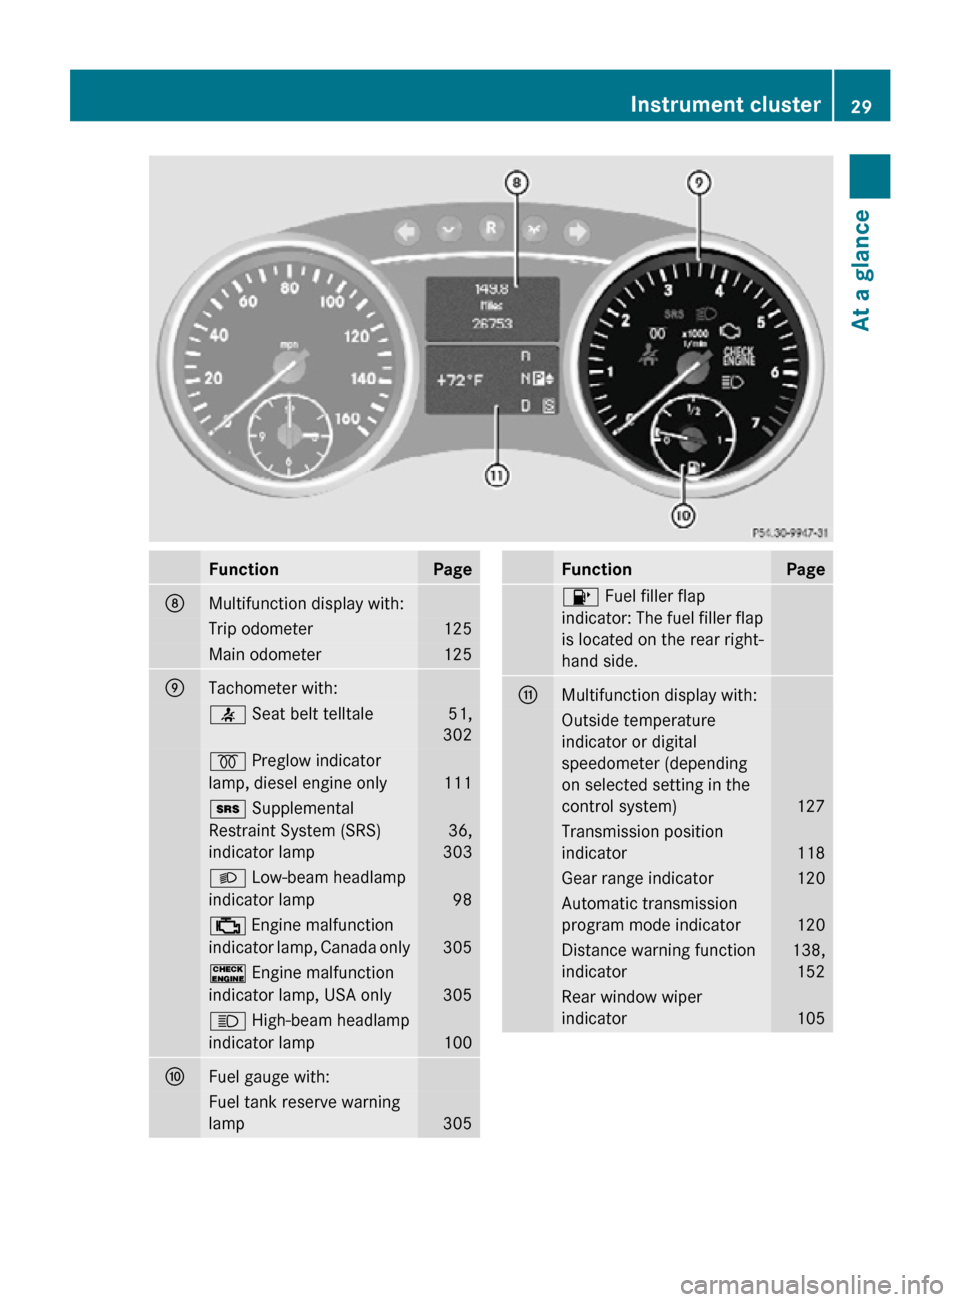
Function Page
D
Multifunction display with:
Trip odometer 125
Main odometer 125
E
Tachometer with:
7 Seat belt telltale 51,
302 % Preglow indicator
lamp, diesel engine only
111
+ Supplemental
Restraint System (SRS)
indicator lamp
36,
303 L Low-beam headlamp
indicator lamp
98
; Engine malfunction
indicator lamp, Canada only
305
! Engine malfunction
indicator lamp, USA only
305
K High-beam headlamp
indicator lamp
100
F
Fuel gauge with:
Fuel tank reserve warning
lamp
305 Function Page
8 Fuel filler flap
indicator: The fuel filler flap
is located on the rear right-
hand side.
G
Multifunction display with:
Outside temperature
indicator or digital
speedometer (depending
on selected setting in the
control system)
127
Transmission position
indicator
118
Gear range indicator 120
Automatic transmission
program mode indicator
120
Distance warning function
indicator 138,
152 Rear window wiper
indicator
105Instrument cluster
29At a glance
251_AKB; 4; 52, en-US
d2ureepe, Version: 2.11.8.1 2009-03-23T09:22:52+01:00 - Seite 29 Z
Page 32 of 364
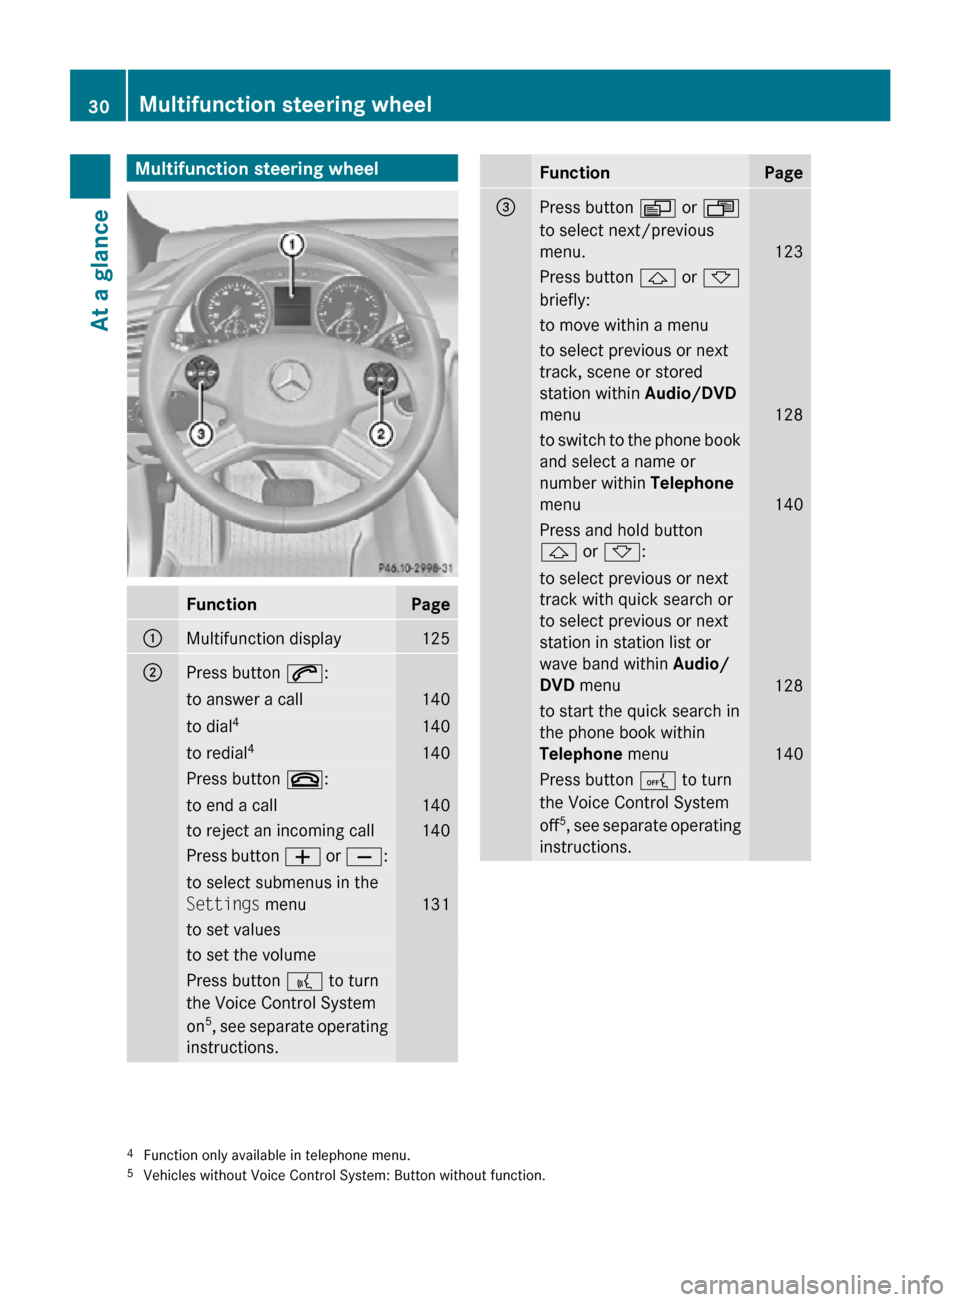
Multifunction steering wheel
Function Page
:
Multifunction display 125
;
Press button 6:
to answer a call 140
to dial
4 140
to redial
4 140
Press button ~:
to end a call 140
to reject an incoming call 140
Press button
W or X: to select submenus in the
Settings menu
131
to set values
to set the volume
Press button ? to turn
the Voice Control System
on 5
, see separate operating
instructions. Function Page
=
Press button V or U
to select next/previous
menu. 123
Press button & or *
briefly: to move within a menu
to select previous or next
track, scene or stored
station within Audio/DVD
menu
128
to switch to the phone book
and select a name or
number within Telephone
menu
140
Press and hold button
& or *:
to select previous or next
track with quick search or
to select previous or next
station in station list or
wave band within
Audio/
DVD menu 128
to start the quick search in
the phone book within
Telephone
menu 140
Press button A to turn
the Voice Control System
off 5
, see separate operating
instructions. 4
Function only available in telephone menu.
5 Vehicles without Voice Control System: Button without function. 30
Multifunction steering wheelAt a glance
251_AKB; 4; 52, en-US
d2ureepe,
Version: 2.11.8.1 2009-03-23T09:22:52+01:00 - Seite 30
Page 45 of 364
When the OCS senses that the front
passenger seat occupant is classified as
being heavier than the weight of a typical
12-month-old
child seated in a standard child
restraint or as being a small individual (such
as a young teenager or a small adult), the
42 indicator lamp will illuminate
for approximately 6 seconds when the engine
is started and then, depending on occupant
weight sensor readings from the seat, remain
illuminated or go out. With the
42 indicator lamp illuminated,
the front passenger front air bag is
deactivated. With the 42
indicator lamp out, the front passenger front
air bag is activated.
When the OCS senses that the front
passenger seat occupant is classified as an
adult or someone larger than a small
individual, the 42 indicator lamp
will illuminate for approximately 6 seconds
when the engine is started and then go out,
indicating that the front passenger front air
bag is activated.
If the 42 indicator lamp is
illuminated, the front passenger front air bag
is deactivated and will not be deployed.
If the 42 indicator lamp is not
illuminated, the front passenger front air bag
is activated and will be deployed
R in the event of certain frontal impacts
R if impact exceeds a preset deployment
threshold
R independently of the side impact air bags
If the front passenger front air bag is
deployed, the rate of inflation will be
influenced by
R the rate of relevant vehicle deceleration as
assessed by the air bag control unit
R the front passenger’s weight category as
identified by the OCS For more information on air bag display
messages in the multifunction display, see
(Y page 277). G
Warning!
According to accident statistics, children are
safer when properly restrained in the rear
seating positions than in the front seating
position. Thus, we strongly recommend that
children
be placed in the rear seats whenever
possible. Regardless of seating position,
children 12 years old and under must be
seated and properly secured in an appropriate
infant restraint, toddler restraint, or booster
seat recommended for the size and weight of
the child.
The infant or child restraint must be properly
secured with the vehicle’s seat belt, the seat
belt and top tether strap, or lower anchors and
top tether strap, fully in accordance with the
child seat manufacturer’s instructions.
Occupants, especially children, should always
sit as upright as possible, wear the seat belt
properly and use an appropriately sized infant
restraint, toddler restraint, or booster seat
recommended for the size and weight of the
child.
Children can be killed or seriously injured by
an inflating air bag. Note the following
important information when circumstances
require you to place a child in the front
passenger seat:
R Your vehicle is equipped with air bag
technology designed to deactivate the front
passenger front air bag in your vehicle
when the system senses the weight of a
typical 12-month-old child or less along
with the weight of a standard appropriate
child restraint on the front passenger seat.
R A child in a rear-facing child restraint on the
front passenger seat will be seriously
injured or even killed if the front passenger
front air bag inflates in a collision which
could occur under some circumstances,
even with the air bag technology installed
in your vehicle. The only means to Occupant safety
43
Safety and security
251_AKB; 4; 52, en-US
d2ureepe, Version: 2.11.8.1 2009-03-23T09:22:52+01:00 - Seite 43 Z
Page 56 of 364
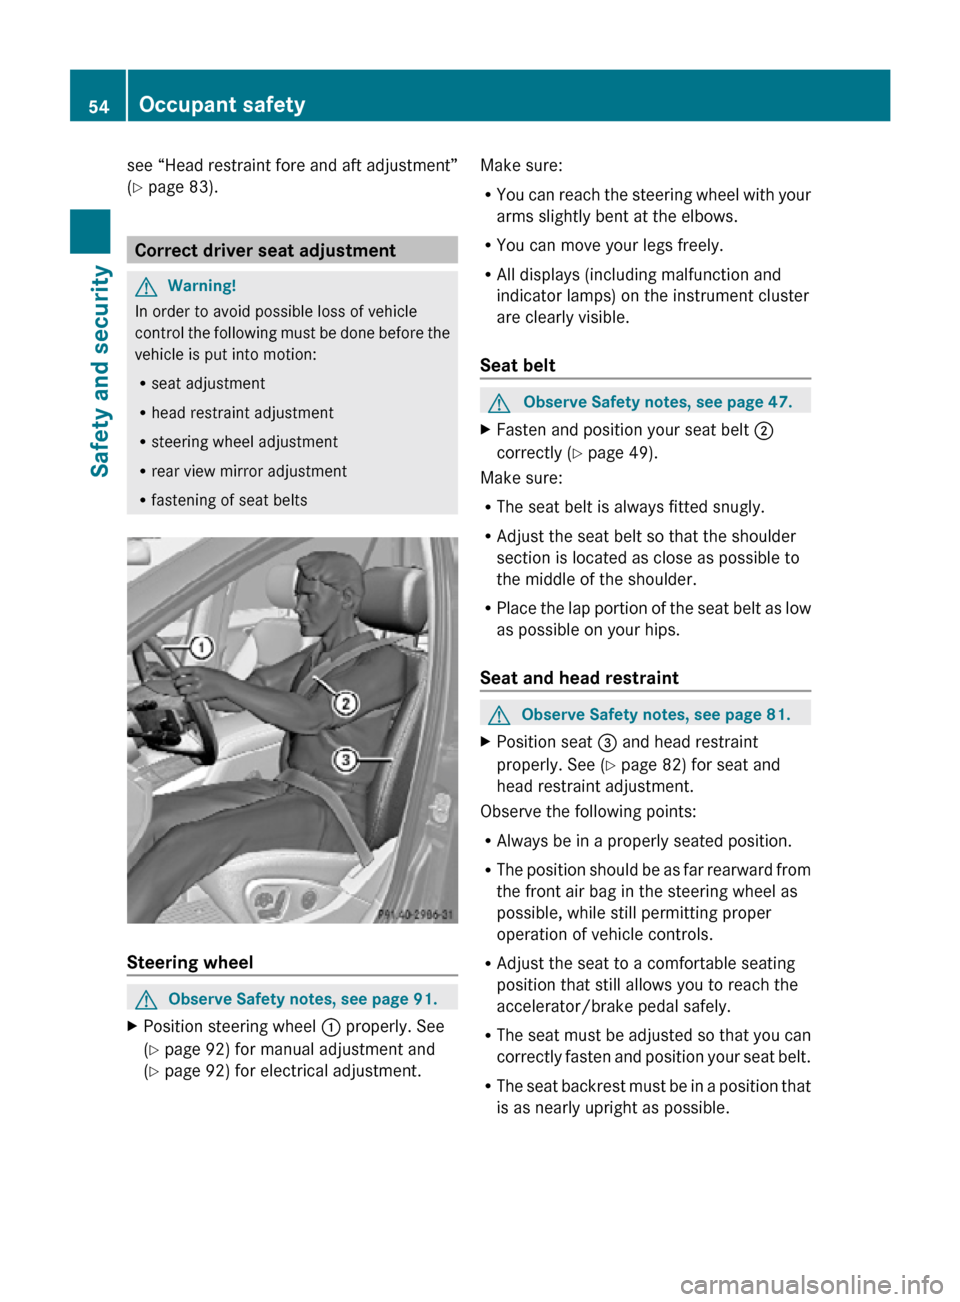
see “Head restraint fore and aft adjustment”
(Y page 83).
Correct driver seat adjustment
G
Warning!
In order to avoid possible loss of vehicle
control the following must be done before the
vehicle is put into motion:
R seat adjustment
R head restraint adjustment
R steering wheel adjustment
R rear view mirror adjustment
R fastening of seat belts Steering wheel
G
Observe Safety notes, see page 91.
X Position steering wheel : properly. See
(Y page 92) for manual adjustment and
(Y page 92) for electrical adjustment. Make sure:
R
You can reach the steering wheel with your
arms slightly bent at the elbows.
R You can move your legs freely.
R All displays (including malfunction and
indicator lamps) on the instrument cluster
are clearly visible.
Seat belt G
Observe Safety notes, see page 47.
X Fasten and position your seat belt ;
correctly (Y page 49).
Make sure:
R The seat belt is always fitted snugly.
R Adjust the seat belt so that the shoulder
section is located as close as possible to
the middle of the shoulder.
R Place the lap portion of the seat belt as low
as possible on your hips.
Seat and head restraint G
Observe Safety notes, see page 81.
X Position seat = and head restraint
properly. See ( Y page 82) for seat and
head restraint adjustment.
Observe the following points:
R Always be in a properly seated position.
R The position should be as far rearward from
the front air bag in the steering wheel as
possible, while still permitting proper
operation of vehicle controls.
R Adjust the seat to a comfortable seating
position that still allows you to reach the
accelerator/brake pedal safely.
R The seat must be adjusted so that you can
correctly fasten and position your seat belt.
R The seat backrest must be in a position that
is as nearly upright as possible. 54
Occupant safetySafety and security
251_AKB; 4; 52, en-US
d2ureepe,
Version: 2.11.8.1 2009-03-23T09:22:52+01:00 - Seite 54
Page 65 of 364
i
USA only:
This device complies with Part 15 of the
FCC Rules. Operation is subject to the
following two conditions:
1.
This device may not cause harmfulinterference, and
2. this device must accept any interference received, including
interference that may cause undesired
operation.
Any unauthorized modification to this
device could void the user’s authority to
operate the equipment.
i Canada only:
This device complies with RSS-210 of
Industry Canada. Operation is subject to
the following two conditions:
1. This device may not cause interference, and
2. this device must accept any interference received, including
interference that may cause undesired
operation of the device.
Any unauthorized modification to this
device could void the user’s authority to
operate the equipment. Driving safety systems
Introduction
This section contains information about the
following driving safety systems:
R ABS ( Antilock Brake System)
R BAS ( Brake Assist System)
R EBP ( Electronic Brake Proportioning)
R ESP ®
( Electronic Stability Program)
i In winter operation, the maximum
effectiveness of most of the driving
systems described in this section is only achieved with winter tires, or snow chains
as required.
Safety notes G
Warning!
The following factors increase the risk of
accidents:
R Excessive speed, especially in turns
R Wet and slippery road surfaces
R Following another vehicle too closely
The driving safety systems described in this
section cannot reduce these risks or prevent
the
natural laws of physics from acting on the
vehicle. They cannot increase braking or
steering efficiency beyond that afforded by
the condition of the vehicle brakes and tires
or the traction afforded.
Only a safe, attentive, and skillful driver can
prevent accidents.
The capabilities of a vehicle equipped with the
driving safety systems described in this
section must never be exploited in a reckless
or dangerous manner which could jeopardize
the user’s safety or the safety of others.
Always adjust your driving style to the
prevailing road and weather conditions and
keep a safe distance to other road users and
objects on the street.
If a driving system malfunctions, other driving
safety systems may also switch off. Observe
indicator and warning lamps that may come
on as well as messages in the multifunction
display that may appear. ABS
G
Observe Safety notes, see page 63. G
Warning!
Do not pump the brake pedal. Use firm, steady
brake pedal pressure instead. Pumping the
brake pedal defeats the purpose of the ABS Driving safety systems
63
Safety and security
251_AKB; 4; 52, en-US
d2ureepe, Version: 2.11.8.1 2009-03-23T09:22:52+01:00 - Seite 63 Z
Page 66 of 364
and significantly reduces braking
effectiveness.
The Antilock Brake System (ABS) regulates
the
brake pressure so that the wheels do not
lock during braking. This allows you to
maintain the ability to steer your vehicle.
The ABS is functional above a speed of
approximately 5 mph (8 km/h) independent
of road surface conditions.
On slippery road surfaces, the ABS will
respond even to light brake pressure.
The ABS indicator lamp ! indicator lamp
in the instrument cluster comes on when you
switch on the ignition. It goes out when the
engine is running.
Braking At the instant one of the wheels is about to
lock up, a slight pulsation can be felt in the
brake pedal. The pulsation indicates that the
ABS is in the regulating mode.
X
Keep firm and steady pressure on the brake
pedal while you feel the pulsation.
Continuous, steady brake pedal pressure
yields the advantages provided by the ABS,
namely
braking power and the ability to steer
the vehicle.
The pulsating brake pedal can be an
indication of hazardous road conditions and
functions as a reminder to take extra care
while driving.
Emergency brake maneuver X
Keep continuous full pressure on the brake
pedal. G
Warning!
If the ABS malfunctions, other driving safety
systems
such as the BAS or the ESP ®
are also
switched off. Observe indicator and warning
lamps that may come on as well as messages
in the multifunction display that may appear. If the ABS malfunctions, the wheels may lock
during hard braking, reducing steering
capability
and extending the braking distance. BAS
G
Observe Safety notes, see page 63.
The Brake Assist System (BAS) operates in
emergency
situations. If you apply the brakes
very quickly, the BAS provides full brake
boost automatically, thereby potentially
reducing the braking distance.
X Apply continuous full braking pressure until
the emergency braking situation is over.
The ABS will prevent the wheels from
locking.
When you release the brake pedal, the brakes
function again as normal. The BAS is then
deactivated. G
Warning!
If the BAS malfunctions, the brake system still
functions, but without the additional brake
boost available that the BAS would normally
provide in an emergency braking maneuver.
Therefore,
the braking distance may increase. EBP
G
Observe Safety notes, see page 63.
The Electronic Brake Proportioning (EBP)
enhances braking effectiveness by allowing
the
rear brakes to supply a greater proportion
of the braking effort in straight-line braking
without a loss of vehicle stability. G
Warning!
If the EBP malfunctions, the brake system will
still function with full brake boost. However,
the rear wheels could lock up during
emergency braking situations, for example.
You could lose control of the vehicle and
cause an accident.
Adapt your driving style to the changed
driving characteristics. 64
Driving safety systems
Safety and security
251_AKB; 4; 52, en-US
d2ureepe,
Version: 2.11.8.1 2009-03-23T09:22:52+01:00 - Seite 64
Page 74 of 364

Important notes on using KEYLESS-GO
R
You can also use the SmartKey with
KEYLESS-GO like a normal SmartKey
(Y page 70).
R You can combine KEYLESS-GO functions
with normal SmartKey functions (e.g.
unlocking with KEYLESS-GO and locking
with button &).
R Always carry the SmartKey with you.
R Never store the SmartKey together with:
-Electronic
items such as a mobile phone
or another SmartKey
- Metallic objects such as coins or metal
foil
Doing so could impair the function of the
KEYLESS-GO system.
R To lock or unlock the vehicle, the SmartKey
must be located outside the vehicle within
approximately 3 ft (1 m) of a door or the
tailgate.
R When the vehicle has been parked for more
than 72 hours, the KEYLESS-GO function is
deactivated. Pull an outside door handle
and switch on the ignition once to activate
the KEYLESS-GO function.
R If the SmartKey is positioned farther away
from the vehicle, the system may no longer
recognize the SmartKey. The vehicle
cannot be locked or the engine started via
the KEYLESS-GO system.
R If the SmartKey is removed from the vehicle
(e.g. if a passenger exits the vehicle with
the SmartKey)
-when pressing the KEYLESS-GO start/
stop button or trying to lock the vehicle
with the lock button on an outside door
handle the message Key Not
Detected appears in the multifunction
display
- with the engine running, the red message
Key Not Detected appears in the
multifunction display while driving off Find the SmartKey or change its present
location immediately (e.g. place it on the
front passenger seat or insert it in shirt
pocket).
R If you have started the engine with the
KEYLESS-GO start/stop button, you can
turn it off again by
-pressing the KEYLESS-GO start/stop
button
- inserting the SmartKey into the starter
switch
when the vehicle is at a standstill
and the automatic transmission is in park
position P
R The vehicle could be inadvertently
unlocked if the SmartKey is within 3 ft (1 m)
of the vehicle and
-an outside door handle is splashed with
water
or
- you attempt to clean an outside door
handle
R Remember that the engine can be started
by anyone with a SmartKey that is left
inside the vehicle.
Possibility 1 (One SmartKey in the vehicle,
one SmartKey outside the vehicle):
If you leave the SmartKey behind when
exiting and locking the vehicle, no message
appears in the multifunction display.
Possibility 2 (One SmartKey in the vehicle,
no SmartKey outside the vehicle):
When exiting and trying to lock the vehicle,
the message Key Detected In Vehicle
appears in the multifunction display. The
vehicle will not be locked.
Factory setting X
Global unlocking: Grasp an outside door
handle. 72
Locking and unlocking
Controls in detail
251_AKB; 4; 52, en-US
d2ureepe,
Version: 2.11.8.1 2009-03-23T09:22:52+01:00 - Seite 72