2010 MERCEDES-BENZ R320 turn signal
[x] Cancel search: turn signalPage 79 of 364
Closing the tailgate from the outside
G
Observe Safety notes, see page 55. G
Warning!
Monitor the closing procedure carefully to
make sure no one is in danger of being
injured. To prevent possible personal injury,
always keep hands and fingers away from the
cargo compartment opening when closing the
tailgate. Be especially careful when small
children are around. To stop the closing
procedure, do one of the following:
R Press or pull the remote tailgate opening/
closing switch on the driver’s door.
R Press the tailgate closing switch.
R Press the KEYLESS-GO locking/closing
switch.
R Pull outside handle on the tailgate.
R When no SmartKey is inserted in the starter
switch (vehicles with KEYLESS-GO: Make
sure the vehicle’s on-board electronics
have status 0): Press button F on the
SmartKey.
Do not leave the SmartKey in the vehicle. You
may lock yourself out.
If the vehicle was previously centrally locked
with the SmartKey or KEYLESS-GO, the
tailgate will lock automatically when it is
closed. The turn signal lamps flash three
times to confirm locking. Vehicles without KEYLESS-GO Vehicles with KEYLESS-GO
X
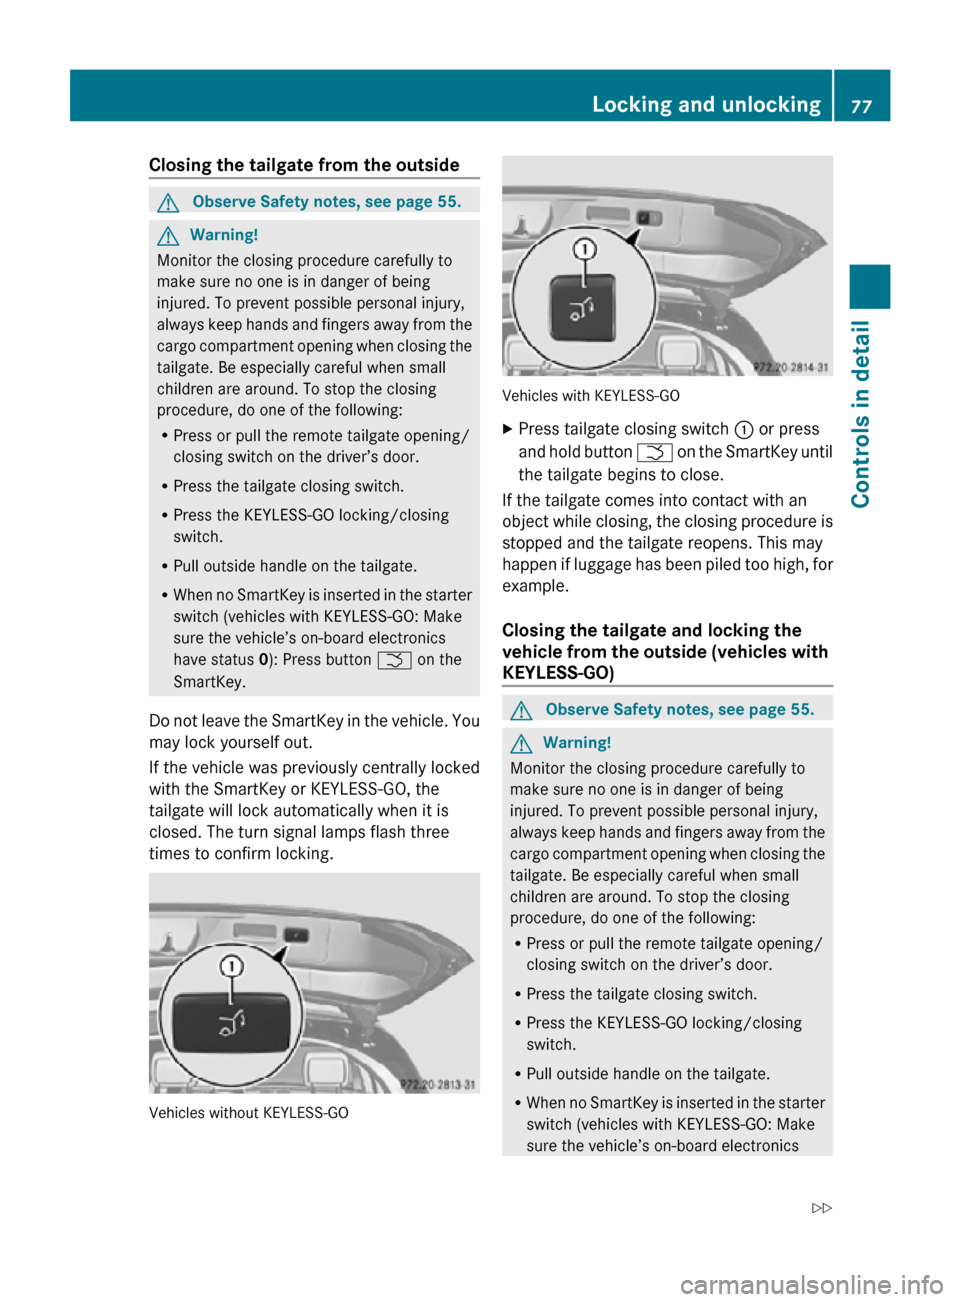
Press tailgate closing switch : or press
and hold button F on the SmartKey until
the tailgate begins to close.
If the tailgate comes into contact with an
object while closing, the closing procedure is
stopped and the tailgate reopens. This may
happen if luggage has been piled too high, for
example.
Closing the tailgate and locking the
vehicle from the outside (vehicles with
KEYLESS-GO) G
Observe Safety notes, see page 55. G
Warning!
Monitor the closing procedure carefully to
make sure no one is in danger of being
injured. To prevent possible personal injury,
always keep hands and fingers away from the
cargo compartment opening when closing the
tailgate. Be especially careful when small
children are around. To stop the closing
procedure, do one of the following:
R Press or pull the remote tailgate opening/
closing switch on the driver’s door.
R Press the tailgate closing switch.
R Press the KEYLESS-GO locking/closing
switch.
R Pull outside handle on the tailgate.
R When no SmartKey is inserted in the starter
switch (vehicles with KEYLESS-GO: Make
sure the vehicle’s on-board electronics Locking and unlocking
77Controls in detail
251_AKB; 4; 52, en-US
d2ureepe, Version: 2.11.8.1 2009-03-23T09:22:52+01:00 - Seite 77 Z
Page 80 of 364
have status 0): Press button
F on the
SmartKey.
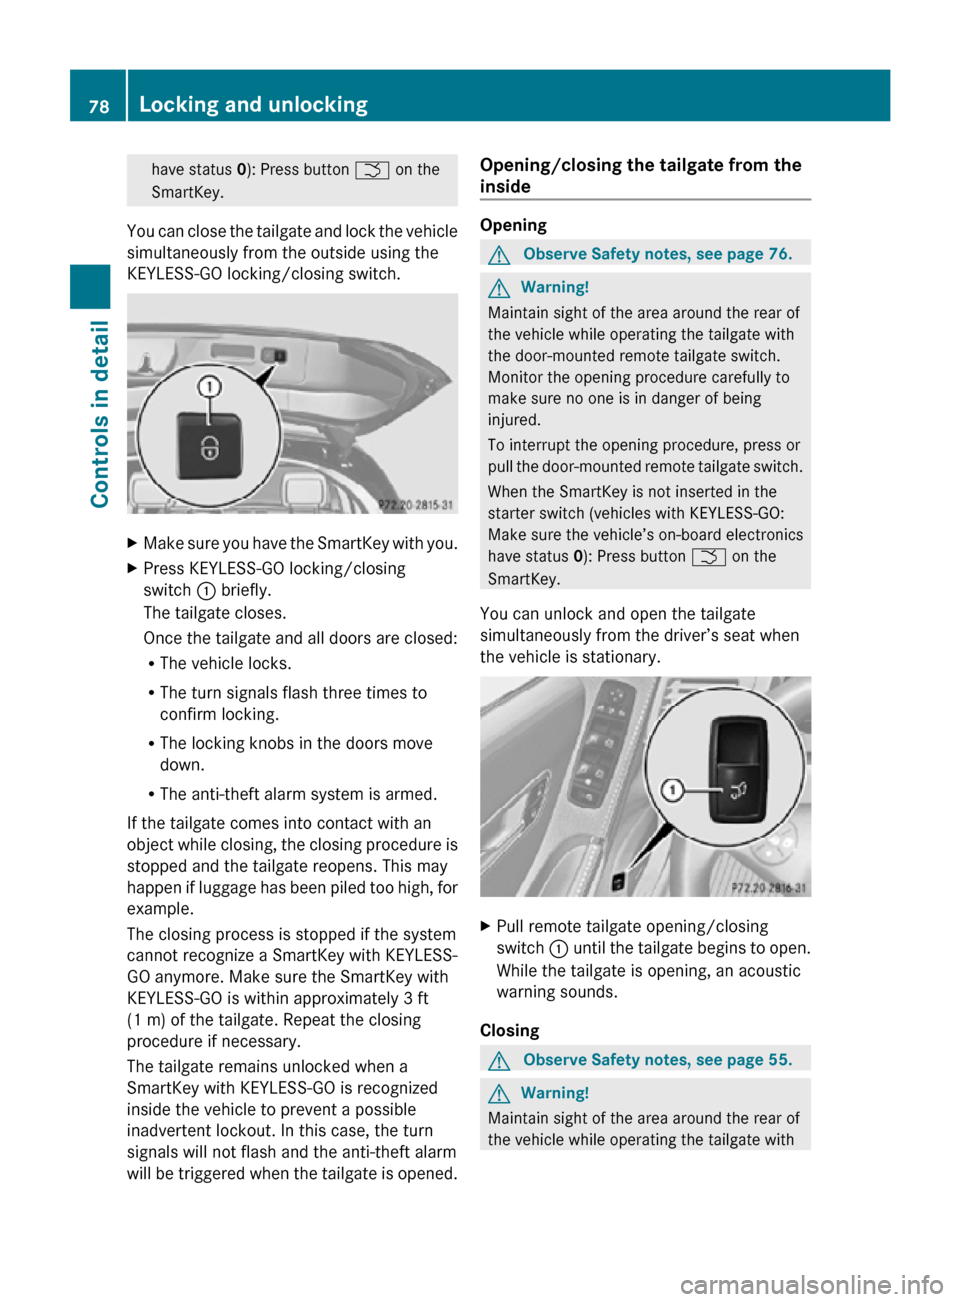
You can close the tailgate and lock the vehicle
simultaneously from the outside using the
KEYLESS-GO locking/closing switch. X
Make sure you have the SmartKey with you.
X Press KEYLESS-GO locking/closing
switch : briefly.
The tailgate closes.
Once the tailgate and all doors are closed:
R
The vehicle locks.
R The turn signals flash three times to
confirm locking.
R The locking knobs in the doors move
down.
R The anti-theft alarm system is armed.
If the tailgate comes into contact with an
object while closing, the closing procedure is
stopped and the tailgate reopens. This may
happen if luggage has been piled too high, for
example.
The closing process is stopped if the system
cannot recognize a SmartKey with KEYLESS-
GO anymore. Make sure the SmartKey with
KEYLESS-GO is within approximately 3 ft
(1 m) of the tailgate. Repeat the closing
procedure if necessary.
The tailgate remains unlocked when a
SmartKey with KEYLESS-GO is recognized
inside the vehicle to prevent a possible
inadvertent lockout. In this case, the turn
signals will not flash and the anti-theft alarm
will be triggered when the tailgate is opened. Opening/closing the tailgate from the
inside Opening
G
Observe Safety notes, see page 76. G
Warning!
Maintain sight of the area around the rear of
the vehicle while operating the tailgate with
the door-mounted remote tailgate switch.
Monitor the opening procedure carefully to
make sure no one is in danger of being
injured.
To interrupt the opening procedure, press or
pull the door-mounted remote tailgate switch.
When the SmartKey is not inserted in the
starter switch (vehicles with KEYLESS-GO:
Make sure the vehicle’s on-board electronics
have status 0): Press button F on the
SmartKey.
You can unlock and open the tailgate
simultaneously from the driver’s seat when
the vehicle is stationary. X
Pull remote tailgate opening/closing
switch : until the tailgate begins to open.
While the tailgate is opening, an acoustic
warning sounds.
Closing G
Observe Safety notes, see page 55. G
Warning!
Maintain sight of the area around the rear of
the vehicle while operating the tailgate with 78
Locking and unlockingControls in detail
251_AKB; 4; 52, en-US
d2ureepe,
Version: 2.11.8.1 2009-03-23T09:22:52+01:00 - Seite 78
Page 81 of 364
the door-mounted remote tailgate switch.
Monitor the closing procedure carefully to
make sure no one is in danger of being
injured.
To interrupt the closing procedure, press or
pull the door-mounted remote tailgate switch.
If the tailgate comes into contact with an
object while closing, the closing procedure is
stopped and the tailgate reopens. This may
happen if luggage has been piled too high, for
example.
X Turn the SmartKey in the starter switch to
position 1 or 2.
X Press remote tailgate opening/closing
switch : until the tailgate begins to close.
While the tailgate is closing an acoustic
warning sounds.
X Interrupting the closing procedure:
Press or pull remote tailgate opening/
closing switch :.
Limiting opening height of tailgate You can limit the opening height of the
tailgate in the upper opening range. This can
be useful, for example, when the space above
the tailgate is not sufficient.
Activating
X
Open the tailgate: Pull on handle
(Y page 75) or press and hold button
F on the SmartKey until the tailgate
opens.
X Stop opening procedure: When the
tailgate is in the desired position, press
tailgate closing switch ( Y page 77) or pull
on handle once more.
X You can also press or pull the remote
tailgate opening/closing switch
(Y page 78) to stop the opening procedure. X
Press and hold the tailgate closing switch
in the tailgate ( Y page 77) until you hear a
short acoustic signal.
The opening height of the tailgate is limited.
The tailgate will now stop at the stored
position when opened.
Deactivating
X Press and hold the tailgate closing switch
in the tailgate ( Y page 77) until you hear
two short, consecutive acoustic signals. Starter switch positions
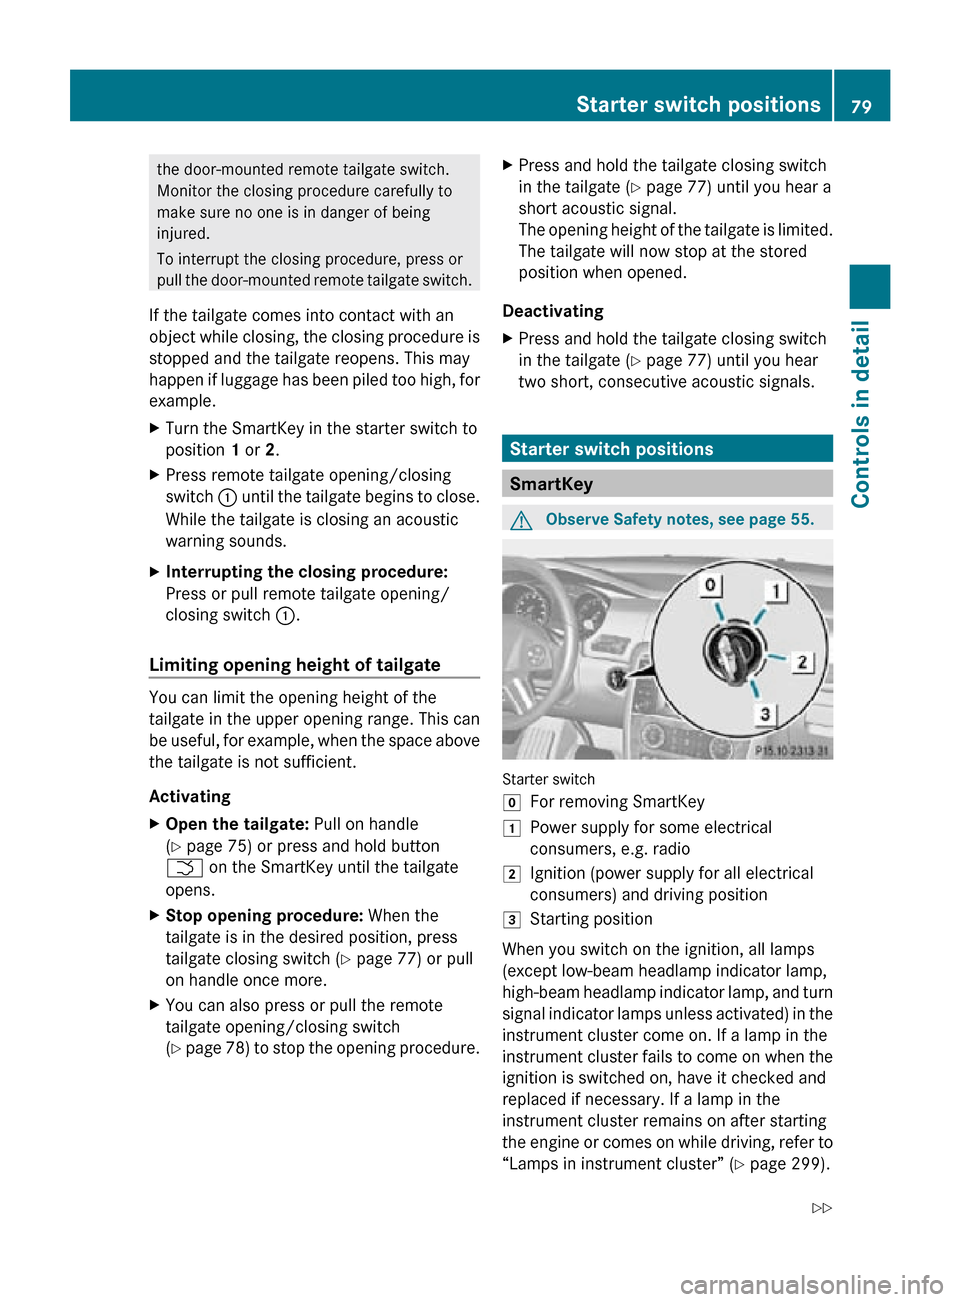
SmartKey
G
Observe Safety notes, see page 55. Starter switch
g
For removing SmartKey
1 Power supply for some electrical
consumers, e.g. radio
2 Ignition (power supply for all electrical
consumers) and driving position
3 Starting position
When you switch on the ignition, all lamps
(except low-beam headlamp indicator lamp,
high-beam headlamp indicator lamp, and turn
signal indicator lamps unless activated) in the
instrument cluster come on. If a lamp in the
instrument cluster fails to come on when the
ignition is switched on, have it checked and
replaced if necessary. If a lamp in the
instrument cluster remains on after starting
the engine or comes on while driving, refer to
“Lamps in instrument cluster” (Y page 299). Starter switch positions
79Controls in detail
251_AKB; 4; 52, en-US
d2ureepe, Version: 2.11.8.1 2009-03-23T09:22:52+01:00 - Seite 79 Z
Page 83 of 364
Position 1
X
Press the KEYLESS-GO start/stop button
once.
This supplies power for some electrical
consumers, such as radio functions.
i If you now press the KEYLESS-GO start/
stop button
R once more, the ignition (position 2) is
switched on
R twice more the power supply is again
switched off
Ignition (or position 2) X
Press the KEYLESS-GO start/stop button
twice.
This supplies power for all electrical
consumers.
All lamps (except low-beam headlamp
indicator lamp, high-beam headlamp
indicator lamp, and turn signal indicator
lamps unless activated) in the instrument
cluster
come on. If a lamp in the instrument
cluster fails to come on when the ignition
is switched on, have it checked and
replaced if necessary. If a lamp in the
instrument cluster remains on after
starting the engine or comes on while
driving, refer to “Lamps in instrument
cluster” ( Y page 299).
i If you now press the KEYLESS-GO start/
stop
button once, the power supply is again
switched off. Seats
Safety notes
G
Warning!
In order to avoid possible loss of vehicle
control
the following must be done before the
vehicle is put into motion:
R seat adjustment
R head restraint adjustment
R steering wheel adjustment
R rear view mirror adjustment
R fastening of seat belts G
Warning!
Do not adjust the driver’s seat while driving.
Adjusting the seat while driving could cause
the driver to lose control of the vehicle.
Never ride in a moving vehicle with the seat
backrest
in an excessively reclined position as
this can be dangerous. You could slide under
the seat belt in a collision. If you slide under
it, the seat belt would apply force at the
abdomen or neck. That could cause serious
or fatal injuries. The seat backrest and seat
belts provide the best restraint when the
wearer is in a position that is as upright as
possible and seat belts are properly
positioned on the body. G
Warning!
Your seat must be adjusted so that you can
correctly fasten your seat belt.
Observe the following points:
R Adjust
the seat backrest until your arms are
slightly angled when holding the steering
wheel.
R Adjust the seat to a comfortable seating
position that still allows you to reach the
accelerator/brake pedal safely. The
position should be as far back as possible
with the driver still able to operate the
controls properly. Seats
81
Controls in detail
251_AKB; 4; 52, en-US
d2ureepe, Version: 2.11.8.1 2009-03-23T09:22:52+01:00 - Seite 81 Z
Page 100 of 364
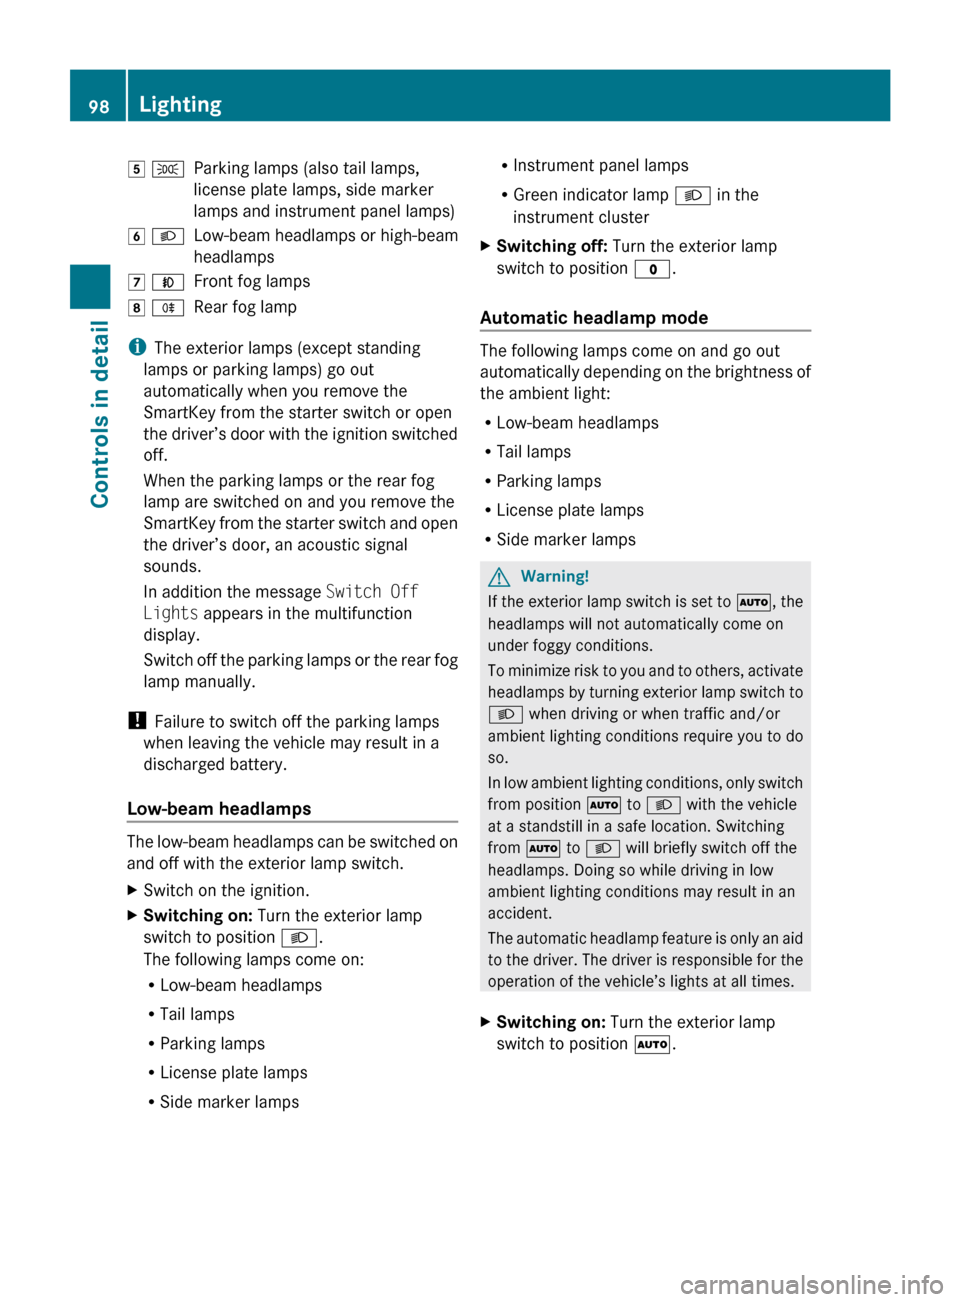
5 T
Parking lamps (also tail lamps,
license plate lamps, side marker
lamps and instrument panel lamps)
6 L Low-beam headlamps or high-beam
headlamps
7 N Front fog lamps
8 R Rear fog lamp
i The exterior lamps (except standing
lamps or parking lamps) go out
automatically when you remove the
SmartKey from the starter switch or open
the
driver’s door with the ignition switched
off.
When the parking lamps or the rear fog
lamp are switched on and you remove the
SmartKey from the starter switch and open
the driver’s door, an acoustic signal
sounds.
In addition the message Switch Off
Lights appears in the multifunction
display.
Switch off the parking lamps or the rear fog
lamp manually.
! Failure to switch off the parking lamps
when leaving the vehicle may result in a
discharged battery.
Low-beam headlamps The low-beam headlamps can be switched on
and off with the exterior lamp switch.
X
Switch on the ignition.
X Switching on: Turn the exterior lamp
switch to position L.
The following lamps come on:
R Low-beam headlamps
R Tail lamps
R Parking lamps
R License plate lamps
R Side marker lamps R
Instrument panel lamps
R Green indicator lamp L in the
instrument cluster
X Switching off: Turn the exterior lamp
switch to position $.
Automatic headlamp mode The following lamps come on and go out
automatically
depending on the brightness of
the ambient light:
R Low-beam headlamps
R Tail lamps
R Parking lamps
R License plate lamps
R Side marker lamps G
Warning!
If the exterior lamp switch is set to Ã, the
headlamps will not automatically come on
under foggy conditions.
To
minimize risk to you and to others, activate
headlamps by turning exterior lamp switch to
L when driving or when traffic and/or
ambient lighting conditions require you to do
so.
In low ambient lighting conditions, only switch
from position à to L with the vehicle
at a standstill in a safe location. Switching
from à to L will briefly switch off the
headlamps. Doing so while driving in low
ambient lighting conditions may result in an
accident.
The automatic headlamp feature is only an aid
to the driver. The driver is responsible for the
operation of the vehicle’s lights at all times.
X Switching on: Turn the exterior lamp
switch to position Ã. 98
Lighting
Controls in detail
251_AKB; 4; 52, en-US
d2ureepe,
Version: 2.11.8.1 2009-03-23T09:22:52+01:00 - Seite 98
Page 102 of 364
G
Warning!
In low ambient lighting or foggy conditions,
only switch from position à to L with
the vehicle at a standstill in a safe location.
Switching from à to L will briefly
switch off the headlamps. Doing so while
driving in low ambient lighting conditions may
result in an accident.
Fog lamps will operate with the parking lamps
and/or the low-beam headlamps on. Fog
lamps should only be used in conjunction with
low-beam headlamps. Consult your State or
Province Motor Vehicle Regulations
regarding permissible lamp operation.
X Switch on the ignition.
X Turn the exterior lamp switch to position
T or L (Y page 97).
X Switching on front fog lamps: Pull out the
exterior lamp switch to first stop.
The green indicator lamp N in the
exterior lamp switch comes on.
X Switching on rear fog lamp: Pull out the
exterior lamp switch to second stop.
The rear fog lamp, the front fog lamps, the
green and the yellow indicator lamp R
in the exterior lamp switch come on.
X Switching off front fog lamps/rear fog
lamp: Push in the exterior lamp switch to
its stop.
Locator lighting and night security
illumination Locator lighting and night security
illumination are described in the “Control
system” section, see “Switching locator
lighting on or off” (Y page 135) and
“Switching night security illumination
(Headlamps delayed shut-off feature) on or
off” (Y page 135). Combination switch
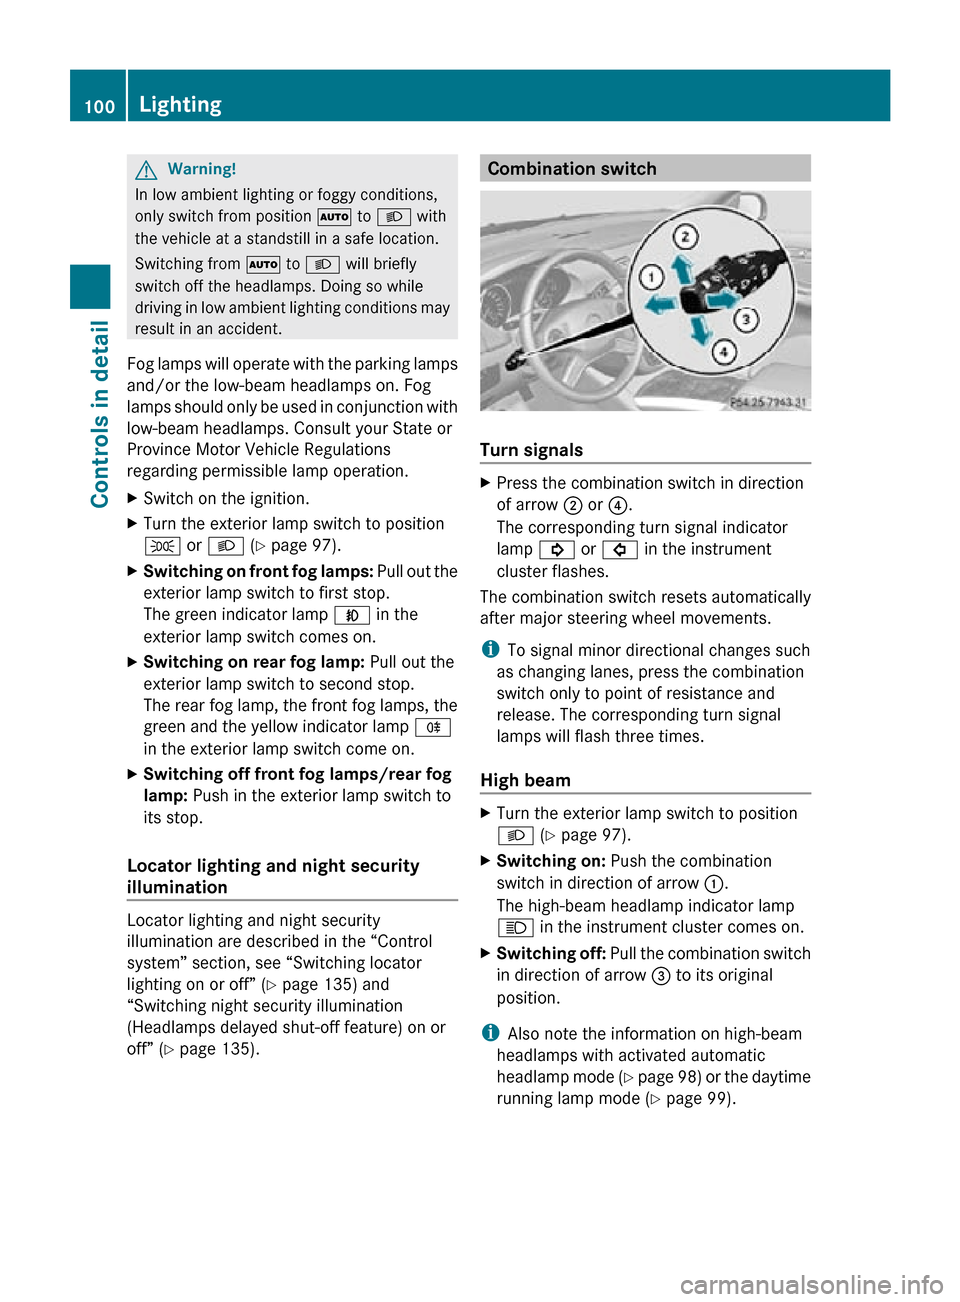
Turn signals
X
Press the combination switch in direction
of arrow ; or ?.
The corresponding turn signal indicator
lamp ! or # in the instrument
cluster flashes.
The combination switch resets automatically
after major steering wheel movements.
i To signal minor directional changes such
as changing lanes, press the combination
switch only to point of resistance and
release. The corresponding turn signal
lamps will flash three times.
High beam X
Turn the exterior lamp switch to position
L (Y page 97).
X Switching on: Push the combination
switch in direction of arrow :.
The high-beam headlamp indicator lamp
K in the instrument cluster comes on.
X Switching off: Pull the combination switch
in direction of arrow = to its original
position.
i Also note the information on high-beam
headlamps with activated automatic
headlamp mode (Y page 98) or the daytime
running lamp mode ( Y page 99).100
LightingControls in detail
251_AKB; 4; 52, en-US
d2ureepe,
Version: 2.11.8.1 2009-03-23T09:22:52+01:00 - Seite 100
Page 103 of 364
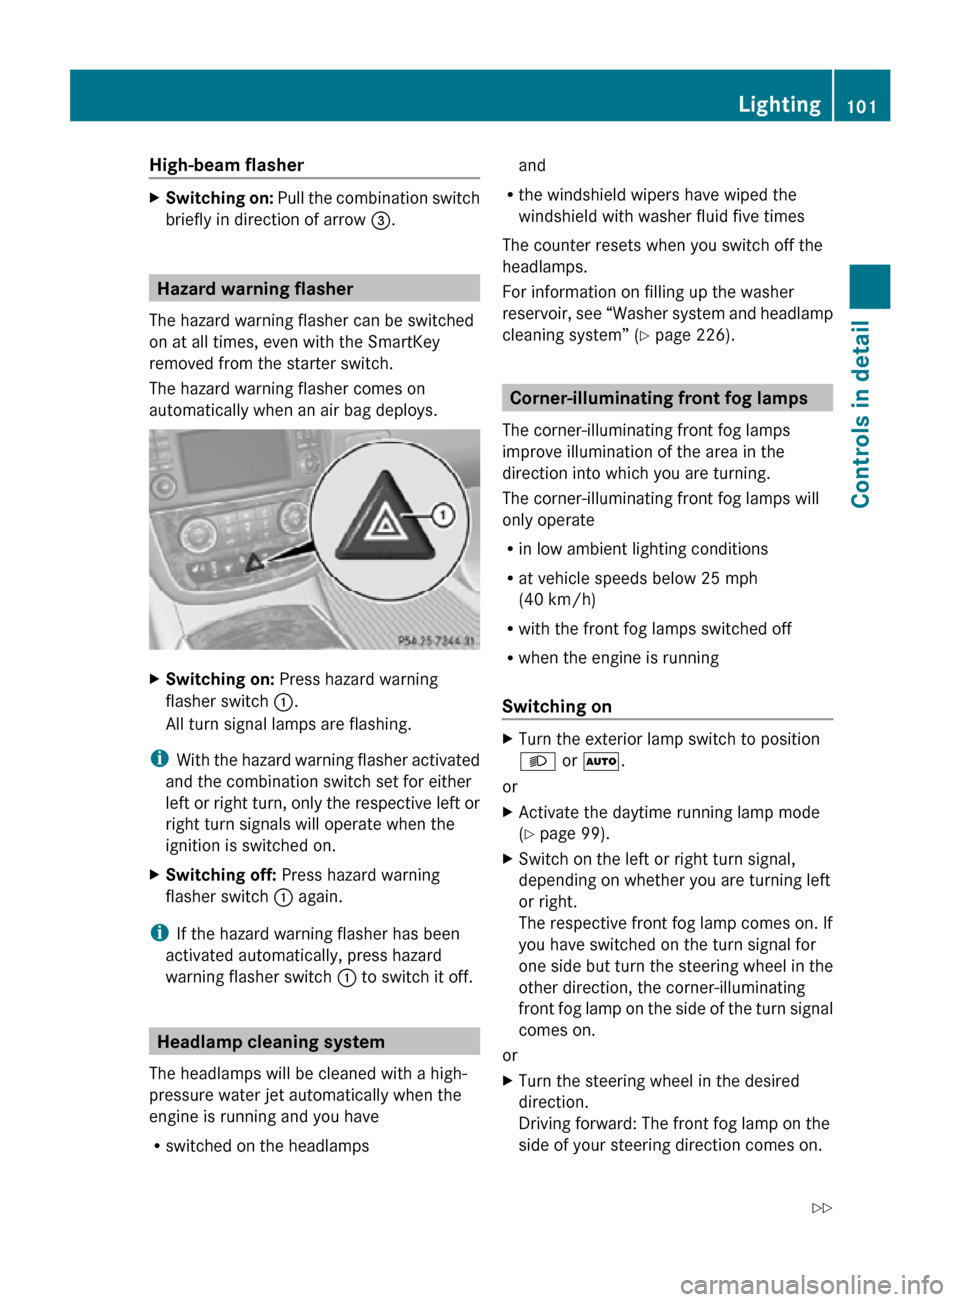
High-beam flasher
X
Switching on: Pull the combination switch
briefly in direction of arrow =.Hazard warning flasher
The hazard warning flasher can be switched
on at all times, even with the SmartKey
removed from the starter switch.
The hazard warning flasher comes on
automatically when an air bag deploys. X
Switching on: Press hazard warning
flasher switch :.
All turn signal lamps are flashing.
i With the hazard warning flasher activated
and the combination switch set for either
left or right turn, only the respective left or
right turn signals will operate when the
ignition is switched on.
X Switching off: Press hazard warning
flasher switch : again.
i If the hazard warning flasher has been
activated automatically, press hazard
warning flasher switch : to switch it off.Headlamp cleaning system
The headlamps will be cleaned with a high-
pressure water jet automatically when the
engine is running and you have
R switched on the headlamps and
R the windshield wipers have wiped the
windshield with washer fluid five times
The counter resets when you switch off the
headlamps.
For information on filling up the washer
reservoir, see “Washer system and headlamp
cleaning system” ( Y page 226). Corner-illuminating front fog lamps
The corner-illuminating front fog lamps
improve illumination of the area in the
direction into which you are turning.
The corner-illuminating front fog lamps will
only operate
R in low ambient lighting conditions
R at vehicle speeds below 25 mph
(40 km/h)
R with the front fog lamps switched off
R when the engine is running
Switching on X
Turn the exterior lamp switch to position
L or Ã.
or
X Activate the daytime running lamp mode
(Y page 99).
X Switch on the left or right turn signal,
depending on whether you are turning left
or right.
The respective front fog lamp comes on. If
you have switched on the turn signal for
one side but turn the steering wheel in the
other direction, the corner-illuminating
front fog lamp on the side of the turn signal
comes on.
or
X Turn the steering wheel in the desired
direction.
Driving forward: The front fog lamp on the
side of your steering direction comes on. Lighting
101Controls in detail
251_AKB; 4; 52, en-US
d2ureepe, Version: 2.11.8.1 2009-03-23T09:22:52+01:00 - Seite 101 Z
Page 104 of 364
Driving in reverse: The front fog lamp
opposite to your steering direction comes
on.
The corner-illuminating front fog lamps will
come on automatically depending on the
steering angle, even if you did not switch on
either turn signal. If the corner-illuminating
front fog lamps came on automatically, they
will also go out automatically depending on
the steering angle and vehicle speed.
The corner-illuminating front fog lamps
temporarily come on on both sides of the
vehicle if you turn the steering wheel in one
direction and then again in the other direction
shortly thereafter.
The corner-illuminating front fog lamp
remains lit for a short time only. It then goes
out automatically.
Switching off X
Switch off the left or right turn signal.
or
X Steer straight ahead.
i There may be a brief delay before the
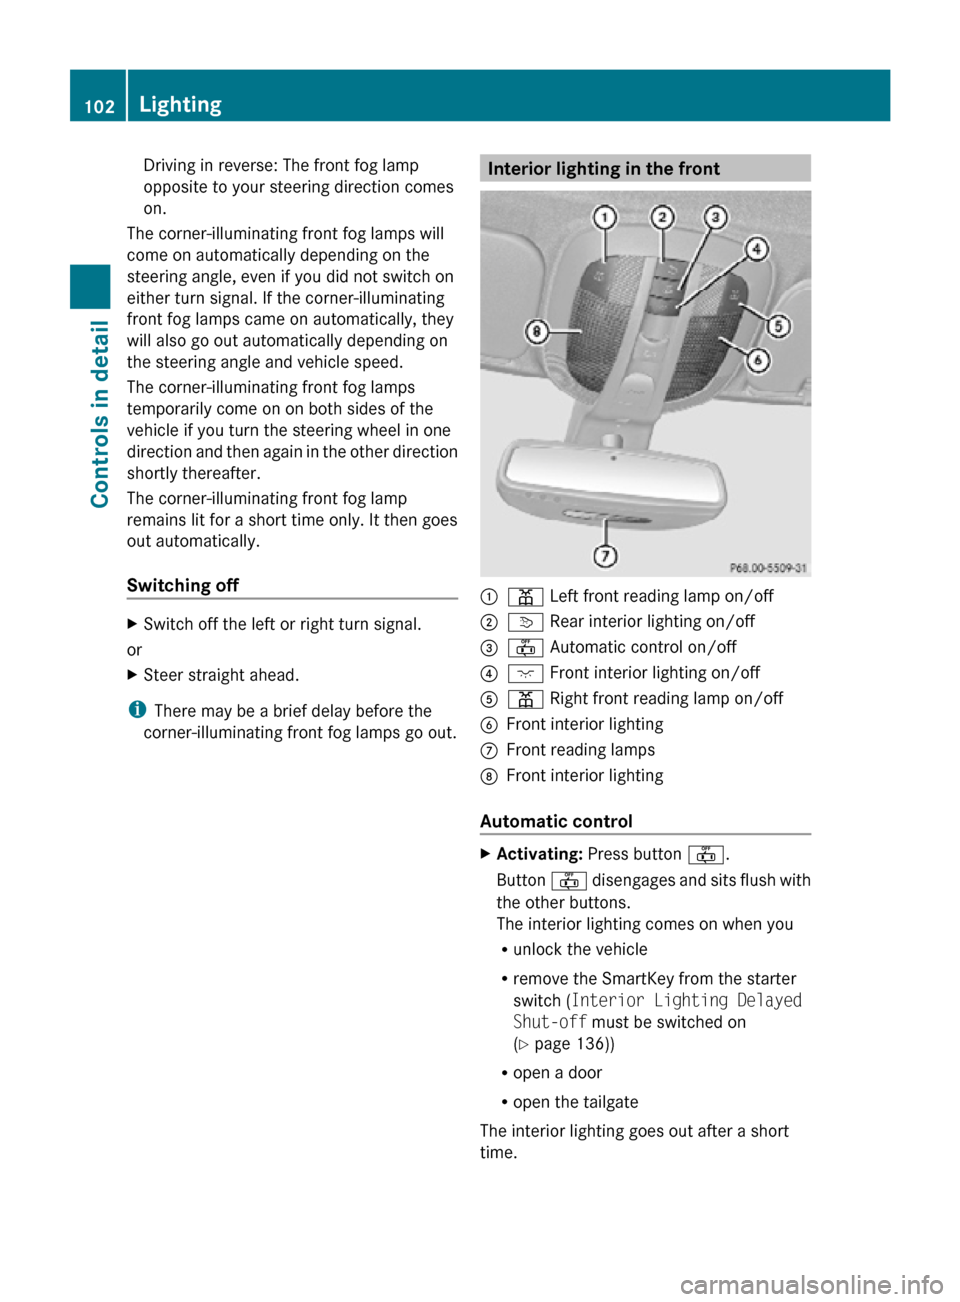
corner-illuminating front fog lamps go out. Interior lighting in the front
:
p Left front reading lamp on/off
; v Rear interior lighting on/off
= ~ Automatic control on/off
? c Front interior lighting on/off
A p Right front reading lamp on/off
B Front interior lighting
C Front reading lamps
D Front interior lighting
Automatic control X
Activating: Press button ~.
Button ~ disengages and sits flush with
the other buttons.
The interior lighting comes on when you
R unlock the vehicle
R remove the SmartKey from the starter
switch ( Interior Lighting Delayed
Shut-off must be switched on
(Y page 136))
R open a door
R open the tailgate
The interior lighting goes out after a short
time. 102
LightingControls in detail
251_AKB; 4; 52, en-US
d2ureepe,
Version: 2.11.8.1 2009-03-23T09:22:52+01:00 - Seite 102