2010 MERCEDES-BENZ R320 ECO mode
[x] Cancel search: ECO modePage 102 of 364
G
Warning!
In low ambient lighting or foggy conditions,
only switch from position à to L with
the vehicle at a standstill in a safe location.
Switching from à to L will briefly
switch off the headlamps. Doing so while
driving in low ambient lighting conditions may
result in an accident.
Fog lamps will operate with the parking lamps
and/or the low-beam headlamps on. Fog
lamps should only be used in conjunction with
low-beam headlamps. Consult your State or
Province Motor Vehicle Regulations
regarding permissible lamp operation.
X Switch on the ignition.
X Turn the exterior lamp switch to position
T or L (Y page 97).
X Switching on front fog lamps: Pull out the
exterior lamp switch to first stop.
The green indicator lamp N in the
exterior lamp switch comes on.
X Switching on rear fog lamp: Pull out the
exterior lamp switch to second stop.
The rear fog lamp, the front fog lamps, the
green and the yellow indicator lamp R
in the exterior lamp switch come on.
X Switching off front fog lamps/rear fog
lamp: Push in the exterior lamp switch to
its stop.
Locator lighting and night security
illumination Locator lighting and night security
illumination are described in the “Control
system” section, see “Switching locator
lighting on or off” (Y page 135) and
“Switching night security illumination
(Headlamps delayed shut-off feature) on or
off” (Y page 135). Combination switch
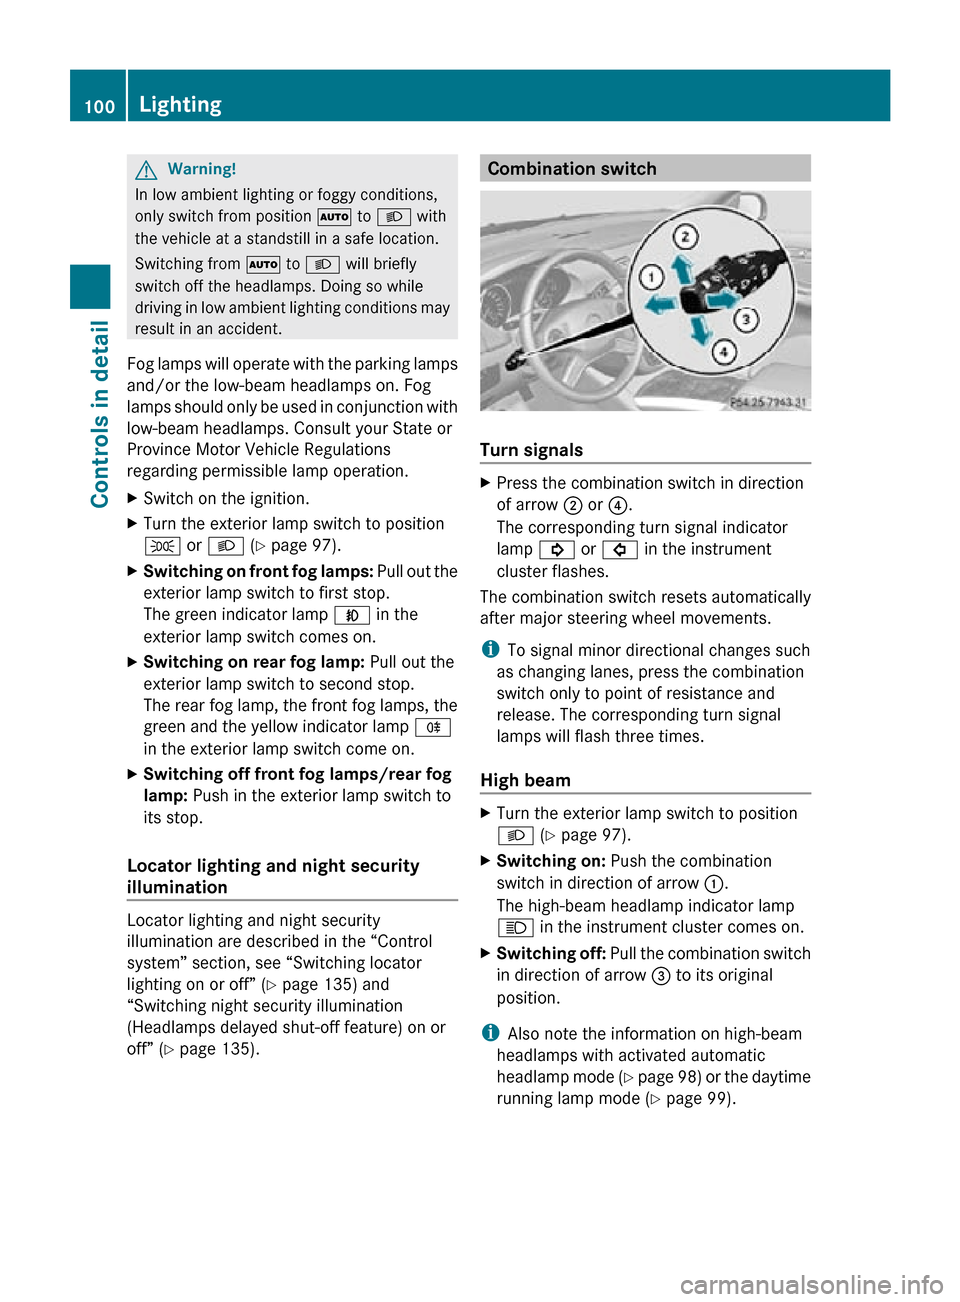
Turn signals
X
Press the combination switch in direction
of arrow ; or ?.
The corresponding turn signal indicator
lamp ! or # in the instrument
cluster flashes.
The combination switch resets automatically
after major steering wheel movements.
i To signal minor directional changes such
as changing lanes, press the combination
switch only to point of resistance and
release. The corresponding turn signal
lamps will flash three times.
High beam X
Turn the exterior lamp switch to position
L (Y page 97).
X Switching on: Push the combination
switch in direction of arrow :.
The high-beam headlamp indicator lamp
K in the instrument cluster comes on.
X Switching off: Pull the combination switch
in direction of arrow = to its original
position.
i Also note the information on high-beam
headlamps with activated automatic
headlamp mode (Y page 98) or the daytime
running lamp mode ( Y page 99).100
LightingControls in detail
251_AKB; 4; 52, en-US
d2ureepe,
Version: 2.11.8.1 2009-03-23T09:22:52+01:00 - Seite 100
Page 108 of 364
If the windshield wipers fail to function at
all with the combination switch in position
Ä or Å,
R
set the combination switch to the next
higher wiper speed
R have the windshield wipers checked at
the nearest authorized Mercedes-Benz
Center Power windows
Opening and closing
The door windows and the hinged quarter
windows are opened and closed electrically.
The switches for all door windows and the
hinged quarter windows are located on the
driver’s door control panel. The switches for
the respective door windows are located on
the front passenger door and the rear doors.
The
hinged quarter windows can be operated
from the driver’s seat only.
i Operating the rear door windows from
the rear is not possible when you activate
the override switch (Y page 62). G
Observe Safety notes, see page 55. G
Warning!
When opening or closing the windows, make
sure there is no danger of anyone being
harmed by the opening/closing procedure.
The door windows are equipped with the
express operation and automatic reversal
function.
If in express operation mode a door
window encounters an obstruction that
blocks its path, the automatic reversal
function will stop the door window and open
it slightly.
The door windows operate differently when
the switch is pulled and held. See the “Closing
when a door window is blocked” section in
this chapter for details.
The closing of a door window can be
immediately halted by releasing the switch or, if the switch was pulled past the resistance
point and released, by either pressing or
pulling the respective switch.
The
closing of the hinged quarter windows can
be immediately halted by pressing or pulling
the switch.
If a window encounters an obstruction that
blocks its path in a circumstance where you
are closing the windows by pressing and
holding button & on the SmartKey or by
pressing and holding the lock button (vehicles
with KEYLESS-GO) on an outside door handle,
the automatic reversal function will not
operate.
Activate the override switch when children
are riding in the back seats of the vehicle. The
children may otherwise injure themselves,
e.g. by becoming trapped in the window
opening. G
Warning!
Do not keep any part of your body up against
the
window pane when opening a window. The
downward motion of the pane may pull that
part of your body down between the window
pane and the door frame and trap it there. If
there is a risk of entrapment, release the
switch and pull it to close the window.
i You can also open or close the windows
using the SmartKey, see “Summer opening
feature” ( Y page 108) and “Convenience
closing feature” ( Y page 108).
i After switching off the ignition or
removing the SmartKey from the starter
switch, you can operate the windows until
you open the driver’s or front passenger
door. If no door was opened you can
operate the windows for up to 5 minutes. 106
Power windows
Controls in detail
251_AKB; 4; 52, en-US
d2ureepe,
Version: 2.11.8.1 2009-03-23T09:22:52+01:00 - Seite 106
Page 123 of 364
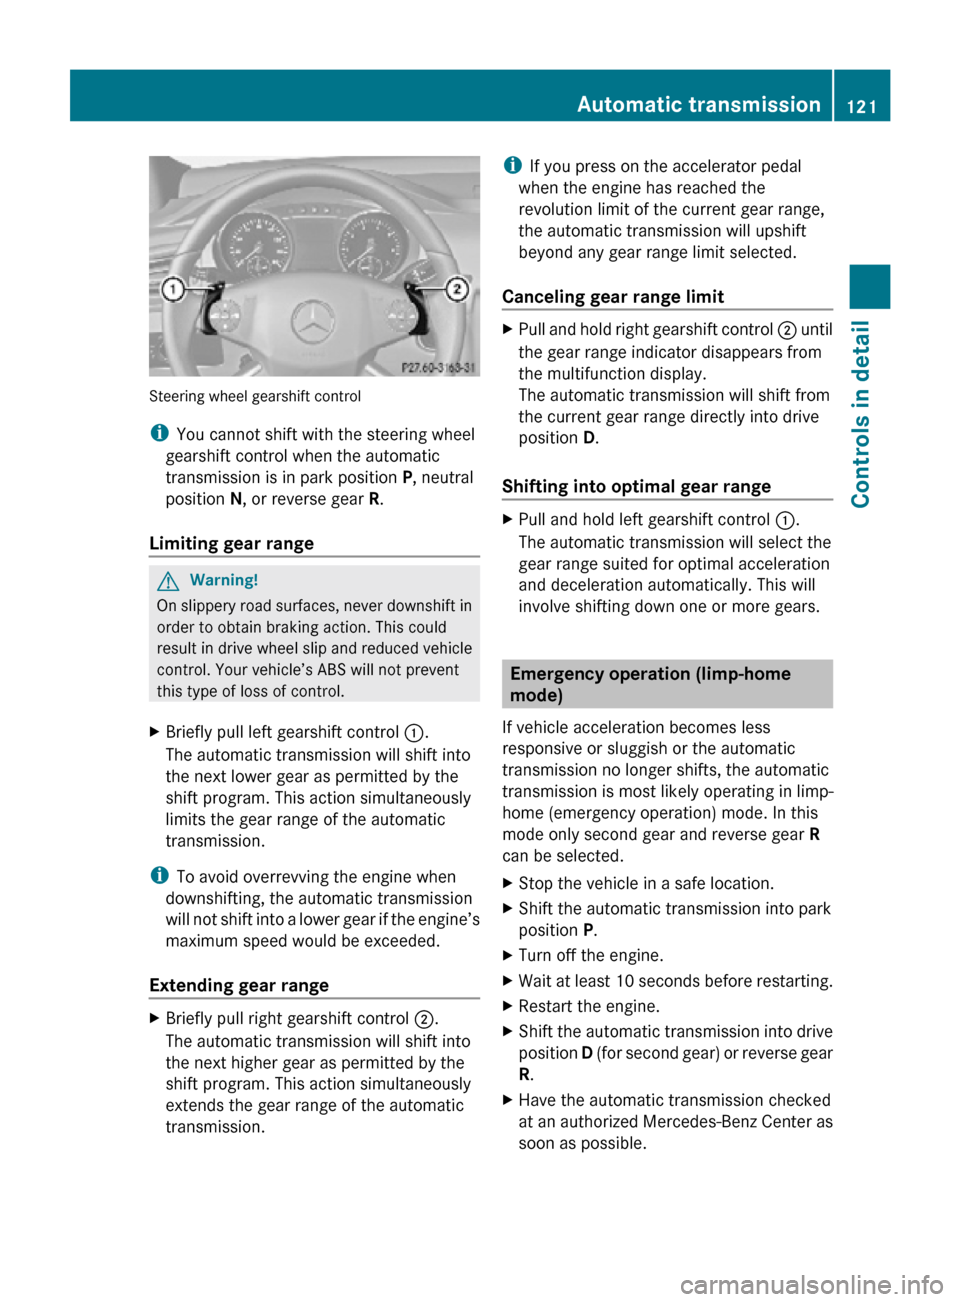
Steering wheel gearshift control
i
You cannot shift with the steering wheel
gearshift control when the automatic
transmission is in park position P, neutral
position N, or reverse gear R.
Limiting gear range G
Warning!
On slippery road surfaces, never downshift in
order to obtain braking action. This could
result in drive wheel slip and reduced vehicle
control. Your vehicle’s ABS will not prevent
this type of loss of control.
X Briefly pull left gearshift control :.
The automatic transmission will shift into
the next lower gear as permitted by the
shift program. This action simultaneously
limits the gear range of the automatic
transmission.
i To avoid overrevving the engine when
downshifting, the automatic transmission
will not shift into a lower gear if the engine’s
maximum speed would be exceeded.
Extending gear range X
Briefly pull right gearshift control ;.
The automatic transmission will shift into
the next higher gear as permitted by the
shift program. This action simultaneously
extends the gear range of the automatic
transmission. i
If you press on the accelerator pedal
when the engine has reached the
revolution limit of the current gear range,
the automatic transmission will upshift
beyond any gear range limit selected.
Canceling gear range limit X
Pull and hold right gearshift control ; until
the gear range indicator disappears from
the multifunction display.
The automatic transmission will shift from
the current gear range directly into drive
position D.
Shifting into optimal gear range X
Pull and hold left gearshift control :.
The automatic transmission will select the
gear range suited for optimal acceleration
and deceleration automatically. This will
involve shifting down one or more gears. Emergency operation (limp-home
mode)
If vehicle acceleration becomes less
responsive or sluggish or the automatic
transmission no longer shifts, the automatic
transmission is most likely operating in limp-
home (emergency operation) mode. In this
mode only second gear and reverse gear R
can be selected.
X Stop the vehicle in a safe location.
X Shift the automatic transmission into park
position P.
X Turn off the engine.
X Wait at least 10 seconds before restarting.
X Restart the engine.
X Shift the automatic transmission into drive
position D (for second gear) or reverse gear
R.
X Have the automatic transmission checked
at an authorized Mercedes-Benz Center as
soon as possible. Automatic transmission
121Controls in detail
251_AKB; 4; 52, en-US
d2ureepe, Version: 2.11.8.1 2009-03-23T09:22:52+01:00 - Seite 121 Z
Page 133 of 364
Resetting to factory settings
You can reset the settings of all submenus to
the factory settings.
For safety reasons, the function
Lamp
Circuit Headlamp in the Lighting
submenu cannot be reset while driving.
The following message appears in the
multifunction display:
Settings
Cannot be
completely reset
to factory settings
when engine is running.
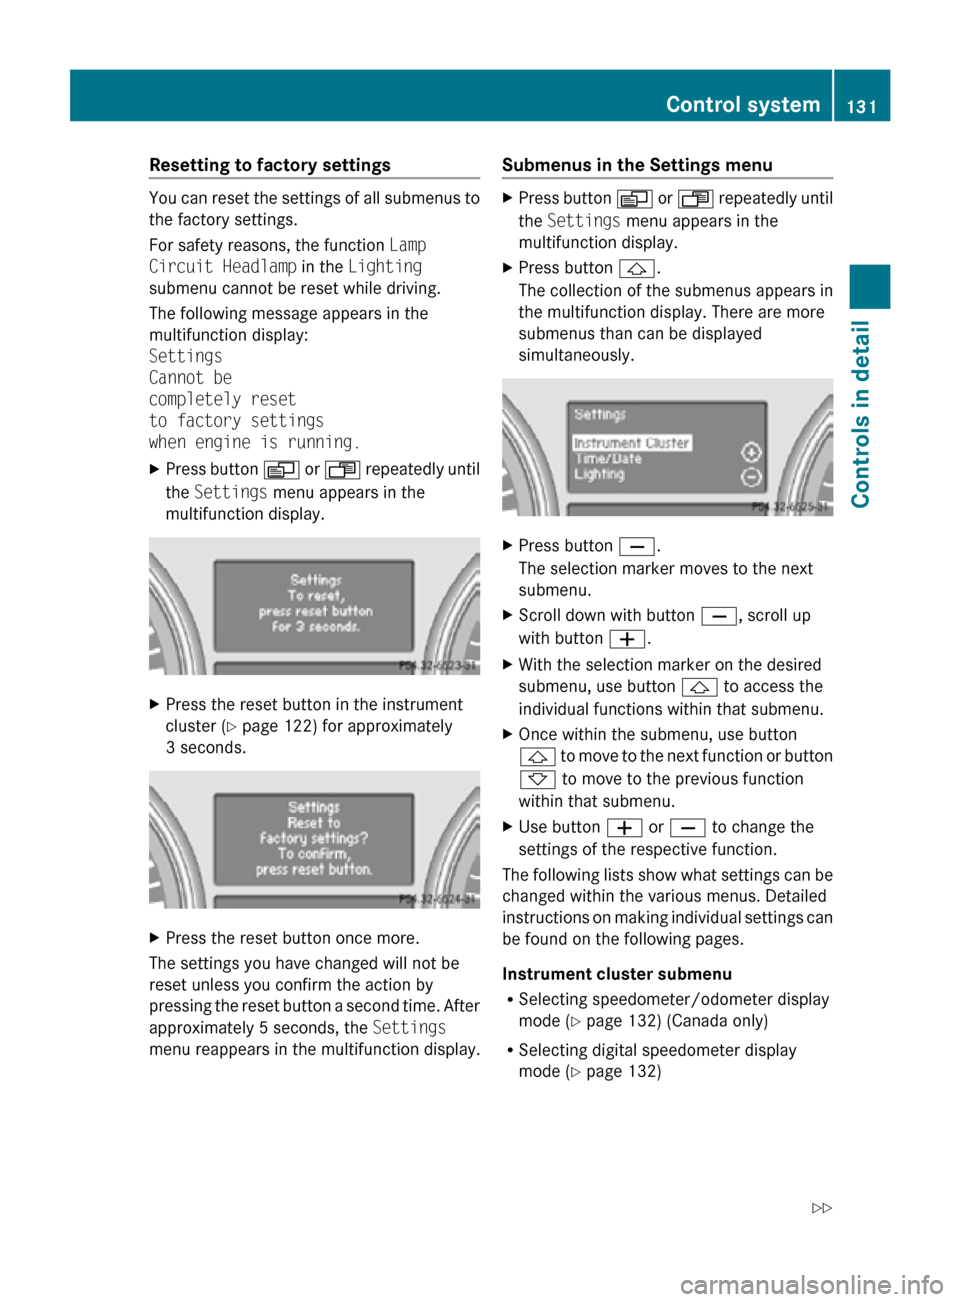
X Press button V or U repeatedly until
the Settings menu appears in the
multifunction display. X
Press the reset button in the instrument
cluster (Y page 122) for approximately
3 seconds. X
Press the reset button once more.
The settings you have changed will not be
reset unless you confirm the action by
pressing the reset button a second time. After
approximately 5 seconds, the Settings
menu reappears in the multifunction display. Submenus in the Settings menu X
Press button V or U repeatedly until
the Settings menu appears in the
multifunction display.
X Press button &.
The collection of the submenus appears in
the multifunction display. There are more
submenus than can be displayed
simultaneously. X
Press button X.
The selection marker moves to the next
submenu.
X Scroll down with button X, scroll up
with button W.
X With the selection marker on the desired
submenu, use button & to access the
individual functions within that submenu.
X Once within the submenu, use button
& to move to the next function or button
* to move to the previous function
within that submenu.
X Use button W or X to change the
settings of the respective function.
The following lists show what settings can be
changed within the various menus. Detailed
instructions on making individual settings can
be found on the following pages.
Instrument cluster submenu
R Selecting speedometer/odometer display
mode ( Y page 132) (Canada only)
R Selecting digital speedometer display
mode ( Y page 132) Control system
131Controls in detail
251_AKB; 4; 52, en-US
d2ureepe, Version: 2.11.8.1 2009-03-23T09:22:52+01:00 - Seite 131 Z
Page 137 of 364
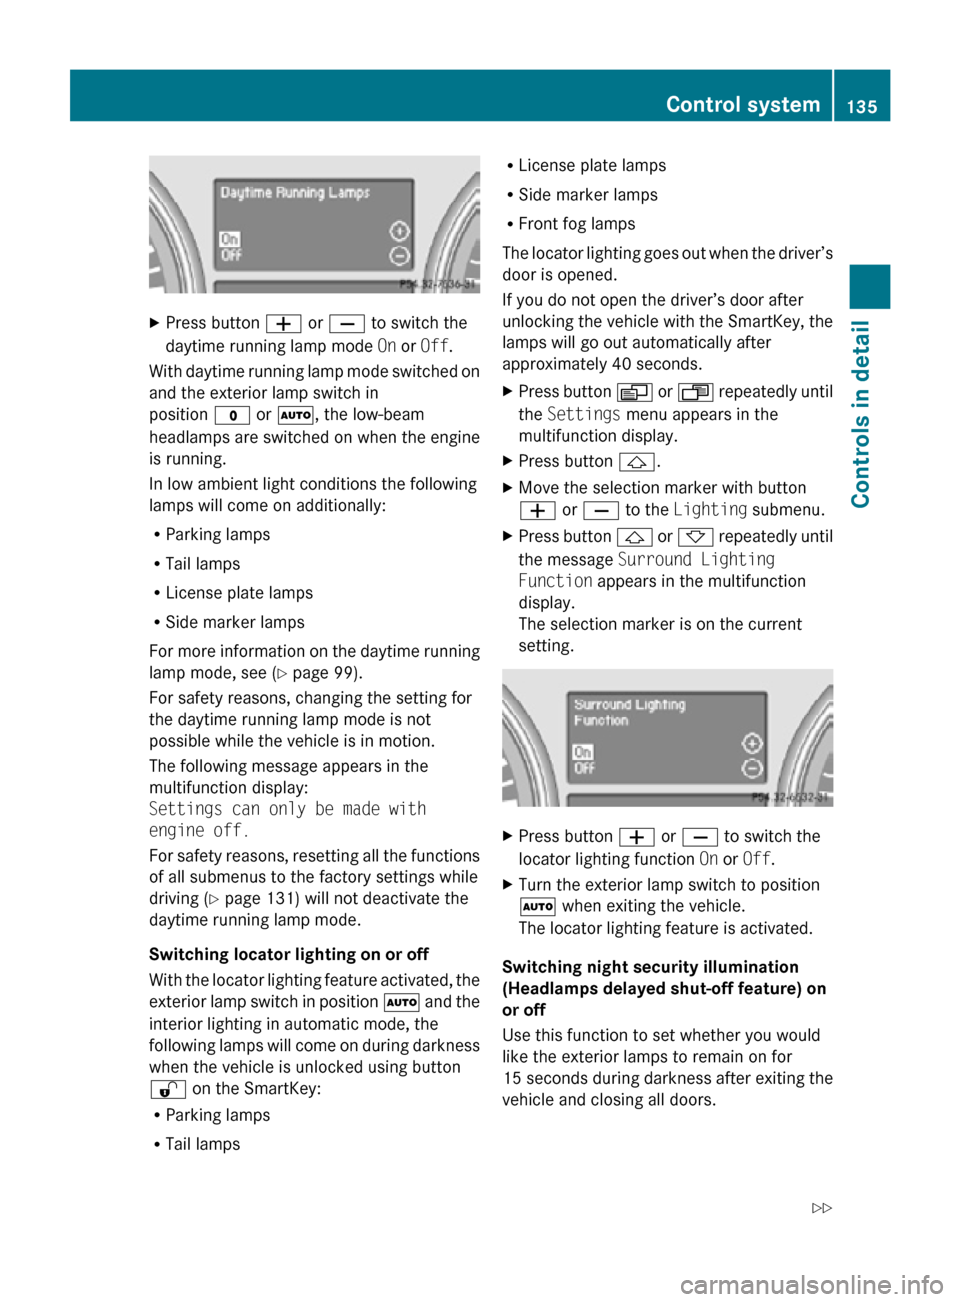
X
Press button W or X to switch the
daytime running lamp mode On or Off.
With daytime running lamp mode switched on
and the exterior lamp switch in
position $ or Ã, the low-beam
headlamps are switched on when the engine
is running.
In low ambient light conditions the following
lamps will come on additionally:
R Parking lamps
R Tail lamps
R License plate lamps
R Side marker lamps
For more information on the daytime running
lamp mode, see ( Y page 99).
For safety reasons, changing the setting for
the daytime running lamp mode is not
possible while the vehicle is in motion.
The following message appears in the
multifunction display:
Settings can only be made with
engine off.
For safety reasons, resetting all the functions
of all submenus to the factory settings while
driving ( Y page 131) will not deactivate the
daytime running lamp mode.
Switching locator lighting on or off
With the locator lighting feature activated, the
exterior lamp switch in position à and the
interior lighting in automatic mode, the
following lamps will come on during darkness
when the vehicle is unlocked using button
% on the SmartKey:
R Parking lamps
R Tail lamps R
License plate lamps
R Side marker lamps
R Front fog lamps
The locator lighting goes out when the driver’s
door is opened.
If you do not open the driver’s door after
unlocking the vehicle with the SmartKey, the
lamps will go out automatically after
approximately 40 seconds.
X Press button V or U repeatedly until
the Settings menu appears in the
multifunction display.
X Press button &.
X Move the selection marker with button
W or X to the Lighting submenu.
X Press button & or * repeatedly until
the message Surround Lighting
Function appears in the multifunction
display.
The selection marker is on the current
setting. X
Press button W or X to switch the
locator lighting function On or Off.
X Turn the exterior lamp switch to position
à when exiting the vehicle.
The locator lighting feature is activated.
Switching night security illumination
(Headlamps delayed shut-off feature) on
or off
Use this function to set whether you would
like the exterior lamps to remain on for
15 seconds during darkness after exiting the
vehicle and closing all doors. Control system
135Controls in detail
251_AKB; 4; 52, en-US
d2ureepe, Version: 2.11.8.1 2009-03-23T09:22:52+01:00 - Seite 135 Z
Page 167 of 364
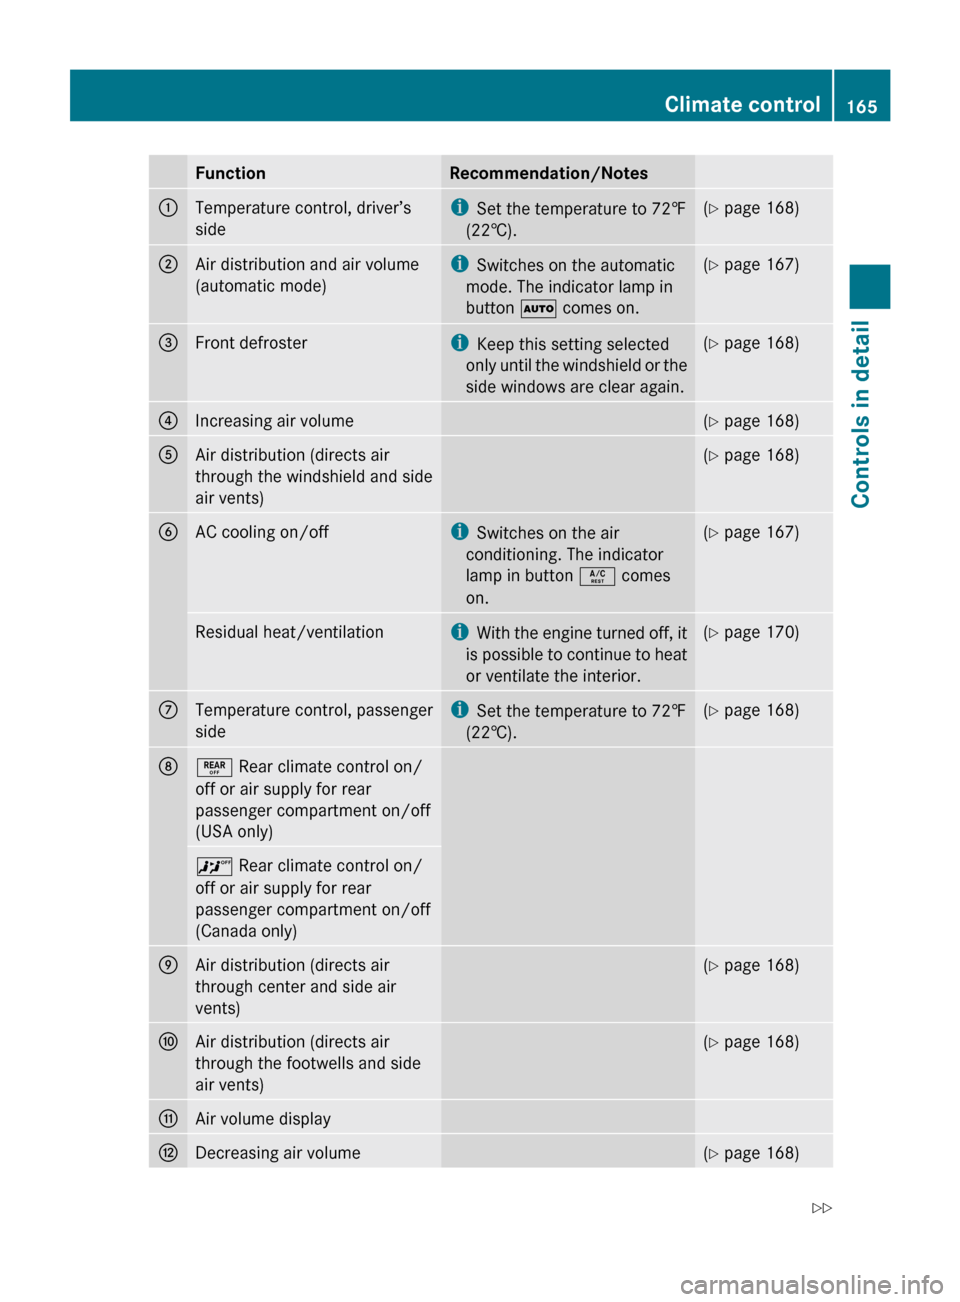
Function Recommendation/Notes
:
Temperature control, driver’s
side i
Set the temperature to 72 ‡
(22†). (Y page 168)
;
Air distribution and air volume
(automatic mode) i
Switches on the automatic
mode. The indicator lamp in
button à comes on. (Y page 167)
=
Front defroster i
Keep this setting selected
only
until the windshield or the
side windows are clear again. (Y page 168)
?
Increasing air volume (Y page 168)
A
Air distribution (directs air
through the windshield and side
air vents) (Y page 168)
B
AC cooling on/off i
Switches on the air
conditioning. The indicator
lamp in button Á comes
on. (Y page 167)
Residual heat/ventilation i
With
the engine turned off, it
is possible to continue to heat
or ventilate the interior. (Y page 170)
C
Temperature control, passenger
side i
Set the temperature to 72
‡
(22†). (Y page 168)
D
± Rear climate control on/
off or air supply for rear
passenger compartment on/off
(USA only)
^ Rear climate control on/
off or air supply for rear
passenger compartment on/off
(Canada only)
E
Air distribution (directs air
through center and side air
vents) (Y page 168)
F
Air distribution (directs air
through the footwells and side
air vents) (Y page 168)
G
Air volume display
H
Decreasing air volume (Y page 168)Climate control
165
Controls in detail
251_AKB; 4; 52, en-US
d2ureepe, Version: 2.11.8.1 2009-03-23T09:22:52+01:00 - Seite 165 Z
Page 168 of 364
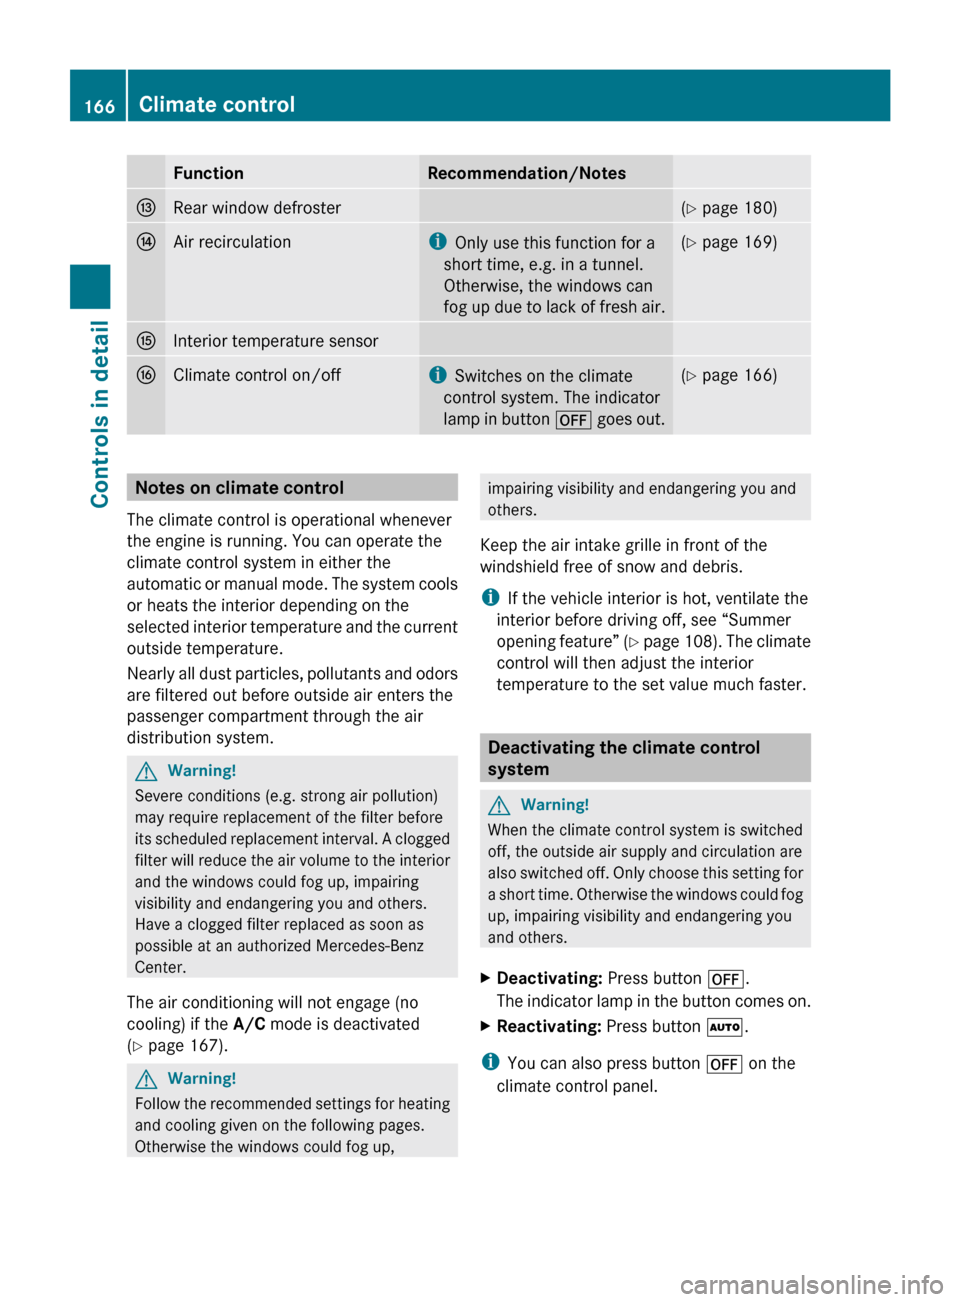
Function Recommendation/Notes
I
Rear window defroster (Y page 180)
J
Air recirculation i
Only use this function for a
short time, e.g. in a tunnel.
Otherwise, the windows can
fog
up due to lack of fresh air. (Y page 169)
K
Interior temperature sensor
L
Climate control on/off i
Switches on the climate
control system. The indicator
lamp
in button ^ goes out. (Y page 166)
Notes on climate control
The climate control is operational whenever
the engine is running. You can operate the
climate control system in either the
automatic
or manual mode. The system cools
or heats the interior depending on the
selected interior temperature and the current
outside temperature.
Nearly all dust particles, pollutants and odors
are filtered out before outside air enters the
passenger compartment through the air
distribution system. G
Warning!
Severe conditions (e.g. strong air pollution)
may require replacement of the filter before
its
scheduled replacement interval. A clogged
filter will reduce the air volume to the interior
and the windows could fog up, impairing
visibility and endangering you and others.
Have a clogged filter replaced as soon as
possible at an authorized Mercedes-Benz
Center.
The air conditioning will not engage (no
cooling) if the A/C mode is deactivated
(Y page 167). G
Warning!
Follow the recommended settings for heating
and cooling given on the following pages.
Otherwise the windows could fog up, impairing visibility and endangering you and
others.
Keep the air intake grille in front of the
windshield free of snow and debris.
i If the vehicle interior is hot, ventilate the
interior before driving off, see “Summer
opening
feature” (Y page 108). The climate
control will then adjust the interior
temperature to the set value much faster. Deactivating the climate control
system
G
Warning!
When the climate control system is switched
off, the outside air supply and circulation are
also
switched off. Only choose this setting for
a short time. Otherwise the windows could fog
up, impairing visibility and endangering you
and others.
X Deactivating: Press button ^.
The
indicator lamp in the button comes on.
X Reactivating: Press button Ã.
i You can also press button ^ on the
climate control panel. 166
Climate control
Controls in detail
251_AKB; 4; 52, en-US
d2ureepe,
Version: 2.11.8.1 2009-03-23T09:22:52+01:00 - Seite 166
Page 173 of 364
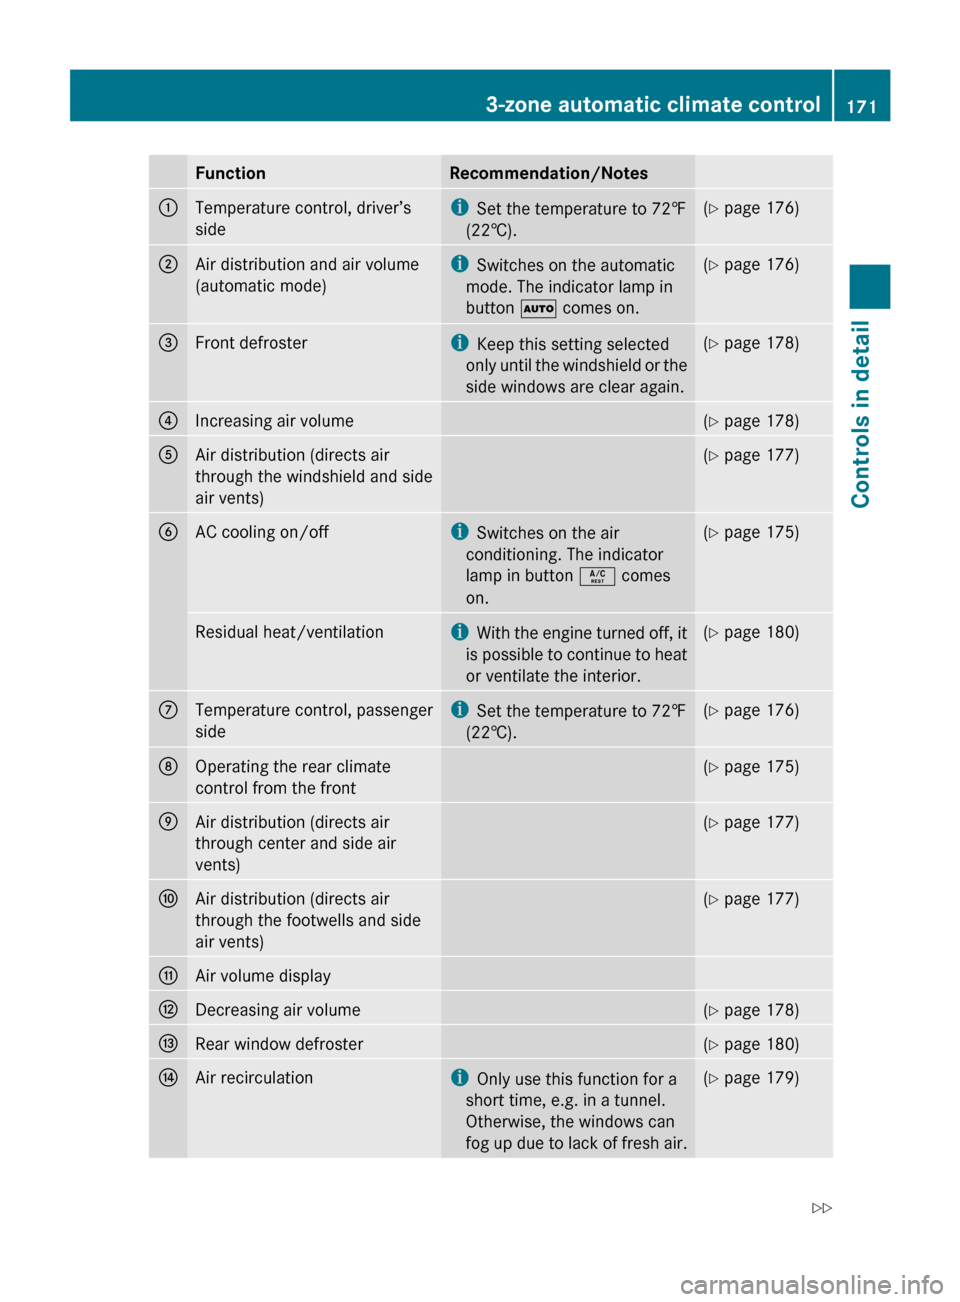
Function Recommendation/Notes
:
Temperature control, driver’s
side i
Set the temperature to 72 ‡
(22†). (Y page 176)
;
Air distribution and air volume
(automatic mode) i
Switches on the automatic
mode. The indicator lamp in
button à comes on. (Y page 176)
=
Front defroster i
Keep this setting selected
only
until the windshield or the
side windows are clear again. (Y page 178)
?
Increasing air volume (Y page 178)
A
Air distribution (directs air
through the windshield and side
air vents) (Y page 177)
B
AC cooling on/off i
Switches on the air
conditioning. The indicator
lamp in button Á comes
on. (Y page 175)
Residual heat/ventilation i
With
the engine turned off, it
is possible to continue to heat
or ventilate the interior. (Y page 180)
C
Temperature control, passenger
side i
Set the temperature to 72
‡
(22†). (Y page 176)
D
Operating the rear climate
control from the front (Y page 175)
E
Air distribution (directs air
through center and side air
vents) (Y page 177)
F
Air distribution (directs air
through the footwells and side
air vents) (Y page 177)
G
Air volume display
H
Decreasing air volume (Y page 178)
I
Rear window defroster (Y page 180)
J
Air recirculation i
Only use this function for a
short time, e.g. in a tunnel.
Otherwise, the windows can
fog
up due to lack of fresh air. (Y page 179)3-zone automatic climate control
171
Controls in detail
251_AKB; 4; 52, en-US
d2ureepe, Version: 2.11.8.1 2009-03-23T09:22:52+01:00 - Seite 171 Z